
How to Combine Raised Planters With a Pergola
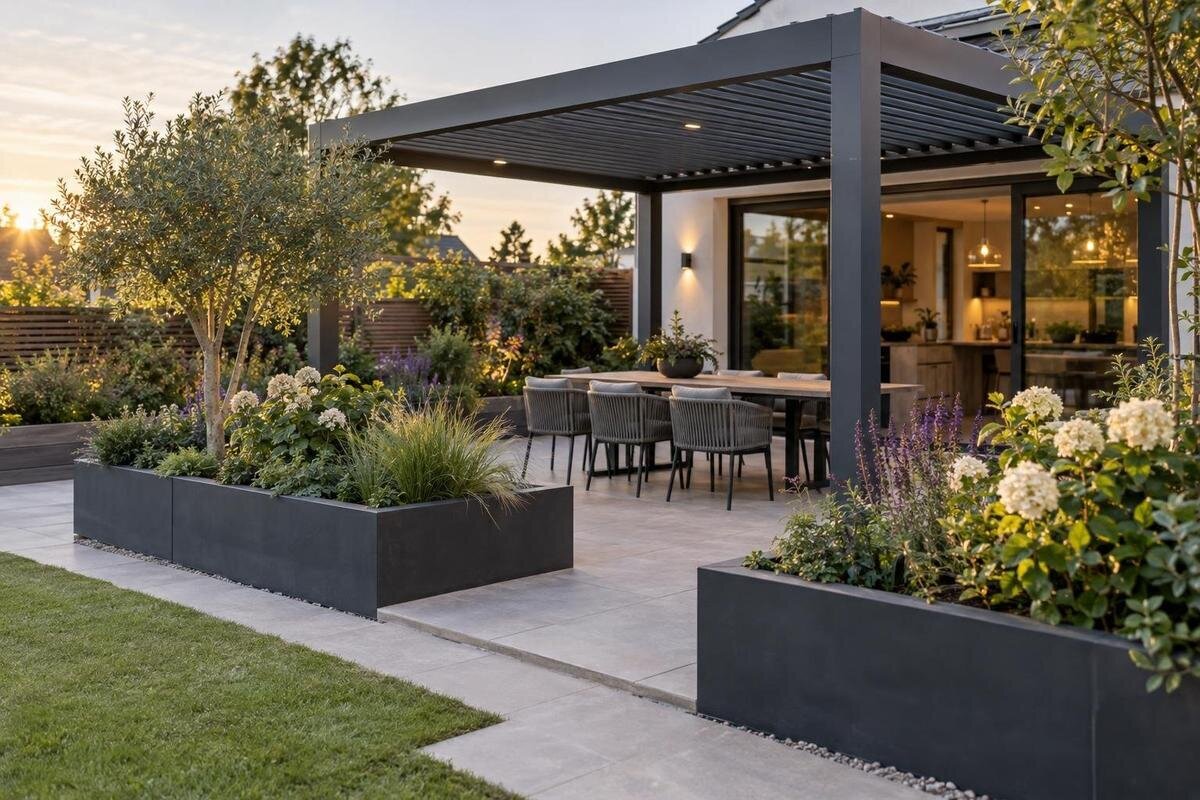
Pergola planning
Raised planters can bring planting closer to a pergola’s seating area, but fitting the boxes around the frame without a plan can leave too little room for roots, movement or upkeep. Treat the pergola and each planter as separate elements first, then coordinate their footprints, drainage and planting. Check the actual growing space inside each box, the route people will take between the house and garden, and access needed to clean or maintain the structure. This measured approach works for an existing patio as well as a new outdoor layout.

01
Map the frame and planter footprints separately
Start with the dimensioned drawing for the exact pergola model and configuration, rather than estimating a rectangle from a photograph. Mark the outside footprint, every post position and any wall connection shown in the plan. The Bloomcabin Pergola listing identifies options from 9 to 24 m², but area alone does not show where supports land or what clearance remains. Use the Bloomcabin Pergola listing as a product reference, then confirm the precise dimensions for the configuration you are considering before setting planter positions. Draw each planter at its full outside size, including rims, feet, edging and any trellis or surround you plan to add.
Put fixed features on the same measured base plan: the house wall, windows, doors and their swing, steps, paving edges, drains, taps and utility covers. Add the table and chairs in their actual positions, including room to pull chairs back and pass behind someone seated. Record a planter’s internal growing dimensions separately; its outside footprint tells you how much floor it occupies, not how much soil it holds. Keep the structure, furniture and planting on separate drawing layers. Then a change in model or bed size can be assessed before it squeezes a walkway or puts a post inside a planter.
Keep a clear route through the seating area
Trace the everyday route from the house to the seating area and from the pergola out into the garden. Include the space needed to open doors, move chairs and pass between the table and the planters. A narrow gap that looks generous on an empty sketch can disappear when a chair is pulled out or a person is standing beside it. Avoid making the space between a planter and a post the only way through. Leave enough room for the ordinary tasks the area needs to support, such as carrying food, moving garden tools or reaching a seat.
Test the route at full scale with chalk, garden hoses or other removable markers, then set out the furniture in its intended position. Walk through from each entry and check corners, changes in paving and any planter edges that might be hard to notice. If a wall-mounted format is being considered, the Bloomcabin Wall-Mounted Pergola is one option to compare; confirm its dimensions along the wall and its support locations before putting a planter along the façade. The same route test applies to an existing patio: mark what is fixed, then see whether the remaining path still feels easy to use.
02
Size the planter for the plants’ root needs
Choose planter dimensions using the clear internal depth, width and length, not just its outside height or overall appearance. Side walls, liners and other construction details take up space, so the growing area can be smaller than the box looks from outside. Root needs depend on the plants you want to grow and their mature size. Check reliable plant labels, seed information or advice from a garden centre before settling on a planter. If the available soil depth or volume does not suit the plants, choose a different planting plan or a larger box rather than trying to fit plants into too little root space.
Consider root spread as well as depth, particularly when several plants will share one planter. Small seedlings can look far apart at planting time and later compete for the same soil area. Check how much room each plant needs as it matures, and leave space accordingly. Use these spacing requirements to decide how many plants the box can accommodate, rather than choosing enough plants to fill its visible surface immediately. A larger planter may suit the intended combination better, while fewer plants may be the more practical choice in the space available. Keep the planting plan alongside the planter’s internal dimensions so you can adjust both together before buying.
Keep planters clear of supports and wall connections
Treat the pergola frame and the planters as separate elements. A planter wall should not be used to brace a post, support a frame or conceal a base or connection. Mark support locations and any access areas shown in the pergola documentation before deciding where boxes will sit. Soil, foliage and stored tools can make an otherwise visible connection difficult to inspect or reach, so keep the relevant space clear. If a planned planter overlaps a support or connection area, revise the layout instead of assuming that the support can be moved or the frame altered.
For a wall-mounted layout, include the wall-side connection and the access needed along the building in the plan. Do not place a planter against the façade simply because it fits in the remaining floor area; it may make it harder to reach the wall or carry out maintenance. If a wall-mounted Bloomcabin Pergola option is on your shortlist, confirm the exact wall-side dimensions and support arrangement for that model before finalizing the bed position. Where the drawings do not make the required clearance clear, ask the installer or another qualified professional rather than guessing.

03
Plan where excess water will go
Find out how each planter drains before choosing its final position. A box with an open base, one with drainage holes and one with a collection tray handle excess water differently. Use the planter’s instructions to understand its construction, then mark where water can leave it and where it will go next. Separately identify any runoff or drip line associated with the selected pergola arrangement; do not assume that rain will reach every bed evenly. Before placing a box beside the pergola, consult the Bloomcabin Pergola product page and confirm the water path for the exact configuration. Its listed area range is not drainage information.
Keep planter outlets visible enough to inspect and clear, and avoid a layout that sends water towards a pergola support, a doorway or the main route across the patio. On a hard surface, think through where water can flow after it leaves the planter; a nearby drain is useful only if the route to it is understood. Check for pooling after watering or rainfall once the arrangement is in place, and remove debris that blocks an outlet. If the layout needs a connected drain or a change to surface drainage, have a qualified landscape professional review it.
Leave access for cleaning and upkeep
Plan access around the jobs you will actually do, rather than leaving an arbitrary gap and assuming it will be enough. You may need to reach the planter’s back edge to weed, prune, inspect its outlet or replace a plant. You may also need to clean the paving and reach the pergola frame. Try each task on the drawing or mock-up: can you get a hand or tool into the space without shifting heavy furniture or leaning over a bed? A narrow space that looks acceptable when empty may become awkward once plants fill it.
Before fixing bed locations, check the model-specific care and clearance information for the Bloomcabin Bioclimatic Pergola. If the selected design has parts that move or access panels, preserve the documented space they need; do not assume those areas will remain reachable after planting. Think about hose access as well, and avoid making the main walking route the only place to lay watering equipment. Leaving useful access from the outset makes routine care easier without requiring you to remove plants or rearrange the seating area.
04
Check the surface beneath a filled planter
Consider the planter’s filled condition, not just the weight or footprint of its empty shell. Soil, water and mature plants add weight, and a filled box may be difficult to move. On natural ground, choose a position that will remain practical and does not cover a drain or utility access. On paving, check how the planter’s base will sit and where water can escape. These are separate questions from the pergola’s own support requirements: a planter does not make an unsuitable pergola location suitable, and it should not be treated as part of the frame.
If a planter is going on a deck or another elevated structure, ask a qualified professional to confirm that the surface can support its filled weight and that the water route is appropriate. Avoid relying on a general estimate or on the apparent strength of the pergola. Decide where the planter will stay before filling it, and make sure there is a sensible way to bring soil and plants to the location. If the surface, support or drainage arrangement is uncertain, resolve that question before installation rather than after the planter is in use.
Set planter height with seating and views in mind
Check how the planter will look and feel from the places where people sit and stand. The wall of the box and the eventual height of the planting both affect sightlines across the garden, towards the house and through the pergola. Sketch the planter’s side profile and add the expected mature height of the plants, rather than judging only by the small plants at purchase. Consider whether someone seated can see through or over the bed, and whether the planter will make an entry feel too enclosed. Do not assume a planter can double as seating unless it is designed for that use.
Compare one continuous bed with smaller groups of planters, taking the clear walking area and furniture position into account. A planting edge can frame a seating zone, but a repeated arrangement is not automatically the best fit for every layout. When comparing a product such as Bloomcabin’s regular pergola option, use its confirmed dimensions alongside side views of the planters on the drawing. The listed area range alone cannot show how tall planting will look from a chair or how much open space the arrangement will leave around the frame.

05
Choose plants that suit the conditions in each bed
Different positions around a pergola may receive different amounts of light, so assess the intended planting locations rather than treating the whole area as one uniform bed. Check the site through the day and consider the conditions plants will experience in the chosen positions. Group plants with broadly similar watering needs in the same box where possible; otherwise, watering one plant appropriately may leave another too wet or too dry. Plant labels or advice from a garden centre can help you compare requirements. Where two groups need notably different care, separate planters can make the routine simpler.
Allow for mature height and spread when arranging plants near a path, seat or frame. Foliage that grows into a walkway can reduce usable space, while dense growth can hide planter edges or areas that need to be cleaned. Choose a mix of shapes, textures or seasonal colour if that suits your garden, but keep maintenance and access in the plan. If a model such as the bioclimatic Bloomcabin model is being considered, assess the actual light at each bed location rather than assuming its name tells you how much sun the plants will receive.
Test the complete layout before planting
Before ordering materials or filling planters, make one final drawing that combines the confirmed pergola outline, support locations, planter footprints and internal growing dimensions. Add the furniture, doors, paths, drainage routes and any areas that need to stay accessible. On site, mark the planter edges and post positions with removable markers, then walk the routes and use the seating as planned. Upright garden stakes can help you picture mature plant height. A full-scale test often reveals a crowded corner or blocked approach that is easy to miss on a page.
Record the intended plants and their root-space requirements alongside the drawing so the planter dimensions and planting choices remain connected. If a route, post location, water outlet or maintenance area conflicts with a bed, revise the plan before installation rather than shifting a support or blocking access later. If you are considering the bioclimatic model, use the Bloomcabin Bioclimatic Pergola product page as a reference and confirm the dimensions for the exact configuration; its listed range from 9 to 24 m² does not establish post positions. Coordinate the layout with the pergola installer and landscape professional where their work meets.
Frequently asked questions
Can a raised planter sit beside a pergola post?
It can be nearby only if it leaves the post, base, connections and any required inspection or maintenance access clear. Mark the actual post position and planter footprint on a dimensioned plan. Do not use the planter as a brace, anchor or cover for the pergola frame unless the manufacturer and a qualified installer approve it.
How deep should a planter be under a pergola?
There is no depth that suits every plant. Check the clear internal depth and width of the planter against the root-space needs of the plants you intend to grow, using reliable plant labels or advice from a garden centre. If the available soil volume is unsuitable, choose different plants or a larger planter.
Will rain from the pergola water my planters?
Do not rely on that without checking the selected design and its position. Rain may reach a planter unevenly or be directed elsewhere. Confirm where runoff will fall, then plan watering and drainage for the plants and planter rather than assuming the pergola provides either.
How can I prevent planter drainage from pooling beside the frame?
Find out how the planter drains and where its excess water will go before choosing its position. Keep outlets accessible, and avoid directing water towards a pergola support, doorway or main walking route. If the layout involves drainage on a hard surface, ask a qualified landscape professional to review the route.
Can I put a filled planter on a deck?
That depends on the deck and the planter. Soil, water and mature plants add weight, so have a qualified professional confirm that the supporting structure can carry the filled planter and that water can drain appropriately. Decide on the location before filling it, since a full planter may be difficult to move.
A well-planned combination gives each element what it needs: the pergola has a clear, accessible frame, and each planter has suitable root space, a workable drainage route and room for care. When the layout also preserves comfortable movement and reflects the plants’ mature size, greenery can frame the seating area without taking over the space.
