
Growing Garlic in a Greenhouse
Ireland’s Field Almanac for Greenhouse Garlic
Garlic Growing Under Glass in Ireland
Every garlic clove carries a seasonal clock. A rewarding crop under cover develops in measured stages: winter cold, root establishment, leafy growth, lengthening daylight, dry ripening and unhurried curing.
Let the greenhouse moderate difficult weather rather than imitate endless summer. Its roof shields the bed from heavy rain, while controlled watering and adjustable vents make conditions easier to manage. Garlic must still receive the variety-specific cool period that encourages the bulb to divide into cloves.
01 · Work with the season
Garlic thrives under cover when shelter preserves its yearly rhythm and still admits the winter coolness associated with properly divided bulbs.
A sound clove may look like a simple beginning, but its route to a mature bulb follows a sequence. Rooting comes first, then the plant must build enough leaf area. Many varieties also respond to an extended cool period. Earlier temperatures, spring warmth and longer days subsequently combine to trigger division within the bulb.
Continuous heating can upset that sequence. Foliage may appear strong while inadequate chilling produces small bulbs or undivided rounds beneath it. An unheated house, perhaps given limited protection against severe frost, is usually better suited. It keeps the bed accessible and sheltered, permits measured watering and ventilation, yet leaves the natural progression of the seasons largely intact.
Match the growing position to the named variety. Softneck garlic commonly has numerous smaller cloves, can be plaited and generally stores longer. Hardneck or rocambole types often favour cooler areas, usually making fewer, larger cloves around a firm edible scape. These traits provide broad guidance only; rely on instructions for the actual planting stock from a reputable supplier serving Ireland or a comparable region.
When autumn and spring crops will share the structure, account for the greenhouse model in the first layout: Classic Aluminium Greenhouse It should be considered alongside the crop plan. Garlic needs a deep soil bed or raised growing area, a clear route for tending and harvest, and accessible ventilation. Position the row so taller tomatoes or cucumbers will not cast premature spring shade across the garlic leaves.
PreparationSelect sound cloves
Winter conditionsReceive chill and establish roots
Brighter springDevelop healthy foliage
Increasing daylightDivide and fill bulbs
Early-summer maturityLift, dry and cure
Treat the sequence as a set of growing stages, not a strict list of months. Start with large, healthy planting cloves. Cool earth with moderate moisture supports rooting, while the appropriate chill prepares many varieties for bulbing. Strong spring leaves then capture resources for division into cloves. Towards maturity, ease back growth and watering so lifting takes place from comparatively dry soil.
Garlic development reflects genetics, day length, cold exposure and the pattern of changing temperatures. For most varieties, the Royal Horticultural Society cites approximately one to two months within 0 to 10 °C. Regard this as background guidance rather than a universal refrigeration method. Variety, origin and storage history alter the requirement, so directions supplied with the planting garlic take precedence.
Cooler inland gardens
For suitable varieties, plant during October or November in a deep, freely draining greenhouse bed. Do not seal the house throughout winter, as the plants still need seasonal coolness. The roof and glazing reduce persistent rain and sudden weather exposure. Nevertheless, check covered soil following a long frosty spell; it may be dry even when the surrounding air suggests otherwise.
Milder town and coastal gardens
Choose a naturally cool position and avoid a spot beside a wall that stores daytime sun. Ask a knowledgeable supplier for varieties appropriate to mild Irish districts. Pre-chilling is sensible only with precise guidance for the chosen stock. If cooling lasts too long or occurs at the wrong point, bulb formation may begin before the plant has made adequate leaves.
Greenhouses receiving strong sunshine
Vent before trapped warmth builds. Strong sunshine during winter or spring may raise the temperature under glass despite chilly air outdoors. Do not allow heat, dampness and still air to combine. Openings arranged across the house, sufficient room between plants and a clear passage help moisture and excess warmth escape.
Know the clove before planting
Papery skin
Narrow end uppermost
Flat root end below
Protective skin. Leave the dry, papery covering undamaged where you can. It protects against drying, bruises and small injuries.
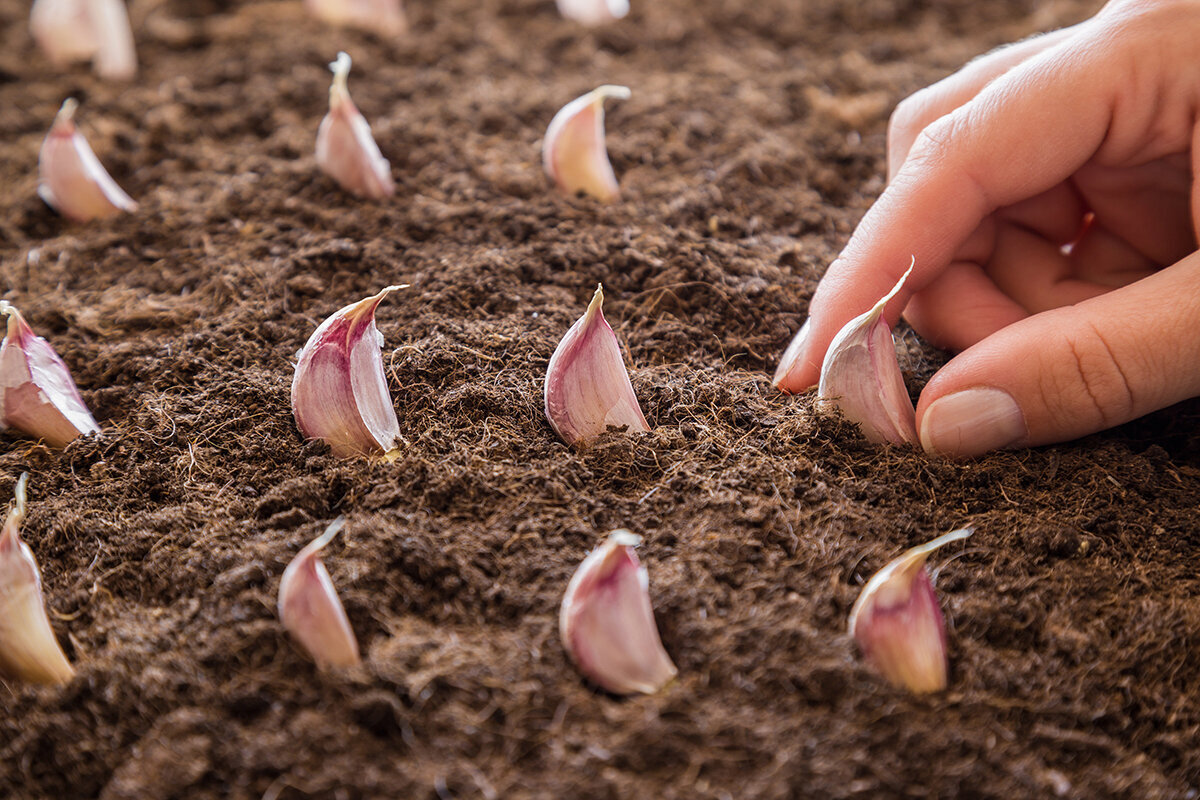
Shoot end. Point the tapered tip upwards so the new shoot can travel directly towards the soil surface.
Root-producing base. Set the flat base downwards, in direct contact with loose and consistently moist earth.
03 · Begin with sound planting stock
Choose the planting bulb before choosing its place in the bed.
Plant health begins with dependable stock. Buy certified planting garlic, or bulbs specifically sold for cultivation, from a reputable specialist rather than selecting an unknown supermarket bulb. Garlic intended for eating may originate in another climate, have a sprout-suppressing treatment or introduce hidden disease. Keep only plump, firm bulbs under dry coverings; reject mould, softness, damage, low weight or a dried base.
Hardneck
Hardneck or rocambole garlic frequently suits Ireland’s cooler districts. Its relatively large cloves usually form around a firm central flowering stem. If generous bulbs are the priority, remove each young scape when it has curled clearly. The tender shoots can be eaten, so allow extra plants if you also want a supply for the kitchen.
Softneck
Selected softneck varieties can suit gentler climates. Instead of a stiff central stem, they commonly develop numerous modest-sized cloves, and their cured tops are suitable for plaiting. They also tend to store for longer. For replanting, retain particularly vigorous and healthy cloves from the outside of the bulb.
Elephant garlic is a separate crop
Elephant garlic belongs botanically closer to the leek group and is not true garlic. Although useful in cooking, its exceptional size and different cultivation habits make it a poor reference for planning an ordinary garlic bed.
Separate a bulb no earlier than one or two days before planting. Work gently so each clove keeps its dry wrapper and the flat basal plate remains whole. This guards against drying and unnecessary wounds. A clove that is crushed or badly split is better used for food than placed into moist winter soil.
04 · Prepare the bed and row
Provide depth for winter roots and enough space for each bulb to swell.
Garlic needs a genuinely deep, open root zone; a thin compost layer laid over hard ground is inadequate. Under glass, a permanent soil bed is generally the easiest option. If containers are necessary, use broad frost-resistant pots, unobstructed drainage holes and at least 25 to 30 cm of medium. Pots fluctuate in moisture and temperature more quickly than deep beds.
Insufficient cover
Suitable position
Excessive cover
When too shallow: A visible tip is more likely to dry, shift during temperature changes or establish without secure anchorage.
At a suitable depth: Place the pointed end upwards and cover the clove with approximately 5 cm of loose earth in a typical greenhouse bed.
When too deep: An excessive layer of soil slows emergence, especially where the bed stays cold, dense or persistently wet.
Spacing for access and airflow
For mature bulbs, leave approximately 12 to 15 cm between cloves and 20 to 25 cm from row to row. Two orderly rows use space efficiently when a broad working path remains beside them. Never tread over the rooting zone. Raising a slow-draining bed can help, although very loose fill may settle considerably by spring.
Before planting, incorporate well-matured compost. Improve heavy ground with suitable mineral aggregate, coarse sand or a raised bed so excess water can drain. The mixture should stay usefully moist without becoming waterlogged. Avoid fresh manure and surplus nitrogen: both favour tender leaves and may interfere with bulb ripening or reduce storage performance.
Before covering the cloves
- Use the largest healthy outer cloves; take the small central cloves to the kitchen.
- Pointed shoot tip upwards; flat basal plate underneath.
- Water thoroughly once to settle earth around the cloves, but do not leave the row saturated.
- If mulch is useful, choose clean, airy material and keep emerging shoots uncovered.
- Label each variety and record the date planted together with its position inside the greenhouse.
05 · Guide moisture through the crop
Supply the roots without making the air around the crop wetter.
Garlic does not need constantly wet ground. Aim for evenly supplied, oxygenated soil where roots remain active from autumn planting through the period when bulbs are filling.
Immediately after planting
Apply enough water to settle the prepared earth around every clove. For later checks, inspect the soil a few centimetres beneath its top. A cool bed protected by a roof may stay moist throughout winter even after the visible surface turns pale and dry.
While foliage and bulbs develop
Water demand rises as the plant makes more leaves and receives stronger light and warmth. Soak the root zone evenly, but use its condition—not a fixed weekly timetable—to decide when. Greenhouse soil receives no rain, and evaporation varies with ventilation, sunshine, bed volume and texture. Check below the surface. Drip irrigation or a slow morning watering directed at the ground keeps foliage drier. The top may dry slightly, but the deeper soil should not repeatedly dry out during active growth.
As maturity approaches
Gradually reduce water as the expected harvest nears and, where conditions allow, cease watering near the end. Slightly dry earth makes bulbs easier to lift cleanly and shortens initial drying. This change must not begin early enough to stress bulbs during enlargement.
Ventilation must accompany watering. On bright days, open roof and side vents early so heat and dew do not linger among the leaves. A Classic Aluminium Greenhouse is especially useful in late spring, when strengthening light quickly heats the space below the glazing. Plan ventilation, clear access and responsive watering together. The relevant model page contains further details for the Classic Aluminium Greenhouse.
06 · Let the foliage tell the story
Trouble visible in a bulb often began much earlier.
Do not immediately add fertiliser or apply a treatment. First read each symptom in the context of the crop’s current stage. Garlic occupies the bed for a long period, and the harvested bulb records choices and stresses that may have occurred months earlier.
Abundant tops but disappointing bulbs
The crop may have missed enough cold or followed a poorly matched schedule. Unsuitable stock, very late planting, excessive greenhouse heat and overly generous nitrogen can produce a similar result. Review the variety and recorded conditions first; adding warmth later cannot recreate the winter phase that was absent.
Yellow foliage ahead of schedule
Inspect moisture around the roots first. Waterlogging, poor feeding, pests, disease and natural ripening may look alike in the foliage. Expose one test plant before assuming nutrients are lacking. Remove plants that are clearly diseased, including their bulbs, and do not add suspicious remains to compost.
Bulbs that remain undersized
Limited bulb size can follow from undersized planting cloves, close spacing, weeds, uneven watering, too little leaf area or bulbing that starts prematurely. The greenhouse is most valuable when it allows several stresses—heavy rain, dry spells and temperature peaks—to be moderated at the same time.
Outer skins opening
Burst outer layers often indicate that harvest was delayed. Once cloves break through their protective wrappers, storage life declines. Use these bulbs before intact ones. Keep only solid, closed and spotless specimens when setting aside material to plant in the next season.
07 · Recognise the best lifting point
A brief set of visible signs marks the harvest window.
Harvest should occur after the first clear signs of ageing, not while all foliage is deep green and not after the plant has entirely collapsed. Timing changes with variety, location and the season. Look for lower leaves drying or yellowing while upper growth retains some green. When about one-third to one-half has aged, carefully expose a test bulb. Its cloves should be clearly shaped beneath tight, unbroken wrappers.
Autumn-planted garlic usually matures during summer. In Ireland, greenhouse conditions, local weather and variety can bring lifting forwards or delay it. Let the foliage, neck and enclosing layers guide you, supported by examining one bulb, rather than relying on a printed month. If possible, harvest while both the bed and weather are dry.
1
Taper the irrigation
As the crop reaches maturity, reduce each application in stages and allow the ground to become moderately dry. This belongs to the finishing period only; withholding moisture while bulbs are filling can reduce the harvest.
2
Loosen first rather than tugging
Insert a digging fork or narrow hand tool well below the bulb, loosen the surrounding earth and raise the complete plant with roots and leaves attached. Tugging the stem risks bruising or splitting the neck, and these injuries shorten the period for which cured garlic can be stored.
3
Protect the outer skins
Gently dislodge only the larger pieces of soil that come away easily; firmly attached earth can remain during early drying. Do not wash garlic intended for storage or peel its outer layers at harvest. Those dry wrappers are the cloves’ natural protection.
4
Sort eating bulbs from future stock
After curing, select the biggest, soundest and most evenly developed bulbs as next season’s planting material. Careful selection often benefits the following crop more than extra machinery or stronger feeding.
A sheltered place with moving air
Shade
Keep direct sunlight away.
Keep direct sunlight away.
Air movement
Leave gaps between plants.
Leave gaps between plants.
Duration
Normally two to four weeks.
Normally two to four weeks.
08 · Cure the harvest before storage
Dry garlic for keeping quality rather than appearance.
Freshly lifted garlic is edible, but a careful curing period prepares bulbs for keeping. Hang complete plants as small, loose bundles, or spread a single layer over mesh or spaced slats. Use a dry, shaded and rainproof place where air circulates freely. A greenhouse is suitable only if shade and ventilation are dependable; otherwise direct sunlight, trapped heat or condensation may damage the coverings and lower quality.
Ordinary curing takes two to four weeks. The crop is ready when roots feel dry, necks rustle and the outside coverings have turned papery. At that point, brush away loose earth and shorten the roots and stalks. Softneck stems may be plaited while still flexible. Inspect the crop again, using soft, damaged or conspicuously marked bulbs before the sound storage batch.
Keep completely cured garlic in an airy, dry and dark position. Mesh, open crates or loosely hanging bulbs all permit ventilation, whereas closed plastic traps moisture. Whole bulbs are seldom suited to prolonged refrigeration because dampness and temperature swings can encourage shoots. Storage life depends on the variety, the quality of curing and the room climate, with softneck types generally lasting longer. Inspect the crop regularly and use or remove any bulb that softens.
A year-round growing plan can be organised around the Classic Aluminium Greenhouse and its bright, orderly space for winter garlic. Once the summer harvest is lifted and the bed cleaned, use it for a suitable heat-loving follow-on crop or prepare it for the next rotation.
09 · Decisions gardeners often face
Questions about raising garlic under glass
Practical answers for choices affecting bulb formation, lifting time and how well the harvest keeps.
Does garlic benefit from a heated greenhouse?
A heated house can produce garlic foliage, yet constant warmth does not provide the cool cue required by many varieties for proper clove division. Use warm-house techniques only for specialist cultivation where the chosen variety’s needs are understood. For domestic bulbs intended for storage, an unheated house, limited frost protection or a cooler section will usually give a more reliable seasonal pattern.
Should planting cloves go into a refrigerator first?
Not as a routine step. Garlic planted in autumn under unheated cover may acquire enough natural chilling in Ireland, though coastal, town and inland sites differ. At an exceptionally mild location, a supplier might prescribe pre-cooling for a named variety. Follow those exact directions, since cooling that is excessive or badly timed may begin bulbing before sufficient foliage has formed.
Will garlic grow in containers under cover?
Yes. Use a broad, frost-resistant pot at least 25 to 30 cm deep, with drainage holes kept open. The crop must still receive the winter coolness required by its variety. Deep soil changes temperature and moisture more gradually, so containers need extra attention. Prevent waterlogging and leave approximately 12 to 15 cm between cloves intended to produce large bulbs.
Should hardneck garlic scapes be removed?
For the largest possible bulbs, cut young scapes once they are visibly curled but still tender. Doing so directs more of the plant’s resources towards the bulb. Scapes are edible in pesto and cooked dishes. You may retain a few for observation, accepting that those plants can produce slightly smaller bulbs.
What makes a bulb stay round instead of forming separate cloves?
A single round bulb often points to too little winter chill, a variety poorly matched to the site, late planting or an abbreviated leaf-building period. Excessive greenhouse warmth may also play a part. The bulb is still edible. Record the stock, planting time and temperatures, then adjust just one element during the next attempt.
What should follow garlic in the greenhouse bed?
According to the harvest date, the cleared space can support a summer crop needing warmth, a leafy crop, or a rest-and-recovery phase. Do not immediately replant the same soil with garlic, onions, leeks or chives. Clear away crop remains and use a rotation lasting several years to limit persistent problems. For one example of space planning, consult the Classic Aluminium Greenhouse.
References and further guidance
Sources informing the growing advice.
Related Bloomcabin reading: Greenhouse layout, planting and care · Using less water in greenhouse gardening · Curtains and shade for a greenhouse
- LWG Bavaria garlic factsheet — Die Wunderzehe An introduction to planting, tending, harvesting and using garlic, including notable characteristics of the crop.
- LWG Bavaria — garlic growing as the climate changes German practical findings on garlic, climate and crop development.
- RHS guidance for growing garlic Information about cold requirements, planting schedules, location, maintenance, lifting and storage.
- University of Minnesota Extension — growing garlic at home Research-based advice covering variety selection, autumn planting, distances, irrigation and healthy planting stock.
- Oregon State University Extension — autumn garlic guidance Seasonal advice about planting in autumn, managing the crop, judging maturity and harvesting.
- Oregon State University Extension — garlic preservation Food-preservation recommendations for safe handling, curing and storage after lifting.
- LWG Bavaria garlic overview — Die Wunderzehe Further German guidance on location, cultivation, harvest and use.
