
How a Pergola Creates Focus in a Long Garden
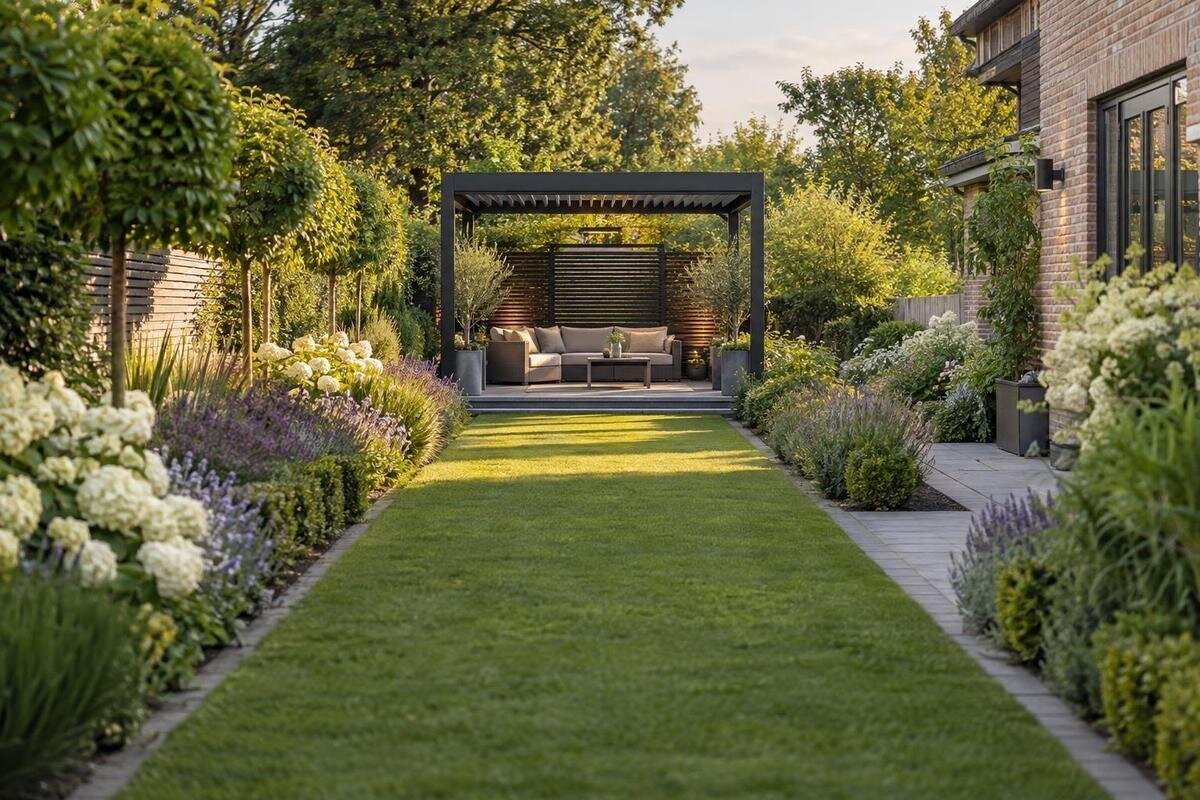
Pergola and garden design
Long gardens often pull the eye along a strong axis, from the house towards the far end. A pergola can give that view a destination or create a pause part-way along it. Its success depends on more than its position: the approach path, the view through and beyond the frame, and the depth of surrounding planting all shape the result. The aim is to make the pergola part of a connected garden, rather than a feature dropped into a long strip of space.

Before choosing a pergola 1
Why a long garden benefits from a clear focal point
An elongated plot often has a strong visual axis: parallel boundaries, a lawn edge or a straight path lead the eye from the house towards the far end. When every feature sits on that same line, the garden can read as one corridor, even if it contains useful places to pause. A pergola introduces a distinct outline and a change of scale. Seen from the house, it can interrupt the length visually without needing to close the route. Its role is not to fill the garden, but to give one stretch a clear point of attention. The effect depends on what is visible around and beyond the frame.
Decide whether the pergola should be the final destination or a pause along the way. At the far end it can draw attention towards the boundary; part-way down, it can create a visual pause while leaving another layer visible behind it. Neither position is automatically better. A focal point needs enough visual space around it to stand out, while the rest of the garden still needs a purpose. From the main viewpoint, identify what should catch the eye first and which features can stay secondary. This avoids asking a pergola, a mature tree, a bright border and a shed to compete for equal attention. Choose one supporting feature to strengthen the composition rather than adding several equally prominent ones.
Views from the house and along the garden
Walk the garden from viewpoints people actually use: a kitchen window, back door, main path and, if relevant, the far end looking back. A position can seem balanced on a plan yet cut across a useful view in person. At each point, note what lies behind the proposed frame: open sky, a hedge, a boundary, a neighbouring roofline or a feature worth highlighting. The aim is not to hide every practical object, but to choose which views the pergola should organise and which should remain open. Notice whether a door is usually open, too, as the view from indoors may differ from the one at the threshold. A quick sketch with arrows can record these sightlines before you settle on a position.
Mark the candidate outline on a scaled plan, then check it from the house with temporary markers at the approximate corners. Include the path and established planting; a drawing of the structure alone will not show whether a post interrupts the view or a bed hides its lower edge. If you are considering a wall-mounted option, compare the Bloomcabin Wall-Mounted Pergola with those sightlines; its listing gives an area range of 9 to 24 m². Use dimensions for the specific size under consideration when plotting the layout, rather than relying on a product photograph to judge scale. If a position works only from one marked viewpoint, note that limitation instead of treating it as the solution for every view.
Before choosing a pergola 2
Place the focal point along the garden's length
Think in three zones: the space close to the house, the middle distance and the far end. A pergola near the boundary can make a convincing destination if its outline is visible and the approach reaches it naturally. A position in the middle can shorten the perceived distance by giving the eye a pause before the end, while leaving the far portion in view. Do not put it at the mathematical centre by default; the route, existing trees, access points and main view should decide. An uneven division can feel more natural and keep the garden from reading as a symmetrical corridor. A change in path direction or a narrowing in the plot may already provide a natural point for the view to shift.
Look at what each position leaves beside and beyond the frame. If a boundary or dense planting sits immediately behind it, the outline may merge into the background; if it is far from both the route and other features, it may appear disconnected. Walk the proposed approach to see how that relationship changes as you move. For an in-garden focal point, compare the Bloomcabin Pergola with the position on your drawing. Consider the space on either side as well as the length remaining behind it. A position that leaves a useful continuation of the garden can create a pause without making the area beyond feel cut off.
Make the approach path part of the composition
A pergola reads as a destination more clearly when the way to it is apparent. Trace the route from the house, a gate or another regular access point. Does it arrive at a usable side of the structure, or ask people to cut through a border or across the main lawn? A direct path can reinforce the long axis, while a gentle change of direction can reveal the pergola gradually. Choose according to use: a route used to carry food or garden tools needs clarity; a route intended mainly for a leisurely walk can allow a more deliberate turn. Think about the return journey as well, especially if people need to continue to the far end. Keep these different aims in mind instead of asking one path to do everything.
Draw the route beside doors, steps, gates and any area that needs regular access. Show where people pass, where the path meets the pergola and, if seating is planned, where chairs fit without narrowing circulation. If a house-attached design is being considered, compare the wall-mounted Bloomcabin option against the route from the relevant door. Distinguish the space used for sitting from the space needed to pass through: arriving at the pergola should not mean walking through the middle of a seating arrangement. If there is more than one regular entrance, draw each route rather than assuming one path covers them all. This will show whether the approach also works for everyday movement through the garden.

Before choosing a pergola 3
Use planting to create depth
Planting can connect a focal point to the rest of a long garden. Think about foreground, middle distance and backdrop rather than choosing each bed in isolation. Open or lower planting near the view can leave the frame readable; denser forms at the sides can frame it, while a background feature gives the eye somewhere to rest. The intended effect should be visible from the main viewpoint, not just when standing among the plants. A narrow strip that runs continuously down each boundary may reinforce the corridor effect; beds that change in depth can make the route feel like a sequence of spaces. Gaps between planted areas can also preserve glimpses along the garden.
Plan for mature height and spread, seasonal change and room to tend each bed. A newly planted border may leave the pergola exposed at first, then obscure its outline or narrow the route as plants grow. Mark the expected mature extent on the same drawing as the structure and path. Check the eventual size of the plants you select rather than relying on how they look in a pot. Keep access for pruning and weeding in mind, and avoid positions where routine maintenance will block the approach. If the pergola is to remain the leading feature, let planting frame rather than cover its key outline. Assess the balance from both ends of the garden and from the most-used indoor viewpoint.
Check the pergola's outline against its background
Read the pergola's outline against its immediate background. A frame seen against open sky has a different visual weight from one set in front of a hedge, fence or mass of tree branches. Posts can line up with trunks or boundary uprights and make a view feel busier; a small change of position may separate those lines. Dense planting around every side can blur the edges, while a more open approach can let the structure register clearly. Consider whether the outline is distinct from more than one viewing angle, not just from directly in front. This is a question of composition, not a guarantee of shade or weather protection. Use the actual outline and dimensions of a shortlisted model when judging how much of the view it occupies.
If the Bloomcabin Bioclimatic Pergola listing is among the options you are comparing, consider its outline against the background recorded on your garden drawing. Look for places where posts would overlap tree trunks or fence uprights, and where the top of the frame would sit against foliage or sky. Consider how that background changes through the seasons. Bare branches, evergreen growth and changing border height can alter how clearly the structure stands out over the year. The aim is not to remove every competing line, but to keep the pergola recognisable within the wider view. A small adjustment in position may be enough to separate its outline from a busy backdrop.
Before choosing a pergola 4
Use the view through the pergola to retain depth
Use the opening through the pergola to direct attention to something beyond it: a tree, a change in paving, a gate or a planted area. The frame can act as a visual threshold, ordering the view without making the structure the only thing worth seeing. A focal point part-way down the garden often benefits from a glimpse of what lies behind; that continuation preserves depth and invites the eye onward. If the pergola sits at the far end, consider what forms its backdrop so it does not appear as an isolated outline against an unrelated boundary. The view should work from the house and along the route, not only from directly in front.
Check that the intended view works from more than one place. From the house, the opening might frame a tree; approaching from the side, it could reveal a service area instead. Adjust the position or edge planting if needed, while keeping entrances and access visible. Include the Bloomcabin pergola option in your comparison of how the frame would sit within this view. If seating is planned, check the outlook from that position as well: the view enjoyed while sitting may differ from the one seen on arrival. A slight offset between the path and the framed view can make the layout feel less rigid without making the route confusing.
Alignment with the house and boundaries
Relate the pergola's lines to the house, fences and other fixed features. A frame aligned with a long boundary may extend the direction of the garden; set across it, the same form may mark a visual pause. Neither alignment is a rule. Compare both from the main viewpoint and note how the posts sit against the house's openings, roof edge or existing tree trunks. The useful choice is the one that strengthens the view you want, rather than one that merely repeats every line already on the site. Too much repetition can accentuate the garden's length, while a clear change in direction can help distinguish the focal area. A plan and an elevation sketch can expose awkward overlaps before you compare specific models.
If a house-attached option is under consideration, compare the Bloomcabin wall-mounted pergola listing with the actual wall and door positions. Check the information for the chosen model and have any attachment or site requirements confirmed by a suitably qualified professional. On the drawing, show how the frame aligns with the door, threshold and other nearby openings. Then consider the view back towards the building from the garden. An alignment that looks orderly from indoors may create an awkward overlap when seen from the opposite direction. Comparing these two views helps relate the pergola to both the house and the open space, rather than treating its connection to the wall as the only design decision.

Before choosing a pergola 5
Paths, mature planting and pergola dimensions
A dimensioned landscape drawing makes it easier to compare perspective, path and planting choices. Include the house, boundaries, existing trees, gates, known level changes, all routes, the pergola outline and the intended mature planting extents. Add arrows from the main viewpoints and identify foreground, frame and backdrop. Show the actual clear path around posts or beds; a single line on a sketch can hide a pinch point. Mark how beds meet the route and where access is needed for routine garden work. A plan cannot answer every structural or ground question, but it can reveal a visual or circulation conflict before product selection. Note which dimensions and plant spreads are confirmed and which still need checking.
Use copies of the same drawing to compare two or three candidate locations, rather than relying on memory. For each, record what appears behind the pergola, how much garden remains beyond it and whether people can reach other areas without crossing a bed. If the Bloomcabin bioclimatic model is on the shortlist, plot its specific published dimensions on each version. Keep the viewpoint arrows and planting extents consistent so the differences between positions are easy to judge. Mark any unresolved dimensions or planting requirements on the drawing itself. This gives a design discussion a clear basis and prevents an attractive layout from being mistaken for a fully resolved plan.
Choosing a pergola for the planned layout
Once the layout is clear, compare pergola models against the space and relationships it establishes. Separate the choice of type, such as wall-mounted or freestanding, from the details of a specific model: its dimensions and any stated site or mounting requirements. Where two options would occupy different positions, note what each changes about the approach, the view from the house and the garden beyond. A design consultation is most useful when these differences are explicit. Share the dimensioned drawing and documented planting requirements so the discussion addresses the actual layout, rather than simply which product looks most appealing in a photograph.
Write a short brief: what should be seen first, how people reach the pergola, what remains visible beyond it, and how mature planting will frame the view. Then compare that brief with the regular pergola model from Bloomcabin and any other options using their exact product details. Treat the brief as a way to identify trade-offs: one option may give a clearer framed view, while another may fit the approach more naturally. The aim is a connected garden, not merely a shorter-looking one. If a model disrupts the intended route or obscures the continuation of the garden, reconsider its position before redesigning the surrounding beds to accommodate it.
Frequently asked questions
Does a pergola have to be at the end of a long garden?
No. It can sit part-way along the plot and act as a visual pause, provided the approach reaches it naturally and a view or useful area of garden remains beyond it.
Where is the best position for a pergola in a long garden?
There is no fixed position. Check the main sightline, existing features, route and remaining view from the house and the far end of the garden. The mathematical centre is not a requirement.
How can planting add depth around a pergola?
Use foreground planting, a middle layer and a clear backdrop. Keep the pergola's outline readable from main viewpoints, and draw mature plant sizes so borders do not obscure the path or structure.
Should the path to a pergola be straight?
Not necessarily. A direct route is easy to follow; a gentle turn can reveal the structure gradually. Keep everyday access clear, and make sure a bend does not send people through a bed or across a seating area.
How do I make a pergola stand out without dominating the garden?
Relate its outline to the background, keep planting from merging with it, and let other features play supporting roles. Check the effect from several viewpoints rather than relying on one photograph.
A successful focal point is not simply a pergola at the far end. It is a clear relationship between the structure, the route leading to it, the planting that frames it and the garden still visible beyond. In a long plot, small shifts in position and alignment can change the whole perspective. Walk the proposed route, check the view from both directions and draw planting at its mature spread; that helps the pergola feel like part of the garden's sequence rather than an isolated stop.
