
Designing a Pergola for a Traditional Brick House
Pergola design guide
Designing a pergola for a traditional brick house is less about finding a frame in a matching colour and more about controlling scale, rhythm and the point where new work meets old masonry. Brick brings its own pattern through bond, mortar joints, openings and sills, so a convincing design responds to those lines without imitating period details. This guide develops a practical concept from the house elevation outwards, then considers post placement, finishes and the terrace edge. It also explains what belongs on a measured drawing before a product is chosen.

The house’s brickwork and architectural details
Traditional brick houses are not a single style. Some have plain elevations; others have pronounced lintels, sills, arches, bays, porches or a later extension. Before sketching a pergola, look at the rear elevation from the garden and note its strongest features: the main roof edge, door and window openings, brick bond, mortar colour and any repeated stone or painted trim. Record which elements set the visual rhythm, and whether each detail belongs to the whole façade or just one opening. Note where the brick changes in colour or bond at an extension; that boundary may be a more useful reference than the oldest part of the house.
Then decide what the pergola should do in the composition. It may frame the back door, extend a terrace beside a newer addition or sit as a separate garden feature. Give it one clear relationship to the house rather than copying every detail. A restrained rectangular outline can read clearly as a new layer beside textured brick; imitation arches, brackets or historic joinery can look artificial if they are not part of the building. Photograph the wall square-on and from the main garden approach, and note the view from rooms that open on to it. Those viewpoints show whether posts will frame a view or interrupt it.
Set the pergola’s scale against the house
Draw the house elevation and a simple plan before choosing the footprint. On the elevation, compare the proposed width with the door, nearby windows, bays and visible section of wall; on the plan, compare its depth with the usable terrace and garden route. A frame that is too narrow can look incidental, while one that spans most of the house may become the dominant feature. Neither outcome is automatically wrong, but it should be deliberate. Keep the height in relation to the tops of doors and windows and the eaves, and check that it does not crowd openings or compete with the roofline. Drawing the plan and elevation at the same scale helps reveal differences that a garden photograph can disguise.
Use the activities below it to test the outline: a table, chairs and the route back indoors need to fit without making the pergola feel oversized for the elevation. The Bloomcabin Pergola is listed with an area range from 9 to 24 m², which offers a broad point of comparison, not a recommendation for a particular terrace. Area alone does not tell you the exact width, projection or height. Compare confirmed product dimensions with your measured plan, and revisit the outline if posts cut across a doorway, window view or usual walking line. Test the outline from inside and from the garden, since both are part of its setting.
Choose between a wall-mounted and freestanding layout
Decide whether the pergola should read as attached to the house or as a separate frame. A freestanding arrangement leaves a visual gap and can make the terrace feel like a distinct outdoor room; a wall-mounted arrangement brings the roof edge closer to the brick elevation and can make the transition feel more continuous. The choice affects both the composition and the use of the terrace. Think about access around the posts, views from inside and how the junction will be seen at close range. A deliberate separation keeps more of the brick visually uninterrupted; a close connection draws attention to the line where the new frame meets the wall.
Brickwork varies in condition and construction, and the appearance of a sound wall does not establish that it is suitable for a particular fixing. If a wall-mounted layout is under consideration, include the masonry and intended connection in a design discussion with a suitably qualified professional. The Bloomcabin Wall-Mounted Pergola is the named wall-mounted option; its name does not confirm that a specific brick wall or junction is suitable. Ask the designer or installer to verify the mounting approach and how rainwater and the building envelope will be handled before finalising the drawing. This is also the point to discuss any visible gap, trim or finish at the meeting point.
Place posts and beams around openings
Position the posts and beams so their rhythm works with the openings. On a symmetrical rear elevation, a frame may align around the main door or carry its visual axis out to the terrace; on an irregular wall, forcing symmetry can make the existing arrangement more obvious. Check every post on the plan against door swings, window access and the furniture layout, then view the elevation from the garden. The aim is not to hide brickwork but to avoid awkward overlaps with a window edge, stone sill or strong vertical corner. Review the frame from standing and seated viewpoints, especially where a post sits near the main view through the glazing.
Beam depth and post thickness affect how substantial the frame appears against masonry. A light-looking outline may be lost against a complex façade, while heavy members can obscure the house’s openings; the right balance depends on viewing distance and overall span. Sketch both centre lines and visible member widths rather than treating a post as a dot on the plan. When reviewing the Bloomcabin Pergola page, use confirmed dimensions and post positions to draw the frame on your elevation. This lets you compare the edges of the members with the edges of windows and doors, rather than relying on the overall impression of a product photograph.

Choose materials and finishes to suit the brickwork
Colour is only one part of how the pergola meets brick. The masonry has texture, joint depth and variation between individual bricks; a smooth or strongly outlined frame will make a different impression from a surface that echoes nearby timber or painted trim. Decide which element should lead. One considered approach is to let the house remain the main textured surface and keep the new frame’s material language simple, repeating an existing finish elsewhere on the terrace only when it feels deliberate. Avoid trying to reproduce the brick exactly in a different material, since a near-match can highlight the difference rather than make it disappear.
Compare samples against the actual wall, not just a screen image or a small colour card. Look at them beside the brick, mortar, paving and door or window trim in daylight and shade; notice sheen, texture and edge detail as well as hue. When assessing the Bloomcabin Bioclimatic Pergola, compare its confirmed material and finish information with this palette. Look at samples together rather than choosing the frame and terrace separately, and record the selected finishes in a short schedule. Refer to that schedule when choosing furniture or planters, so these later additions do not introduce another competing tone.
Relate the pergola roof line to the house
Treat the top of the pergola as a line in the rear elevation, not merely a cover above seating. Compare its upper edge with the house’s eaves, porch roof, bay window and lintels; a line that follows one of these references may feel considered, but copying a roof pitch or height without context can create a second roofline that competes with the original. The depth and repetition of the roof structure also change how much sky and upper brickwork remain visible. Include views from inside the house and the garden, and note whether the pergola’s horizontal members sit against brick, sky or a roof backdrop.
Where a frame approaches the wall, draw the junction at a useful scale and show the intended finish, any visible gap and how the meeting point is to be resolved. Do not assume a wall-mounted product includes a weatherproof detail for every house. When considering the wall-mounted pergola option, distinguish between the product’s own details and the work needed where it meets the building. If the visual concept depends on flashing, trim or a recess, mark that intention in the brief for the responsible professional to specify. Show enough of the surrounding brickwork and roof edge to explain the intended appearance; a coloured sketch alone is not a construction detail.
Coordinate the pergola with paving and thresholds
Let the paving reinforce the pergola’s geometry without forcing every line to align. A terrace pattern can run parallel to the house, define an outer edge or continue the frame’s rectangular footprint; each choice changes how large the structure feels. Mark the door threshold, level changes, drains and routes to the garden on the plan. A post beside a step or along a narrow passage can make an otherwise balanced elevation awkward in everyday use, so test movement around the whole outline rather than looking only at the front view. Decide whether the terrace is a single clear plane or a series of connected areas.
Decide whether existing paving stays, is extended or ends at a clear border. Repeating the house’s brick colour in every surface can make the area feel heavy, while strong contrast may draw attention away from the façade; samples reveal the balance. If comparing the regular pergola option, place its confirmed footprint against patio dimensions and paving joints before ordering. Consider where the posts fall within the paving pattern and whether the terrace border follows the frame or extends beyond it. A border can define where the outdoor room ends without adding another frame or decorative motif.
Plan planting and furniture around the frame
Planting and furniture soften the meeting between brick, frame and paving, but they need their own space on the plan. Show existing shrubs, mature plant spread, pots, seating and the route for maintaining the wall; a plant that is small in a nursery pot may occupy a different footprint later, so use documented mature dimensions where available. Keep approaches to doors and windows clear, and avoid placing tall planting where it blocks the view from indoors. The drawing should show both hard edges and softer elements, including where foliage may conceal an opening or make access awkward.
Furniture is also a scale test. A small chair arrangement may leave a wide frame looking empty, while a large table can make a modest terrace difficult to move through. Place the actual intended furniture sizes on the drawing before deciding where a border or planter goes. When you assess the Bioclimatic Pergola option, use confirmed product dimensions to check the space available between posts for seating and planting. Show chairs in use as well as tucked under the table, and keep the route back to the house visible on the plan. This gives a clearer picture of the usable layout than an empty pergola outline.

A pergola concept beside a brick house
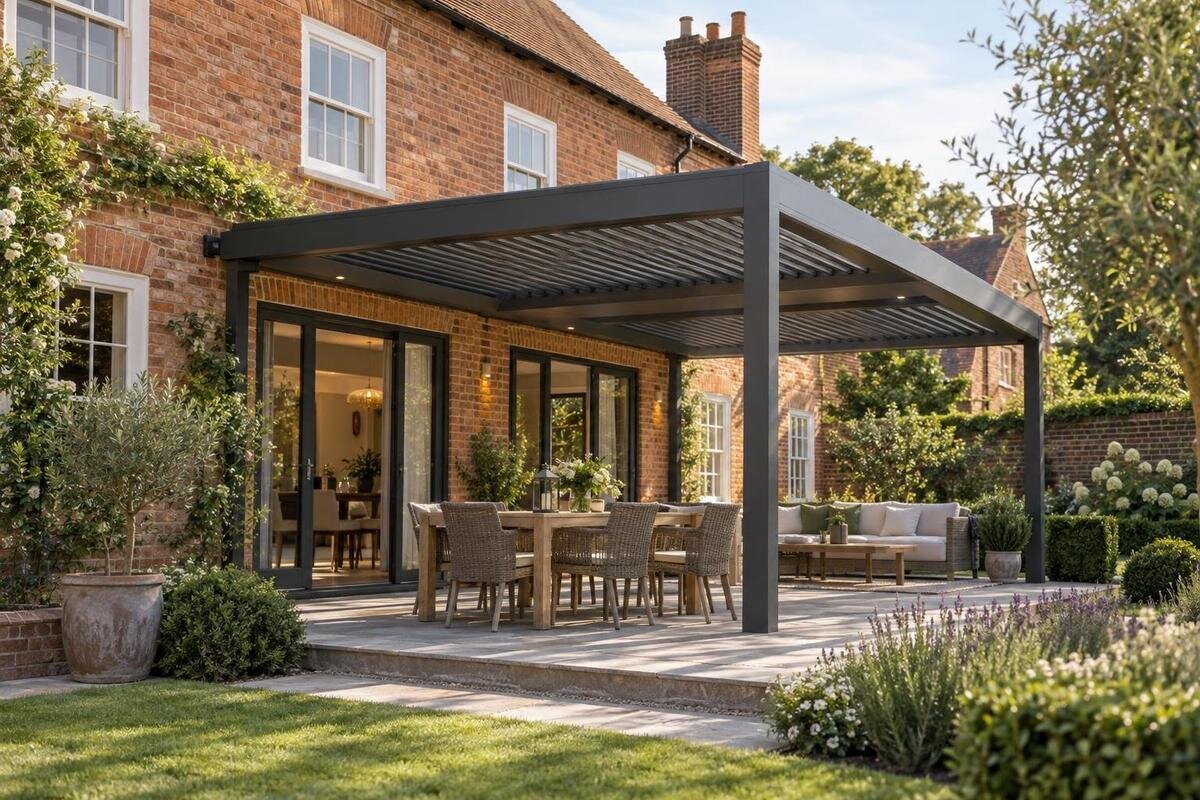
Consider this illustrative concept: the rear wall has a main door opening on to a paved rectangle, with one window close to the terrace and a roof edge visible above. In an elevation sketch, retain the brick and window as the dominant pattern; draw a simple horizontal pergola line below the main roof edge, then place the outer posts beyond the clear route to the door. In plan, make the frame a clean rectangle that relates to the paved seating area rather than continuing across the full rear wall by default. These are visual relationships, not set dimensions; a different house may call for a narrower frame, an offset post line or a freestanding layout. The sketch is deliberately simple enough to adjust once the real openings and levels are measured.
In this concept, use one restrained finish with a clear relationship to an existing element, such as window trim or paving, while allowing the brick itself to remain visible. Let the paving edge define the outdoor room and place planting outside the main access route. Show where the frame begins and ends, which openings stay clear and how the terrace is used; leave brackets and fixing details for the chosen product and site design. When comparing the concept with the Bloomcabin bioclimatic model, draw the confirmed product outline over the sketch to see which relationships can be retained and which need adjustment. The concept provides a basis for that comparison, rather than assuming one style will suit every brick house.
Prepare a dimensioned design brief
Before requesting a price or placing an order, turn the concept into a dimensioned landscape brief. Record the overall wall and terrace, door and window positions, threshold and paving levels, relevant roof or eaves line, walking routes and intended furniture. Mark planting with documented requirements where available, and note features that may affect the layout, such as a drain, downpipe, external light or access point. An elevation explains the visual relationship; a plan explains footprint and circulation. Both are needed to assess the idea beyond a flattering garden view.
Compare product information against those drawings: overall dimensions, post layout, finish, roof outline, mounting arrangement and confirmed details of the wall junction. Record which details are settled and which still need assessment or specification, including the suitability of the masonry and any connection or weatherproofing work. If you arrange a design consultation, bring the elevation, plan, finish samples and planting requirements. Identify the relationships you most want to retain, such as a clear view through a window or alignment with a terrace edge, so any adjustments can be discussed against those priorities. The finished pergola should relate to the house through considered proportions and details, rather than an unrelated decorative feature.
Frequently asked questions
How do I make a pergola suit a traditional brick house?
Use the house’s proportions and repeated details as references, especially its openings, eaves, brickwork and mortar. Keep the new frame legible rather than imitating period ornament. Check the composition in both plan and elevation, and view it from inside the house as well as from the garden.
Should the pergola match the colour of the brick?
Not necessarily. A close match can draw attention to small differences in tone, while a considered contrast can relate to existing trim or paving. Compare material and finish samples beside the brick and mortar in daylight and shade before settling on a palette.
Is a wall-mounted pergola always better beside brick?
No. A wall-mounted layout brings the frame closer to the house, while a freestanding one reads as a separate structure. The right choice depends on the design and the particular wall. Ask a suitably qualified professional to assess the masonry and proposed connection before deciding.
Does the pergola need to copy the house roof pitch?
No. Its upper line should sit comfortably alongside the roof edge and nearby openings, but copying the pitch can create competing geometry. Compare the proposed heights and lines in an elevation, then choose a relationship that leaves the house’s existing form clear.
What should I include in a drawing before choosing a pergola?
Show the proposed footprint, post positions, doors and windows, eaves, thresholds, paving levels, access routes, furniture and planting. Compare the drawing with confirmed product dimensions and finish information; a photograph cannot replace those measured details.
A successful match is built from a few well-judged relationships: the frame is in scale with the brick elevation, its posts respect openings, and its finish and roof line sit comfortably beside the house without pretending to be original. A measured plan and elevation turn those judgements into practical checks, including how people move across the terrace and where planting belongs. Consider the material, junction and product dimensions together, and the pergola can feel like a natural part of the garden while allowing the traditional brickwork to remain its defining feature.
