
Planning Pergola Space for Play and Supervision
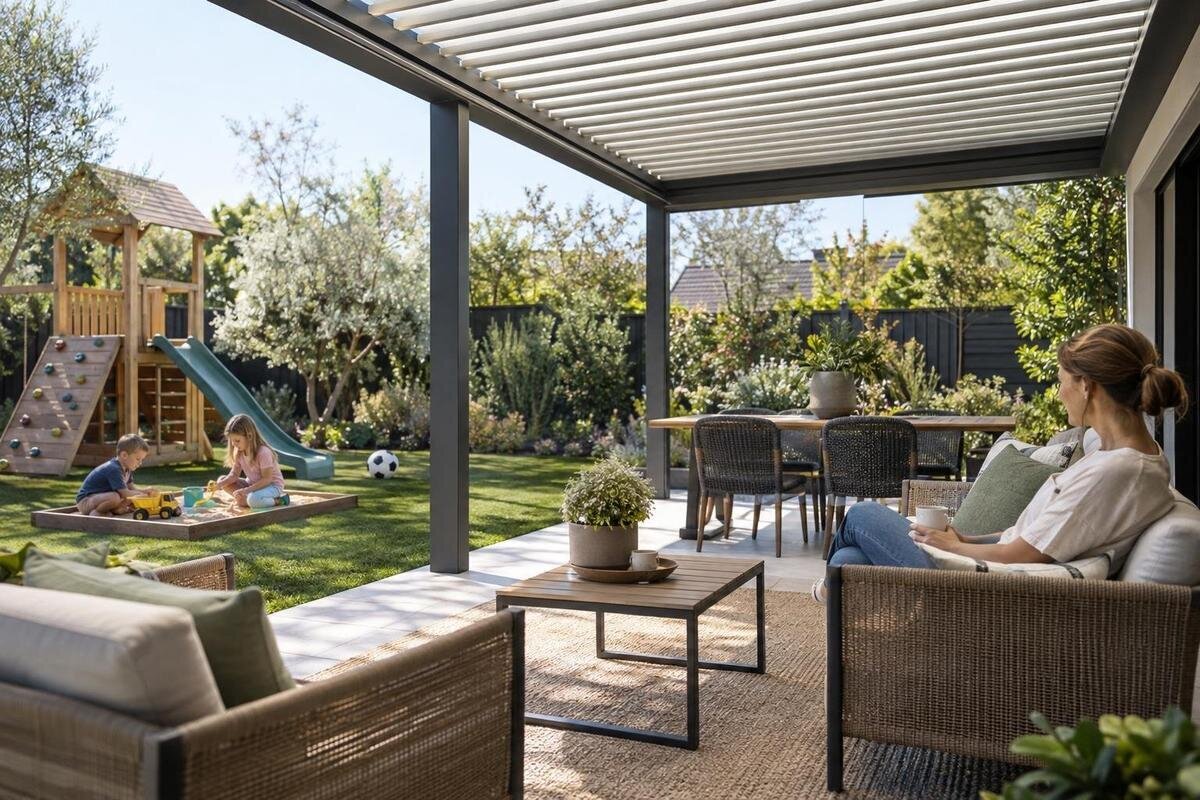
Family pergola planning
Planning a pergola for family use is less about fitting in the largest play item than about keeping the everyday routes, play space and adult viewpoints working together. Start by noting where children tend to play, where adults sit or stand, and how everyone moves between the house, garden and pergola. Then test those positions with real furniture measurements. A pergola can help organise an outdoor area, but its presence does not make the space or equipment child-safe. The layout still needs to suit the site, and children still need active supervision.

Sightlines from adult seating and standing positions
A useful family layout begins with the adult’s usual position, not with the pergola’s centre line. Note where someone typically sits: in a chair near the house, at the dining table or on a garden bench. Mark the play area and check what an adult can see from each place while sitting and standing. A view that works only when someone leans around furniture is difficult to rely on in everyday use. If the seat most often occupied faces away from play, consider turning or moving it before settling on the pergola’s position. The aim is a practical view during ordinary use, not a perfect sightline from an empty garden.
Draw the obstructions as carefully as the open space. Pergola posts, side panels, chair backs, parasols, tall planters, storage boxes, mature shrubs and an open door can each hide a different part of the play area. Put temporary markers in likely positions, then check the view from the places adults genuinely sit or stand. Look at the far corner and the area just beyond the pergola as well as the floor directly underneath it; children may move between them. If a view disappears when someone uses a chair or opens a door, note that on the plan. The layout can reduce avoidable blind spots, but it cannot guarantee safety or replace active supervision.
A concept layout with separate play, seating and routes
Draw a simple concept layout before comparing pergola models. As a concept, put the adult’s usual seat at an edge facing the play zone, keep the main route from the house to the garden clear, and place fixed equipment away from that route. This is a planning sketch, not a measured plan or a safety guarantee; adapt it to the actual site, equipment instructions and family routines. If you are considering a wall-mounted option, include the Bloomcabin Wall-Mounted Pergola in the comparison and check the exact dimensions and drawings against your concept rather than relying on the model name.
Mark the house, doors, gates, steps, existing paths, trees and any change in level on the same plan. Give each main use its own outline: adult seating, play, storage and the route people need to walk. Do not count one strip of floor as available for two activities if they happen at the same time. Use the measurements of the actual table, chairs and play items, and show chairs pulled out rather than tucked in. A full-size outline made with removable tape can reveal a pinch point that looks harmless on paper. If the arrangement works only when toys or furniture are moved each time, decide whether that change is realistic for daily use.
Seating arrangements that keep play in view
Choose furniture positions that make looking towards play natural. Put the seat most often used where an adult can see the play zone without turning around, and avoid a chair back or parasol cutting across the view. A side-on seat can work if it still gives a clear view; a seat facing away is less useful when nobody remembers to move it. Consider where a second adult will sit too. If the family usually gathers at a table, test every usual chair, not just the one at the end. That can show whether a post, table setting or another person blocks the view from the position where supervision is likely to happen.
Measure the furniture in its normal arrangement, including the space needed to pull chairs back and move around the table. A dining set can become the main adult viewpoint, but meals also occupy attention, so do not assume that any seat under a pergola is a suitable supervision point. When comparing the Bloomcabin Pergola with your seating plan, mark the support positions shown in the drawing for your chosen configuration. Check whether the usual seats still face the play zone and whether someone can leave the table without stepping into it. This makes the seating arrangement part of the product comparison rather than something to squeeze in afterwards.
Keeping everyday routes outside the play area
Map the routes that will be used repeatedly: from the house to the garden, to a gate or other destination, and between the adult seat and the play area. Keep the main through-route outside active play wherever the site allows. Children carrying toys, adults carrying items and visitors entering the space all need predictable paths; a ball or toy table should not sit where everyone has to pass. Include the full opening arc of a hinged door and the space needed to step through it. A route that looks wide on an empty plan can narrow sharply once chairs are pulled out or a toy is left beside them.
A route should remain visible as well as clear. Avoid creating a hidden corner with a screen, tall planter or storage unit between the adult and child. Mark post locations and the paths between them, so the way through does not zigzag around furniture. If you are considering the Bloomcabin Bioclimatic Pergola, compare the plan view for your chosen configuration with the route sketch. Trace the journey from the door to the garden and the shorter route from the adult’s seat to the play area. On a crowded site, test both with the furniture in place, including occupied chairs, rather than assuming the play zone can double as a passage.

Measuring usable floor area
Treat a listed area as a starting point, not as the amount of uninterrupted play space. The Wall-Mounted Pergola by Bloomcabin is listed with size options from 9 to 24 m², but a usable layout depends on the exact footprint, support positions, furniture, storage, routes and equipment. Transfer the dimensions for the chosen configuration to a plan and show each item in its intended place. A pergola’s outline cannot tell you whether a chair can be pulled out without entering the play area, or whether a child can reach equipment without crossing the main path. Keep those separate questions visible as you compare footprints.
Make a dimension list for what will actually be there, not just the largest items. Include the dining table, each chair in use, toy storage, the equipment footprint and any clearance its maker specifies. For activities involving movement, allow for the space stated by the equipment manufacturer; do not assume the item’s base dimensions describe its full use area. Mark the entrance to each zone and the room needed to pass. A tape outline on the ground is a useful reality check, especially for a compact arrangement: sit where adults will be, open doors and see whether the planned route remains clear when furniture is in use.
Checking play equipment clearances
Separate loose play from fixed equipment when you plan the footprint. A box of toys, a small play table and a larger freestanding item create different patterns of movement and storage, so do not label the entire area simply as play. Check the maker’s instructions for outdoor use, surface and clearances, then plot the equipment in the orientation it will actually occupy. If children use wheeled toys or carry items through the area, show where they turn and stop rather than drawing only the parked position. Store frequently used items where an adult can reach them without crossing the active part of the play zone.
Do not assume a pergola is designed to carry a swing, climbing rope, hanging seat or other play equipment because it has posts or beams. Do not attach or suspend a child’s equipment unless the relevant manufacturers and a suitably qualified professional confirm that the specific arrangement is appropriate. The Bloomcabin Pergola model can be assessed as a pergola option, but its name or appearance does not establish a load capacity or approve an attachment. Keep the equipment’s own instructions in view when deciding where it sits, and make sure its stated clearances work with the site layout.
Walking surfaces and toy storage
Check the actual walking surface from the house to the play area and around the pergola. Note thresholds, uneven joints, edges between paving and lawn, steps and loose coverings; these can be easy to miss on a drawing. Keep toys and cables out of the main route, and avoid placing a rug or mat where its edge becomes another obstacle. A toy box should be close enough for everyday tidying but should not occupy a turning point or block an adult’s view. The point is not to make every surface identical; it is to understand where people will walk and where the surface changes.
Do not assume the ground beneath an overhead structure stays dry, shaded or suitable for every activity. Open edges and changing weather mean that the floor and play equipment need to be considered for their actual outdoor conditions; follow the equipment maker’s guidance rather than inferring suitability from the pergola. Include the toy box in your floor check: can it be opened and used without its lid or contents obstructing the passage? Check the route during play as well as after tidying. If the site has a step, a pronounced change in level or another feature you cannot resolve through furniture placement, get advice from an appropriate professional before finalising the layout.
Shade and visibility through the day
Shade and visibility can change over the day, so check the area at the times your family expects to use it. A position that is shaded at one point may be brighter later, and glare can make it harder for an adult to see a child or a toy. Observe the proposed seating position and play zone rather than assuming the pergola roof covers all of the floor. If a child’s activity is likely to move beyond the covered footprint, include that part of the garden in the sightline check too. The usable play area should not depend on everyone staying in the exact spot shown in a product image.
When comparing the bioclimatic pergola from Bloomcabin, use the product information and drawing for the exact configuration to assess coverage over your proposed play zone. Keep the adult’s seat on the same sketch, so shade and visibility are considered together. Do not treat an overhead structure as a promise of full shade or weather protection. If changing conditions mean play moves to another part of the garden, identify where the adult would sit or stand to retain a useful view. Check that the route between that position and the alternative play area stays clear, rather than planning only for the times when everyone can use the covered space.

Making room for adult activities alongside play
Decide which adult activities will happen alongside play and which can take turns. A table for meals or crafts can narrow the route when chairs are occupied, while a quiet chair or side table may be easier to place outside the main play zone. Keep hot drinks, fragile items and adult tools away from the part of the surface where toys move, and avoid using the play area as a shortcut to collect them. When the space is in use, try the intended arrangement with the table set, chairs drawn out and usual items in place. A clear, empty-floor layout is not enough.
If one footprint must serve both dining and play, draw both activities at once, not as separate ideal arrangements. Include chair movement, toy storage and the clear passage between the door and garden. The Bloomcabin regular pergola option is listed in sizes from 9 to 24 m², but area alone cannot confirm that two uses fit together; compare the exact dimensions with your furniture and equipment. If the zones overlap, decide which use is occasional and where it can move, rather than treating a crowded arrangement as flexible. That choice makes the product comparison more realistic.
Revisiting the layout as family routines change
A family layout is unlikely to stay fixed. A new toy, a different outdoor table or a change in where adults sit can block a view or occupy the route that used to be clear. Recheck the arrangement when equipment changes and when a temporary setup becomes a regular one. Look again from the seat most often used, test the route with furniture in place and make sure storage has not spread into the play zone. A plan that can be adjusted without moving the pergola itself is often easier to live with than a rigid arrangement built around a single activity.
Before choosing, record which furniture and play items will stay in place and which are likely to change. Keep their dimensions, the adult viewpoints and the main walking route on your concept drawing. If the Bloomcabin wall-mounted model is on your shortlist, compare its proposed position with both the current arrangement and any changes you already expect, such as a different table or play item. Ask the seller for any missing dimensions needed for that comparison, and speak to a suitably qualified professional about site-specific structural questions or proposed attachments. Keep the drawing labelled as a concept until the actual site and product details have been checked.
Frequently asked questions
Does a pergola make a play area safe for children?
No. A pergola does not make a space or its equipment child-safe by default. A clear layout can support supervision, but the equipment must suit the site and be used according to its maker’s instructions. Keep supervising children actively.
How can I check whether an adult can supervise from the seating area?
Set out the chairs where they will normally go and check the view while sitting as well as standing. Include posts, planters, table settings and open doors in the test. If furniture blocks part of the play area, adjust the layout.
Can I hang a swing or climbing equipment from a pergola?
Do not assume the pergola is designed to carry play equipment. Only consider an attachment if the relevant manufacturers and a suitably qualified professional confirm that the specific arrangement is appropriate.
What size pergola do I need for a play area?
There is no single size that suits every family. Measure the equipment, furniture and walking routes you need at the same time. The Bloomcabin models discussed here are listed from 9 to 24 m², but that range alone cannot confirm whether a layout will fit.
Will a pergola provide enough shade for children’s play?
Do not assume it will shade every part of the floor throughout the day. Check the product information for the exact configuration and observe where shade falls at the times you expect to use the space.
A workable family pergola layout keeps everyday paths clear, gives adults a useful view from their usual seats and provides the space required for play equipment to be used according to its maker’s instructions. Draw the furniture and equipment at scale, test the view while sitting and standing, and leave room for routines to change. That gives you a more realistic basis for choosing a footprint and deciding which activities belong under the pergola or elsewhere in the garden.
