
Can Pergola Rainwater Be Stored in a Garden Tank?
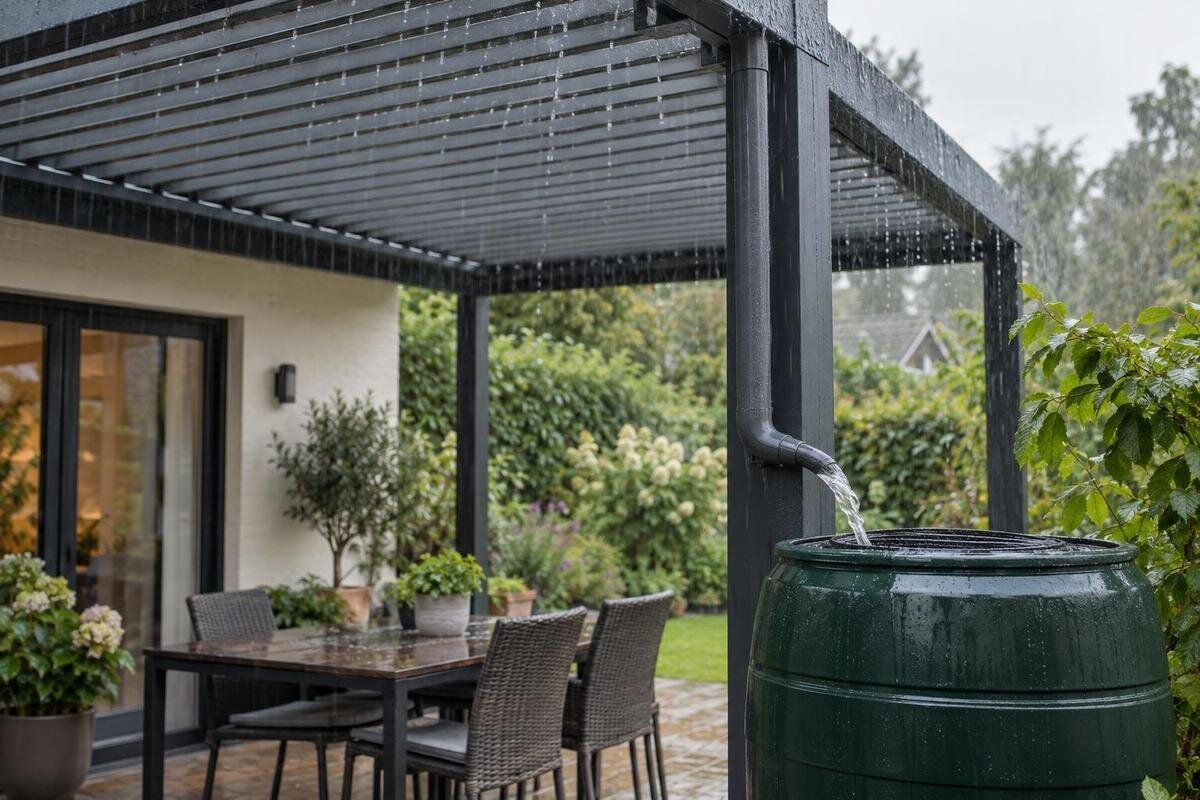
PERGOLA RAINWATER COLLECTION
A garden tank can store rainwater from a pergola, but only where the roof configuration channels runoff to an outlet and that outlet can feed the tank. Storage capacity is just one part of the decision: the route must work from the collection surface, through a compatible connection, into the tank and out again when it is full. Check the model-specific drainage information, estimate realistic yield, decide how the water will be used and plan the overflow before buying equipment.

Confirm that the pergola actually channels rain
Rainwater can be stored only if it is directed to a collection point. A pergola’s name or appearance does not show whether its roof drains into a channel, where an outlet sits, or what happens when the roof is open or adjustable. Open-beam, louvred and solid arrangements can direct rain differently, and the installed configuration matters even within one product range. Trace the route from the surface that receives rain to the outlet shown on the model-specific drainage drawing. A feature that looks like a gutter is not proof of a tank connection; rain that runs off the structure or passes through gaps is not available to storage.
Use the wall-mounted pergola model as a model reference, then request documentation for the precise roof and enclosure setup being considered. Confirm which roof sections feed each channel, how many outlets there are, where they sit and whether collection depends on a particular roof position. This establishes the usable catchment as well as the connection point. Check that the drawing covers the installed configuration, not a different roof option. Do not cut a new hole, divert a built-in channel or add a fitting until the manufacturer or a competent installer confirms that the change is suitable; an unsupported alteration can change how water is carried across the structure.
Check the pergola outlet against the tank inlet
Compatibility depends on both dimensions and position. Record the pergola outlet type and measurements from its technical information, then compare them with the tank inlet and adaptor requirements. Do not pick a connector because it looks close: a loose joint can leak, while a mismatched or narrowed route may not pass water as intended. Establish whether the pergola outlet terminates in a downpipe, channel or another fitting, and whether the tank accepts that kind of feed. When considering the Bloomcabin Pergola product page, use the exact model’s outlet details to assess the connection rather than judging the fit from photographs.
Check the space between the two ends as carefully as the connector. Compare the outlet and tank inlet heights, the distance between them and the route for the pipe; note bends, doorways, paving and any screen or filter that needs room. Insufficient height difference, an awkward pipe route or a lack of clearance can make a direct connection impractical. Do not confuse the tank’s fill inlet with the tap or outlet used to draw stored water. Ask the pergola and tank suppliers, or an installer, to confirm the adaptor and pipework for the actual arrangement. If the route would need pumping, have it assessed rather than assuming a gravity-fed connection will work.
Estimate the rainwater available
Estimate potential volume using the area that actually drains to the connected outlet. A useful first approximation is catchment area in square metres multiplied by rainfall in millimetres: one millimetre over one square metre is one litre. For example, 10 mm of rain over 10 m² represents 100 litres before losses. Use the horizontal plan area of the roof section feeding the outlet, not the garden area or an unrelated product image. If several sections drain separately, count only those connected to the tank; do not include water that runs off the edges or passes through gaps.
Treat the result as an upper estimate, not a promise of how much will reach the tank. Some rain may escape the route, splash away, be diverted or bypass the outlet during heavier rainfall; filters and any first-flush device also affect the amount stored. With an adjustable roof, check the instructions for how its position affects collection instead of assuming every position performs alike. If considering the bioclimatic pergola listing, establish the usable catchment for the roof setting you intend to use before estimating yield. Compare local rainfall records by month or by typical intervals between watering: an annual average alone hides dry spells and periods when the tank is already full.
Choose tank capacity to suit garden use
Choose capacity around how much water you can use and when you need it, not simply the largest tank that fits the garden. List likely uses and estimate how much you would draw between periods of rain; compare that demand with a realistic estimate of what reaches the tank over the same period. Rain can arrive in bursts while demand may rise during a dry spell, so an annual average can be misleading. Consider seasonal patterns and the space available, including room to reach the lid, tap and fittings. A larger tank cannot make up for a collection route that captures little water.
A small tank may fill quickly and send more water to the overflow; a much larger one may not fill often enough to meet your intended use. For the regular pergola option, compare likely yield from the connected roof area with the tank’s usable capacity and your planned draw-off. This links the storage decision to the water you expect to collect rather than to the pergola’s overall size. Ask the tank supplier how much water is accessible for use rather than relying only on nominal volume, and check how the tank indicates that it is full. Treat rainwater as a supplementary source, not a guaranteed supply for every time of year.

Plan an overflow route for a full tank
A storage tank needs an overflow route for rain arriving when it is full. Consider the whole collection path too, including what happens if water bypasses the tank or cannot enter it. Decide where excess will go before choosing a tank position or fitting a hose. Discharging beside a doorway, onto a frequently used path or against a building can create avoidable problems; flowing water can also wash out soil or leave a surface slippery. The route should remain clear and accessible rather than being pinched, blocked by the tank or directed somewhere that conflicts with how the garden is used.
Follow the tank manufacturer’s overflow instructions and confirm that the pergola inlet can feed the arrangement without an unsupported restriction. An overflow hose or pipe is not automatically adequate just because it fits the tank. Check the route, destination and access for inspection. If the proposal relies on ground infiltration, an existing drain or another formal discharge point, have its suitability and local requirements checked by a qualified drainage professional. Do not assume that a soakaway, surface drain or public network is available for this purpose. When considering the Bloomcabin Wall-Mounted Pergola page, plan the pergola runoff and tank overflow together, including where excess water will go once storage is full.
Access for filter and tank maintenance
Rainwater arriving at the tank can carry leaves, pollen, dust, bird fouling and residues from routine cleaning. Plan a suitable screen or filter at a location that is accessible and compatible with the pergola outlet and tank inlet. It should be straightforward to inspect and clean without obstructing the intended drainage route. If considering a first-flush diverter, use an arrangement designed for the setup and maintain it as instructed; do not assume a generic part will fit or work with every outlet. Removing debris does not make rainwater potable or replace water-quality testing where that is needed.
Make maintenance part of the layout rather than an afterthought. Leave room to remove the screen, inspect the inlet and overflow, and follow the tank maker’s cleaning instructions. A closed cover and suitably screened openings help keep leaves and animals out. Check fittings for leaks after installation and inspect them periodically, particularly after weather that brings a lot of debris. For a collection system paired with the model on the Bloomcabin Bioclimatic Pergola page, consider access to each component, not just access to the roof outlet. Confirm the maintenance requirements in the relevant component instructions and choose equipment that can be reached without dismantling the pergola.
What the drainage documents need to show
The drainage documents should match the exact pergola model, roof type and installed enclosure, rather than simply describe the product range. A useful diagram shows the collection surface, channel, outlet and water path; the operating instructions explain how roof position or configuration affects drainage. Read these together so that the catchment used in your estimate corresponds to the outlet you plan to connect. Use the wall-mounted model details to identify the product when discussing the proposal with the supplier. Check outlet measurements, stated limits and approved accessories against the proposed tank connection, and ask the manufacturer or installer to confirm any fitting on which the arrangement depends.
Where documentation describes observations or limits, read them as applying to the stated model and conditions. They do not establish a universal guarantee for every storm or installation. Ask specifically whether the proposed tank connection is supported, how water leaves when the tank is full, and whether the roof needs to be in a particular position. If instructions are silent, do not fill the gaps with assumptions based on another pergola, a photograph or a similar-looking outlet. Get clarification where the drainage route is central to the purchase, and make sure the installer works from the same drawing.
Set a clear use for collected water
Decide what the stored water is for before selecting the tank. Garden watering and some outdoor tasks may be suitable non-potable uses, but rain from a pergola can pick up debris or surface residues, and clear-looking water is not proof of its quality. Do not drink it, cook with it or use it as household drinking water unless a suitable treatment and testing arrangement has been designed and verified for that purpose. Keep it separate from potable plumbing unless a qualified professional designs an appropriate system. A clearly labelled tank tap or outlet can help prevent confusion.
If you plan to use the water on edible crops, check reliable water-quality guidance for the crop and the way the water will contact the produce; do not assume it is suitable for washing food. Consider whether any maintenance products have been used on the roof or nearby surfaces and whether they could reach the collection route. Avoid uses where people or animals could ingest untreated water. Reserving the tank for clearly identified non-potable tasks makes its purpose easier to manage, and the use should remain consistent with the instructions for the tank and collection components.

Choose a suitable place for the tank
A full tank is heavy, so select a position and base that meet the tank maker’s requirements and suit the ground. Do not place it on the pergola, a wall, raised platform or decking unless a qualified professional has confirmed that the support is designed for the load. Sloping or soft ground, paving that may settle and a position that blocks access can all affect the practical choice. When pairing a tank with the pergola shown on the regular model page, assess the tank’s support separately from the outlet connection. A convenient position beside the pergola is useful only if the base is also suitable for the filled tank.
Keep the tap, lid, inlet, overflow and any filter reachable for ordinary use and maintenance. Check that the pipe route does not cross a doorway, create a trip hazard or put spilled water where it could affect a building or frequently used area. Leave the space required to service the tank in the way its supplier specifies, and consider how exposed fittings could be protected from accidental knocks. If the proposed base, support or drainage path is uncertain, consult a competent installer or site professional before filling the tank; do not use a full tank to test an unsuitable base.
Review the full collection route before buying
Sketch the route from the roof section to its collection channel, outlet, connector, tank inlet and overflow destination. Note the intended water use, a realistic yield estimate and who will maintain the screens and tank. Check each component against its own instructions, and make sure the tank capacity, inlet, overflow and access space fit together. If you plan to add side panels or another enclosure later, confirm that the drainage information covers that configuration. Do not assume an enclosure automatically improves rainwater collection or changes how the pergola handles weather.
A workable purchase depends on a documented route and a realistic water plan, not a single capacity figure. The pergola must direct water to a compatible connection, the tank must accept it, and excess needs a suitable destination. If any link in that chain is unclear, pause until the supplier or a qualified installer confirms the arrangement. A different tank size or collection point may suit the site better, but compare options using the actual layout rather than assuming every pergola outlet can feed a garden tank.
Frequently asked questions
Can I connect any pergola to a garden tank?
No. The pergola must have a drainage route that channels rain to an outlet, and that outlet must suit the tank inlet. Check the exact model and roof configuration in the drainage information; appearance alone does not confirm compatibility.
How can I estimate how much water will be collected?
Use the area that actually drains to the connected outlet and local rainfall figures. As a rough upper estimate, one millimetre of rain on one square metre is one litre. Allow for water that escapes, is diverted or does not reach the tank.
What size garden tank should I choose?
Compare realistic collection over the periods that matter with the amount you expect to use. A tank that is too small may fill and overflow quickly; a much larger one may not provide the supply you expect. Consider seasonal rainfall and available space as well.
Does a garden tank need an overflow?
Yes. Plan where excess water will go when the tank is full, and follow the tank manufacturer’s instructions. Check the destination and route before installation; a drainage professional can advise if it relies on ground infiltration or an existing drain.
Can I drink pergola rainwater?
Do not assume it is drinking water. Rain can pick up debris and surface residues, and a basic screen or filter does not make it potable. Drinking use would require a suitable treatment and testing arrangement designed and verified for that purpose.
A pergola rainwater tank is practical when the roof actually directs water to a compatible outlet, the expected yield suits the storage capacity, and the overflow has a suitable destination. Treat the tank, pipework and pergola as one collection system: a sound plan accounts for the intended water use and leaves access for maintenance. Without a documented route, a large tank alone will not make the arrangement reliable.
