





Bloomcabin Prestige Premium Greenhouse
Prestige Premium aluminium greenhouse with enclosed base cladding and adaptable glazing combinations
The Bloomcabin Prestige Premium Greenhouse brings productive cultivation together with solid aluminium cladding around the base. Compared with full-height transparent glazing, the lower panels screen pots, growing media and tools. Placed near a home or terrace, it presents a more composed garden view without taking away the light appearance of its glazed walls and roof.
The range includes compact and generous models. Depending on width, not only the floor area but also the ridge and door heights vary. This lets you match the greenhouse to available space, planned paths and growing areas.
Assess the summer sun, intended winter activity, outlook from the home, foundation and rainwater route as one plan before choosing. They shape the glazing specification and where the entrance, roof ventilators and working zones belong. Define the greenhouse’s future purpose early so permanent features are chosen deliberately while the internal arrangement can remain adaptable. More about Bloomcabin Ireland.
Sheltered base area
Enclosed aluminium base cladding for greater privacy at low level
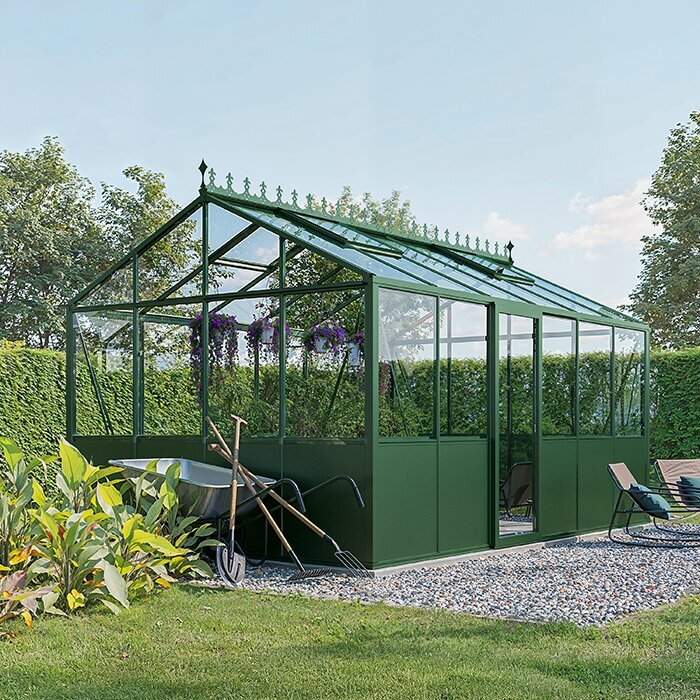
Solid aluminium panels surround the base and create a visually quiet lower zone. Benches, shelving and substantial pots appear more orderly against this finish, and ordinary tools attract less attention when viewed through the greenhouse.
That screening is valuable beside a terrace, along a regularly used path or where the structure can be seen from living rooms. It limits views at seated and low standing level. Review the location from indoor windows, main garden routes and each important sitting place before settling the orientation.
Glazing continues across the roof and upper wall sections, admitting abundant daylight to the growing space. Even so, account for the point where glass meets the opaque lower panels: small plants with high light demands may need raised positions or placement farther from an edge receiving reduced lateral light.
Choose the right size
A scale for compact plots and larger gardens
Enclosed base cladding
Screens storage and jobs close to floor level
Purpose-led glazing
Weigh light, screening, heat control and upkeep
Coordinate the colour
Blend the frame with house, patio and garden
Choose glazing carefully
Match each glazing choice to plants, privacy and sun exposure
Available infills comprise polycarbonate, 4 mm toughened safety glass and specialist alternatives: self-cleaning, mirrored, solar-control and matt white glass. Their benefits differ. Decide which priority leads the specification—strong light transmission, restricted views, relief from intense sunshine or reduced effort when washing exterior surfaces.
One glazing type need not cover both roof and sides. You might favour greater light overhead yet screen a wall facing a prominent viewpoint. Review all elevations independently because solar movement, nearby homes, terrace positions and established vegetation affect each direction in a different way.
Base the final mix on the greenhouse position, its aspect, the intended plants and whether cultivation, leisure or a collection will dominate. Crops demanding bright conditions must receive adequate illumination; a sitting zone may put more emphasis on glare and screening. Settle competing needs before committing to panes that form a permanent part of the structure.
Prestige at a glance
Key dimensions and equipment features
Model range
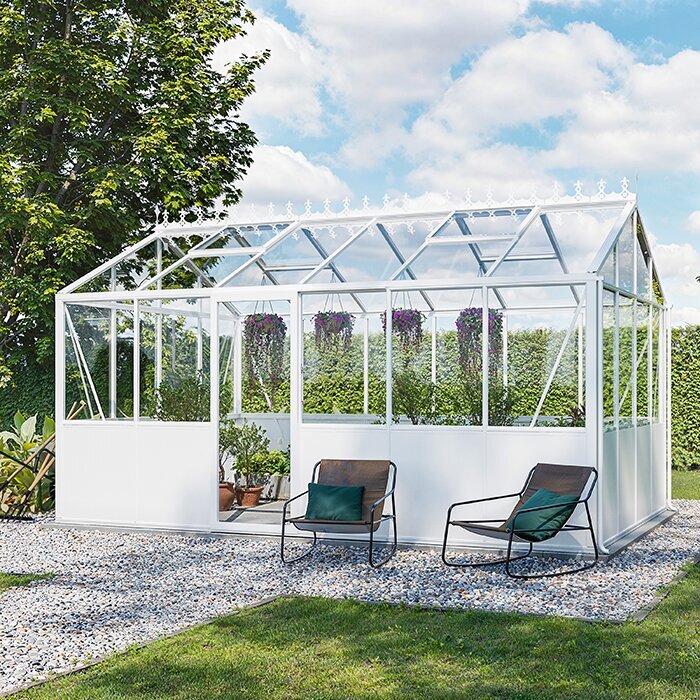
22 configurations, 3.77–28.08 m²
Choices for different garden sizes and uses
Narrower range
235 cm wide
Ridge height approx. 231 cm; door height approx. 165 cm
Wider range
310 cm wide
Ridge height approx. 267 cm; door height approx. 185 cm
Base section
Enclosed aluminium base cladding, 79 cm high
Extra screening across the low interior
Glazing and door options
Polycarbonate, 4 mm toughened safety glass and specialist glass
Single sliding door, with a double sliding door at widths of 310 cm and above
Equipment and colour choice
Roof ventilators, gutters, integral aluminium base frame and 37 RAL colour choices
12-year warranty
Ventilation and temperature
Plan glazing, roof ventilation and optional heat together
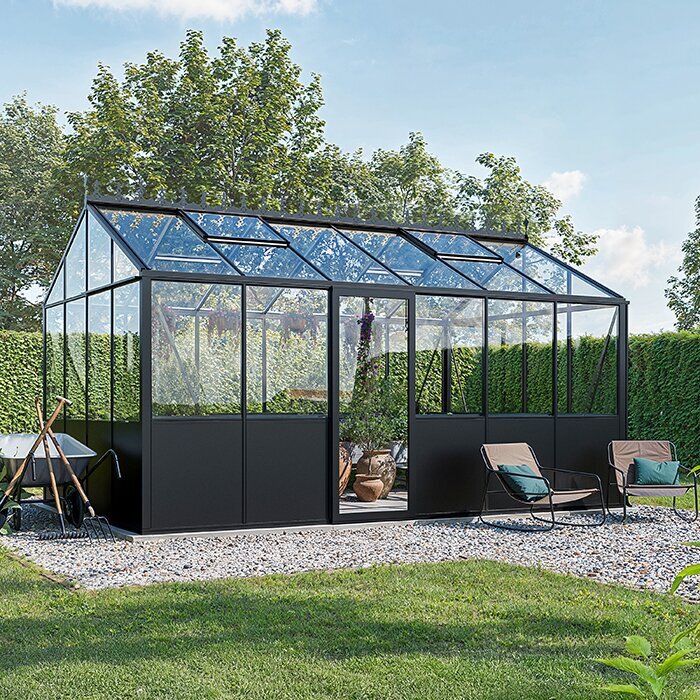
Roof ventilators are included on every Prestige. The standard fittings open by hand, while temperature-responsive automatic units can reduce routine intervention. Lay out paths, benches and other contents so the manual controls can always be reached and used without first having to rearrange the greenhouse.
Where direct sunshine is strong, consider solar-control glazing or shading that can be deployed when required. In a dimmer position, preserve the light the plants need rather than reducing it without cause. Optional heating may lengthen the useful season, but its controls must suit the crop and the installation requires appropriate professional expertise.
Choose the discharge point for the built-in gutters while preparing the site layout. Arrange outlets, gradients and an overflow route to keep standing water clear of the foundation and circulation areas. Connections positioned within easy reach are simpler to inspect, clear and maintain after the greenhouse is in service.
Ways to use it
Four practical layouts for a Prestige
01
Vegetables and propagation
A vegetable and propagation layout can combine beds, raised benches and convenient circulation, helping to extend the cultivation period. The opaque lower panels make an orderly setting for practical zones, while taller plants can occupy the brighter glazed height. Design irrigation, airflow and the planting arrangement as a single scheme from the beginning.
02
A garden seating spot
Appropriate chairs can turn part of the greenhouse into a temporary retreat among the planting. Opaque panels screen the area at lower eye level and make practical contents less prominent. Choose furniture that can be shifted rather than permanent fittings, allowing it to move for busy cultivation, thorough cleaning or the winter accommodation of large plants.
03
Sensitive plant collection
Citrus trees, tropical plants and other sensitive specimens may call for a particular balance of glass, airflow and optional warmth. Avoid applying one set of conditions to an entire mixed collection. Flexible containers, distinct zones and adequate circulation let you move individual plants towards the entrance or deeper inside as their requirements change.
04
A garden design feature
With a broad palette available, the aluminium finish can relate to the home’s exterior, its window profiles, paving or established garden features. Inspect samples outdoors in daylight because reflections, nearby colours and shade alter how a finish reads. Opaque base panels also give the frame greater visual presence than a completely clear lower section would.
Planning the site for every season
Site, foundation, sunlight and water management determine whether the chosen version suits long-term use. Also check the route for delivery and assembly, access through the door, clear maintenance space and possible service routes. The position must work not only for plants, but also for assembly, cleaning and later servicing.
Heat in sunny positions
A south- or west-facing greenhouse may warm rapidly during a bright Irish summer day. Specify its glass, ventilation and shade after observing sunlight at the chosen location. Track shadows cast by trees and buildings over several hours too: morning shelter does not rule out a long period of strong afternoon sun.
As warm air rises, the roof ventilators provide an escape route. Keep tall crops, racks and climbing supports clear of that route. Opening the entrance for a short interval can add airflow in very warm conditions, but regular observation of both the internal temperature and plant response remains essential.
Reserve solar-control glazing for elevations that receive sustained intense sun; adjustable shade offers a response that can change with the season. Let crop requirements guide the decision, since seedlings, fruiting crops and container plants kept over winter need different light levels. Glass is a fixed choice, whereas removable shade preserves flexibility.
Frost and foundations
The integral aluminium base must rest on a flat, structurally sound foundation designed for the location. Product specifications state wind resistance up to 30 m/s and a snow load of 210 kg/m². Achieving those ratings depends on anchoring and assembly in accordance with the instructions; a competent assessment must still address the actual ground and site exposure.
Ground movement caused by frost may disturb the sliding door, frame geometry, panes and drainage. Have the foundation build-up selected for the soil at the property. Secure anchorage and consistent support across the entire base are crucial. Careful preparation is far easier than trying to realign a frame already placed under strain.
Agree the excavation depth, drainage detail and completed installation level before work starts. Include the proposed interior finish and its meeting point with the doorway. Doing so prevents surprise changes in level and carries water clear of the structure. Later alterations to ground height may compromise access, door travel or connected services.
Screening beside a home or terrace
Opaque panels obscure chiefly the area nearest the floor; taller contents can still be seen through the glass above. Plan around what sits behind the panel line and which plants, shelving or tools extend beyond it. Use the actual viewing angles from windows, terraces and regularly travelled garden routes to organise the space.
Keep everyday tools close to the entrance by arranging benches and stores without narrowing circulation. A working area may be moved to an elevation less prominent from the main viewpoint, provided its plants still get suitable illumination. This approach preserves efficient movement while presenting a calmer view from outside.
Plants beside the structure can visually connect it with the wider garden. Leave enough separation to reach the gutters, glass and aluminium panels for washing and repair. When choosing those plants, allow for their mature spread and height rather than judging clearance by their dimensions on planting day.
Collect and direct rainwater
Built-in gutters can feed collected rainfall towards storage or a drainage outlet. Route pipework and hoses away from the entrance, working routes and areas needed for future attention. Position any tank on secure support, with convenient access and a direct, uncomplicated connection back to the plants.
For one of the larger greenhouses, a rainwater vessel sized to the project may be worthwhile. Work out capacity from the roof catchment, rainfall at the property, room for a tank and expected irrigation demand. Include spare capacity and a managed overflow for periods when rainfall is frequent.
Send overflow safely beyond the base without creating standing water or washing out adjoining ground. Keep downpipes, joints and clearing points within reach throughout the year. Filters or guards that intercept leaves may reduce maintenance effort, although they still require routine checking and emptying.
Plants and interior
Thoughtful zoning supports easier plant care, effective air movement and future reconfiguration. Map immovable elements first—the entrance, ventilators and water point—then arrange circulation, the work station and pot positions around them. Avoid layouts in which furniture hides fittings or takes away room needed for safe movement.
Plan the interior
Opaque base panels make a restrained setting for raised beds, work benches and storage. Since lateral daylight is reduced close to the panel line, place smaller high-light plants farther inward or raise them. Large pots require firm, stable support together with a surface that either contains irrigation water or carries it to a suitable outlet.
Preserve a central route wide enough for irrigation work, repotting and moving trays. Drawing the room to scale makes bench dimensions, turning room and circulation widths easier to test. Include doors in their open position, shelf projections and plants at maturity, rather than assessing movement only in an unfurnished structure.
Nothing in the planting or furniture arrangement should impede ventilators, the entrance or panes requiring washing. Maintain a gap behind shelving placed near a wall to discourage trapped moisture. Keep frame members, panels and fasteners in view and within reach, enabling prompt investigation of changes and uncomplicated cleaning.
Tall crops
Tomatoes, climbers and substantial specimen plants can occupy the generous glazed height. Plan their final dimensions and training system before assigning positions. Fit ties or supports solely to points confirmed as suitable for that purpose; glass, ventilator frames and operating hardware must never carry the plants.
Choose positions for tall planting by considering incoming light and how air travels towards the high-level ventilators. Prevent large leaves from casting persistent shade over shorter crops. Relocating pots between seasons can accommodate successive crops and changing cultivation plans without rebuilding permanent features.
Keep vigorous plants clear of the entrance, ventilators and all operating hardware. Comfortable working routes allow tying, side-shoot removal and harvesting with less risk to tender growth. Maintain a gap between broad foliage and the panes so cleaning remains possible and wet leaves are not held continuously against the glass.
Automatic ventilation
Automatic roof controls respond as the greenhouse becomes warmer, reducing the need for someone to adjust ventilation throughout each day. They are helpful during unattended hours, but do not remove the need for checks. Changing sunlight, seasonal conditions and increasing foliage all alter the amount of airflow required.
Reliable ventilation depends on unimpeded travel of every roof vent. Train climbing shoots, cords and suspended items away from both the pane and its operating hardware. If severe conditions are forecast, use the manufacturer’s instructions to determine how the vents should be operated and secured.
Provide a safe route to the roof controls and vents for routine examination, washing and upkeep. Clear debris or encroaching growth before it begins to restrict travel. Give these fittings particular attention ahead of prolonged hot spells and again while preparing the greenhouse for winter.
Set glazing for each surface separately
Begin by assigning one leading purpose to each glazed section. Solar-control glass can moderate an intensely sunny elevation; matt white material screens views, while a self-cleaning finish may reduce exterior washing. Mirrored glass has a pronounced visual effect outdoors. Select by the conditions and task of the surface, rather than forcing visual uniformity.
Create a labelled drawing that identifies the chosen material at every side and roof position. Use it to verify that areas receiving strong sun, prominent views or awkward maintenance access have the intended treatment before placing the order. This record also removes ambiguity when agreeing the completed specification.
Study the meeting lines between glass finishes from the main windows and garden viewpoints. A combination chosen for practical reasons can vary visually as reflections and surroundings change. Sketching each elevation gives you a chance to reconcile screening, heat management and appearance before approving the final arrangement.
Coordinate permanent decisions
Sequence fixed choices according to what they control. First establish the foundation level and greenhouse alignment; next settle the doorway and principal approach; then use the glazing plan to organise crop zones. Only after that should rainwater and irrigation pipework be routed, avoiding the agreed circulation and working spaces.
Floor and work surface
A durable floor simplifies routine irrigation, repotting and wash-down. Specify its finish and drainage for the activities planned: stable footing matters at a bench, while areas receiving frequent water need an intentional discharge route. The chosen material should retain grip while damp and tolerate suitable gentle cleaning products.
Possible internal finishes include paving, gravel and other materials appropriate to greenhouse use. Relate the finished level to both the foundation and doorway, providing durable support and dependable runoff. Loose aggregate must stay clear of sliding-door tracks. For a fixed surface, determine gradients and junction levels before erection.
Set the completed floor level before adding fixed benches, shelving or irrigation. Consider how it will be cleaned, whether services pass underneath and the height at which tasks will be comfortable. Increasing the level later can obstruct the doorway or lower panels; setting it too low can produce awkward steps and hollows where water gathers.
Watering
On a large Prestige, a deliberate water layout keeps pipe runs direct and circulation uncluttered. Decide in advance where the supply enters, how it divides and where it can be isolated during winter. Keep pipes out of principal routes and washing zones. Independent controls for separate crop areas accommodate varying irrigation demands.
A drip system delivers moisture at each plant without trailing loose hoses across circulation areas. Adjust emitter positions and operating periods for the crop, container volume and time of year. Inspect outlets and joints routinely: finding a blockage or leak promptly protects the planting and prevents water spreading unnoticed across the floor.
Locate filters, isolation valves and connectors where they can be operated, cleaned and protected in cold weather. Arrange indoor and outdoor pipe runs logically, allowing the source of a problem to be traced. Empty or insulate water-filled components before freezing conditions according to their design, and eliminate hidden pockets in which water might remain.
Maintenance access
The glass, gutters, entrance, ventilators and lower panels all require periodic observation and washing. Preserve working access on every side. Select soft implements and gentle cleaners compatible with each finish; abrasive products may mark aluminium and coatings or scratch the glazing.
Do not let dense hedging, walls or permanent furniture prevent approach to exterior faces and operating parts. Nearby vegetation needs enough room for pruning without putting the panes at risk. Sensible separation also improves access when clearing gutters, reviewing anchors and removing accumulated foliage around the bottom edge.
Reserve a continuous maintenance route, even if it is narrow, and keep it firm underfoot and free from stored items. Test the route on the site drawing, especially along elevations turned towards a boundary or out of view from the home. Otherwise, dirt, growth and minor defects in those locations may go unnoticed.
Future flexibility
A greenhouse may serve different collections and activities as time passes. Leave a flexible section without permanently installed furniture. It could later hold substantial planters, extra propagation benches or temporary chairs, and the same open area provides useful manoeuvring room whenever more involved maintenance is required.
Prestige may initially be used for vegetables and later accommodate citrus, ornamental plants or a seating area. With such a change, light, temperature and watering need to be adjusted to the new use. The basic construction should therefore meet the most likely long-term need, not only one season.
Select wheels or furniture glides that are compatible with the proposed floor when using movable benches, racks and pots. Provide a means of preventing accidental rolling. Designate a place for items when they are moved aside, ensuring that this temporary position leaves circulation, the entrance and all glazing accessible.
Before ordering
Settle the base, aspect and glazing specification before purchase
Before purchase, confirm the footprint, delivery access, relevant clearances, foundation extent and whether the proposal needs planning permission or qualifies for an exemption in the Republic of Ireland. Ask the relevant local planning authority when the position is uncertain. Measure entrances, gates and constricted routes to ensure every component can reach the erection area.
On the site drawing, show where the most intense sunshine arrives and identify elevations towards neighbouring property, the terrace and occupied rooms. Add tree canopies, eaves and other sources of shade. Use this information to decide ventilation, screening and glass types, then plot the doorway and principal approach before fixing the orientation.
Complete the firm, accurately levelled support and decide the rainwater destination before erection. Recheck dimensions, diagonals, finished levels and service points before assembling any frame members. Maintain an uncluttered working zone so long profiles and panes can be carried safely, without repeated moves or accidental contact with hard objects.
Plan further with Bloomcabin
Explore greenhouse selection, ordering, warranty and product information
Frequently asked questions
Bloomcabin Prestige Premium Greenhouse: common queries answered
How do I select a suitable model size?
Start by mapping circulation, beds and benches, allowing for each crop at maturity. Next assess the footprint available, the width of each model and its entrance arrangement. The result should be a greenhouse that occupies the site comfortably while providing genuinely workable room for plants and everyday tasks.
What clearance is needed on each side of the greenhouse?
There is no single clearance suitable for every property without considering the site and erection method. Reserve a walkable route around all elevations so panes, guttering, joints and anchors can be reached. The entrance also needs a clear working zone for convenient passage and for carrying pots or trays.
How does base cladding affect planting?
Opaque lower panels limit lateral daylight close to the perimeter. Raise small plants that demand bright conditions or set them farther towards the centre. Benches, substantial pots and practical work zones generally sit well against the screened section.
Should glazing for each side be decided before ordering?
Yes. Assess direct sun, privacy, crop requirements and the practical washing route at each side and overhead position. Replacing structural panes afterwards takes considerable work, so record and approve the complete combination before purchase.
Can roof and walls have different glazing?
Yes. During specification, choose the material for the overhead and vertical sections independently. This allows a bright roof to be paired with extra screening or reduced solar gain on one selected elevation.
When does a double sliding door make sense?
Choose a double sliding entrance if broad trays, machinery or substantial containers will pass through it frequently. Confirm that its wider opening aligns properly with circulation, bench positions and all other planned zones inside the greenhouse.
Are automatic roof openers necessary?
No. Hand-operated fittings are supplied as standard. Temperature-responsive controls are optional and may help when strong sunshine raises internal heat quickly or when the greenhouse is unattended for part of the day.
Which documents should I keep?
Retain the order record, product literature and erection instructions. They document essential details for the foundation, assembly, operation and upkeep, and provide a useful reference if maintenance or support is required later.
Bloomcabin Prestige Premium Greenhouse
Build a Prestige Premium specification around your garden
Begin with the model dimensions and entrance arrangement appropriate to the project. Specify the glass separately across overhead and vertical areas, then choose the frame finish and additional equipment. Before submitting the order, compare the whole configuration with the foundation drawing, approach to the entrance and planned routes for water or other services.
Pre-order checklist
✓ verify footprint and space for maintenance
✓ confirm the site and important viewpoints
✓ decide roof and wall glazing
✓ coordinate frame colour with house and garden
✓ map doors, ventilators and rainwater drainage
✓ check foundation dimensions and final build height
