
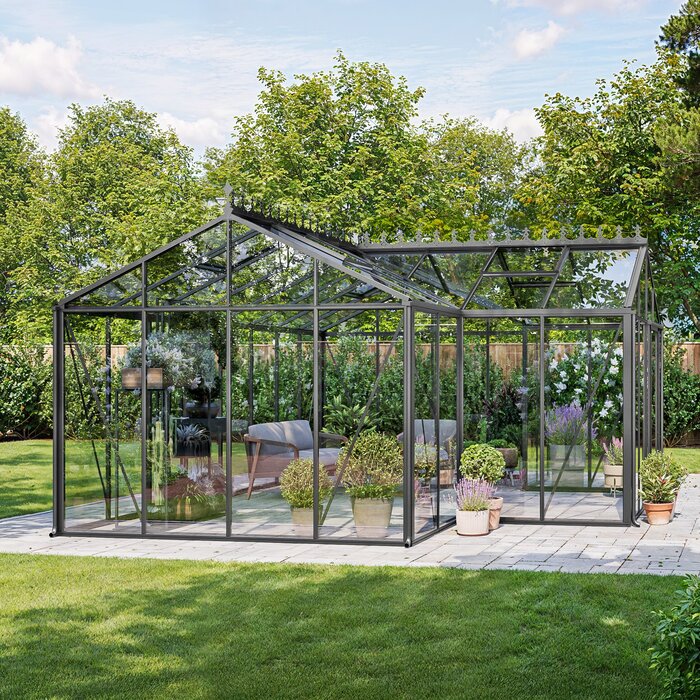







Bloomcabin T Model – greenhouse with a T plan
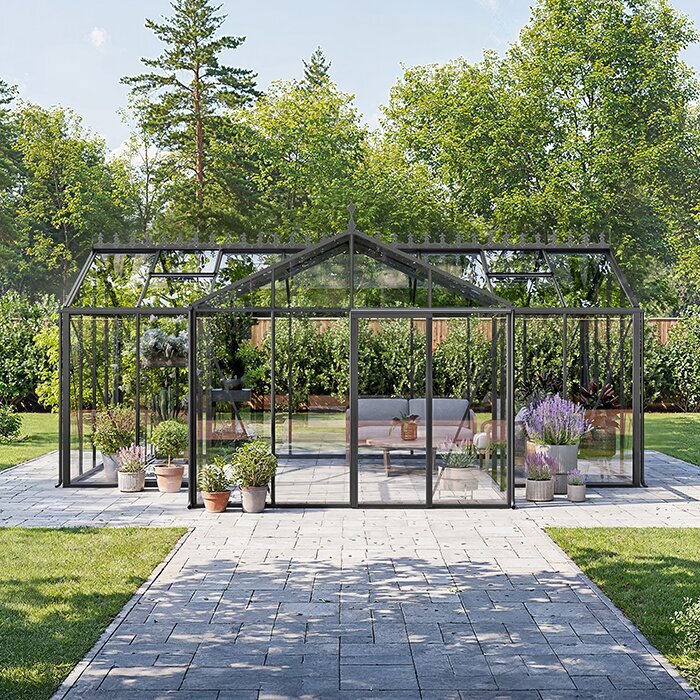
A T-plan Bloomcabin orangery, organised into dedicated growing and leisure spaces
The Bloomcabin T Model greenhouse works well in gardens where cultivation and leisure need defined places beneath the same roof. The side-to-side wing creates a useful hub within the long structure. Benches, crops and tools stay in the working section, leaving the wider wing available for dining, seating or creative work.
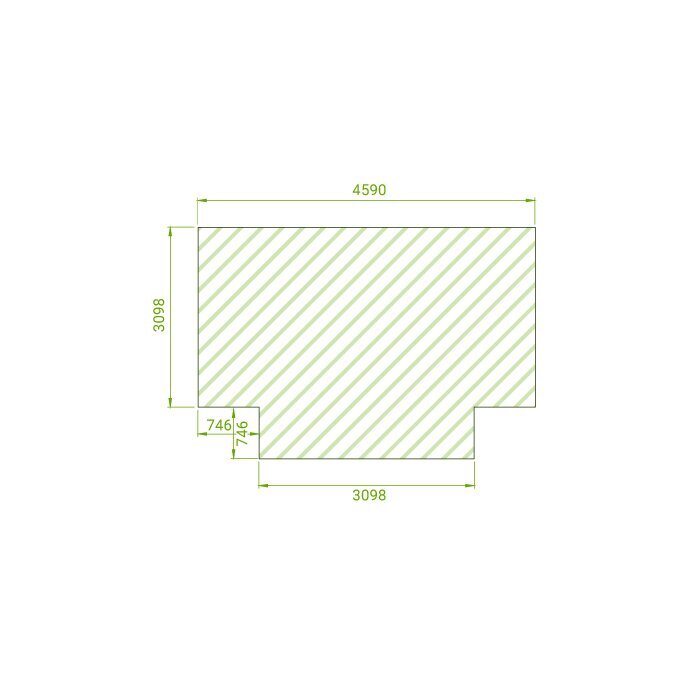
There are three configurations, covering approximately 16.5 to 30.0 m². The structure is 310 cm wide overall, with a ridge height of about 267 cm and doors 185 cm high, providing substantially more space than a small hobby greenhouse.
Look beyond the available garden footprint when choosing: allow for circulation, the sun’s course, the foundation, drainage and service connections. Decide early what each wing will do. A mainly horticultural layout has different demands for access, airflow and water than an orangery used for meals, reading or work. Resolving the floor plan first makes every later decision clearer. More information from Bloomcabin for Ireland.
The distinctive T-shaped plan
How the T shape simplifies furnishing
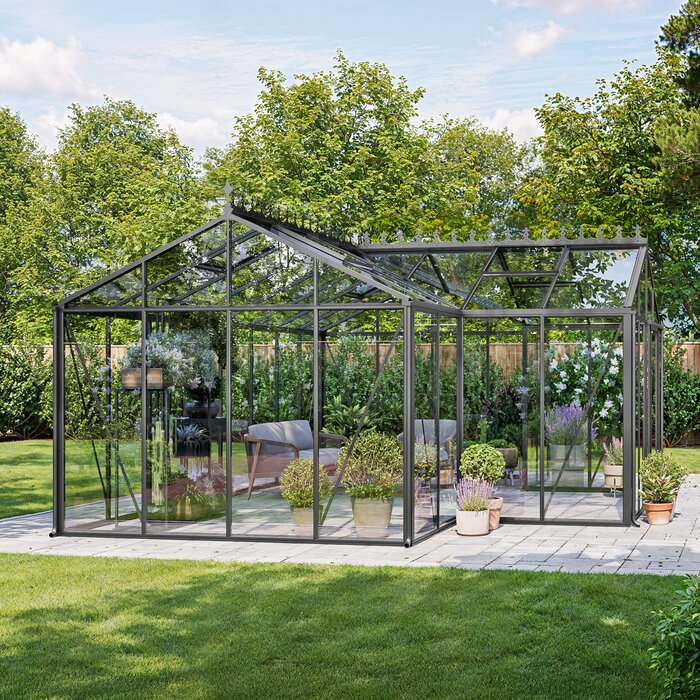
A standard rectangular greenhouse usually places its crops, benches and paths along one length. Here, a transverse wing intersects the longer section and forms a central hub. Although no partition separates the spaces, the architecture gives each one a recognisable role. Growing and leisure can therefore sit beneath the same glazing without requiring an internal dividing wall.
Use the longer section for orderly lines of crops, seed benches, shelves and plants needing extra headroom. The broader wing can take a table, moveable chairs, statement pots or a studio bench. Leave the intersection uncluttered so chairs, trays and watering cans travel comfortably between the doorway, cultivation section and sitting place.
Because the zones are open to each other, the interior feels generous and the planting remains in sight from the seats.
Three configurations
Three configurations of approximately 16.5 to 30.0 m²
Aluminium and safety glass
Aluminium frame with 4 mm toughened safety glass
Generous internal height
310 cm overall width, 267 cm ridge height and 185 cm door height
Configurable individually
RAL colour choices, roof ventilation, sliding-door options and provision for an optional flue
Two connected zones
Give each connected section a role that reflects how you will use it
Plant-growing area
Long benches, propagation space and collections sit naturally in the main section. Grouping crops by care requirements simplifies watering and routine inspection. Reserve prominent, convenient positions for vulnerable specimens or plants chosen as decorative features.
Train tall vegetables and climbers away from the central junction, doorways and roof ventilation. Shorter crops belong nearer the benches, while weighty pots need an accessible permanent position from the beginning. Planning for mature growth now prevents plants from constricting circulation or covering ventilation openings later.
A modest clear surface near the junction is useful for short-term tasks. Baskets, trays and watering items may rest here briefly, rather than spreading into the dining or sitting section as permanent clutter. Keep the actual crossing point open.
Orangery and seating space
Let the intended activity determine the cross-wing layout. Dining chairs need room to slide back, a reading chair belongs away from through traffic, and studio work requires convenient surfaces for making and storing materials. Moveable furniture keeps the arrangement adaptable when seasonal planting or extra visitors call for more space.
A few substantial pots can give the seating space a composed border, avoiding the visual clutter of many small floor-level containers. Select furniture, upholstery and fabrics that tolerate greenhouse fluctuations in warmth and humidity.
There is no need for partitions: carefully placed furniture and containers can signal where one zone ends and another begins. This also makes seasonal rearrangement straightforward as activities or planting change.
Construction
Aluminium frame, 4 mm safety glass and integrated gutters
The aluminium framework does not require recurring protective painting. Transparent glazing preserves views of the planting and highlights the openness created by the intersecting wings. Account for sloping roof lines, structural profiles and door movement when arranging the interior, using the usable floor area rather than the nominal outline.
The selected configuration may have one sliding door or a paired set. Door location shapes entry, regular movement and ventilation between the garden, cultivation section and wider wing. Warm air can leave through the roof vents. Roof runoff enters built-in gutters, and an aluminium base frame forms the junction with the prepared support below.
A flue provision can be specified for heating that is designed as a separate project. First establish whether heat is intended only to safeguard tender plants or occasionally make the seating zone more comfortable. Each objective calls for different controls, distribution, airflow and energy provision. A competent professional must design the appliance and its installation; the flue provision does not do that work.
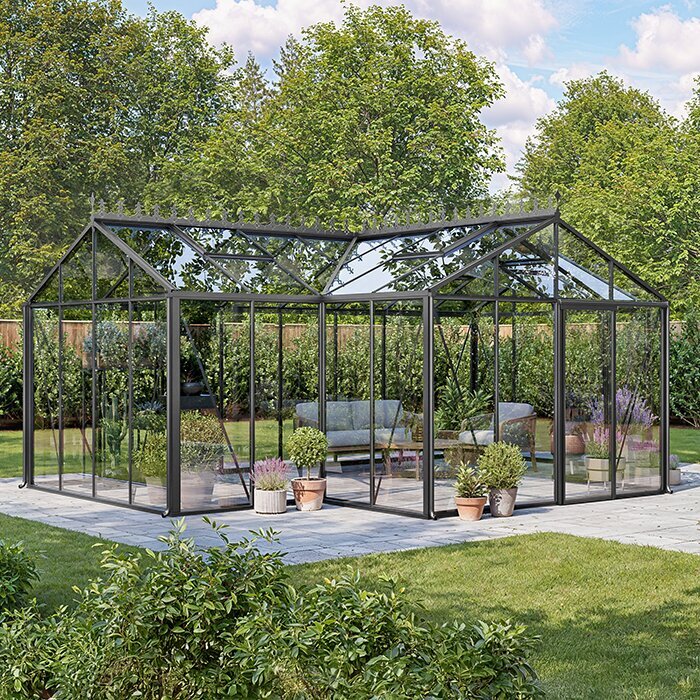
Product details
Key specifications for the T Model
Sizes
Three configurations
approx. 16.5–30.0 m²
Width
310 cm
Stated overall model width
Height
267 cm ridge height
Door height 185 cm
Glazing
4 mm toughened safety glass
Included with the model
Doors
One sliding door or a double set
According to selected version
Features
Aluminium base frame, roof ventilators and rain gutters
Optional flue provision; 12-year structural warranty; design ratings of 30 m/s for wind and 210 kg/m² for snow loading
Four possible uses
What can you do with a T-plan greenhouse?
01
Growing in the main body
Arrange vegetables, herbs, young plants, collections and long benches down the extended section. An uncluttered middle aisle supports planting, tending and picking while activities in the cross wing continue undisturbed. Store everyday tools in compact cupboards beside the bench, rather than leaving them exposed around the central hub.
02
Welcoming guests and dining together
Dedicate the wider wing to conversation or meals and reserve most of the long section for cultivation. This keeps visitors apart from seed trays and working equipment without losing the garden setting: the connected interior still gives seated guests a view of the plants.
03
Bright studio
Daylight supports painting, reading, photography and concentrated tasks, although glare and indoor warmth will shift as the sun moves. Moveable desks and adjustable shade let the setup follow the hour and season while preserving access to the central aisle and roof ventilation.
04
Greenhouse for plant collections
Display citrus, flowering specimens, climbers and ornamental pots on several levels. Consider mature dimensions, weight and the room needed to tend each plant. Since large containers become awkward to relocate, keep them away from doorways, drains and any fitting that needs access for inspection or cleaning.
Location and climate
Consider the T-plan, movement of the sun, eventual furniture and service requirements together. On an Irish site, also note exposure to Atlantic winds and local drainage. A sketch recording orientation, nearby buildings, trees, entrances and existing services will reveal likely shade, runoff routes and whether the proposed doorway is practical.
Sun-exposed southern and western aspects
Clear weather can raise temperatures quickly where the orangery has a sunny southern or western aspect. Do not assess only the long wing’s orientation: one part of the T may be illuminated while the intersecting section shades another. Watch the proposed position from morning to evening, noting the effect of surrounding buildings and trees.
Opening doors and roof ventilators helps only if air has an unobstructed route across the greenhouse. Closely packed shelving, cupboards and rows of tall plants may interrupt circulation. Use lower planting beside the principal air routes, and set taller growth back from openings and operating mechanisms.
Adjustable shade is particularly useful when the broad wing is chiefly a work or sitting zone. Move it to the part currently exposed and alter it as seasonal light and crop needs shift. Do not cover the roof-vent controls, and preserve ventilation through every shaded section.
Frost and foundation
Setting out an intersecting plan takes greater care than marking a rectangle: levels, centre lines and angles all need accurate transfer to the ground. Have the foundation specified for the site’s soil, drainage and local frost exposure. Made-up, soft or inconsistently bearing ground may settle unevenly, disturbing the frame, glazing and movement of the doors.
Correctly installing the aluminium base frame depends on a flat, square support built to the specified dimensions. Before erection, verify the outside measurements, diagonals and exact placement of the cross wing. Alterations are much harder after glazing is installed. Coordinate the finished floor with the threshold level and drainage arrangement too.
Prevent rainfall or overland flow from ponding beside the support or across an entrance. Set gradients and outlets to carry runoff away from the greenhouse. Where paving surrounds the orangery, allow for intense rainfall as well, avoiding any depression immediately beside the aluminium base.
Near a terrace and home
Near the house, the wider wing may create a welcoming transition into the garden. Before settling the position, study roof runoff, shade and the routes people use most often. The shortest approach is convenient, but it should avoid vulnerable crops, and opened doors should never project across a principal garden route.
Position the entrance, table and larger plants so the orangery also looks balanced from frequently used rooms and routes around the house.
Place practical propagation and potting functions farther along the extended wing, allowing the part seen from the house to retain a quieter, ordered appearance.
Interior and equipment
Begin by assigning the through route, bench zone and place for seating. Fit planting, furnishings and services around those priorities so everyday activities can proceed without conflict.
Plan heating for the intended use
The flue option provides only one element of heating that needs its own design. Choice of system will reflect the plants, months of operation and target temperatures. A competent specialist must assess the appliance, clearances, exhaust route, combustion-air supply and controls. Never place a portable heater among crowded foliage or furniture without checking its safe use.
Protecting plants from freezing is not the same as maintaining comfort through long winter visits. The first calls for a reliable lower temperature limit; the second also needs warmth distributed around the sitting position. Extensive glazing follows outdoor temperatures and solar input far more closely than an insulated room, so agree realistic comfort and running expectations before equipment is specified.
Place controls and shut-off points where they can be reached readily, without encroaching on the worktop or crossing.
Evening use
Include evening lighting in the initial layout of seating, benches and service points.
A focused lamp over the table is often preferable to flooding the whole structure with bright light. Add separate task lighting at potting or plant-care stations. Every fitting must be suitable for the moisture expected in its precise position. Route cables away from feet, door travel and ventilator controls.
Installing switches, sockets and wiring before the final floor goes down allows a tidy arrangement aligned with the eventual benches and seats.
Clear routes in the T plan
Movement between the long section and its cross wing converges at their intersection. Do not let broad tables, pots, shelving or parked tools squeeze this point. Allow enough width for people to pass each other, including when one person is seated or carrying out watering.
Test the route against real actions, not an empty floor plan. Chairs slide backwards, cabinet doors swing out and trays may be carried sideways; bags and watering cans also need somewhere to pause. Preserve access to doors, ventilator gear and inspection points. Drawing furniture at scale exposes these conflicts before weighty items are positioned.
Give particular protection to the doorway approaches and the intersection itself, ensuring entry and movement remain comfortable.
Designed for everyday use
Assign a home to routine tools, growing supplies and cleaning materials. Even at busy times, this keeps benches usable and leaves doors and inspection points approachable.
Plan furniture to scale
Allow circulation behind every chair and around the seating when all places are occupied. Show chairs both tucked under and drawn back from the table. Studio layouts must also accommodate body movement and materials. Lightweight or folding pieces help the cross wing alternate through the year between leisure, workspace and winter plant accommodation.
Rather than defaulting to the biggest option, select the configuration that properly accommodates mature planting, furnishings and the circulation you require.
Reserve a temporary bench or clear surface for harvesting, repotting and routine care instead of occupying the entire interior with pots and furniture.
Plan services early
Coordinate water, power, lighting and any heating route before completing the base and finished floor. Establish the regular watering, working and sitting positions first. Locating water beside crops reduces hose and watering-can travel; sockets near the seats avoid extension leads crossing circulation. Keep switches and isolators readily approachable.
Have a Registered Electrical Contractor assess fixed electrical work and confirm what completion certification is required. Use a competent heating specialist for the heating installation. Both can determine suitable routes, protection and components for the location. Position and seal floor or foundation penetrations ahead of erection; drilling through fitted parts later may harm finishes, drainage or structural performance.
Keep an accurate record of concealed service routes and sealed openings so future work can locate them without guesswork.
Rainwater
Provide a defined discharge route for every built-in gutter. Subject to the site, roof water may feed an appropriate infiltration area or a storage vessel. Keep pipework open to inspection and discharge away from busy walking or working positions. Design access so blossom, leaves and deposits can be cleared without shifting heavy pots or furniture.
Stored roof water is useful for many greenhouse crops. The vessel needs secure inflow, a managed overflow and access for washing out. Send excess water away from the supporting structure. A full store must continue to discharge safely during an extended absence rather than spilling beside the base or across paths.
Position the store outside main routes; short distances to the plant zone make everyday use easier.
Maintenance access
Preserve access to the glass, ventilators, gutters, door gear and framework joints for inspection and washing. Avoid dense permanent planting against the outside walls. Tasks near roof level require stable access equipment standing on sound ground. Never step on panes, guttering or structural parts that are not designed as a working platform.
Indoors, leave a modest gap between weighty furniture or pots and the glazing or profiles. It will be easier to clear debris and inspect seals and connections. Remove grit, compost and foliage from the door rails to maintain smooth travel. Arrange prompt professional examination if glass or fixings show an unusual change.
Clutter and dirt are particularly disruptive where the two wings intersect. Make that busy junction a specific part of routine housekeeping and inspection.
Planning for every season
Keeping the T Model useful through the seasons
High-level ventilators release heated, moisture-laden air, while door openings may bring cooler air into the lower interior. Start summer ventilation before indoor heat becomes excessive. After watering, suitable circulation reduces prolonged moisture on foliage and limits condensation. Solar shade lowers heat input, but it cannot serve as a substitute for fresh-air movement.
The optional flue provision can support heating designed under a separate plan. It does not turn the T Model into an insulated room: this is still a glass garden structure, and cold zones may develop beside the panes. Choose crops, furniture and equipment for fluctuating conditions, with seasonal changes in use forming the most practical expectation.
Comfort depends on weather, sunlight, crop density, airflow, shade and any heating provided. Ireland’s generally cool, windy winters and comparatively mild summers still vary greatly by site and year. Spring sunshine may warm the orangery by day before a cold night; summer calls for heat removal, while autumn brings shorter days and condensation. Use a thermometer and observation to adjust care and ventilation.
Plan the interior first
Choose the right size from furniture, routes and growing space
Sketch the intersecting floor plan before choosing a configuration, adding the entrance, circulation, tables, chairs, containers and benches. Show door movement, roof-vent operating access and the strips needed for care and cleaning. Insert measured furniture dimensions, not estimates. The drawing will reveal whether the wider wing performs its intended role while retaining a useful continuous growing zone along the main section.
Use the same drawing to test whether fully grown plants might interfere with openings, benches or sightlines from the chairs.
Add the proposed water, electrical and heating entries before construction of the support and finished internal surface.
Site preparation
Preparing the site, access route and working area for a T Model
Finish and inspect the supporting base before erection starts. Preparation also extends to the area immediately around it: provide firm footing for workers, a dry and orderly place for components, and adequate room to operate along every elevation.
Walk the complete route from the public road to the build position. Tight gateways, gradients, steps, low branches and vulnerable landscaping may complicate the movement of long profiles or fragile glazing. At the destination, reserve flat ground for sorting parts and panes in installation order. Because the plan projects in several directions, cramped boundaries and dense planting can seriously restrict working access.
Although supplied in kit form, this large glazed model represents a demanding erection project. Study the whole manual and identify every part before work begins. Support the glass correctly and restrain it from falling. Aligning the frame, handling large panes and working overhead call for enough helpers, suitable protective gear and settled weather. If specialist help is needed, enquire about installer availability, location, timing and price.
Continue planning with Bloomcabin
More information on choosing, ordering and warranty terms
Frequently asked questions
T Model questions and answers
How is the T Model arranged?
A long greenhouse section and a projecting transverse wing form the T Model. Their intersection acts as the natural centre, and the two parts communicate openly without a permanent partition. Compared with a simple rectangle, the plan gives cultivation and sitting or studio activity more clearly recognisable territories.
What is a practical way to allocate the two wings?
Put propagation, benches and other growing work along the extended section. Use the broader wing for a table, chairs or studio activities. Treat the intersection as circulation space rather than a permanent store.
Which configuration will work for my garden?
Available ground area is only the starting point. Make a scaled drawing showing furniture, mature crops, benches and circulation. Select the option in which both wings perform their intended jobs while door movement and roof ventilation remain unrestricted.
Where should large plant containers go?
Assign heavy pots an accessible long-term position at the beginning. Keep door operation, ventilation, drainage and inspection points unobstructed. A modest gap beside glazing and framework also simplifies washing and examination.
How should the support for the T plan be prepared?
Build a flat, square support to the specified dimensions. Verify the outer measurements, diagonals and cross-wing location before erection. Professional design must also account for ground conditions, frost exposure and disposal of surface runoff.
Can guests use the T Model comfortably?
Yes. Dining, conversation or studio activity can occupy the wider wing. Draw furnishings at scale, protect the route through the centre, and provide appropriate shade and ventilation. Remember that its interior behaves like a glass greenhouse, not a thermally insulated living room.
Is roof ventilation included?
Yes. High-level vents are supplied to help warmed air leave. Coordinating them with suitable door openings can establish useful circulation, provided shelves, furniture and plants are kept away from both the airflow route and operating controls.
Can the greenhouse be heated?
Yes. Heating may be designed around the optional flue provision. The appropriate system will reflect the crops, required frost protection and expected length of occupancy. A competent specialist must handle design, connection and operating advice; specifying the flue provision does not supply a functioning heater.
What needs checking before the delivery arrives?
Survey access from the road for restricted widths, gates, gradients, steps and overhanging branches. Prepare a flat, dry holding place where glazing and profiles can be sorted safely and restrained from falling. The erection team will also need clear working room around every projecting side of the footprint.
Bloomcabin T Model overview
Coordinate intended use and specification before placing an order
Before ordering, clarify the model configuration, equipment and local conditions. The following checklist helps you review outstanding decisions about the plot, interior, delivery and services.
Pre-order checklist
✓ Select a configuration that fits the site, planting and planned activities
✓ Plot the main section, cross wing, furnishings, plants and unobstructed routes to scale
✓ Inspect delivery access, component storage and working clearance around each required side
✓ Prepare a level, accurate base suited to local soil and frost conditions
✓ Coordinate the RAL colour, doors and roof ventilation with access, layout and airflow
✓ Arrange professional planning of water, power, roof drainage and possible heating before base and floor construction
