
Botrytis in a greenhouse: remove the opportunity for grey mould.
Greenhouse health / United Kingdom
Botrytis in a greenhouse: remove the opportunity for grey mould.
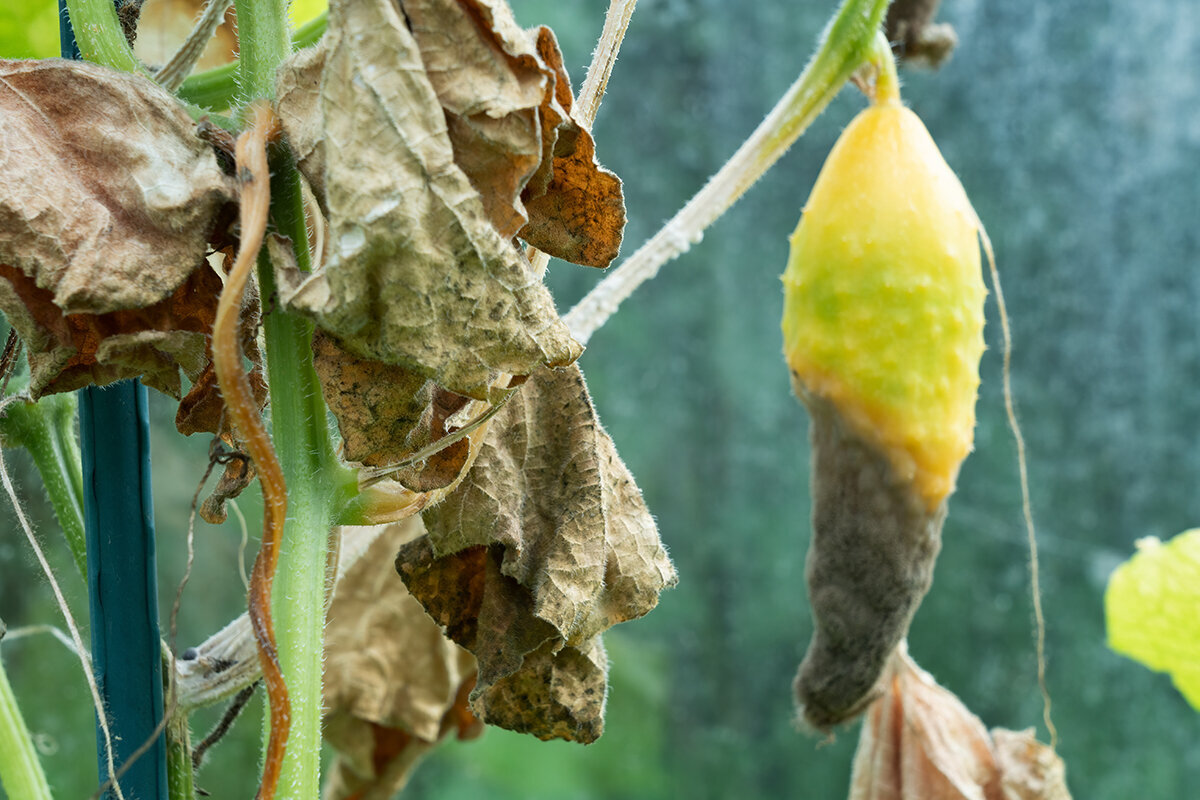
Grey mould is rarely random. It exploits a spent petal held against a leaf, bruised fruit, a pruning wound that remains damp or a crowded canopy cooling into condensation after a still British evening.
Botrytis cinerea is widespread, and its familiar fuzzy grey-brown sporulation can develop quickly where susceptible tissue meets prolonged surface moisture. The useful response is not panic or improvised spraying. Identify the affected tissue, contain and remove it, help the greenhouse dry, then protect healthy growth through sanitation, spacing and an appropriate climate routine.
Tonight’s principle: Leave nothing dead, damaged or wet pressed into the crop as the greenhouse cools.
First response / act quietly before debating the diagnosis
Move quietly. Remove deliberately.
A fuzzy patch does not always prove Botrytis, but classic grey spores, soft collapse or an advancing lesion deserve careful handling. Shaking a plant, deadheading briskly, carrying an open trug or spraying with a hose can disturb spores and move contaminated material farther through the greenhouse.
- 01
Pause routine crop work.
Do not prune, harvest, tie in or brush through neighbouring plants until the suspect area is contained. - 02
Bag at the plant.
Bring a bag beside the plant before cutting. Enclose affected material rather than carrying exposed clippings through the crop. - 03
Cut beyond obvious damage.
Use clean, sharp snips; remove the affected flower, fruit or leaf and any visibly collapsing tissue attached to it. - 04
Read the whole greenhouse.
Check for condensation, wet foliage, stagnant corners, touching leaves and fallen material beneath benches and pots.
For a considered structure that supports straightforward access, inspection and daily ventilation, see Bloomcabin’s Classic Aluminium Greenhouse. The aim is a working house you can inspect closely, clean efficiently and ventilate without rearranging the crop whenever conditions change.
Recognition / not every mould is Botrytis
Read the pattern before choosing a response.
Grey mould commonly appears as dusty grey to grey-brown fuzzy growth on infected flowers, leaves, stems or fruit. However, ordinary ageing, other surface moulds, cold injury and root-related decline can all appear alarming from a distance. Examine the tissue, its position and the conditions inside the greenhouse during the preceding days.
More consistent with grey mould
Look for fine grey-brown sporulation on soft or dead tissue, blighted flowers, or brown lesions expanding from a wound, retained petal or damaged fruit. Stem lesions may begin where a clip, leaf or fading flower has remained damp against the plant.
Grey spores are a strong clue, particularly when symptoms begin on ageing tissue after humid conditions. They should still be considered alongside the crop, lesion and recent greenhouse climate.
Collapse without visible fuzz
Brown, water-soaked or softened tissue can appear before obvious sporulation. It may also reflect another rot, physical damage, chilling or root trouble. Check whether decline begins at the crown, roots, leaf margin, fruit scar or a single wound before treating a visual impression as certainty.
For recurrent losses in edible crops, valuable collections, seedlings or plants with rapidly advancing stem lesions, isolate suspect material and seek a sound professional diagnosis.
Ordinary senescence
A dry finished flower or yellowing lower leaf is not automatically infected. It becomes an opportunity for Botrytis when trapped in a shaded, wet canopy or held against fruit, stems and healthy foliage.
The practical distinction is simple: remove dry ageing tissue during routine grooming; contain and carefully remove suspicious, soft or fuzzy tissue as sanitation.
Plant opportunity map — these are risk sites, not proof of infection.
1 / Spent flowers Fading petals can retain moisture against young fruit, leaves, stems and flower joints.
2 / Leaf contact Crowded leaves form shaded seams that cool slowly and dry poorly after watering.
3 / Pruning wounds Fresh cuts need clean handling and time to dry, not prolonged overnight dampness.
4 / Fruit scars Cracks, bruises, retained flower parts and other damage create vulnerable points in humid conditions.
5 / Fallen debris Leaves, petals and deteriorating fruit beneath pots or benches can support the fungus close to healthy growth.
6 / Stem lesions Inspect brown or softened lesions around wounds, clips and dying leaves before they advance.
Why the fungus gets in
Botrytis favours the places an attentive gardener already knows to inspect.
Botrytis readily colonises ageing, injured and dying plant tissue. That does not make it harmless. Once established on a dead flower, wounded stem or soft fruit, its spores can be disturbed by air movement, splashing water, hands, clothing and tools, placing nearby susceptible tissue under further pressure.
In a home greenhouse, risk sites are often visible before disease develops. Tomatoes collect petals around leaf axils and trusses; broad cucumber leaves can press together; flowering ornamentals retain spent blooms; strawberries may hold petals and ripening fruit within one damp pocket. These details create opportunities for infection, not an inevitable outbreak.
- Inspect after cool, cloudy weather. The greenhouse may feel comfortable at noon even though foliage remained damp from dusk until well into the morning.
- Handle healthy, dry plants first. Leave the suspect area until last, then clean tools and hands before returning to unaffected plants.
- Keep floors and bench lines visible. Clear surfaces make fallen petals, leaves and deteriorating fruit difficult to overlook.
The decisive interval / evening to dry leaf
Humidity matters. Surface wetness tells the clearer story.
Relative humidity is a useful signal, but it is not the complete diagnosis. Risk rises when leaves, flowers and stems remain wet as their surfaces cool. Condensation on greenhouse glazing is therefore more than a cosmetic issue: it reveals a moisture and temperature pattern worth correcting, especially when the crop itself is wet at dawn.
Late afternoon
Sunset
Night
Early morning
After sunrise
Water with time to dry
Finish watering early enough for splashes, compost surfaces and pathways to dry before temperatures fall. Direct water towards the root zone rather than foliage.
Temperature falls
Glazing, foliage and the structure cool. Dense canopies and enclosed corners tend to lose useful airflow first.
Condensation risk rises
Moist air meets cooler surfaces. Leaves and flowers can become wet even without visible dripping or an exceptional daytime humidity reading.
Break the wet period
Use measured ventilation, circulation and suitable heat where appropriate, always respecting the crop and outside conditions, so surfaces begin drying.
Verify, then reset
Inspect inner foliage rather than glazing alone. Persistent dampness calls for changes to spacing, watering time, airflow or the heat-and-vent balance.
There is no single number of wet hours that predicts infection across every crop, temperature and plant condition. Use the clock as a management habit instead: avoid creating a long, cool, wet period around vulnerable tissue. Preventing condensation on plant surfaces is a central part of greenhouse Botrytis management.
A greenhouse with accessible roof ventilation provides a stronger foundation for a responsive daily climate routine. The Classic Aluminium Greenhouse offers a considered basis for planning roof ventilation, access and a growing layout that can be adjusted as British weather changes.
Spacing
Create air corridors, not decorative gaps.
Space pots and growing containers so foliage does not remain permanently interlocked. Train tomatoes and cucumbers promptly, remove appropriate leaves resting against wet surfaces, and create room around flowering plants before their canopies close. Gentle air circulation may reduce stagnant pockets, but it should not direct a harsh, continuous draught at one plant.
Irrigation
Water the roots and protect the evening.
Direct irrigation towards the compost or growing medium and minimise unnecessary leaf wetness. Earlier watering gives accidental splashes time to dry; late watering can turn minor moisture into an overnight problem. During a still, overcast week, do not automatically follow the same watering rhythm used during bright, warm weather. Check the compost and crop first.
Pruning
Work cleanly while the crop is dry.
Prune, pinch out and harvest when foliage is dry, using clean tools and avoiding unnecessary wounds. Remove finished flowers and yellowing leaves before undertaking larger shaping work. When moving through several groups, begin with healthy plants and finish in the area where disease is suspected, cleaning equipment afterwards.
Seasonal shift
Expect pressure when light and drying power fall.
In Britain, changeable spring and autumn weather can make a greenhouse seem mild while surfaces remain damp for hours. Still, cloudy nights are particularly revealing. Summer may demand shading and generous ventilation, whereas cooler seasons require a measured balance of air exchange and suitable warmth to avoid stagnant moisture without chilling tender crops.
For practical climate and layout planning, consider Bloomcabin’s Classic Aluminium Greenhouse, including how ventilation, access and usable working space can support a calmer daily care routine.
Sanitation / the route matters
Do not carry the problem through the crop.
Removal works best when suspect tissue is contained from the moment it is found. Think of the route as a short, one-way corridor from plant to closed waste, rather than a tour around the greenhouse with diseased clippings exposed in an open trug.
Dead flowers, infected leaves and spoiled fruit should not remain beneath staging, beside the door or in an open compost caddy near the crop. While deteriorating, they can continue to provide food and shelter for the fungus.
At plant→
Cut→
Contain→
Exit→
Reset
At the plant
Bring a bag or closable container to the affected plant before making the cut.
This limits handling and stops loose tissue brushing against healthy leaves and fruit.
The cut
Remove soft, diseased or visibly sporulating tissue using clean, sharp snips.
A deliberate cut is easier to inspect and avoids creating a larger torn wound.
Containment
Place removed material directly into the bag and close it before leaving the area.
Do not shake it, leave it on a bench or transport it in an uncovered harvest basket.
Exit
Take the closed waste out promptly and use the appropriate local household-waste route.
Do not create a decaying waste pile immediately beside greenhouse doors, windows or vents.
Reset
Remove visible residue from tools, then clean and disinfect them according to the disinfectant label. Allow equipment to dry and wash your hands before touching healthy plants.
Physical cleaning comes first; disinfectant cannot work properly through plant fragments and clinging organic residue.
Make containment part of weekly care rather than reserving it for an outbreak. Clear benches, accessible paths and durable working surfaces make a greenhouse easier to inspect and maintain. Consider Bloomcabin’s Classic Aluminium Greenhouse when planning a structure around the way you actually grow, ventilate, inspect and clean.
Treatment / prevention after correction
Products cannot replace a dry, clean and well-managed greenhouse.
When Botrytis is active, begin by removing infected tissue and correcting the conditions that allowed it to progress. For UK home gardeners, physical removal, sanitation, ventilation, crop spacing and moisture management form the centre of the response. No treatment can restore plant material that has already softened, collapsed or been colonised.
Work order A
Use cultural control as the first response.
- Remove spent flowers, infected fruit, dead leaves and greenhouse debris promptly.
- Reduce surface wetness through earlier watering, suitable ventilation, appropriate warmth and gentle air movement.
- Increase spacing and open wet, compressed pockets within the canopy.
- Inspect neighbouring plants, contact points, pot rims and the bench below.
Work order B
Treat every product decision as crop- and label-specific.
- The RHS advises home gardeners that no fungicides are approved for use against grey mould.
- Never improvise with agricultural or professional products, homemade mixtures or outdated recommendations found online.
- For commercial protected crops, check current authorisation, crop, timing, application, resistance-management and worker-safety requirements.
- Use only a product explicitly authorised for the crop, protected situation and intended user category.
Biological options are specific, preventative and label-led.
Commercial protected-crop programmes may use biological controls as one component of integrated management. Their suitability depends on the exact product, crop, timing, environmental conditions and current authorisation. They generally cannot compensate for infected debris, wet foliage or poor spacing, and they do not repair colonised tissue. Home gardeners should not assume that a biological description makes a product authorised or suitable for every edible or ornamental crop.
Professional fungicides require a planned programme, not a reflex.
Where authorised products are used in commercial production, selection must account for the exact crop, protected situation, disease risk, label and resistance-management requirements. Botrytis management should never involve improvised mixtures, off-label rates or agricultural products repurposed for a home greenhouse. Current HSE information and the product label, rather than an old list or informal recommendation, must guide any legal product decision.
UK authorisation rule: For a home greenhouse, use only products currently authorised for the crop, situation and user category, and follow the complete label. Check HSE information before purchase or use. Directions governing application, protective measures, ventilation and harvest restrictions must not be guessed or borrowed from another crop or product.
If you are planning a new growing space, consider how vent access, glazing, paths and room around staging work together. The Classic Aluminium Greenhouse provides a design-conscious starting point for a greenhouse routine centred on ventilation, accessibility and orderly crop care.
Recovery / verify rather than hope
A greenhouse is recovering when susceptible new growth remains clean, plants dry reliably after watering and work surfaces stay free from dropped petals, leaves and fruit.
For the next 72 hours
Inspect the original site and adjacent plants each day, preferably including an early-morning check. Remove new suspect tissue promptly and examine leaf undersides, flower joints and the interior of dense growth rather than only the outward-facing leaves.
For the next week
Record when condensation appears and when the crop becomes dry. If dampness regularly persists into the morning, alter one practical variable: watering time, spacing, airflow or the measured balance between ventilation and suitable warmth.
Before the next crop cycle
Remove all old crop remains, wash reusable pots and benches, sweep beneath staging and inspect corners where leaves gather. Decide spacing and ventilation before young plants fill the greenhouse.
For an orderly structure that supports seasonal greenhouse maintenance, review the Bloomcabin Classic Aluminium Greenhouse. A simple, repeatable routine is usually more valuable than a complicated response used only after disease appears.
FAQ
Questions gardeners ask when grey mould appears.
Can I save a plant affected by Botrytis grey mould?
Often, yes, when infection is limited and addressed early. Carefully remove affected tissue, clear the immediate area, improve drying and monitor neighbouring growth. If the crown or main stem is extensively soft, several areas are affected or removal would leave little healthy plant, taking out the whole plant may better protect nearby crops. Infected tissue itself will not recover.
Will lowering humidity alone prevent Botrytis?
No. Lower humidity can help, but surface wetness, condensation, poor airflow, dead flowers, wounds, crowded foliage and debris also matter. The practical objective is to prevent vulnerable plant surfaces from remaining cool and wet for prolonged periods, particularly overnight.
Should I spray plants to wash grey mould away?
No. Washing can disturb spores and prolong leaf wetness. Contain and remove affected material instead, then correct watering, spacing and ventilation. For UK home gardeners, the RHS advises that no fungicides are approved for use against grey mould, so do not improvise with unapproved treatments.
Can infected greenhouse debris go on my compost heap?
For a small home greenhouse, it is safer to contain visibly sporulating material and remove it through the appropriate local waste route than to carry it uncovered to an open compost heap. The immediate priority is preventing exposed infected tissue from travelling through the greenhouse or remaining close to doors and vents.
Why does grey mould appear after a cold night without watering?
As temperatures fall, foliage and glazing can cool enough for moisture from greenhouse air to condense on leaves, flowers and stems. Watering is therefore not the only source of wetness. Inspect within the canopy at dawn and adjust spacing, ventilation, watering timing, circulation and suitable heat without exposing tender plants to a harsh cold draught.
Sources & further reading
Authoritative guidance for diagnosis and crop-specific decisions.
Botrytis management depends on plant species, growing conditions, weather and, where relevant, the exact authorised product label. These UK and international horticultural resources provide sound starting points for diagnosis, prevention and current product decisions.
More from Bloomcabin: custom aluminium greenhouses · aluminium greenhouse FAQ · UK greenhouse collection
- Royal Horticultural Society — Grey mould guidance
- HSE — information on authorised pesticide products
- HSE — GB pesticide approvals register
- Cornell Greenhouse Horticulture — Botrytis blight factsheet
- University of California IPM — Gray mould management
- Royal Horticultural Society — grey mould control
- HSE — authorised pesticide product information
Before nightfall
Clear vulnerable tissue before dusk.
One of the most refined greenhouse habits is also among the most effective: finish the day with the crop dry, its structure open enough for air to move and no ageing material waiting to become tomorrow’s grey mould.
Classic Aluminium Greenhouse- 01
Lift spent blooms.
Remove fading flowers and fallen petals before they settle into foliage, calyces or fruit trusses. - 02
Check damp interior growth.
Look within dense canopies, beneath leaves and beside glazing, not only along the central path. - 03
Restore some breathing room.
Separate touching pots, train growth appropriately and keep access routes clear for inspection and air movement. - 04
Take contained waste outside.
Close the bag, remove suspect material promptly and leave no exposed pile of diseased debris in or beside the greenhouse.
