
Can You Collect Pergola Rainwater in a Garden Tank?
Pergola rainwater collection
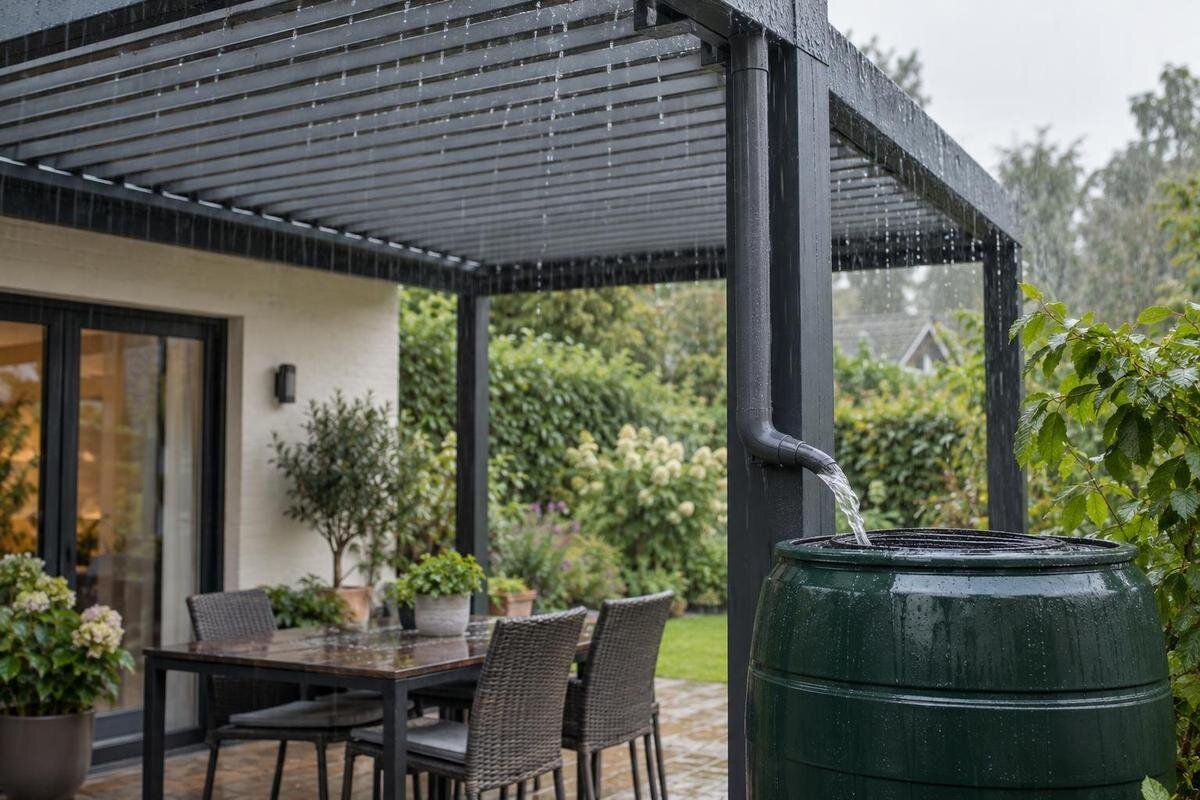
Rainwater from a pergola can be collected in a garden tank, but only if the drainage outlet and tank inlet can be connected without restricting the pergola’s intended water route. Before choosing a tank, trace where runoff leaves the roof, check the approved fittings, decide what the water will be used for and give excess water a suitable destination when the tank is full.
When pergola runoff can feed a garden tank
Yes, runoff from a pergola can in principle be stored in a garden tank or water butt. The essential requirement is a defined drainage route that carries rain to an outlet, plus a connection the pergola manufacturer allows. A drip at a roof edge is not proof that a hose can be attached: the exit may need to remain open, form part of a particular drainage arrangement, or differ between models and installations. Collection is practical only when water reaches a known point in a predictable way. The volume is limited to rain that actually reaches that outlet, rather than every drop falling on or around the structure.
Treat rainwater collection as an addition to the pergola’s drainage design, not a replacement for it. Water may miss the intended route, particularly when roof positions or wind direction change, and a drainage diagram does not mean the structure is watertight in every condition. Weather information, operating instructions and drainage details answer different questions: how rain is managed, when the roof may be operated and where water exits. If a tank connection is not shown or described, do not drill, seal or redirect parts to create one. Ask whether an approved adaptor or a separate collection method is available.
Follow the drainage route to its outlet
Trace the water from the collecting surface to the point where it leaves the pergola. Use the model’s assembly drawing or drainage diagram to identify any channel, internal route, downpipe or outlet; the outside appearance alone may not show where water flows. Note which side or corner the outlet serves and whether the installation orientation affects its position. If the roof can be adjusted, check whether different permitted positions direct water to the same outlet. These details help you decide where a tank could stand and whether a connection route is practical before you choose storage.
Record the exact model and configuration when asking for guidance. For the Bloomcabin Lean-To Pergola, request the drainage drawing for the version you are considering and mark the outlet positions on your garden plan. If there are several outlets, establish which collecting area feeds each one: a tank at one corner may not receive runoff from the whole roof. On an existing pergola, ask the installer to identify the outlets without removing covers or opening enclosed sections yourself. Note any paving, planting or access route between each outlet and the proposed tank position. This gives the installer a clear basis for assessing the connection, rather than just a photograph of the roof. A wall beside the structure is not necessarily part of its rainwater route, so do not assume nearby house gutters or downpipes serve the pergola.
Match the outlet to the tank inlet
Compatibility involves more than whether a hose appears to fit. Confirm the outlet’s shape and size, its direction, and whether the manufacturer specifies a particular spout, pipe, adaptor or open discharge. Then check that the tank inlet and the proposed route suit those details. A poorly matched connection can leak, spray or restrict the designed flow. Ask which components are approved and whether direct connection is permitted; do not drill into posts or channels, seal seams or rely on adhesive unless the instructions explicitly allow it.
Check that the roof outlet will still drain if a screen becomes blocked or the tank is already full. The pergola should not depend on the tank accepting every litre of incoming rain. When considering the Bloomcabin Pergola model, ask the supplier to identify the permitted connection components in its installation documents. Give the installer the tank’s inlet details as well as the outlet details, including their positions relative to one another. Physical fit alone does not establish that water can travel along the proposed route. A clear photograph can help explain the layout, but do not guess dimensions from an image. Also ask how the connection can be detached for tank maintenance while leaving the pergola able to drain normally. Agreeing this detail before purchase avoids a setup that works only while every component remains connected.
Estimate tank capacity from usable supply and demand
Tank capacity is a balance between how much water reaches the outlet, how much you can use and how much space you can allocate. Base an estimate on the effective collecting area shown in the drainage documents, not automatically on a pergola’s advertised footprint: some of that area may not drain to the outlet in a particular configuration. Combine the documented catchment information with local rainfall records and the pattern through the year. Allow for water that misses the route or is diverted by a filter. Published rainfall figures are useful planning inputs, not a promise about the next shower.
Estimate demand as well: consider how often you water, which parts of the garden need it and how long you want stored water to last between wet spells. Keep a simple record of the watering cans or other measured quantities you use over a representative period. Distinguish routine watering from occasional jobs, such as establishing new planting, which may not justify permanent extra storage. A large tank takes more space and may remain partly unused; a smaller one fills sooner and may overflow sooner if demand is low. For the Bloomcabin Bioclimatic Aluminum Pergola, use the actual drainage plan and intended roof setup to establish the effective catchment area. Compare likely supply and demand by season, since wet periods may not coincide with the greatest watering need. A rainwater specialist can assess that mismatch without treating annual rainfall as a dependable daily supply.

Give excess water a separate route
Plan what will happen when the tank reaches capacity before connecting the inlet. Further rain must be able to leave; otherwise it may spill around the lid or inlet, wet the tank base or back up into the connection. Check the tank manufacturer’s overflow instructions alongside the pergola drainage diagram, so the overflow arrangement suits the proposed feed and the roof can continue draining. A cap or shut-off valve does not remove the need for an overflow. Do not block the pergola outlet, narrow it with an improvised fitting or rely on the tank as the only exit for rain.
Choose an overflow destination that works with the actual ground around the tank. Persistent puddles, eroded soil, slippery paving or repeated wetting near a building can create avoidable problems. For the Bloomcabin wall-mounted model, include the wall, thresholds and nearby paving on the layout given to the installer, so the full-tank discharge can be assessed alongside the original outlet. Ask what happens if the overflow destination is temporarily unable to accept water, rather than considering only an empty tank in light rain. The route also needs to remain accessible for inspection; hiding it behind planting can make a developing blockage harder to notice. If it needs connection to a formal drainage system, ask a qualified drainage installer and check relevant local requirements. Do not assume that a convenient nearby drain is an appropriate destination.
Choose the intended use before collecting
Decide what the water is for before choosing the tank and any filters. Runoff from an exposed roof and drainage route is not automatically drinking water: leaves, dust, bird droppings or residues from cleaning may enter storage. Non-potable garden watering is a more straightforward intended use, but suitability still depends on the roof materials, maintenance history and the needs of the plants. Do not drink or cook with untreated pergola runoff. Drinking use requires a purpose-designed treatment and testing arrangement, not simply a covered tank or fine screen.
Other uses need their own assessment. If you intend to water edible crops, use the water in a spray system or direct it into a pond, check relevant guidance for that use and the materials in the collection route. Water that looks clear is not proof that it is suitable for every purpose. When reviewing the Bloomcabin Pergola product details, request material and cleaning guidance for the exact model. Include coatings, seals and any added collection fittings in that enquiry, rather than considering only the main roof surface. Check what the cleaning instructions say about rinsing and whether runoff should be kept out of storage during maintenance. Label the tank or tap as rainwater where it could be mistaken for a drinking-water supply. Keep its fittings distinct from drinking-water fittings; any proposed connection to household plumbing needs assessment by a qualified water professional.
Keep the inlet and storage clean and accessible
Keep screens and filters accessible so they can be inspected and cleaned without climbing onto the roof or dismantling the pergola. Leaves and grit at an inlet can affect flow, so fit a screen only if it is compatible with the outlet and does not constrict the drainage route. If you are considering a first-flush diverter, check that the pergola can feed it and that diverted water has a suitable destination. Such a device is not a treatment system and does not make collected water safe to drink.
Follow the tank maker’s instructions for its lid, inlet mesh and cleaning; how often attention is needed depends on local debris and the equipment fitted. Check that the overflow remains clear as part of routine care, and avoid cleaning agents entering stored water if it will be used for plants unless the products are compatible. Do not open sealed structural channels or alter the pergola to clear a collection system. If a component needs access beyond routine tank care, use the supplied instructions or ask the installer to maintain the original drainage route.
Roof position and wind affect collection
Collection can change with roof configuration and operation. If a pergola has moving panels or an opening roof, rain may pass through an open area rather than reach the perimeter drainage; different positions can therefore produce different amounts of runoff. Check the instructions to see which permitted positions direct water through the designed route and whether operation is limited in particular weather. Do not assume that closing a roof is required or suitable for every model. Base the collection plan on the instructions for the exact pergola, not on a general rule for adjustable roofs.
Wind can carry rain over edges or into areas that are not served by the outlet, so the stored yield may be lower than the apparent roof area suggests. For the bioclimatic model, request the relevant weather limits, operating instructions and drainage diagrams before choosing a collection setup. Where controlled observations are available, check which roof configuration and outlet arrangement they describe; a result from one setup is not a guarantee for every storm. Once an approved system is installed, a simple record of roof position, rainfall and tank level can help you understand its usefulness in your garden. Note any water drawn off during the same period, otherwise a falling level could be mistaken for poor collection. Observe from a safe position and do not operate the roof outside its instructions merely to increase the amount stored.

Choose a safe, practical tank location
Place the tank where the approved outlet can reach its inlet without an awkward improvised hose or a route that obstructs normal use of the garden. Keep the lid, tap, inlet and overflow accessible for inspection and cleaning. A full tank is much heavier than an empty one, so use a suitable ground-level base and get competent advice before placing a large tank on a raised deck, balcony or other structure. Do not hang a tank from pergola posts or attach it to the frame unless the model’s instructions expressly permit that arrangement.
Plan for everyday use as well as the inlet: leave room to place a watering can under the tap, reach the lid and inspect the overflow without moving the tank. Check that a hose, if used, will not trail across a doorway or regular walking route. The location of Bloomcabin’s lean-to pergola does not automatically make its wall, frame or nearby paving suitable for a filled tank; assess tank support separately from pergola support. Include the tank’s full external dimensions and any stand or fittings when checking the available space, not just its stated capacity. Follow the tank manufacturer’s instructions for support, stability and securing the lid, particularly where children can access it. If the ground is uneven or the overflow route is difficult, have an installer assess the location before choosing the tank.
What to confirm before ordering
Before buying a tank or connector, put the proposed arrangement into one set of notes: the exact pergola model, configuration, installation orientation, outlet details, tank inlet and intended water use. For the Bloomcabin Pergola listing, request the corresponding technical documents rather than treating the product photograph as a connection guide. Ask the pergola supplier to confirm which fittings are permitted and the tank supplier to confirm which inlet and overflow components are needed. Record who will supply each component, so an adaptor or screen is not assumed to be included by both parties. Keep unresolved details separate from confirmed specifications, especially if the installation layout is still changing. This makes it easier to compare tank options on genuine compatibility, usable storage and maintenance access rather than capacity alone.
Review the proposed arrangement on site: where the tank will stand, how its inlet connects, where excess water goes when it is full and how the pergola’s original drainage remains unobstructed. Ask the installer to identify any required adaptor and explain the overflow route at handover. Keep the relevant instructions with the tank information so that later cleaning does not lead someone to cap or redirect an outlet. If direct connection is not supported, retain the intended pergola drainage and consider a separate collection system designed for a tank.
Frequently asked questions
Can I connect a water butt directly to a pergola outlet?
Only if the pergola instructions allow the connection and the outlet and tank inlet are compatible. Check the specified fittings and how the roof will drain when the tank is full. If the documentation does not describe a direct connection, do not force a hose onto the outlet or block it; ask the supplier or installer about an approved alternative.
How do I choose a tank size?
Compare the effective area that drains to the outlet with local rainfall information and the amount of water you expect to use. Account for seasonal changes and the space available for the tank. A product’s stated footprint does not necessarily equal its rainwater catchment area, so use the model’s drainage documents or ask a rainwater specialist to estimate supply.
Will a pergola tank collect water whenever it rains?
No. Some rain may miss the drainage route, and roof position, wind and the tank’s current fill level all affect what reaches storage. Follow the model’s operating instructions and base capacity expectations on the configuration that will actually be used, rather than assuming every shower will produce the same amount.
Can I drink water collected from a pergola?
Do not treat untreated pergola runoff as drinking water. Debris or material from the roof and drainage route may enter the tank, and clear-looking water is not proof that it is suitable to drink. Drinking use requires a purpose-designed treatment and testing arrangement; garden watering is a more straightforward non-potable use.
What happens when the tank is full?
Further rain needs a planned overflow route, and the pergola’s normal drainage must remain unobstructed. Check the tank instructions and the pergola drainage diagram together, then make sure excess water can leave without creating persistent puddles or wetting a building. Never assume that capping the inlet or outlet deals with overflow.
A pergola can feed a garden tank when its documented outlet arrangement and the tank’s inlet are compatible, and when excess water has a safe route away. The amount collected depends on the effective draining area, roof configuration and weather; the useful storage capacity also depends on how much water the garden uses. Match the tank to both supply and demand while keeping the pergola’s drainage unobstructed. If a direct connection is not supported, retain the designed outlet arrangement and consider a separate rainwater collection system.
