
Creating a Garden Courtyard Around a Pergola
Garden design guide
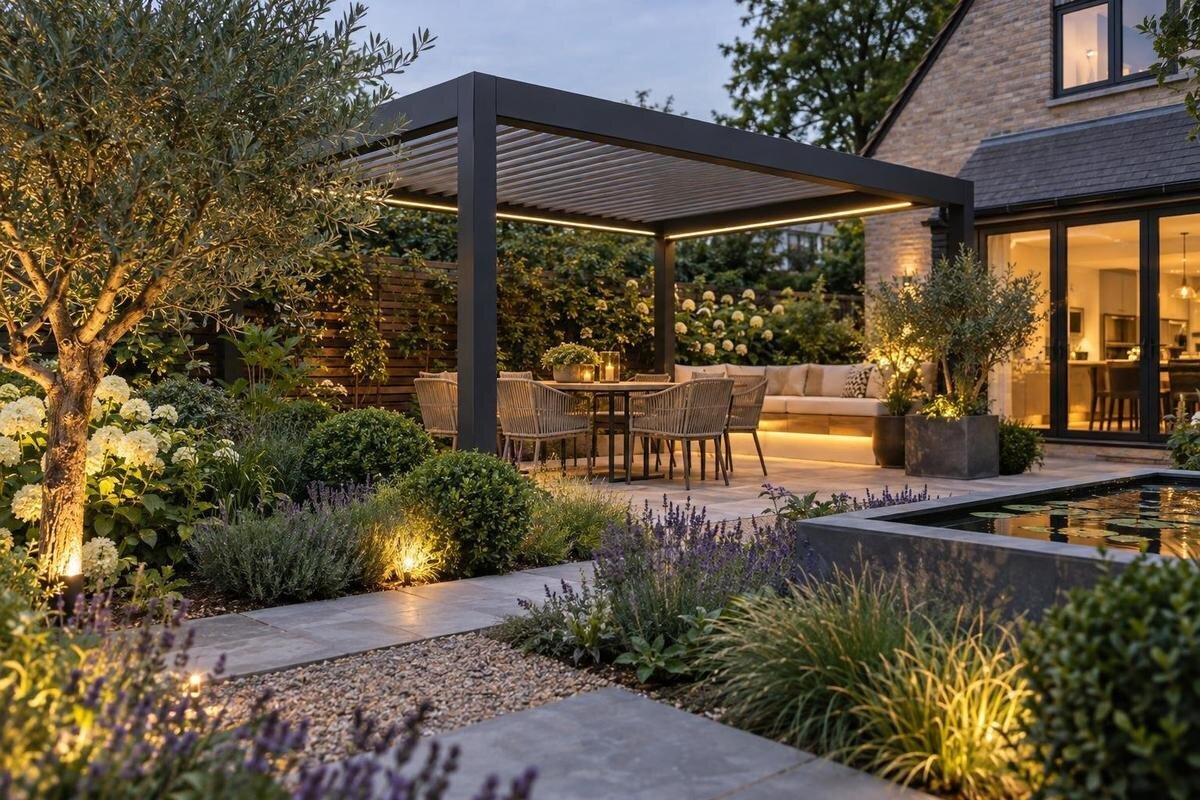
Plan a courtyard garden with a pergola from the outside in: map everyday routes and drainage, set the frame’s true footprint, then use paving, planting and selected boundaries to make an inviting outdoor room. The aim is a defined place to sit that remains practical to move through, connected to the rest of the garden and straightforward to maintain.

Survey existing garden routes and fixed features
Begin with a measured sketch of the garden as it is, before drawing a courtyard. Mark the house, doors and windows, boundaries, existing paving, lawn, mature trees, gates and changes in level. Add everyday features that a mood board can miss: a side passage, bins, washing line, tap, drain covers, steps and the route for carrying tools or moving a mower. Note which features are fixed and which could be moved, and show which door or gate is used most often. This base plan helps prevent the pergola or its surrounding beds from occupying a route or service point used every week.
Walk through the space at different times and note where people naturally enter, pause or cut across the lawn. Record the view from rooms that look onto the garden as well as from the proposed seating, and note whether doors or gates open into the intended area. After rain, record visible puddles and the apparent direction of surface flow, but treat these as observations for a landscape professional, not proof of where water can be discharged. Measure fixed features rather than relying on photographs alone. Dated images alongside dimensions and notes make the constraints clearer to a designer or installer. Distinguish everyday routes from occasional ones so the plan reflects how the garden is actually used.
Define the courtyard around the pergola
Draw the intended pergola over the measured survey, using the confirmed dimensions for the particular configuration under consideration. Show its outside footprint and the support positions given for that model, where applicable; do not draw only the roof outline. Keep the overall footprint separate from the clear area available for seating and movement, since supports and furniture affect how the space works. If the Bloomcabin Pergola is on your shortlist, request a dimensioned drawing before setting the courtyard edges. Compare the outline with the available ground area, leaving space outside the frame for the surrounding planting and paths rather than treating the pergola footprint as the entire courtyard.
Decide which elements will make the courtyard edge easy to read. A change from paving to planting, an existing wall, a low border or a view framed through an opening can distinguish the space from the rest of the lawn. You do not need to close every side: retain an obvious way in and a visual or physical connection to the garden. Mark where people approach, where the seats will face and which edges need more definition. Planning those relationships together makes it less likely that a later addition, such as a bench or a planted bed, will narrow the entrance or leave the pergola isolated in a large paved area.
Keep the main garden routes clear
Draw the principal path before adding secondary stepping stones. It should link places used regularly, such as the house, gate, shed, lawn or another seating area, without making people weave through furniture. Give the route a clear line and let the courtyard sit beside it, unless there is a good reason for the path to pass through. Where movement does pass through, include the space taken by open doors, gates, chair backs and items carried across the garden. A route that exists only as the gap left after furniture is placed is likely to feel improvised.
Separate a through-route from a path that ends at the pergola. The first should remain recognisable when the seats are occupied; the second can lead visitors to the seating without crossing its centre. If you are considering a wall-mounted layout, compare the Bloomcabin Lean-To Pergola with the space beside the house, using confirmed dimensions to position the route. Show how the door opens and where someone carrying a tray or garden tools would pass. Where paths meet, avoid placing pots or seating at the junction: keeping that point open makes both routes easier to follow. Retain a way to reach service areas, even if that route is visually secondary.
Coordinate paving with paths and thresholds
Paving gives the outdoor room a visual ground plane, so consider how it meets the paths and softer areas around it. One surface can make the courtyard read clearly; a restrained change of tone or laying direction can distinguish it from the main route without adding a physical barrier. Compare samples in the actual garden, where brickwork, house finishes and boundary colours all affect the result. When setting paving around a shortlisted model such as the Bloomcabin Bioclimatic Aluminum Pergola, compare confirmed dimensions and support positions with paving joints and borders. A product photograph is not a set-out drawing.
Plan junctions between paving, lawn and planted edges as carefully as the central area. Show where each surface ends, how its edge will be formed and whether an existing step or threshold affects the proposed finished level. Abrupt changes can catch a foot or chair, while a narrow strip left beside a border may be awkward to sweep. Include covers and access points rather than paving over them, and have proposed levels assessed on site. The landscape drawing should coordinate these details with drainage, especially where a paved area meets the house. Also consider how the chosen surface will be cleaned and whether its pattern makes the route easy to follow.

Plan drainage before fixing levels
Treat rainwater as a separate layer in the courtyard plan. Record downpipes, gullies, drain covers, visible low points and the direction water appears to travel after ordinary rainfall. New paving, an edging detail or a planted area may change the way water moves across the ground. A decorative gravel strip or a surface described as permeable does not, by itself, show that the whole layout has a suitable outlet. Include thresholds and existing drainage features so they are not overlooked when the design is viewed only from above. A pergola does not replace the need to understand how water moves across the site.
Ask a suitably qualified landscape professional to assess levels and the intended route for runoff before paving lines are fixed. The drawing should show how proposed surfaces relate to the house and boundaries, where water is expected to go and which drain covers need continued access. Do not guess at a slope or outlet from a sketch. If you are considering the wall-mounted Bloomcabin option, plot it alongside the wall, thresholds and downpipes; the product identity does not resolve drainage for the site. Keep runoff away from places where it could create standing water or affect neighbouring ground, and agree the proposed details on the site plan.
Choose planting for the courtyard edges
Planting can soften paving and help the courtyard feel settled, but plan it at its mature scale. Use the garden’s light, soil and exposure to guide plant selection, then check expected height, width and seasonal form rather than judging only by the size of a plant in a pot. Lower planting beside a path can preserve views; taller shrubs can give an edge more definition where there is room for growth and upkeep. A mix of forms may bring more depth than a dense line of identical plants, provided each has space to develop. Consider how the planting will look through the seasons, not just when it is first installed.
Keep beds clear of important routes, gates, support positions and places that need to remain accessible for inspection or cleaning. Allow for pruning, watering, leaf fall and access to drain covers as well as the plants’ eventual spread; a bed that looks generous on installation day can narrow a path once it fills out. If you choose the Bloomcabin Pergola model, use its confirmed support positions when setting out nearby beds. Draw mature plant widths on the plan so that overhanging growth is visible before planting begins. Ask for the light, soil and maintenance requirements of particular varieties to be documented, including how they will be reached without walking through the bed.
Use boundaries without closing off views
For privacy, begin by identifying a view that genuinely needs screening: perhaps a neighbouring window, a boundary facing the seating or a direct line from a gate. An existing fence, a partial screen or carefully placed planting may be enough. Screening every side can remove the outlook that helps the garden feel connected. Draw sightlines from a seated position and from inside the house, then decide where the courtyard should remain open. The opening does not have to face the main lawn; it should suit the way people arrive and the views they value.
Show screens, hedges and the pergola as separate elements on the plan, even when they sit close together. Their combined height and visual weight affect the feel of the space, and planting will change over time. Do not assume a screen, shade cloth or climbing plant can be fixed to a pergola: check the selected model’s information and ask the supplier or installer about any proposed attachment. If you are comparing the Bloomcabin bioclimatic pergola model, include the proposed screening in your enquiry. Mark both the length and height of each screen, including the opening beside it. Drawing boundaries separately makes it easier to adjust privacy without narrowing the entrance or losing a valued view.
Place seating without blocking circulation
Place seating where it supports the main use of the courtyard and leaves its approach clear. A bench can define an edge and loose chairs allow the layout to change, but either can become an obstacle if its footprint is shown only as a small symbol. Use the real width and depth of the furniture you are considering, and include room to sit down, stand up and move a chair. The aim is not to leave the whole courtyard empty; it is to avoid making the busiest route pass through occupied seating. Compare more than one arrangement on the plan before deciding where paving borders or planted edges should go.
Think about where the seats face as well as where they fit: a garden view, a quieter corner or the house may suit the intended use. Keep a clear connection between the entrance and seating, and avoid putting a side table, pot or spare chair in that line. If the Lean-To Pergola is on your shortlist, show the furniture and door positions on the same drawing, using the confirmed frame dimensions. Check the view at seated eye level; a boundary that looks unobtrusive when standing may dominate the outlook from a low chair. Leave access to drains, taps and planted edges so ordinary upkeep does not require moving the whole seating group.

Include lighting and maintenance access
Treat lighting as part of the garden layout rather than an afterthought. Mark where light would help people recognise a path, find the entrance or use the seating, and consider how it appears from the house and neighbouring windows. A location that illuminates a route need not be on the pergola itself. Distinguish lighting for movement from lighting intended to highlight planting, so decorative effects do not leave the entrance difficult to see. Plan positions before paving is installed so that work can be coordinated with the finished surface. Have a qualified electrician assess any proposed electrical installation and the suitability of fittings for their intended outdoor locations.
When the Bloomcabin bioclimatic option is under consideration, check the manufacturer’s information for any approved accessories rather than assuming that lights, cable routes or fixings are included. Also show the access needed to clean and maintain the space: reach drain covers, downpipes and the edges of paving, and leave room to tend plants. Consider where a hose will run and where tools can be put down during gardening without blocking the entrance. A narrow pocket between a screen and a bed may be hard to reach even if it looks tidy on a drawing. Keep such areas accessible or simplify their layout before the surrounding surfaces are installed.
Test the plan before work begins
Bring the layout together in a dimensioned landscape drawing. Show the chosen pergola configuration, its confirmed footprint and support positions, paths, seating, surface changes, boundaries, drainage features and planted areas. A written planting schedule should record the selected plants and their expected mature size, rather than leaving the final effect to guesswork. Include any levels or drainage details for review by a qualified professional, without trying to turn a concept sketch into an engineering specification. Keeping these decisions in one drawing makes it easier to spot a conflict between a path, bed, threshold or piece of furniture before it becomes part of the finished garden.
Before committing to hard landscaping, mark the proposed edges and paths temporarily on site and walk the routes you expect to use. Check the view from the house, approach the seating as you normally would, and see whether the proposed planting leaves access to the places that need it. Use chairs or cardboard outlines to test furniture positions rather than judging an empty marked rectangle. Revise the plan if a route feels indirect or an entrance seems pinched. Record outstanding decisions on the drawing, with responsibility for confirming each one: product dimensions with the supplier, installation details with the installer, and landscape levels with the relevant professional. This creates a clear brief for the work rather than leaving important junctions to be improvised.
Frequently asked questions
How do I make a pergola area feel like a courtyard?
Give the seating area a coherent ground surface and define some of its edges with planting, an existing boundary or a carefully placed screen. Repeating a paving material or planting group can tie those edges together. The pergola does not have to occupy the whole courtyard; space around it helps connect the frame with the surrounding landscape.
Should I plan the paving or the pergola first?
Survey routes and drainage first, then put the chosen pergola configuration on the measured plan before setting paving lines or levels. Coordinating the frame, paving and thresholds early helps avoid awkward joins and preserves access to doors, drains and garden paths.
How can I keep a pergola courtyard from feeling boxed in?
Use enclosure selectively. A planted edge, an existing wall or a short screen may provide definition without closing every side. Check views from the seats and the house, and leave a clear entrance that connects naturally with the rest of the garden.
How should I plan drainage around paving and planting?
Record existing downpipes, drains, covers, low points and visible water flow, then show proposed paving and beds on the same plan. Have a qualified landscape professional assess levels and the intended water route before work begins; a surface material alone cannot confirm that the whole layout will drain suitably.
Does a pergola have to be centred in the courtyard?
No. Its position should make sense with the routes, views and seating, while leaving enough room for the surrounding edges and access. A measured plan can show whether a central or offset position makes the courtyard easier to use and better connected to the garden.
A successful pergola courtyard combines a comfortable seating area with clear routes, well-placed planting and boundaries that preserve a worthwhile outlook. Its layout also accounts for rainwater and access to service points. With the frame and mature planting shown to scale, you can judge where enclosure adds privacy and where an opening keeps the space connected to the wider garden. The result should feel like a distinct outdoor room without making everyday movement or garden care more difficult.
