
Custom Windows and Doors: From Specification to Approval
UK windows and doors buying guide
A replacement project can lose time when the survey, opening preparation and window order are treated as separate jobs. A revised lintel can change an opening, added insulation can alter the reveal, and an attractive door arrangement can become awkward beside a step, path or kitchen unit. Custom windows and doors should therefore be specified as part of the retrofit sequence, not chosen from photographs and approved in isolation. The objective is a shared record showing where every unit belongs, which dimensions apply, how it opens, what glazing and finish it has, and which details still require confirmation. This guide follows the route from the first site brief to order approval, with practical checks for coordinating British homes, extensions and renovation work.
Begin with the construction sequence
Map the work around each opening before comparing products. For a retrofit, establish whether the old frames remain until delivery, whether reveals will be repaired and when external finishes or internal plastering will happen. On an extension, confirm the expected floor build-up, wall finish and stage at which new openings will be checked. Assign responsibility for the site dimensions, opening preparation, installation and finishing. This exposes dependencies early: a frame selected before the finished floor level is settled, for example, may leave the threshold interface unresolved. A simple programme covering survey, preparation, delivery, installation and making good gives each specification decision a practical context.
Create an elevation sheet and floor plan with a unique identifier for every unit, such as W01 or D01. Use the same labels on photographs, sketches, quotations and drawings. Mark where plaster, tile, cladding, paving or insulation meets the frame, and note anything that may restrict opening movement. Record access as well as the final position; a large glazed unit may suit the elevation but have no straightforward route through the property. This project record does not replace a professional site assessment. Where structural work, weathering details or wider project compliance are involved, ask the appropriately qualified professional to assess the particular design and site conditions.
Turn room use into an opening choice
Select window operation according to what happens around the opening. A sash behind a desk has different clearance needs from one above a clear floor area, while a high-level handle raises questions about comfortable reach. When considering a single-sash outward-opening side-hung window, draw the open sash on the plan rather than judging only its closed appearance. Check external paths, planting, taps and projections, then review curtains, blinds, window boards and furniture indoors. Record whether the window is intended for regular use or only occasional opening. That distinction helps prevent an operable design being placed where it is technically accessible but inconvenient in daily life.
Give each door a similarly specific brief. State whether it is a daily route, an occasional garden connection or a broad opening mainly used for entertaining. Note nearby rugs, furniture, changes in level and the space people need while carrying shopping or moving between rooms. Do not label it only as a garden door. Record whether one leaf will usually be used, whether both leaves need to open and whether the closed view is a central design consideration. These descriptions create tests for the proposed configuration: the chosen movement, handle position and panel arrangement should support the way the household expects to use the opening.
Opening and surrounding area
Measure conditions and define every dimension
Measure existing openings individually even when several appear identical. Record width and height at multiple positions, visible irregularity, reveal depth, surrounding finishes and any sill or threshold. Photograph the inside and outside, including pipes, cables, shutters or other obstacles. Keep these site observations separate from ordered dimensions. An existing structural opening, overall product dimension, finished reveal and visible glazed area are not interchangeable. Every figure should therefore carry a description of its reference points. If a quotation or drawing shows only width and height without explaining what they represent, obtain clarification before using those figures to coordinate building work.
Early dimensions can support budgeting and proportion studies, but mark them as provisional until the agreed site check has taken place. Special shapes require particularly clear geometry. A fixed triangular and angled window may suit an opening beneath a slope, but maximum width and height alone may not define its angles, orientation or reference lines. Ask which drawing records the final shape, who provides the dimensions and when they become ready for approval. Retain superseded sketches with their revision dates rather than silently overwriting them. A visible revision trail shows why a dimension changed and reduces the chance of an earlier sketch being mistaken for the current instruction.
Coordinate sightlines and opening layouts
Consider the view from inside alongside the composition of the exterior elevation. Identify important head and sill lines, then stand in the room to see where mullions or rails fall against furniture and principal views. A central division may balance the façade yet sit directly in front of a dining chair or kitchen workspace. Existing homes also present a choice between following irregular openings and aligning selected visual lines more deliberately. Neither response is automatically correct. Show the intended relationship on an elevation and discuss it with whoever is coordinating the renovation, rather than allowing separate product selections to determine the rhythm by accident.
Where daylight and an uninterrupted view matter but ventilation is available elsewhere, compare an opening design with a fixed non-opening window. Do not assume every pane must open, or that an opening sash can be inserted without affecting the overall composition. Its location changes handles, cleaning access, furnishing and visible frame lines. On grouped windows, identify each fixed pane and operable sash instead of using a general note such as ‘opening windows’. Request drawings at a scale where those differences are legible. The approval review should reveal exactly which parts move and how the divisions align, without relying on a generic product photograph.
Compare large doors through circulation
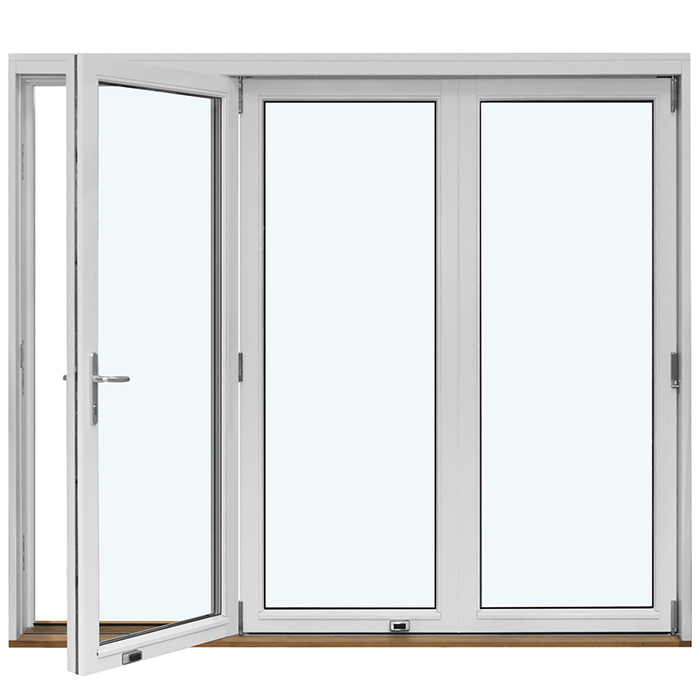
Large glazed openings should be assessed in both their closed and open states. With outward-opening bifold doors, establish the stacking side, projection of the open leaves and effect on the route between indoors and outside. Plot the movement against seating, planters, gates, steps and drainage covers. Inside, check whether furniture leaves a comfortable approach to the operating point. A configuration that creates a generous occasional opening may not provide the most convenient everyday route. Ask which panel is used first and consider how the room works when only that panel is open, rather than evaluating only the fully folded arrangement.
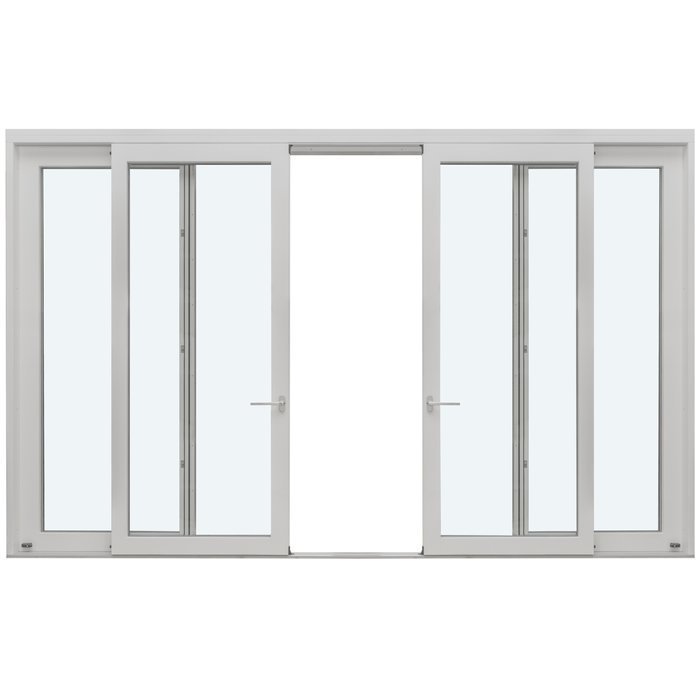
Sliding provides an alternative where hinged leaves would occupy useful space. For a Patio Life side-sliding patio door, identify the moving panel or panels, direction of travel and practical clear opening. Relate the meeting lines to the principal view and to features such as a table or kitchen island. A scaled furniture plan can expose conflicts that an elevation conceals, including an awkward approach to the handle. Record expectations for the threshold area and the intended internal and external finished levels. Give those notes to the installer or project professional so the frame, floor, paving and drainage interfaces can be coordinated rather than left as separate assumptions.
Remove ambiguity from handing and active leaves
Left and right can be interpreted differently unless the viewing side is stated. On each plan, name the viewpoint, show movement with an arrow and identify the handle side. For paired doors, label the active and secondary leaves and state whether both need to be opened regularly. A double-leaf inward-opening patio door defines the broad configuration, but the order still needs its exact handing and relationship to the room. Compare handles and open leaves with walls, kitchen units, curtain tracks and furniture. If a drawing symbol is unfamiliar, ask the supplier to define it in writing rather than relying on a verbal interpretation.
Test the proposed movement physically where possible. Tape a door arc on the floor, stand at the expected handle position and act out entering with bags, opening curtains or passing another person. For windows, consider handle reach and the space outside an opening sash. At an external door, include wet-weather use, footwear and the position in which someone stands while unlocking it. There is no universally correct opening direction; the objective is to match the stated use and actual clearances. Add a ‘handing confirmed’ field to the schedule so this decision receives a deliberate check instead of being lost among drawing notes.
Opening and surrounding area
Specify glazing pane by pane
Start glazing decisions with the location and required outcome. Record whether a pane faces a close neighbour, public route, garden, courtyard or busy street, then describe the priority: privacy with daylight, a clear view, reduced distraction at a workspace or visual consistency across an elevation. Different panes within one composition may need separate consideration. For example, a single-panel door sidelight is a distinct element beside the door and should not inherit a glass description merely because both appear under one opening reference. Tie every selected treatment to the relevant pane on the drawing or schedule.
Where appearance matters, review an appropriate sample and confirm which surface or pane receives the stated treatment. Think about the view from occupied rooms after dark as well as daylight reflections from outside. Avoid copying a shortened glass description across the schedule unless the same selection is genuinely intended everywhere. If the project has a performance target, safety-related glass requirement, acoustic objective or another technical constraint, state the need clearly and seek advice from the supplier and the qualified professional responsible for the wider design. Approval is the stage to resolve unfamiliar abbreviations rather than assume that similar wording always describes the same glazing construction.
Record colour, hardware and glazing bars precisely
A finish specification needs a location as well as a colour name. Record interior and exterior frame finishes separately where applicable, then list visible handles, hinges and other selected hardware. Review physical samples with the surrounding brick, render, planting and interior paint in mind, because context changes how a colour is perceived. State whether the aim is to match existing joinery or introduce a contrast. If heritage-inspired appearance is being considered, a heritage-style outward-opening double-leaf patio door is an alternative configuration, not proof that a particular finish or bar arrangement is included. Those selections still require their own written confirmation.
Use exact terminology for glazing bars. Decorative bars sit on the glass surface, while glass-dividing bars separate glazed sections; ‘bars’ alone does not identify the intended construction. Show the count and position of horizontal and vertical divisions, their alignment across neighbouring units and the side or sides to which any decorative treatment applies as described by the supplier. Use decorative bars, glass-dividing bars or without decorative bars consistently throughout the schedule. Review the pattern from the exterior and the principal indoor viewpoint. A grid that balances an elevation can still interrupt a valued view or align awkwardly with a worktop.
Reconcile the quotation, schedule and drawings
Assemble the latest quotation, order summary, elevations, plans and opening schedule into one review pack. Compare them by identifier rather than reading each document from beginning to end. For W01, check quantity, dimension reference, configuration, operation, handing, glazing, colour, bars, hardware and notes before moving to W02. Highlight discrepancies instead of mentally resolving them. A quotation may group several similar units under one line while the drawings show them separately; request clarification if that grouping hides a meaningful difference. Every opening should have a clear answer to two questions: what is being supplied, and where is that instruction recorded?
Look especially for omissions following late changes. A new frame colour may not have carried across to a sidelight, an amended handing may conflict with an old plan, or a bar pattern may appear only on the elevation. Establish which document controls each type of information and confirm that you hold the latest revision. Keep a query log showing the question, response and resulting document change. Also compare quantities with the physical building, including small fixed panes and paired units that can disappear within grouped descriptions. Plausible-looking paperwork is not enough; unresolved differences should receive an unambiguous written answer before approval.
Approve deliberately and hand over to site
Review the final confirmation alongside the marked drawings after all amendments have been issued. Check every opening ID, product type, defined dimensions, direction of operation, active leaves, glazing, finish, bar layout and listed accessory. Confirm that shaped units and other exceptions remain present. If something is undecided, ask how it will be treated rather than allowing an assumption into the approved order. Save the final files together with their dates and revision references, then circulate the same pack to the homeowner, installer and relevant project team. A single controlled set reduces the risk of an obsolete plan being used to prepare an opening.
After confirmation, turn the approved order into a site handover. Recheck delivery access, planned storage, protection of finished surfaces and the labels used to match units to openings. Delivery is typically 4–6 weeks, subject to order confirmation, so coordinate following trades only after discussing the timing that applies to the order. When the units arrive, compare labels, quantities and visible configurations with the approved schedule before installation progresses. Bloomcabin windows and doors have a 5-year warranty. Retain the confirmation, drawings and warranty information with the project records so the installed units can be traced back to the specification that was approved.
Frequently asked questions
What belongs in a custom window and door schedule?
Include a unique opening ID, room or elevation, quantity, stated dimension reference, configuration, operation, handing viewpoint, glazing, frame finish, hardware, decorative bars or glass-dividing bars, and drawing revision. Add notes for unusual interfaces. Each entry should be directly checkable against the quotation and final drawings.
Are opening measurements the same as ordered dimensions?
Not necessarily. Site measurements describe the existing or constructed opening, whereas an ordered product dimension describes the item being supplied. The documents must state the reference points clearly. Keep preliminary measurements separate from confirmed order dimensions, and establish who is responsible for checking the opening before installation.
How can I avoid approving the wrong door handing?
Use a plan and elevation together. State whether the view is from inside or outside, draw the movement, and identify active and secondary leaves. Test the swing against furniture, walls, paths and steps. Ask for unfamiliar drawing symbols to be explained before approval rather than relying on ‘left’ or ‘right’ alone.
How do decorative and glass-dividing bars differ?
Decorative bars sit on the glass surface, while glass-dividing bars separate glazed sections. Their construction and visual effect differ. Specify the intended type, then check the number, pattern, alignment and location on the relevant drawing. A general note saying only ‘bars’ is not sufficiently precise for approval.
When should I approve the order?
Approve only when the latest quotation, confirmation, drawings and opening schedule agree for every item. Resolve unclear dimensions, configurations, handing, glazing and finishes first. Once confirmed, delivery is typically 4–6 weeks, subject to order confirmation. Retain the approved revision and share it with the installer and project team.
What to do next
A dependable custom order is built through coordination rather than guesswork. Begin with the construction sequence and the way each opening will be used, then define dimensions, movement, glazing and appearance in a consistent schedule. Use drawings to verify details that words can obscure, particularly handing, active leaves, panel divisions and bar patterns. At approval, compare every document by opening ID and request written clarification of discrepancies. Passing the same controlled information to the people preparing and fitting the openings keeps site decisions connected to the choices that were actually approved.
