
Replacing Pergola Seals: Finding the Correct Profile
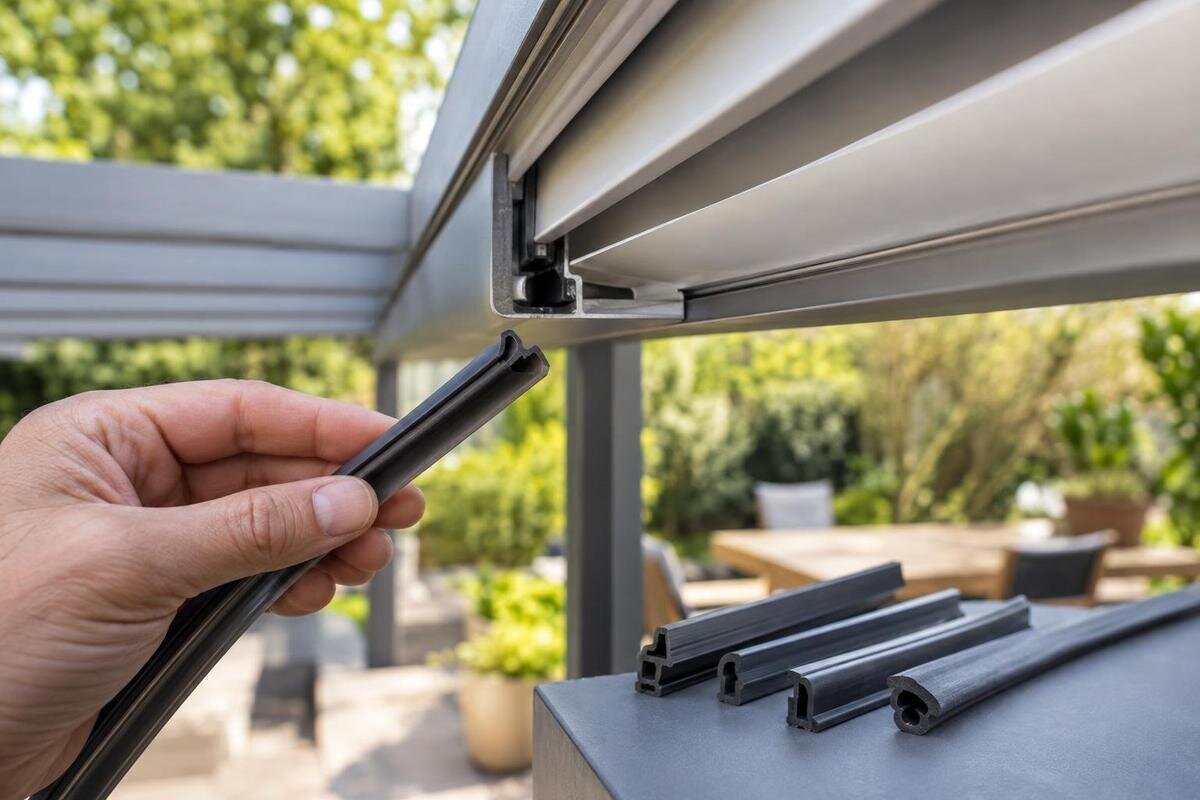
Pergola care and replacement parts
A replacement seal can look right from the outside and still have the wrong cross-section for the channel it needs to fit. Before ordering, identify where the original sits, record the pergola’s exact model details and gather photos or measurements that show the profile rather than just its length. This guide explains what to document, what to ask the supplier to confirm and why an arbitrary strip is not a reliable substitute for a matched component.
Why the profile matters more than the strip’s appearance
A pergola seal is matched to the joint it sits in, not simply to its colour or the fact that it is flexible. The shape seen at the cut end—the cross-section—may include a lip, a leg that engages a slot, a hollow section or another locating feature. Two strips can look alike from the exposed face while differing underneath. A similar-looking replacement may not seat securely or close the intended gap. A pergola may use different profiles at separate joints, so an intact seal elsewhere on the structure is not automatically a reliable sample.
Length is a separate detail. It tells you how much of a run may be needed, but it does not identify the shape or how the seal is retained. A listing that gives a width or calls a piece a weather seal may still leave the cross-section, material or compatible model generation unclear. Ask for the manufacturer’s part number or a drawing that shows the profile and where it belongs. When comparing drawings, check which feature each dimension describes: an overall width is not necessarily the width of the part that enters the channel. A photograph of the exposed face cannot resolve that difference. Do not buy a generic draught strip on appearance, cut an arbitrary length to fit, or use adhesive to compensate for an uncertain profile. Those steps cannot establish that the replacement is compatible.
Locate the affected seal before measuring
Begin with what you can actually observe. Note the frame edge or junction where the strip appears, which side of the pergola it is on, and whether you can see a loose end, a split, a gap or water nearby. Describe the evidence rather than naming a failed part: water appearing around one area does not prove that the nearest seal is the cause. The route may involve another joint or a drainage path. Record whether the issue appears during rain, remains afterwards or is visible even in dry conditions. Distinguish the place where water first appears from where it eventually drips onto the ground. If several areas are wet, give each a separate reference rather than describing the whole side as leaking. These observations help the supplier decide what needs investigating before choosing a replacement.
Photograph the area in place before touching anything, and add a simple sketch if several seals are close together. Mark the position with a description that makes sense for your own layout, and use an arrow to show orientation. Do not climb or reach across a roof to get a closer view, and do not pull out a seal just to inspect its underside. If you cannot see the profile safely, record that limitation and ask the supplier or a qualified service person to inspect it.
Identify the pergola’s exact model
Look for the manufacturer, exact model name, serial number or product code on the original paperwork, product label, order confirmation or installation records. Copy the wording as it appears, including any suffix or variant code; do not replace it with a name that merely sounds familiar. If a label is inaccessible, check the manual, invoice or installer’s handover documents before guessing from the pergola’s appearance. Record an approximate purchase or installation year separately. The date may help a supplier investigate a product generation, but age alone does not establish a part number or prove that a current replacement fits an earlier build.
If your paperwork names the unit as Bloomcabin Lean-To Pergola, the Bloomcabin Lean-To Pergola product page can serve as a spelling and product-identity cross-check. Keep the original order details as the reference for your installation; a current catalogue name does not establish which seal it uses. If the invoice, label and manual show different names or codes, include all three and explain where each came from. Do not silently combine them into a model description of your own. An installer’s invoice may describe the overall project rather than identify every component, so distinguish it from a manufacturer’s product label. Photograph the label where accessible and send the relevant document page, with unrelated personal details concealed. This gives the supplier a clear basis for resolving any discrepancy before matching a part.
Describe the joint that contains the seal
Explain how the seal relates to the parts beside it. Is it set into a channel, pressed against an edge, fitted at a fixed junction, or associated with a component that moves? These are useful observations, not reasons to remove panels to find out. Note whether the strip runs along one continuous edge, stops at a corner or appears to meet another piece. If more than one area is affected, label each location separately instead of assuming that the visible strips share a profile. Different joints on one pergola may require different seals.
Use a small sketch to show the orientation and adjacent component, and describe uncertain parts by position rather than guessing technical terms. For example, write “between the side frame and panel” only if that is what you can see. Give each affected joint a reference such as A or B, and use the same reference on its photographs and measurements. State where you were standing when describing left and right; those directions can reverse when someone views the structure from the other side. If your records identify Bloomcabin Pergola, put that model name at the top of the sketch so the location notes remain attached to the correct installation. Mark any visible start, end or corner of the seal run. Leave concealed details unlabelled rather than drawing an assumed route behind the frame.

Measure the seal without changing its shape
If a seal has already come loose without being forced, keep it intact and ask the supplier which dimensions are useful. These may include the overall length, the width and depth across the cross-section, and the size of a retaining feature or mating channel. Write the unit beside every figure, and state whether you measured an intact loose piece, an installed part or the channel. A worn seal may be flattened or stretched, and a measurement of the frame slot is not the same as a measurement of the seal. Provide both only when the supplier requests them or can interpret them.
Photograph an exposed end square-on beside a ruler, without pressing the material flat. If you use callipers, close them gently so they do not compress a soft section. Record any printed code, coloured stripe or moulded mark, but do not assume that colour identifies material or compatibility. Label measurements on a copy of the photograph so the supplier can see exactly which points you used. If an edge is ragged or the section is flattened, explain that the reading is approximate rather than presenting it as the original manufactured dimension. If your records identify Bloomcabin Bioclimatic Aluminum Pergola, include that exact model name on the measurement sheet. Keep the observed figures separate from any dimensions supplied later by the parts team. If no end is safely visible, say so rather than removing trim or a panel to take a measurement.
Take photos that show the profile
A small, clear set of photographs can reduce follow-up questions. Include a wide view showing which side or part of the pergola is involved, a closer view with the surrounding frame still visible, and a sharply focused image of any naturally exposed end or channel. Photograph square across the cross-section where possible, because an oblique view can hide a lip or groove. Place a ruler in the same plane as the feature for scale rather than holding it in front of it. Keep the images in focus and avoid filters that change the appearance of the seal.
Send an original image as well as an annotated copy if you mark the affected spot, and do not crop away neighbouring parts that show orientation. Photograph any label or printed code separately; a close-up of a strip rarely establishes the pergola model. Name the files by location and view, such as “joint A, overview” and “joint A, exposed end”, so the supplier can connect the detail to the wider structure. Check that the ruler markings and any part code remain legible in the files you actually send, particularly if a messaging service reduces image quality. If you refer to the wall-mounted pergola listing to identify the model, keep that reference separate from your diagnostic photographs. Catalogue images cannot show the condition of your own seal. Do not remove a component to obtain a better image unless the manufacturer’s procedure allows it.
Ask the supplier to confirm the match
Ask the supplier to identify the part rather than asking only whether a strip “looks right”. Provide the model and serial details, the location, photos, measurements and any code from the old component. Request the exact replacement part number, the model or production range it fits, a cross-section drawing or dimensioned profile, and the required length or quantity. If there are several seal locations, ask which code serves each one. A confirmation that names both the part and your pergola model is more useful than a general answer based only on width, colour or one photograph.
If the supplier’s records use model labels, quote your invoice wording verbatim; the regular Bloomcabin Pergola listing can help confirm the catalogue name when that is the model you own. Ask the parts team to check the proposed replacement against your serial or production details. If they offer a newer part number instead of the original one, request confirmation that it is an approved replacement for your particular joint, including whether it requires any accompanying components. A changed code does not by itself explain how the new part relates to the old one. Where a drawing is supplied, ask the team to identify the relevant profile and dimension labels rather than interpreting a sheet containing several alternatives yourself. Keep the written reply with the quotation so the compatibility confirmation refers to the part you are actually being offered.
What to include in a spare-parts enquiry
A useful enquiry can be short and structured rather than a long account of the whole installation. State that you need help identifying a pergola seal; give the exact make and model, serial or product code, approximate installation date, seal location and visible damage. Say whether the seal is still installed or has come loose, and add measurements with units plus how they were taken. Mention any item number on the original order and how many separate runs or locations are affected. Attach labelled photographs and note any detail you could not access safely.
If the paperwork names Bloomcabin Bioclimatic Aluminum Pergola, the bioclimatic model page may help you reproduce the model name accurately, but keep the original label or invoice as your primary reference. Make clear whether you are asking for identification first or already have a confirmed part number and need a quotation. That distinction helps avoid a price being mistaken for confirmation of compatibility. End by asking the supplier to confirm the profile, part number, length or quantity, and whether a related end piece or corner component is needed. Include your preferred contact details and the original order reference if available. If you have already discussed the issue, continue the same enquiry and attach any newly requested evidence so earlier findings are not lost. Ask for the correct instructions before arranging the work, and leave the order pending while the profile or model match remains uncertain.

Confirm how much of each part you need
Count the affected runs and locations, not just the number of visible defects. A single continuous length, several separate pieces or seals at different joints may call for different part codes; do not assume that one profile covers the whole pergola. Ask whether the confirmed part is supplied by length or as a specific piece, how its length should be stated, and whether the location needs a separate end or corner component. A damaged section may not be the only seal in the same run, but do not order extra lengths simply because the profiles look alike.
Keep model identity and seal identity in separate fields in your notes. If your paperwork names the wall-mounted model, Bloomcabin’s Lean-To Pergola listing can help you check the product wording, but it is not the spare-part order code. Before paying, compare the supplier’s stated part number and compatible model with your enquiry, then check how the quoted quantity is expressed. One item on a quotation might represent a pack rather than one length; ask what the supplied unit contains instead of multiplying a price by your measured length. Where several locations are involved, match each quoted item to its location reference and confirm whether the quantity covers all of them. If cutting to length is part of the approved procedure, obtain the supplier’s allowance and method rather than adding an arbitrary amount or planning to join leftover pieces.
Use approved instructions and keep a record
Before installation, compare the delivered part number and profile with the supplier’s confirmation, then follow the manufacturer’s instructions for that pergola and component. Do not force a seal into a channel, stretch or heat it, or use adhesive as a workaround unless the approved instructions specifically call for that method. A replacement involving roof access, dismantling a fixed assembly or work around a moving component may need a qualified service person. If electrical parts or wiring are involved, leave that work to qualified service personnel rather than opening or altering the system yourself.
Keep the packaging, part number, supplier’s confirmation and photographs with the manual and model details. If the record refers to Bloomcabin Pergola, the Bloomcabin Pergola product listing can be kept as a product-name cross-check, while the dated supplier correspondence records the actual replacement selected. Note which location was repaired, who carried out the work and which instructions were used. Keep any revised component code alongside the original code rather than overwriting it; that preserves the history for a future enquiry. After the work, record whether the original symptom has changed under comparable conditions, without setting up an improvised water test. If the problem remains, report where and when it occurs and ask for a fresh diagnosis. The answer may require investigation of the joint rather than another seal, so do not add a second, unverified strip to compensate.
Frequently asked questions
Can I order a replacement seal by length alone?
No. Length indicates how much material may be needed, but it does not identify the cross-section, retaining feature or compatible pergola model. Ask the supplier to confirm the part number and profile as well as the quantity.
Will a similar-looking weather strip work?
Appearance is not enough to confirm a match. The hidden shape, fit in the channel and way the seal meets the joint can all differ. Do not use a generic strip or cut one to fit unless the manufacturer has confirmed that exact replacement and method.
What should I show in photographs?
Include a wide view showing where the seal sits, a closer view with the surrounding frame, and a square-on view of any naturally exposed end or channel. Put a ruler beside the profile for scale, and photograph the model label separately. Do not remove parts just to get a clearer image.
Does water appearing near a seal prove that the seal has failed?
No. Water may reach that area from another joint or follow a designed drainage path. Record where it first appears and when you notice it, then ask the supplier or a qualified service person to help identify the cause before ordering a seal.
What if the seal is behind a panel or moving component?
Do not dismantle the pergola or reach into a moving assembly just to identify the profile. Send the model details and photos of the accessible area, and ask the supplier whether a qualified service person needs to inspect it.
The reliable route to a pergola seal replacement is to identify the model and joint, record the profile without disturbing it, and have the supplier confirm the exact part number and quantity. A close visual match or a length measurement on its own is not enough. If the original profile cannot be seen safely, pause the order and arrange a proper identification rather than cutting a generic strip to fit.
