


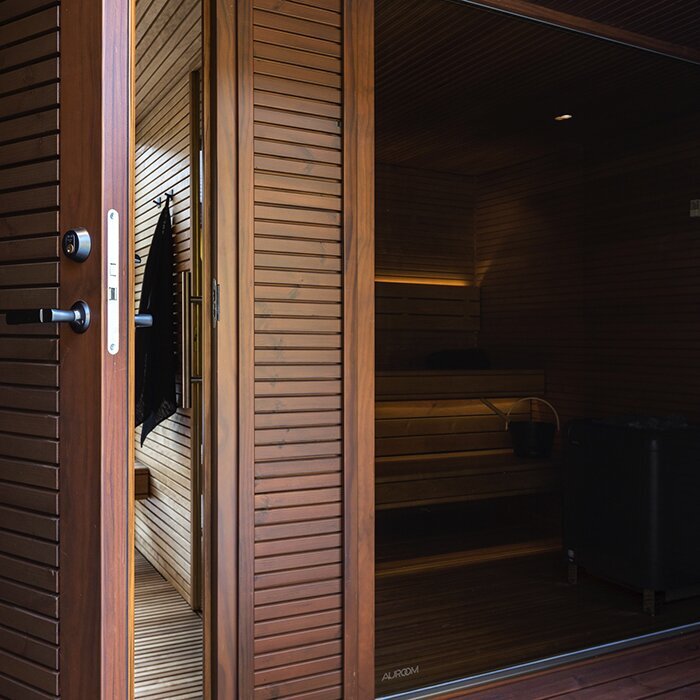





Spacious garden sauna with an integrated terrace
Osa 350 outdoor sauna – 3.5 × 3.5 m with panoramic glazing and Thermowood terrace
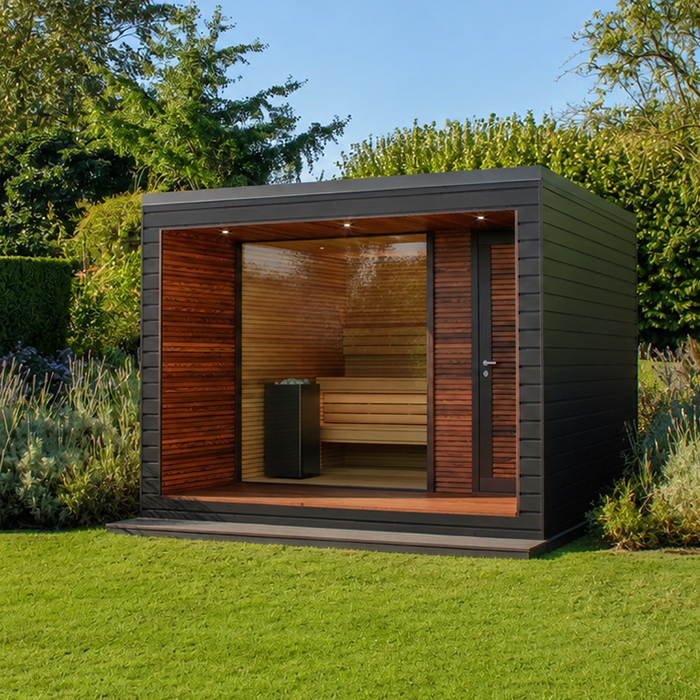
The Bloomcabin Osa 350 is a generous outdoor sauna measuring about 350 cm wide, 350 cm deep and 266 cm high. Its 12.25 m² footprint brings together the sauna room and an integrated oiled Thermowood terrace. Panoramic glass draws daylight inside and frames the garden view. Heat-treated timber, insulation and lighting designed for both interior and terrace turn Osa 350 into a complete outdoor retreat. It is suited to anyone planning a lasting garden sauna setting rather than simply adding a single cabin.
Settle the practical details before committing to a site. The foundation, electrical supply and delivery plan depend on the final position and orientation of Osa 350. Use the documentation for the specification you select, and involve the appropriate trades early so each preparatory step is coordinated. To compare different layouts and their space requirements first, browse the Bloomcabin sauna range.
Dimensions and features
Osa 350 at a glance
The external dimensions of approximately 350 × 350 × 266 cm describe the Osa 350 structure itself. When assessing a location, also consider how terrace access will connect with existing paths and garden areas. Mark out the complete footprint at the proposed site and include adjoining walking and access zones on the site plan. This makes it easier to judge the proportions against the house, property boundaries and planting, and to identify possible pinch points before confirming the final position.
350 × 350 × 266 cm
With a 12.25 m² footprint, Osa 350 has the presence of a separate garden room. The key question is therefore not only whether it fits the intended area, but whether its proportions sit comfortably with the property and neighbouring garden spaces. Near the home, consider views from inside the house as well as short, safe walking routes between house, sauna and garden. A well-planned connection makes moving between sauna room, terrace and living area easier.
Thermowood terrace
Built into the front of the sauna, the oiled Thermowood terrace creates a defined outdoor zone. Use it to leave shoes, set out towels and pause briefly between rounds. Design nearby garden surfaces to limit loose soil and splashback reaching the timber. A firm, comfortable path to the house will also make access easier after dark or in wet conditions.
Panoramic glass frontage
Daylight enters through the expansive glazing, while the view beyond becomes part of each sauna session. Choose an orientation that looks towards a garden scene you will appreciate from inside. A hedge, wall or modest planting scheme can frame that outlook and visually settle the building into its setting, provided nothing is positioned directly across the glazed frontage.
Digital control and Wi-Fi option
The planned heater for Osa 350 is electric and digitally controlled. A Wi-Fi option is available with some specifications. Check the chosen package before ordering to establish whether it contains the heater, controller and Wi-Fi capability; rely on its specific documentation. Electrical preparation must match that configuration and be completed professionally at the site. An ordinary outdoor power point will not provide the required connection.
Room concept
Sauna room and terrace as one connected retreat
Moving between heat and fresh air is straightforward because the sheltered sauna room opens directly onto its terrace. You can arrive across the terrace, enter the sauna, take outdoor breaks between rounds and then follow a short route home. Keep this built-in outdoor area orderly rather than crowding it. Place furniture and movable items where they cannot obstruct the door or circulation routes, screen the glazing or interfere with the exterior lights.
Study the proposed outlook in morning, afternoon and evening light before deciding which way the sauna will face. Panoramic glass can showcase the best part of the garden, although an illuminated interior may be conspicuous after sunset. Assess sightlines towards the sauna from paths, neighbouring land and house windows as well as the view looking out. Any privacy screen needs clearance for airflow, building access and glass cleaning.
Osa 350 works best where its substantial form is treated as part of the overall landscape plan. Clear routes and open space around it help the building sit comfortably in the garden. Low garden beds or restrained planting can soften the meeting point between terrace and grounds. Avoid vigorous growth beside the façade or roof because it complicates inspection, cleaning and upkeep. Select a private, accessible position that leaves every exterior area needed for maintenance exposed.
Timber surfaces
Materials for the sauna room, façade and terrace
Lacquered, heat-treated softwood forms the exterior cladding, while light-coloured timber lining gives the sauna room a warm and restful character. Each zone encounters different conditions. Sun, rain and dirt affect the outside; heat, humidity, skin contact and repeated bathing affect the inside. Match cleaning methods and maintenance products to the particular finish, as harsh general cleaners or incompatible coatings may change its colour or texture.
Heat treatment helps the timber withstand variable outdoor conditions, but regular attention is still required. Timber naturally develops colour variation, small superficial marks and differences in grain. Examine it periodically, concentrating on places where moisture could linger. The interval between treatments of the oiled terrace will vary with exposure and use. Always clean the surface and let it dry before applying a suitable maintenance product, and observe the care directions supplied by its manufacturer.
Insulation and roof
Insulated walls, roof and floor for regular sauna use
Insulation is fitted to the walls, floor and roof of Osa 350, separating the heated room from the weather outside. Warm-up time and temperature behaviour will still vary with the initial conditions, ventilation, heater operation and frequency of door opening. Proper airflow and the correct settings for the fitted heater remain essential. For heating, operation and ventilation, follow both the documentation for the selected sauna configuration and the instructions supplied with the actual heater.
An overhanging EPDM roof shields the top of Osa 350 from the weather. Decide during site planning where its run-off will go, preventing water from gathering beside the base, across nearby paths or at the doorway. Positioning the sauna under large overhanging branches increases fallen leaves and twigs and makes upkeep more demanding. Preserve access to the roof perimeter for inspection. Do not use the roof for storage, walk on it or treat it as an occupied area.
Lighting concept
Separate lighting for terrace and sauna room
IP65 LED spotlights provide terrace light and make the entrance easier to navigate after sunset. They help reveal step edges, wet patches and objects left outside, but cannot compensate for obstructed or unsafe paths. Provide an approach that avoids uneven ground and garden beds. Once darkness falls, review how the lights perform and adjust the surrounding layout to limit spill into the home or neighbouring properties.
Dimmable LED strips beneath the benches and behind the backrests supply indirect light inside the sauna. Without a dominant ceiling source, the brightness can be changed for different tasks: stronger illumination assists with entry, cleaning and tidying, while a softer level creates a restful bathing atmosphere. Operate all lights and controls only as designed. The presence of electricity, heat and moisture means cables, fittings and controls must be altered solely by a qualified professional.
Heater and operation
Professionally match electric sauna equipment to Osa 350
Heater, sensors and digital controller are specified to work with the sauna room as one system. The chosen version determines how they are fitted and commissioned. Consult the Osa 350 documents and the manual for the installed heater for clearances, electrical connection, controls and operation. Supply both sets of instructions before work starts and have the proposed arrangement professionally reviewed. Avoid isolated component changes, which may compromise correct installation, operation or the system’s intended performance.
The digital controller brings the heater’s available operating functions together. Where Wi-Fi is part of the ordered specification, complete its additional preparation and configuration as instructed. Learn what every display, setting and shut-off control does before using the sauna. Remote access does not remove the need for an in-person safety check: before starting the heater, confirm that its surroundings are clear and that towels, cleaning equipment and other objects are away from hot components.
Entrust the complete electrical plan to an appropriately qualified electrical professional. The work includes selecting heater output for the ordered configuration, routing cables, providing protection, installing controls and making the final connection. Give the electrician the Osa 350 technical documents and selected heater details well before assembly. This allows supplies and connection points to be positioned correctly for construction and commissioning. Extension leads and improvised connections are inappropriate for a permanent outdoor sauna. If you notice damage, an unusual odour or signs of an electrical fault, leave the system off until a professional identifies the cause.
Site, delivery and assembly
Prepare the location, foundation and unloading position completely
Osa 350 needs a level, stable base that is accurately aligned across the entire footprint. A concrete slab is considered the ideal solution. Before it is constructed, compare position, finished level and external dimensions with the product documents. The base must permanently support the structure and must not encourage twisting. Unevenness cannot be sensibly corrected with loose packing or support at isolated points only. If foundation work is contracted out, provide the installer with model details and the intended orientation.
Good site preparation also accounts for both rain and cleaning water. Shape the falls and surrounding surfaces so water travels away from the building instead of gathering against timber parts. Maintain enough room around Osa 350 to reach its glazing, cladding, roof perimeter and technical zones. Permanent screens, dense vegetation and difficult-to-move furniture can obstruct later care. Decide on these landscape features only after confirming the working clearances needed for construction, inspection, cleaning and maintenance.
Unloading calls for either a crane or forklift, so assess the full route between the public road and nominated drop-off point. Check entrance width, turns, gradients, gates, ground capacity, branches, overhead services and other obstacles that could restrict a delivery vehicle or lifting machinery. Discuss the plan early with the responsible carrier or specialist contractor, who must make the final site assessment. The standing areas for both vehicle and equipment also need adequate access, space and load capacity; an apparently open area may not meet those needs.
From assembly to commissioning
Professionally assemble prefabricated modules and complete final checks
Prefabricated modules are joined on site to form Osa 350. Reserve a clear work zone, keep delivered sections protected from damage and dirt, and ensure installers can reach every prepared service point. Neither packaging nor components should obstruct lifting, vehicle movements or foundation work. Assembly must follow the instructions written for this product. Seek professional guidance before drilling new holes, creating penetrations or modifying any element responsible for structural support, insulation or weather sealing.
Examine all delivered parts for visible shipping damage before construction begins, recording any concern clearly. On completion, review each accessible area with the installer. Check that doors move freely, glazing is undamaged, and fittings, connections and cladding are complete and properly finished. The terrace also needs to be uncluttered, clean and secure underfoot. Operate technical equipment only after it has been correctly connected and in accordance with its instructions. Afterwards, store the documents for the sauna, controls and heater together where they can be found readily.
Complete every technical task, interior fitting and cleaning step before routine use. Before the first warm-up, calmly review the controller’s displays and settings together with ventilation, lighting and emergency shut-off functions. Confirm that nothing impedes either the door or the route outside. Every person entering Osa 350 needs to understand how to exit promptly and stop the system whenever necessary. Share these essential operating points before the sauna is used as a group.
Everyday use
From preparation to drying after a sauna session
Organise the complete session before switching on the heat. Clear and clean the benches and floor, taking out any damp fabric left from earlier use. Put fresh towels and drinks within reach while keeping the heater zone open. Shoes that are wet or heavily soiled belong on the terrace, reducing the moisture and dirt carried indoors. Begin with enough illumination to see the floor, seating and controls properly. Lower the lights only after the room is ready and every item has been placed safely. Set the length and intensity of each sauna round according to what feels comfortable, leaving immediately if you become unwell. When sharing the room, pay attention to the wellbeing of others. Only perform a sauna infusion in the manner allowed by the fitted heater’s manual. Do not use unsuitable liquids, excessive amounts or accessories resting on heated parts, as these may damage the equipment. Between sauna sessions, the terrace provides an immediately accessible place to spend time. Particularly when wet, keep its surface free of towels, shoes and other trip hazards. In winter or at low outdoor temperatures, approach the temperature change consciously and according to your own wellbeing. Because the terrace is open, a weather-suitable access route matters. Keep a towel or bathrobe close by without blocking the walkway or door.
When the final round is over, clear away loose dirt and remove every damp towel, floor covering and other textile. Open the intended ventilation points so the benches, sauna room and remaining timber can dry thoroughly. Never leave wet belongings inside while the closed sauna stands unused. After the room has cooled, inspect it for residual moisture and forgotten items. Completing this routine leaves Osa 350 dry, tidy and ready for its next use.
As both an outdoor surface and the link to the sauna room, the terrace collects garden debris. Sweep away dry leaves, sand and soil before moisture binds them to the timber. Water should not be allowed to sit there for long periods. Regularly move mats, containers and portable furniture to expose hidden dampness and clean beneath them. Anything that traps rainwater or continually blocks airflow should not occupy a permanent position on the terrace.
Cleaning and care
Care for sauna timber and floor grates appropriately
How can I clean the interior gently?
As required, collect hair and other loose debris from the seating, floor and grates. Use only a small amount of water and a cleaner intended for sauna timber on suitable surfaces; avoid harsh products and saturating the wood. Take out floor grates only as their design permits, then dry them completely before replacement. Include concealed spaces below the benches in inspections, but do not open or alter electrical equipment.
Exterior surfaces and glass
Targeted care for glass frontage, façade timber, terrace and roof
Use soft, clean cloths and an appropriate glass product on the panoramic glazing; abrasive pads and scratching implements must be avoided. Prevent cleaner from running across adjacent timber unnecessarily. While working, wipe the edges and frames and look over exposed fittings for dirt or visible deterioration. Arrange professional assessment for damaged glazing or any part that no longer operates correctly. Without the appropriate instructions, do not attempt adjustments to glass components or their fittings.
Match maintenance of the lacquered exterior cladding and oiled Thermowood terrace to their different finishes. Begin by cleaning the timber carefully and letting it become completely dry. Before wider application, try any unfamiliar care product on a concealed area and read its manufacturer’s directions. A treatment made for the terrace may be unsuitable for painted exterior timber. Add another coating only after confirming compatibility with the finish already present. To assess Osa 350 alongside alternative sizes and designs, browse the outdoor sauna range from Bloomcabin.
Check roof and surroundings
Clear leaves, twigs and loose material from the EPDM roof without using sharp tools that could cut its membrane.
From ground level, regularly look for visible changes around the roof edge, exposed connections and run-off path.
Cut back planting to prevent ongoing contact with the façade, glass or roof, while leaving inspection access unobstructed.
Following unusually severe exposure, examine the terrace and exterior timber and refer any visible damage for professional assessment.
Keep all drainage routes open so rainfall cannot pool beside the foundation or immediately outside the entrance.
Maintain a record of servicing and care so changes in the sauna’s condition are easier to follow.
View Osa 350 in the shop