
Will a Central Island Bed Work in Your Greenhouse?
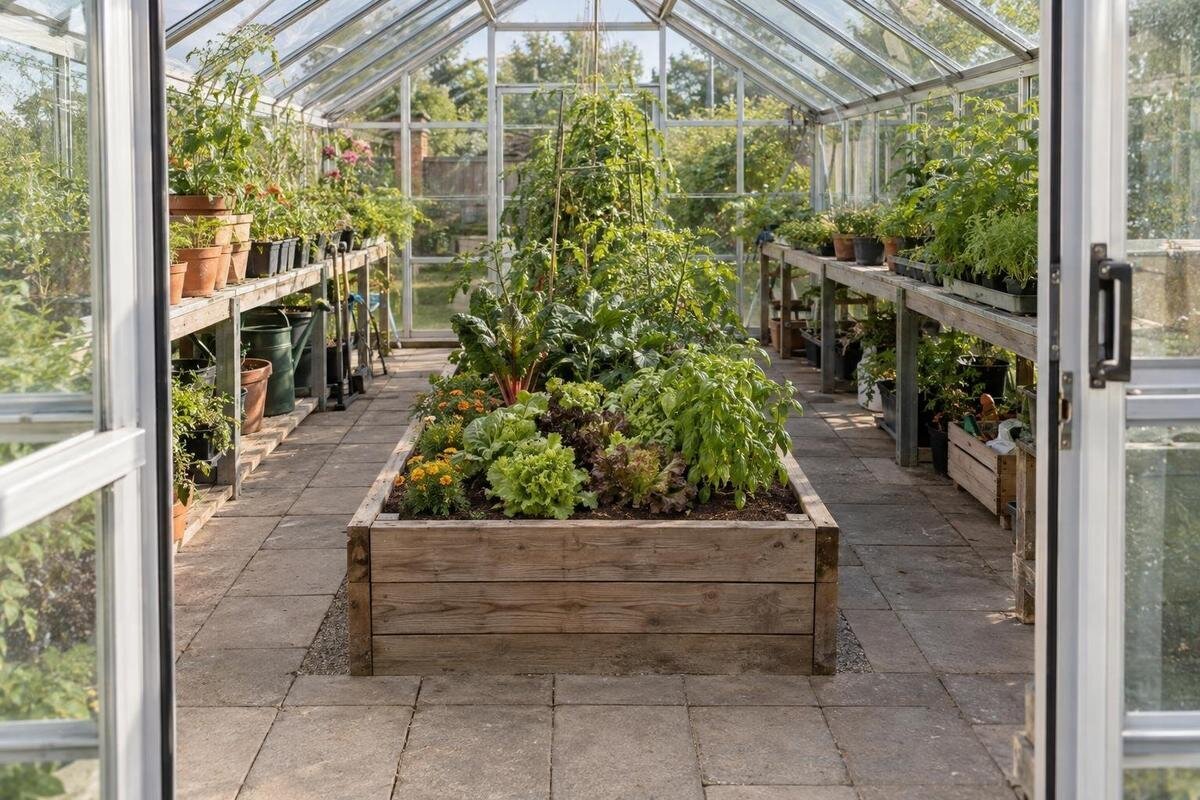
Greenhouse layout
A central island bed can make both sides of a planting area reachable, but it also divides the greenhouse floor into routes that must stay clear. Whether it works depends on the inside dimensions, the bed's width and length, the door position, and the room plants occupy later in the season. A floor-area figure alone cannot answer the question. Compare an island with perimeter beds on the same measured plan, then test the routes you will actually use.

How a central island bed changes the layout
A central island bed sits away from the greenhouse walls, with a path intended to run around it. A fully accessible island also leaves room to get to its ends; if an end is blocked by a fixture or stored items, the bed is central but not reachable from all sides. Perimeter beds sit along one or more walls and generally preserve an open central strip, although deep beds can reduce it. The difference is about circulation as much as planting: an island divides open floor into side aisles and end crossings, while perimeter beds concentrate growing space along the edges.
Consider what you reach on an ordinary visit. If you pick, thin or tie plants on both sides, an island can provide direct approaches without asking you to reach across its full width from one edge. In exchange, both side aisles and a practical route around the ends must remain open. Perimeter beds can leave a continuous path down the middle, but the back of a wall bed may be difficult to tend if it is deeper than your comfortable reach. Neither label guarantees a good layout: compare the planting footprint with the access needed for care.
Compare growing area with usable floor space
Count bed area separately from floor area. A central bed does not turn every open square metre into planting space: the surrounding aisles, end clearance, door approach and fixed furniture still take room. Perimeter beds can add planting length along walls, but their depth comes out of the central route. Compare the area you can actually plant and tend, not how many rectangles fit on an empty outline. Measure each bed at its outside edge, including its frame, and mark any wall-side gap you need. This prevents the same strip from appearing both as planting space and as an aisle.
Here is an illustrative drawing exercise, not an available greenhouse size or a recommended bed or aisle dimension: imagine a clear interior rectangle 3.0 m wide by 4.0 m long, with a centred island bed 0.8 m wide by 2.4 m long. It leaves 1.1 m along each side and 0.8 m at each end before door swings, shelves, stored items or mature plants are counted. Whether those routes work depends on the person and layout; the arithmetic only shows how the space is divided. The Classic Aluminum Greenhouse range lists floor areas from 3.77 to 28.08 m², but the selected model's actual interior dimensions—not its area figure—must anchor the comparison.
Can you reach every part of the bed?
Two-sided access changes how you judge bed width. A wall bed has one working edge, so you may need to reach farther to tend its back row; an island offers an approach on each long side, provided both sides stay clear. That can make a central bed practical for thinning, checking labels, tying stems and harvesting, but it does not make every width comfortable. Test your own reach while standing and kneeling, with the kind of hand tool you expect to use. See whether you can work the centre without bracing against plants or stepping into the soil. A width that works for watering may still be awkward for close picking.
Reach is also different from seeing the plants. Leaves can hide fruit or stems toward the middle, and a crowded row can force you to lean farther than the empty bed suggests. Sketch where each crop sits and which side you will use for pruning or picking. If one side will carry sprawling foliage, the opposite route may no longer be a clear working edge as the season progresses. Keep the planting plan workable from both approaches; if the far row still requires reaching across another row, narrow the bed or choose an arrangement better matched to your reach.
Measure the narrowest aisle
Measure the tightest route, not the most generous one. A path beside the island can look ample on a plan but pinch at the door, a frame, a water container, a fixed shelf or a cluster of leaves. Trace the route from the entrance along one side, around the bed end and back, noting anything that projects into it. Include the space taken by the door as it opens. If you use a watering can, harvesting tub or kneeling pad, draw or place one in the aisle to judge whether you can move and turn without brushing plants. A spot where you stop to work may need more room than a path you simply walk through.
Do not treat one aisle measurement as a universal standard. Your comfort depends on body movement and what you carry, and the space needed to stop and work differs from the space needed to turn. If you are considering a Lean-To greenhouse, trace the route from its entrance on its own interior plan and check where the bed, wall-side features and corners make it tightest. Use internal measurements rather than an outside footprint, and include the door opening in your drawing. If a route fails at its narrowest point, moving or reducing the bed is more useful than drawing a wider aisle only near the doorway.

Leave room to turn at the bed ends
An island can be reachable along both sides and still be awkward at its ends. To tend the last plants, you need to get beside them; to move through the greenhouse, you need to turn or continue past the bed without backing into a wall or tray. A short bed with a route around both ends behaves differently from a long bed that leaves only a tight turning pocket. Follow an ordinary visit on your drawing: enter with a container, stop to pick, change sides, then leave. Note where you must reverse, set something down or step across a bed. If a full loop is not practical, decide whether the remaining route works for your usual tasks.
Test the turn with what you normally carry, rather than judging whether you can squeeze through empty-handed. A harvest tub, watering can or bag of growing medium changes the movement, and an aisle used while kneeling can feel tighter than one used upright. When comparing a Limited Edition Aluminum Greenhouse model, use the internal length and entrance arrangement for the specific size to trace those bed-end movements. Listed floor area cannot tell you if a loop is convenient. A measured outline can show whether there is room to turn, where you would need to backtrack and whether the bed's far end is still easy to tend.
Plan watering and cleaning routes
Watering should work from the routes you have drawn. If you use a hose, note where it enters and whether it crosses the main path, catches on bed corners or has to pass through a crowded side aisle. With a watering can, consider whether you can reach both sides without repeatedly walking around an obstructed end. Keep this routine in mind after plants are established: the shortest route on an empty plan may not be usable when foliage fills the space. A bed that is easy to plant but awkward to water can turn ordinary care into repeated detours.
Cleaning and upkeep need the same access. A central bed can leave a strip beside the greenhouse walls, but that strip is useful only if you can pass through it to reach the glazing, fittings or floor behind it. Perimeter beds may put crops closer to the walls and make those surfaces harder to reach, while an open centre can be easier to sweep if it stays clear. If storage is part of your plan, check the selected layout for its position and dimensions first; the Limited-Edition Aluminum Greenhouse with Storage should be drawn with its storage area included. Do not assume it leaves your preferred route open.
Allow for mature plant growth
Plan the bed around established plants, not only the seedlings you see on planting day. Use plant labels or seed-packet spacing as a starting point, then account for the spread you have seen in your own garden; row spacing is not necessarily the full canopy width. On an island, foliage can overhang both side aisles. On perimeter beds, it can narrow the central route or press against a wall. That growth changes how far you can reach and whether two-sided access stays two-sided. Leave room on the sketch for your normal watering, tying and harvesting movements after plants fill their assigned area, rather than judging the gap between bare bed frames.
Account for supports, stakes and labels where they occupy a working edge. A crop that needs picking requires a clear approach to its stems, while a spreading plant can make the opposite side awkward even if its roots are reachable. If you are considering a Pyramid Greenhouse, trace the bed and expected plant spread within that model's own interior outline instead of reusing a rectangular sketch based only on floor area. This is a fit check, not a claim that a particular shape suits an island. Use the actual outline and confirm that its narrowest area still leaves the routes you plan to use.
Access to vents and other fixed features
Access to a fixed feature involves more than a path leading towards it. Mark the vents and hose connection on your plan, along with any other fittings you need to reach during routine care. For each one, identify where you would stand and whether you could reach it from that position without leaning across plants or stepping into a bed. This separates two questions that an empty floor plan can blur: can you walk to the feature, and can you use it once you get there? Include the bed frame and expected plant spread when checking that working position.
Compare those working positions in the island and perimeter layouts. An island may leave a wall-side approach, but that is useful only if the route and the place where you need to stand remain clear. A perimeter bed may preserve a wide central path while putting a fitting beyond comfortable reach. When considering a Prestige Greenhouse model, use the plan for the selected size to locate its fixed features rather than assuming they occupy the same positions throughout the range. If either layout obstructs a feature you use regularly, adjust the bed's position or dimensions and test that working position again.

Check the door position and footprint shape
Door position and footprint shape can change the answer even when total floor area is similar. An entrance at one end makes a long route beside the bed different from an entrance on a side; supports, corners and changes in the outline can create a pinch point or a useful wider spot. Mark the door opening on the same plan as the bed and try both orientations, with the island length running toward the door and then across it. There is no universally best direction. Keep the entrance route direct enough for regular tasks and make sure the bed does not block access to areas you need to maintain.
A T-shaped footprint needs to be drawn as it is, not treated as a plain rectangle with the same area. The T-Model Orangery is named for that format, but the model's exact internal plan and entrance arrangement must guide any bed placement; the name alone does not tell you where an island fits. Map the different parts of the floor, then see whether the bed belongs in a wider area or whether perimeter beds give a simpler route through a narrower part. Treat each change in width as a circulation question until you have confirmed the path stays connected.
Test both layouts on a measured plan
Make two measured sketches of the same greenhouse: one with the island and one with perimeter beds. Use the selected model's internal dimensions, not its nominal footprint; mark the door opening, fixed objects, each bed's outside edge and the route you need to keep clear. Add expected plant spread and the items you carry, then trace the watering, harvesting and cleaning routes. For a reality check, outline the bed and aisles on the floor with tape or string before building. It is easier to move the outline while the floor is empty than to discover that a bed end blocks your usual route later.
Compare the plans on three questions: can you reach the centre of each bed without leaning or stepping into soil, can you get around the bed with your usual tools, and can you reach the greenhouse surfaces that need attention? The Spacious Greenhouse range lists floor areas from 47 to 70 m², but total area alone does not answer those questions; verify the dimensions of the specific model. Choose an island only when its access sides remain practical in use. If they do not, perimeter beds—or a smaller, shorter island—can preserve an easier route without forcing a layout that works only on paper.
Frequently asked questions
What makes a bed an island bed?
An island bed stands apart from the greenhouse perimeter and can be approached from more than one side. For access all the way around, its ends also need workable routes; a bed boxed in by a wall or stored items is not fully reachable. The defining feature is its position and access, not whether it is raised or filled with soil.
Will a central bed fit in a small greenhouse?
It might, but a smaller footprint leaves less room for side aisles and turning at the bed ends. Compare an island and a perimeter arrangement on the same clear interior plan, including the door opening and fixed items. If either side route becomes a narrow dead end, perimeter beds may leave a more practical path through the greenhouse.
How wide should a greenhouse island bed be?
There is no single width that suits every gardener and crop. Mark the planned outside edges, then test reaching the centre from each side while standing and kneeling, including the tasks and hand tools you expect to use. If you have to lean across plants or step into the bed, reduce its width or change the arrangement.
Can I combine an island bed with perimeter beds?
Yes, if the combined bed footprints still leave the routes you need and each bed has accessible working edges. Draw the island, perimeter beds, storage and shelves before deciding; several small additions can turn a continuous route into a pinch point. A mixed layout is useful only if it remains workable once the plants fill their space.
Which measurements matter most?
Use the selected model's internal width and length, entrance position and opening, and any fixed obstructions shown on its plan. Record each bed's outside dimensions, side and end clearances, expected plant spread and the narrowest part of each route. Check the drawing for the specific model; a floor-area figure alone cannot show where the door and usable aisles will fall.
An island bed is worthwhile only if its access remains genuine after planting. On a measured plan, it should have workable approaches on the sides you tend, a clear route around the ends and enough room for ordinary watering and cleaning. Perimeter beds are the better fit when they preserve the central path you rely on or avoid narrow side aisles. Try both layouts at full scale; if the island requires repeated reaching, stepping over soil or backing into a blocked end, change its size or position before building.
