
Greenhouse Flooring: Gravel, Brick or Pavers?
Greenhouse flooring guide
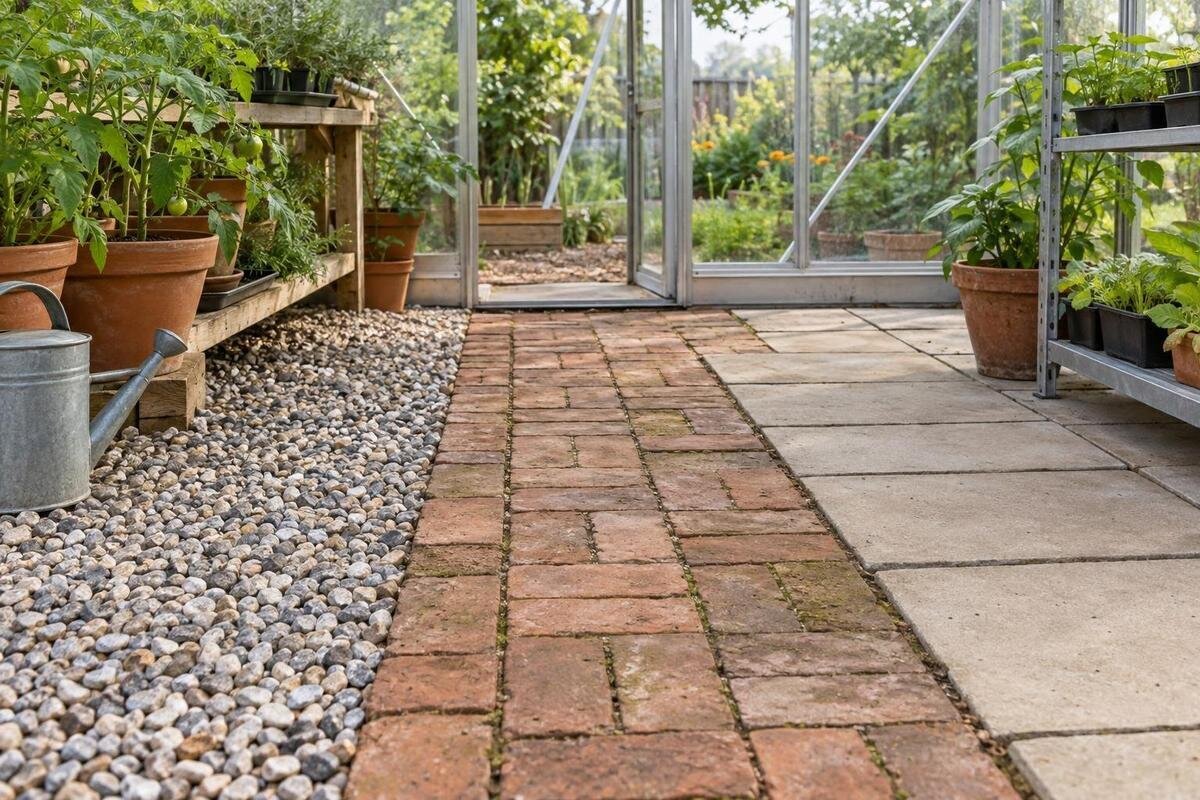
Gravel, brick and pavers can all work as an interior greenhouse walking surface, but each changes how the floor feels, handles water and holds up to day-to-day cleanup. Loose gravel is permeable at the surface but not automatically well drained; brick and pavers provide firmer routes, with joints and finishes that still need maintenance. None of these finishes is the greenhouse’s structural foundation. Choose around how you grow and move through the space, then check the selected surface against the manufacturer’s base drawings and the conditions at the site.

Before you choose 1
Plan the floor around actual greenhouse use
Begin with the jobs the floor must do. A path from the door to benches, pots and planting beds may be enough; a full hard surface can be useful when you move trays or carts often, while open soil makes direct planting straightforward. Note where you stand to water, pot up plants, store tools and set down a harvest basket. Think about footwear too: wet soil tracked inside behaves differently from a dry, swept aisle. If you also use the greenhouse for potting or storage, those work spots may need a different surface from the growing rows. Appearance alone will not tell you whether a full floor, a path or a small work area is most practical.
Use the actual plan for the selected greenhouse rather than estimating from a catalogue category. The Spacious Greenhouse listing covers 47 to 70 m². Once you choose a size, check its interior dimensions, door position and threshold, then place beds, benches and storage on a simple plan. Mark walking routes and areas you expect to keep planted, distinguishing the space occupied by furniture from the space needed to reach it. This helps avoid buying too much paving or leaving a narrow strip that is difficult to reach. It also gives a groundwork contractor a clear picture of where each floor finish is intended to go.
Keep the floor separate from the foundation
Treat the foundation and the walking surface as two separate parts of the project. The foundation supports the greenhouse frame and provides its anchoring arrangement; its design needs to suit the selected model and site. Gravel, brick or pavers can finish an interior area, but a flooring layer is not automatically a footing and cannot correct a base that is out of level, out of square or inconsistent with the manufacturer’s drawing. Nor should a decorative finish cover or obstruct a required connection. Decide how the frame will be supported before choosing the colour or pattern underfoot.
The product name Bloomcabin Prestige Greenhouse with Metal Base identifies a greenhouse offered with a metal base; it does not, by itself, specify an interior floor or a complete foundation design. Use the drawing for the exact greenhouse size to confirm the base outline, anchor locations and door threshold, then have a qualified groundwork professional review the proposed support for the actual ground. Ask separately which work belongs to the foundation and which is only the floor finish. A clear drawing or quote should describe both, so a later gravel bed or paved area is not mistaken for structural support.
Before you choose 2
Gravel’s drainage limits and upkeep
Gravel is a loose aggregate surface, so water can pass between the stones rather than sitting on an unbroken top. That can be useful when small spills are part of normal watering, but gravel is not a drainage system: the layer below may drain slowly, become saturated or have no suitable outlet. The feel also depends on the stone and installation. Loose material can shift under footwear, trays and a garden cart, and stones may travel into growing areas. Stone size and shape affect the feel and how easily you can rake the surface, so compare a sample if comfort and footing matter.
Upkeep is the main trade-off. Leaves, spent blooms, spilled potting mix and small labels can settle between stones, where sweeping is less effective than on a firm surface. A bounded path is easier to keep in place than gravel allowed to migrate into growing areas, but edging must suit the installation and not interfere with the base. When planning a gravel aisle in a Classic aluminium greenhouse, listed from 3.77 to 28.08 m², distinguish its boundaries from the surrounding planting areas. Ask what aggregate and underlying layers are proposed, and how the edges will contain loose material without obstructing access to the beds.
Brick flooring: joints, texture and finished height
Brick creates a firm walking surface from individual units and can suit a simple aisle or a larger finished floor. Its performance is not identical across every brick: dimensions, texture, absorbency and condition vary, especially when salvaged units are mixed. Joints collect soil, fine plant debris and spilled compost, so a brick floor is not joint-free or maintenance-free. In persistently damp corners, organic growth may make some surfaces less sure underfoot. Inspect the actual units and consider how their texture feels when damp; a decorative finish should not be assumed to provide good footing in wet conditions.
Plan the brick installation as a whole. Unit thickness affects the finished height, joint details matter, and the supporting layer influences whether units shift. Pay particular attention to the entrance, where an uneven transition can catch a boot or tray, and to edges beside planted soil. For a wall-adjacent design, align the floor plan with the selected frame drawing rather than measuring from the outer wall alone. The Aluminium lean-to greenhouse is listed from 3.69 to 14.34 m². Use the exact plan to show how the brick aisle meets the threshold and where it ends beside beds or work areas.

Before you choose 3
Pavers: a regular, firm walking surface
Pavers offer a firm route with a more regular layout than loose gravel, and individual units can form a pattern along a straight aisle or around a turning area. Surface texture, joint spacing and joint material affect comfort, cleaning and water movement; not every paving stone has the same finish. A well-supported paved surface is easier to sweep than loose aggregate, but units can settle or move if the layers underneath are unstable. The layout also affects how pieces meet at corners and the entrance. Compare a sample in the greenhouse’s light and check how it feels with damp footwear rather than choosing only from a dry outdoor display.
Decide whether pavers are needed throughout or only where you walk and work. A continuous paved floor can give pots and trays a firm place to sit, but leaves little room for direct planting unless beds are kept separate. A path-and-bed layout can preserve soil, though joints and edges need planning so growing medium does not spill constantly onto the path. When comparing sizes in the Limited Edition greenhouse range, listed from 3.77 to 28.08 m², mark the intended paved area on the plan for your chosen size. Base paving quantities on that area, with the layout, supporting layers and finished height included in the flooring proposal.
Water sources and floor drainage
Map the water sources before comparing materials. In a greenhouse, moisture may come from watering, drained containers, spills, cleaning, condensation dripping from plants or glazing, or weather entering at a doorway. Gravel lets water through gaps at the surface, but it cannot make slow-draining ground or a blocked outlet work. Water may pass through unsealed brick or paver joints, but the material below still has to receive or direct it; some installations restrict infiltration. A hard surface may make a puddle more visible, while a loose or absorbent surface can conceal wetness without resolving it. Decide where excess water should go, not just how the top layer behaves.
Look for existing low or wet spots and consider what lies beyond the greenhouse, including adjoining paving or a building. The finished floor should not be planned in isolation from the base, doorway and site drainage. There is no universal gravel depth, floor slope or drain arrangement for every soil and foundation; avoid copying a generic detail from another garden. Share the manufacturer’s drawing and site photographs with a qualified groundwork professional, and ask them to explain the intended water route. Where seasonal ground movement or freeze-thaw exposure is relevant, include it in the site review rather than assuming a floor finish will prevent it.
Before you choose 4
Choose between a full floor and planted beds
Not every growing setup needs paving from wall to wall. If you plant directly in the ground, a clear aisle with soil or permanent beds alongside it may be more useful than covering the whole interior. If you grow mainly in pots and move them around, a continuous firm surface can simplify carrying trays and sweeping up spilled compost. A mixed layout is also an option: a firm main route, a stable potting spot and planted strips kept open. Think through crop changes and where a garden cart, watering can or temporary trays will travel before deciding which areas can remain unfinished.
Draw the beds and aisles using the selected model’s interior plan, then check whether you can reach the back of a bed without walking across soil or stretching past containers. Consider the bed edges as well as the main aisle: these are the places where planted areas meet the walking surface. The Oasis pyramid greenhouse range is listed from 5.53 to 18.9 m². For the size you select, map the planting footprint, door route and work area together. Where the floor is divided into different materials, check their finished heights so that a tidy-looking boundary does not create an awkward transition along the working route.
Lay out paths around doors and work areas
Keep everyday routes direct: from the entrance to watering points, shelves, potting areas and the plants you check most often. Measure the tool or cart you actually use, and allow enough room for it to pass without scraping foliage or forcing you to step onto a growing bed. Check how the door opens and where the threshold meets the finished floor. Loose stones can migrate towards the doorway, while raised paving units can create an uneven transition. A narrow path might work for someone carrying a small watering can but frustrate repeated trips with a tray, so plan around the tasks you do regularly.
Greenhouse shape can affect how a route branches. A T-shaped plan may have more than one direction of travel, so consider junctions and turning points before selecting a single central strip. The T-shaped orangery greenhouse is listed from 16.52 to 30 m². On the drawing for your chosen size, mark the door, work zones and permanent fixtures, then follow the routes between them. Check where you will turn with a tray or cart and where separate paths meet. Ask the installer how the floor finish meets the frame and foundation, particularly at entrances and junctions where an awkward edge could interrupt an otherwise convenient route.

Before you choose 5
Cleaning access and future floor repairs
Consider whether you can reach the whole floor for cleaning once benches, pots and storage are in place. Gravel holds small debris between stones, while brick and paver joints can collect fine soil, so even a clear central aisle does not eliminate cleaning around edges. Identify the corners where leaves gather and the spaces beneath or beside work areas where spilled potting mix may be difficult to remove. Any surface can collect dirt carried in on boots or dropped from plants. Plan a routine you can maintain: sweeping accessible firm areas, picking debris out of gravel and keeping damp patches and bed edges clear.
Plan for changes as well as regular upkeep. Beds move, containers get larger and the preferred route can shift as the greenhouse is used. A modular surface may be easier to adjust than a continuous finish, but lifting units can disturb the supporting layer; confirm what repairs or alterations are realistic for the installation. The Limited Edition greenhouse with built-in storage is listed from 5.52 to 28.08 m². For your chosen size and configuration, account for both storage access and the floor space in front of it. Keep those areas on the floor plan so that cleaning access is considered alongside the main growing and walking areas.
Ask what the flooring quote includes
Ask for a quote that separates the greenhouse foundation from the interior finish. For the floor, clarify what is included in preparing the area, the underlying layer, the chosen surface material, edging and the finished transition at the entrance. Ask how the proposed build-up handles water on this site and who is responsible for checking it against the manufacturer’s drawing. Compare the full scope and maintenance needs rather than material names alone: two quotes for pavers may describe different preparation or edge work. A generic dimension or detail is not a substitute for reviewing the selected model and actual ground conditions.
Before work begins, have the drawing show the frame and base outline, intended floor coverage, planted sections, path and door threshold. Keep required anchors accessible and confirm with the qualified installer that the proposed finish will not interfere with them. If the site already holds water, has recently altered ground or an uneven finished level, raise that before selecting a material; an attractive top layer will not correct those conditions. The best choice fits your growing style, provides reliable footing and allows a cleanup routine you can maintain, with a clear, site-specific plan for the layers beneath it.
Frequently asked questions
Does gravel make a greenhouse floor drain properly?
Gravel lets water pass through gaps at the surface, but that does not guarantee it will leave the greenhouse. The ground and layers below still need to receive or direct the water. If the site is wet or water pools, have the route assessed before relying on gravel.
Can brick or pavers replace the greenhouse foundation?
No. Brick and pavers can be interior finishes when their installation suits the selected greenhouse and site, but they do not automatically support or anchor the frame. Keep the foundation design separate, and have a qualified groundwork professional check the proposed finish against the manufacturer’s drawing.
Which greenhouse floor is easiest to clean?
A firm, reasonably smooth brick or paver path is generally easier to sweep than loose gravel. Joints can still collect soil and plant debris, and surface texture affects cleaning. Gravel is harder to clear of small debris, so consider the routine you are willing to maintain.
Should I pave the whole greenhouse?
Not necessarily. A path may be enough if you plant directly in the ground, while a larger firm area can be useful if you move pots and trays often. Map beds, work areas and everyday routes first, then decide which parts should stay open for planting.
Does every greenhouse floor need a drain?
Not automatically. The right approach depends on watering, spills, cleaning, the site and where excess water can go. If water repeatedly pools, investigate its source and route rather than covering the problem with a new surface. A qualified professional can review the site and proposed floor.
Gravel, brick and pavers suit different greenhouse routines. Gravel provides a loose surface that is harder to clear of small debris; brick and pavers create firmer routes but still need attention to joints, levels and water movement. Decide whether you need a full floor or dependable paths between planted beds, and keep that finish separate from the foundation. The most useful floor is one that supports your daily growing tasks without making access, watering or cleanup more difficult.
