
Mulching Greenhouse Beds: Moisture, Materials and Slugs
Greenhouse growing guide
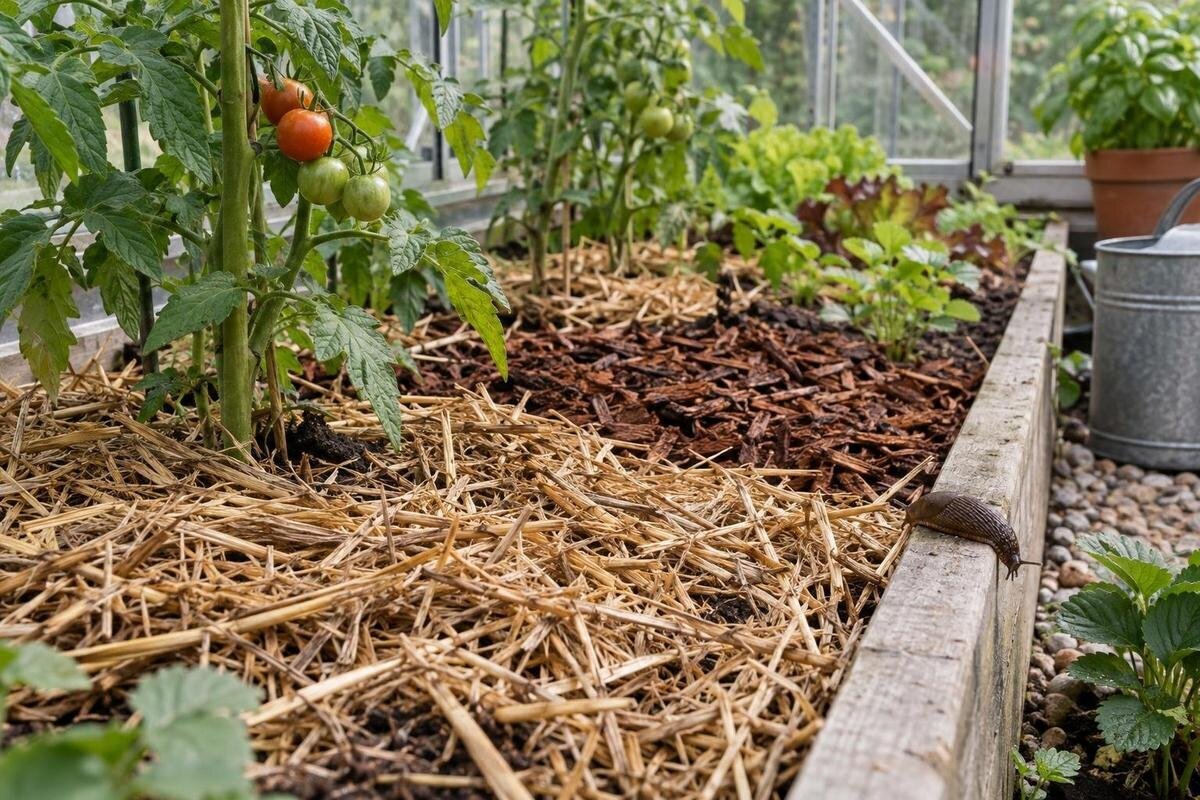
Mulch can make watering in a greenhouse bed more consistent, but the covered setting changes what the soil surface tells you. A roof keeps most rain off the beds; irrigation must replenish what crops use, while mulch can slow evaporation and conceal damp pockets where slugs shelter. The useful choice is not simply the material that looks tidy. It is a layer that suits the crop, lets water reach the root zone and remains easy to inspect. This guide compares common covers and explains how to manage moisture and slug risk under cover.

Planning checks 1
How mulch affects moisture under cover
A greenhouse roof keeps most rainfall off a bed, so mulch cannot rely on showers to become wet again. Water must arrive through irrigation, and a cover can slow how quickly both the soil surface and root zone dry. That makes appearance alone a poor watering guide: dry-looking straw can cover moist soil, while a damp patch on top does not prove water reached the roots. Sun, ventilation, crop size and growing medium still affect drying rates. A bed beside sunny glazing may need different attention from a shaded corner, even when both carry the same material. Mulch changes how quickly moisture is lost, but plants still need the water they use to be replaced.
Before laying mulch, water the bed as you normally would and check the soil beneath the surface in several places, including near an edge and beside a crop. Note where it stays wet or dries first; that gives you a baseline for comparison. Repeat the check after the first mulching and irrigation cycle, because the cover changes how quickly moisture leaves. If you are choosing a structure at the same time, lean-to greenhouse options are listed from 3.69 to 14.34 m². Treat that listed area as greenhouse area, not net bed area: check the chosen model's details and allow for paths and non-growing space before estimating mulch.
Measure the bed before ordering mulch
Choose a material for a defined job—slowing evaporation, limiting weeds or keeping soil from splashing onto lower foliage—then measure only the surface that will be covered. Measure each bed separately. For an L-shaped bed, split it into rectangles; for a divided bed, add only the planted strips you intend to mulch. Leave paths, exposed seed rows and planting gaps out of the total. If different crops will use different materials, calculate each zone separately. This simple map prevents you from ordering by greenhouse footprint and helps keep the finished layer even without covering places where mulch would interfere with sowing or access.
Multiply bed area in square metres by the chosen layer depth in metres to estimate volume. As an arithmetic example, 1 m² at 5 cm works out to 0.05 m³, or 50 L; that is not a universal application depth, since crop, material and product guidance vary. Loose straw settles differently from fine compost, so account for the material's structure and read the package volume before ordering. When planning beds for one of the Limited Edition Aluminum Greenhouses, listed from 3.77 to 28.08 m², use the bed measurements from your layout for this calculation. Keep separate volume estimates for materials that will be applied at different depths.
Planning checks 2
Straw, leaves and grass clippings
Clean straw is light and easy to spread as a loose cover. Its open texture lets irrigation pass more readily than a compressed mat, though water still needs to reach the soil. Choose clean material and check for weed seeds or debris; a tidy-looking bale is not a guarantee that it is seed-free. Shredded, dry leaves can also cover a bed, but whole leaves may cling together when damp and block water from parts of the surface. Break up compacted patches rather than laying a fresh layer over them. Straw and leaves are not slug barriers: either can create a shaded refuge underneath.
Grass clippings are easier to manage in small, thin additions after they have dried. A thick, fresh layer can stick together, become slimy and make the soil difficult to inspect. Keep straw, leaves and clippings away from stems, and do not build a damp mound around a plant base. These materials break down, so check the bed rather than topping up on a fixed calendar. Store unused material cleanly and separately from wet crop debris. The Limited-Edition Aluminum Greenhouses with Storage listing identifies built-in storage; check its actual dimensions and conditions before assigning it to bags of mulch or tools.
Compost, wood chips and sheet covers
Mature compost can serve as a fine surface dressing, but it does not behave like a long-lasting, inert cover: it settles into the bed and adds organic matter and nutrients. Include that contribution in the crop's overall soil plan rather than adding it automatically at every refresh. Clean, untreated bark or wood chips last longer on the surface; for annual vegetables, keep them on top instead of mixing them into the root zone, where decomposing wood can temporarily tie up available nitrogen. Chunky material may leave gaps where small weeds emerge, so it may not suit every bed or sowing method.
Plastic film and landscape fabrics need a different watering plan. Permeability varies, and water poured on top may run off, collect at an edge or fail to reach a bed evenly; read the material instructions and test watering before planting through it. Seams and loose edges can also make inspection harder and provide shelter for slugs. Measure each bed for cut-to-fit material rather than using the greenhouse's total area: the T-Shaped Orangery Greenhouse listings range from 16.52 to 30 m², which does not reveal the size of any individual bed.

Planning checks 3
Make sure water reaches the roots
Before covering a bed, run the watering system and check whether water reaches all planted areas. A drip line or soaker hose may sit under loose mulch, but position it so emitters and connections remain accessible for inspection, and verify the wetting pattern before hiding the line. Surface irrigation can work too if water passes through the chosen cover; a dense layer or sheet can redirect it. Check several points along the bed, not only the soil beside one emitter. Do not assume a line is working evenly just because one spot is moist.
For hand watering, part the mulch and direct water to soil near the root zone, then replace the cover and check beneath it. Very dry, light material may catch some water at first, so apply water in a way that lets it pass through instead of judging by a wet top. After watering, assess soil at a consistent, crop-relevant depth and include the driest-looking location. If you are also planning a greenhouse purchase, compare your proposed bed and water-line route with the Pyramid Greenhouse layout. Check whether you will be able to reach the line for these watering checks rather than relying on the listed area alone.
How mulch can shelter slugs
Mulch does not create slugs, but it can provide a shaded, moist hiding place close to food, especially when the layer is thick, matted or mixed with plant debris. Straw, leaves, compost edges and fabric seams may all offer shelter; none is automatically slug-proof because it looks coarse or dry on top. Damage depends on whether slugs are present, how easily they can enter and how close the shelter is to vulnerable plants. Mulch choice is one part of monitoring, not the only cause or control. Slugs can also arrive with pots or plant debris, so a clean-looking bed surface is not the whole picture.
Lift the cover at several spots during a routine check, especially at bed edges and around young plants, pots and other damp objects. Slugs are easier to spot in low light, so an evening or early-morning inspection can reveal activity hidden during the day. Pull material back from stems, remove dead leaves and spare boards from the bed edge, and keep walking routes clear. Morning watering can give exposed surfaces more time to dry before night, but do not withhold water a crop needs. When comparing the Bloomcabin Prestige Greenhouse listing with other options, use the actual layout to check whether bed edges will remain reachable.
Planning checks 4
Match the cover to crop and planting stage
Direct-sown crops need a clear route from seed to light, so leave the sowing row uncovered until seedlings are established or keep an open strip that can be watered accurately. Mulch placed too early can cover seed, obstruct emergence or hide tiny seedlings during weeding. Around transplants, leave a gap at each stem rather than pressing damp material against the crown. Once plants are established, bring the cover closer to reduce exposed soil while keeping leaves and stems visible for checks. Make sure you can still reach the base of each plant to remove weeds while they are small.
Different beds in one greenhouse may need different treatments: a seedling row, a mature tomato bed and a path-side planting do not share identical access or watering needs. Avoid forcing one material across every surface just to make the greenhouse look uniform. The Spacious Greenhouse listings range from 47 to 70 m². For a layout with several beds, plan mulch coverage bed by bed, marking the crop, planting stage and irrigation route for each. If crops finish at different times, covering each bed separately also makes it easier to reset one area without disturbing another. Choose materials around that growing schedule rather than treating all beds as a single area.
Keep paths and inspection routes clear
Lay out the beds and walking routes before spreading mulch. Loose material that spills into an aisle can be kicked across the greenhouse or tracked into neighbouring beds, while a covered bed edge can hide weeds or pests. Keep the path surface, bed boundaries and access to irrigation connections visible. Leave room for the tools you actually use and for reaching plants without leaning over or stepping into damp soil. The clearance you need depends on the chosen layout and your routine, so mark out the routes before committing to a bed arrangement.
Sketch the bed footprint, access lane and water route against the greenhouse plan before choosing a cover. The Classic Aluminum Greenhouses collection lists options from 3.77 to 28.08 m². Compare your sketch with the chosen model's dimensions to see which bed edges you could reach from the paths. Keep mulch supplies and hose connections out of those access routes. Reachable edges let you lift the cover at several points and notice where moisture or slug activity differs, instead of relying on a single check near the centre of the bed.

Planning checks 5
Refresh mulch when conditions change
Organic layers shrink as they break down; that is not a reason to add more whenever the surface looks uneven. Check how much soil remains exposed, whether the material has compacted and whether any stems have become buried. Top up thin areas only if the crop stage still benefits from a cover. If leaves have formed a tight mat or the layer remains sodden between waterings, loosen or remove the affected material and correct the cause before replacing it. Inspect what is already there first, rather than hiding an old layer beneath a new one.
Use the soil beneath the mulch to diagnose watering problems. If it is dry while the cover is wet, water may be stopping at the surface or running away from the bed; part the material, check the line and repeat a small irrigation test. If soil stays saturated, do not add more mulch as a fix. Check water delivery, drainage conditions and the crop's needs instead. If slug signs increase, thin the damp shelter and clear nearby debris, then keep monitoring. Recheck the bed after the next watering rather than judging by the layer's appearance alone.
Test a small area before covering the whole bed
Trial a new material on a short section with the actual crop and irrigation method before covering every bed. Record what you used and roughly how much, then inspect the soil below it after watering and look at the cover during routine checks. Note whether water reached the root zone, whether the material stayed loose and whether you found slugs underneath. A nearby uncovered strip can be a useful reference, but it will dry differently, so it is not a controlled comparison. The point is to see how the mulch behaves in your own covered growing conditions.
Keep the material if it gives the benefit you wanted and you can still water, weed and inspect the bed easily. Reduce or replace it if it mats, stays wet, blocks emergence or repeatedly provides shelter near vulnerable plants. The best choice may vary between crops and seasons; use a thinner or more temporary cover where access matters, and a more persistent one only where it remains manageable. When the trial ends, lift the mulch and assess the soil itself, not just the appearance of the surface.
Frequently asked questions
What is the best mulch for a greenhouse bed?
There is no single best material. Choose according to the crop, watering method and how easily you can inspect the bed. Loose straw or shredded leaves can cover soil, while mature compost behaves more like a fine dressing and adds nutrients. Any material that stays damp or hides slug activity may need thinning or replacing.
Does mulch create slug problems?
Mulch does not create slugs, but a damp, sheltered layer can give slugs a place to hide close to plants. The risk depends on whether slugs are present and what other shelter is nearby. Lift the layer to inspect it, keep plant debris and boards away from bed edges, and avoid assuming that a coarse mulch is slug-proof.
Should irrigation tubing go under the mulch?
It can, provided water reaches the bed evenly and you can still inspect the line and its connections. Test the system before covering it, then check soil beneath the mulch at several points. If you water by hand, part the cover and direct water to the soil rather than relying on the top layer to show whether the roots are wet.
How do I calculate how much mulch I need?
Measure the bed area you intend to cover, then multiply it by the chosen layer depth using consistent units. Keep paths and uncovered sowing rows out of the calculation. The right depth varies by material and crop, so use crop-specific or product guidance rather than treating an example calculation as a universal application rate.
When should I mulch a newly seeded bed?
Keep the sowing row open until seedlings have emerged and are established, or leave a clear strip over the row. Mulch placed too soon can cover seeds and make small seedlings harder to see. Around transplants, leave a gap at the stem so the material does not sit in a damp mound against the plant.
The right greenhouse mulch slows the loss of moisture without hiding irrigation problems or making slug checks difficult. Start with the bed and crop, water the soil before covering it, keep the layer loose and leave stems clear. Then check below the surface after watering and adjust if soil stays wet, dries out or slug activity increases. Revisit the material as crops and conditions change rather than assuming one cover will suit every bed.
