
Blossom-End Rot on Greenhouse Tomatoes: Why Fertilizer May Not Help
Greenhouse tomato troubleshooting
Blossom-end rot on greenhouse tomatoes can look like a calcium deficiency, but a dark patch does not prove the soil is short of calcium. The disorder usually reflects a failure to deliver enough calcium to rapidly growing fruit, often while root-zone moisture or root function is under stress. More fertilizer may add soluble salts or upset nutrient balance without fixing that delivery problem. Confirm the symptom, inspect moisture and drainage, and review existing fertilizer inputs before making an amendment.

Before adding fertilizer 1
What blossom-end rot looks like
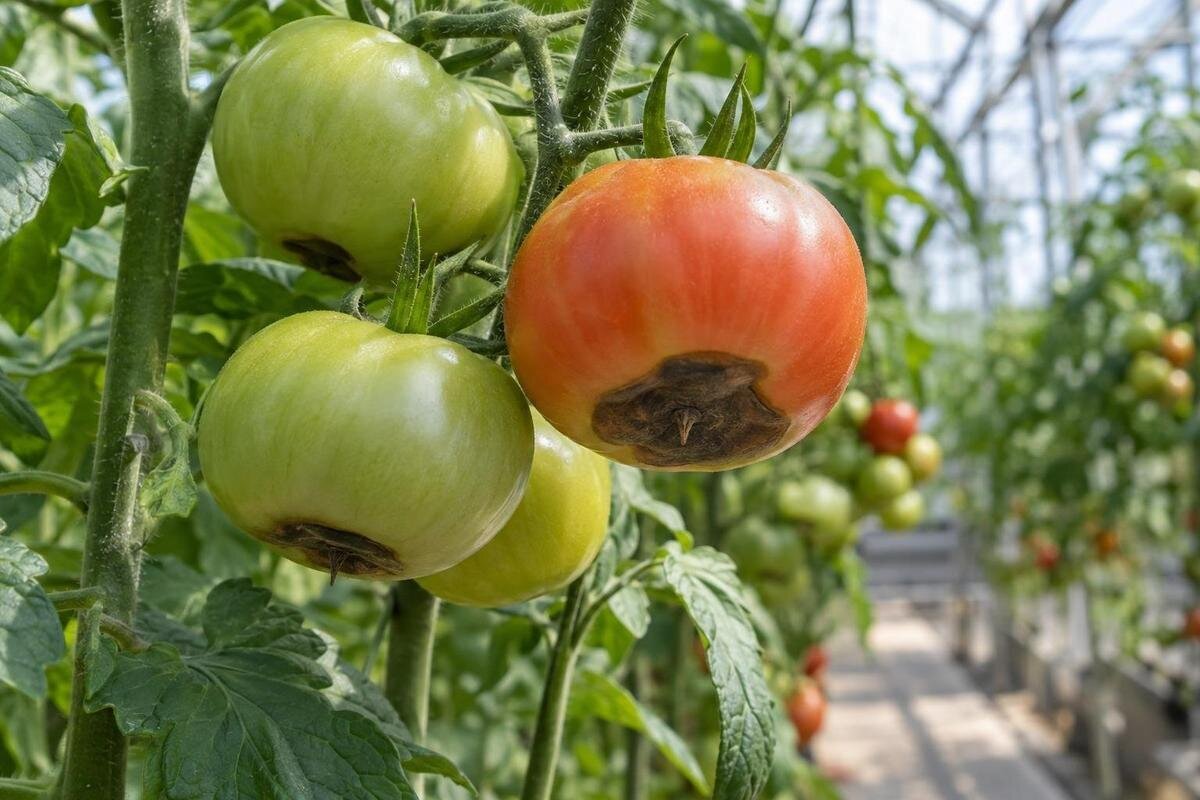
The first sign is usually a small, water-soaked patch centred on the blossom end—the end opposite the stem—of a young or enlarging tomato. It may turn tan, brown or nearly black, then become sunken and dry or leathery as it spreads. The damaged area can be firm at first; later, cracks or secondary mould may develop in the dead tissue. One fruit may show a small mark while another has a broad depression. Location and progression are more informative than colour alone: a dark spot on the shoulder or near the stem is not automatically blossom-end rot.
Look at more than one fruit before drawing a conclusion. Record whether affected fruit are on one plant, one truss or several plants, and note their size and stage. Photograph both ends, the whole fruit and nearby foliage in good light; include the same view again a few days later if the mark is changing. A date and note about recent watering make the images more useful. Similar lesions can have different causes, and blossom-end rot can pick up secondary decay, so a photograph supports a diagnosis rather than proving it. A pattern across plants may point to shared growing conditions, while a single affected truss still deserves a root-zone check.
Why fruit can lack calcium when soil has it
Calcium enters a tomato through its roots in dissolved form and moves mainly with water through the xylem. Leaves lose water to the air and draw strongly on that flow, whereas fruit transpire much less. Calcium delivery is therefore uneven across the plant and can lag behind demand in a fast-expanding fruit, particularly during a sensitive stage of development. A plant may look vigorous and green while the blossom end of one fruit is short of calcium. Leaf colour and general plant growth are not reliable tests for whether an individual tomato received enough.
That is why the amount of calcium in the soil and the amount reaching fruit are different questions. Soil may contain adequate calcium, yet dry, saturated, damaged or salt-affected roots may not take it up consistently. A small or poorly chosen sample can also misrepresent a bed, while a container mix may behave differently from garden soil. Low available calcium is possible, but the fruit symptom cannot tell you which explanation applies. Use a representative soil or growing-medium test, and interpret it alongside irrigation and fertilizer history before changing the nutrient balance.
Before adding fertilizer 2
How uneven watering interrupts calcium uptake
Moisture changes are one common way calcium delivery can fall behind. When the root zone becomes too dry, roots have less water to absorb and transport. If it remains saturated, a lack of air can impair root function as well. A dry interval followed by a large watering does not restore calcium to fruit during the earlier interruption, and repeated swings are harder on the plant than a steady supply. In a greenhouse, the surface can mislead: a dry-looking top layer may cover wet soil, while areas between emitters or near a warm wall may dry first.
Check below the surface in several representative places, including beside and between emitters, rather than relying on the top layer or a fixed calendar. Adjust watering to the crop, growing medium, drainage and current conditions; aim to avoid prolonged drying as well as persistent saturation. Check whether each plant actually receives water and whether outlets are blocked, displaced or uneven. Compare an affected plant with an unaffected neighbour and note any difference in moisture or water delivery. This gives you a specific irrigation problem to investigate rather than a reason to water the entire crop more heavily. When planning access to beds and irrigation lines, the Pyramid Greenhouse listing offers a footprint comparison from 5.53 to 18.9 m². Sketch the beds, hose route and places where you will check moisture within the proposed space; the listed area alone does not describe an irrigation setup.
Inspect the root zone before changing fertilizer
In an in-ground bed, note whether water runs away quickly, pools, or leaves pockets that remain wet; compacted soil, damaged roots or poor drainage can limit uptake even when the surface seems moist. In a bag, pot or other substrate, check that water reaches the full root volume and that the container drains as intended. Avoid digging close to a fruiting plant just to inspect roots: cutting fine roots can create more stress. If a plant wilts during the day, compare the wilt with root-zone moisture before assuming it simply needs more water. A quick surface glance is not enough to tell whether the whole root zone is dry.
Where fertilizer is delivered through irrigation, soluble salts can build up and make water harder for roots to absorb; an unsuitable pH can also affect nutrient availability. White crusting on the surface of a pot or bag can be a warning, but it is not a measurement. Review drainage, irrigation-water quality and fertilizer concentration, then use a suitable test before trying to flush or amend the system. The right response differs between soil, potting mix and other substrate setups. Keep the names and application records of your current fertilizers together so you can identify what has already entered the root zone. If storage is part of a future greenhouse plan, compare the Limited-Edition Aluminum Greenhouses with Storage, listed from 5.52 to 28.08 m². Check the storage arrangement separately from the growing area, including how you would organize labelled products and watering equipment.

Before adding fertilizer 3
Distinguish blossom-end rot from other fruit damage
Sunscald usually shows on a fruit surface exposed to strong light, often as a pale, bleached patch that becomes papery; it is not defined by a depression centred at the blossom end. Cracking produces an open split or scar, often near the stem or shoulders, rather than one dark, leathery spot at the opposite end. Insect feeding, rubbing against a support and handling damage can leave marks at scattered sites. Consider the fruit’s position, whether the skin is broken and how the mark changes over time. Similar colours can occur in unrelated problems, so the shade of the lesion alone is weak evidence.
Some fruit rots also sink into the skin. Anthracnose often becomes more apparent as tomatoes ripen and can form roughly circular sunken areas, sometimes with visible dark specks or ring-like zones; bacterial fruit spot may produce several small, rough or scabby marks. These are comparison clues, not a reliable diagnosis from one photograph, and another organism can colonize tissue already damaged by blossom-end rot. For uncertain symptoms, photograph both ends and the whole plant, then ask a local extension service or plant diagnostic clinic to review them. Make room to inspect fruit from different sides without pulling on a loaded truss. For future layout planning, the Bloomcabin Prestige Greenhouse listing provides a structure to compare. Consider where paths would let you see the crop clearly and reach affected fruit; choosing a structure cannot resolve an uncertain diagnosis.
Why adding more fertilizer can backfire
A dose chosen from the appearance of one tomato can add soluble salts and make it harder for roots to take up water. Excess nitrogen may encourage fast leaf growth, while overly high levels of potassium, magnesium or ammonium can contribute to an imbalance that interferes with calcium uptake. The effect depends on what is already in the soil or growing medium and in the fertilizer; it is not a reason to stop all feeding or to blame one nutrient without evidence. A fertilizer marketed for tomatoes may contain calcium, but that label does not show whether roots can absorb it or whether enough reaches the fruit.
Before adding anything, review the product label, recent applications and a representative test result. Consider the growing medium and irrigation water as well as the fertilizer itself. Write down the product, concentration and application dates rather than relying on a general description such as “tomato feed.” This helps you review the existing programme before deciding whether an amendment is justified. Foliar calcium products are not a dependable rescue for affected fruit: calcium moves poorly from treated leaves to fruit, and a spray cannot repair a lesion that has already formed. Greenhouse area is not a fertilizer rate. The Spacious Greenhouse listing covers 47 to 70 m², but that total is not the same as the planted area or volume of growing medium. Keep those quantities separate, and apply an amendment only when evidence and product directions support it.
Before adding fertilizer 4
Greenhouse heat and airflow affect water demand
Hot, bright periods can raise a plant’s water demand and dry a bed or pot sooner than expected. Conditions may also vary between a sunny wall, a doorway, a corner and shaded foliage. Dense leaf growth, fruit load and the pace of fruit development all influence water use. These factors can help explain why one part of a greenhouse is affected more than another, but none proves the cause on its own. Ventilation may help manage greenhouse conditions; it cannot restore calcium to fruit that has already been damaged or replace an investigation of the root zone.
Note temperature and moisture near the crop when wilting or symptoms appear, and compare sunny and shaded areas rather than relying on a single reading from across the greenhouse. Record the time and location of each observation so you can compare similar parts of the day. A note taken beside the affected plants is more useful for this investigation than an unlabelled reading that could have come from anywhere in the structure. If you are evaluating a new greenhouse, the Aluminum Greenhouses listing covers 3.77 to 28.08 m². Check the specifications for ventilation and openings instead of inferring them from the area or product name. On your proposed layout, mark the openings, crop positions and access needed to operate them. Use that plan to assess the structure and your observations to investigate the tomatoes; ventilation details alone do not diagnose blossom-end rot.
What to change after spotting affected fruit
The damaged patch will not shrink or heal, so avoid trying to reverse it with a sudden heavy watering or a strong fertilizer dose. If the fruit is otherwise developing, you can monitor it and make root-zone corrections for fruit still growing. Heavily damaged fruit can be removed, but removing every affected tomato is not a treatment for the plant. Check nearby fruit and make a note of when symptoms first appeared; the timing can help you relate them to earlier dry periods, drainage problems or changes in feeding.
Make one measured adjustment at a time where practical, then watch the next fruit rather than changing water, fertilizer and several other conditions all at once. Confirm that emitters work, moisture reaches the root zone and water drains as expected. Record what you changed and which fruit were already affected, so old lesions are not mistaken for evidence that the adjustment failed. Keep a few dated views of the same plants for comparison. If a future layout is also under review, Lean-To Greenhouses lists options from 3.69 to 14.34 m². Plan how you would reach plants and irrigation outlets along the wall and from the path. Check the proposed bed and container positions against the available space rather than assuming that the footprint shows where outlets should sit or how evenly they will deliver water.

Before adding fertilizer 5
Use crop notes to find a recurring pattern
A short record can reveal a pattern that a single damaged tomato cannot. Note the plant or variety, truss and fruit stage, location in the greenhouse, watering changes, fertilizer applications and any unusually hot or bright periods. Mark which plants are affected and whether symptoms appear on new fruit after a change. If the problem is limited to plants near one line or one part of a bed, inspect that area’s irrigation and drainage closely. If many plants are affected across the greenhouse, review conditions and inputs shared by the whole crop.
Keep photographs and test results together so a later decision is based on more than memory. Label each photograph with the plant and date, and distinguish existing damaged fruit from fruit that developed after an adjustment. A simple sketch of the greenhouse can connect those records to particular beds, containers or irrigation lines. For a future crop, use the sketch to identify where you need better access for moisture checks and which parts of the watering arrangement deserve closer attention. If you are comparing structures for that plan, Limited Edition Aluminum Greenhouses lists areas from 3.77 to 28.08 m². Place your proposed beds, containers and inspection paths on a scale layout rather than comparing total area alone. The crop record helps define your practical requirements; the product listing supplies the structure information to assess against them.
When to ask for a diagnosis
Ask a horticulture adviser, local extension service or plant diagnostic clinic for help if the lesion does not match the typical blossom-end pattern, several different symptoms appear together, or spots are also developing on leaves and stems. A diagnosis is also useful when the problem returns despite steadier moisture and a review of fertilizer inputs. Provide clear photographs of both ends of the fruit, the whole plant and affected foliage, plus notes about watering, growing medium and recent feeding. Follow the service’s instructions if it requests a sample; a photograph alone may not be enough to distinguish overlapping problems.
A soil or growing-medium analysis and a plant-health diagnosis answer different questions: one helps assess the root-zone conditions, while the other considers whether symptoms fit blossom-end rot or another disorder. Explain what you want to establish when seeking advice, and include the growing setup and changes you have already made. This keeps the discussion focused on the unresolved symptom rather than another unplanned fertilizer adjustment. Keep a greenhouse purchase separate from that investigation. If the T-Shaped Orangery Greenhouse is on your shortlist, use its product specifications to assess the structure and proposed layout. Keep one set of notes for the crop problem and another for purchasing requirements, such as space for beds and inspection access. Plant observations help investigate the tomatoes; the product listing helps compare the structure. Neither answers the other question.
Frequently asked questions
Can a tomato with blossom-end rot recover?
No. The damaged tissue will not repair itself. Conditions can improve for fruit that is still developing, so focus on root-zone moisture, drainage and the existing fertilizer plan.
Does blossom-end rot prove the soil lacks calcium?
No. Soil may contain adequate calcium while stressed roots or uneven moisture interrupt its uptake and movement to fruit. Use a representative soil or growing-medium test before adding calcium.
Will spraying calcium on the leaves fix it?
It is not a dependable rescue. Calcium moves poorly from treated leaves to fruit, and spraying will not repair an existing lesion. Check root-zone conditions and test results first.
Can overwatering cause blossom-end rot?
Not as a simple one-to-one cause. Persistently saturated soil can impair roots, while dry periods and uneven watering can interrupt uptake. Check moisture below the surface and assess drainage.
Can blossom-end rot spread between tomatoes?
Blossom-end rot is a physiological disorder, not an infection that spreads from fruit to fruit. However, other problems can look similar, and decay may develop on damaged tissue.
Blossom-end rot is a signal to investigate calcium delivery and root-zone conditions, not an automatic instruction to fertilize. Confirm where the lesion starts, track moisture and drainage, and review a soil or substrate test before adding calcium. The damaged fruit will not heal, but conditions can improve for fruit still developing. If the symptoms do not match the typical pattern or keep returning despite steadier root-zone care, seek a plant-health diagnosis rather than escalating amendments.
