
How to Keep Greenhouse Seedlings From Becoming Root-Bound
Propagation planning
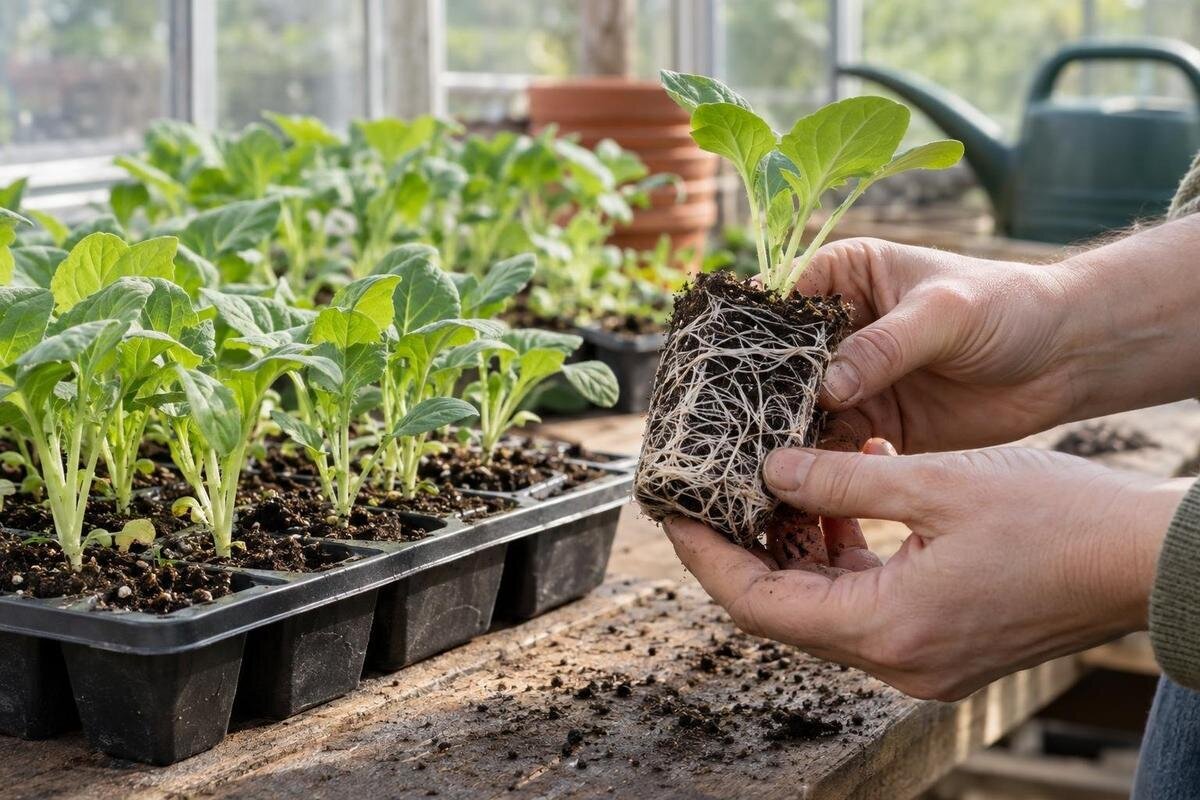
Greenhouse seedlings become root-bound when their roots have filled most of the available space in a cell or pot and the plant must remain there longer than planned. A few roots visible at a drainage hole are not enough to diagnose it: roots naturally reach the edge as a plug develops. More useful signs are a dense web around the plug, roots circling at the sides or bottom, and little growing medium left between them. Preventing the problem is mainly a scheduling and capacity task. Work backwards from a realistic planting window, match each cell or pot to the time a crop will stay indoors, and reserve room for any potting-up stage. Check sample roots again as the schedule changes.

Greenhouse capacity check 1
What root-bound seedlings look like
A root-bound seedling has a crowded root system constrained by its container; it is not simply a well-rooted plant. A few roots at a drainage hole or along a cell wall can be normal. Look for a dense outer layer, roots circling instead of spreading through the mix, or so little loose medium that the plug is mostly roots. When you slide out a sample, a tight, root-heavy mass is more concerning than a plug that holds together while still showing growing medium between roots. Some seedlings show root crowding before their tops look unwell, so do not wait for obvious wilting. The practical question is whether the roots have room for the planned wait before potting up or planting out.
Above-ground symptoms are clues, not a diagnosis. A seedling that wilts soon after watering, dries much faster than neighbouring plants or stops producing new growth may have crowded roots, but moisture, light, temperature, pests or nutrition can cause similar changes. Leggy stems more often point to light or spacing than to a full cell. Compare more than one plant and inspect roots before changing the whole tray; seedlings from one sowing do not always develop at the same rate. If only the fastest has filled its container, move or monitor that part of the batch rather than automatically potting every cell up. That avoids using larger pots and bench space unnecessarily.
Set the planting window first
Begin with a realistic window for planting seedlings in their final bed or container. That date depends on the crop and conditions at the planting site, not simply on when the greenhouse feels warm. Check crop-specific seed-packet advice, a reliable local growing guide and your own records; do not treat one date as right for every plant or garden. Keep the window flexible if outdoor conditions, soil readiness or bed preparation are uncertain. A tender crop may need a later move than one that can be planted in cooler conditions, even if both grew in the same greenhouse. If you are planting in several beds, set a separate target for each.
Work backwards from that window in separate steps. Allow for any recommended hardening-off period, then estimate the time from emergence to a transplant-ready plant, and finally allow for germination. The result is an estimated sowing window, not a guaranteed date: variety and growing conditions affect how quickly seedlings develop. Write down an early and a later plausible planting date and ask whether each crop can stay in its current cell through the later one. If not, arrange an earlier potting-up date or a later sowing batch before starting the seeds. Record hardening as a separate stage rather than folding it into the greenhouse-growth estimate, since it still takes calendar time and attention.
Greenhouse capacity check 2
Calculate how long each crop will stay indoors
Give each crop—and each variety, if schedules differ—a line in a calendar. Record the number of plants wanted, planned sowing date, expected emergence, container stage, likely potting-up point and planting window. Use crop-specific instructions for a first estimate, then update it with your observations rather than assuming seed-packet timing will predict every batch. Where varieties share a tray, the slowest group can delay moving the earliest ones; label and separate them when their dates differ. A fast-growing crop may need a larger cell or earlier move even if sown later, while a slow batch may need the same bench longer than expected. Keeping dates and counts together helps identify the source of a space squeeze.
Use staggered sowings when the final planting will happen in waves or when one large batch would be ready before space is available. Set a target for each wave and allow a modest reserve for uneven germination; decide what to do with extras before every one needs a larger pot. Add overlapping batches to your peak tray estimate, not just to the calendar. If you are considering the T-Shaped Orangery Greenhouse, use your batch schedule to work out which trays would need space at the same time. Reserve room for access and handling in the layout. A batch plan that fits early in the season may not fit after potting up increases the tray footprint.
Choose cell size for the time before planting
Cell size is both a plant-care choice and a capacity decision. Smaller cells can fit more starts on a tray, but offer less growing medium and less time before roots reach the sides; larger cells use more mix and take more room per plant while potentially allowing a longer interval before potting up. These are trade-offs, not a rule that every seedling belongs in the largest pot. Check crop guidance, the expected time indoors, seedling growth and how reliably you can pot up when needed. A cell that suits the planned planting date may not provide enough room if planting is delayed. Selecting a tray by its advertised cell count alone can leave you with too little root space or too many plants for the benches.
Plan containers by stage: an initial cell for germination and early growth, then an appropriate larger pot if the crop will wait longer, or a suitable individual container from the start where crop-specific guidance recommends limiting root disturbance. Count how many trays each stage needs; moving to a larger pot changes the number of plants per tray and may extend the time each one occupies a bench. The Pyramid Greenhouse listing states a floor-area range of 5.53 to 18.9 m²; compare the selected option's layout with your tray plan, because total floor area alone does not give you a tray count. Treat each stage as a separate capacity calculation rather than assuming the starter-tray count carries through.

Greenhouse capacity check 3
Plan potting up before roots run out of room
Potting up should be a planned step, not a last-minute rescue after growth stalls. Set a review point before seedlings are expected to fill their cells, then lift sample plugs from a few parts of the tray. Roots reaching the lower or side edges are a reason to look more closely; a dense, circling layer with little growing medium left signals less room to wait. If seedlings are growing faster than expected, bring the next check forward. A calendar reminder is useful, but roots and the planned planting date—not a universal number of days—should determine whether you move them. Avoid waiting until roots form a hard mat or block drainage openings.
When a seedling needs more room, transfer it into a suitably larger container with fresh growing medium, following the crop's guidance on root handling. Keep the label with the plant and water in a way that settles the mix without leaving the pot persistently saturated. Avoid jumping from a tiny plug into a much larger pot solely to avoid another inspection; larger containers use more bench space and can make the schedule harder to track. Have pots and growing medium ready before the planned move. If you are considering the limited-edition greenhouse with storage, check the selected variant's layout to distinguish storage space from space available for seedlings. After potting up, check the plants again and schedule their next stage.
Check plugs before symptoms become severe
Do not diagnose the whole batch from the largest seedling at a tray edge. Lift a sample plug gently, supporting the stem and root ball, from a typical area; if growth is uneven, inspect another part of the tray. Note how much growing medium remains visible, whether roots spread through it or circle around the outside, and whether the plug is still open enough for water to enter. Compare faster and slower plants separately, particularly in mixed sowings. Use a tray that represents the batch you are assessing, not simply the first one at hand. Periodic sample checks let you move cells that need it without disturbing every seedling on the same day.
Pair the root check with observations of new growth and moisture patterns, and consider the planting date. If roots are just reaching the edges and the seedling remains on schedule, record an earlier follow-up check; if the plug is tightly matted but planting is still some time away, pot up when the crop can be handled. Wilting or yellowing alone does not justify a larger pot: check watering, light and other growing conditions too. When planning benches for a Bloomcabin Prestige Greenhouse, leave enough access to lift trays and examine plugs without first moving other batches. Note the inspection date and root pattern so the next check reflects the batch's actual pace.
Greenhouse capacity check 4
Calculate the peak number of trays
Calculate the number of trays at the busiest point, not merely the number of plants at sowing. For each crop wave, divide the plants you intend to keep by the usable cells per tray and round up to whole trays; repeat for each container size after potting up. For example, 36 seedlings in trays with 12 usable cells need three trays at that stage, before adding any reserve or extra working clearance. This gives you a tray count, not a bench-area figure. Measure the complete outside footprint of each tray and include space to lift, water, label and inspect it. Keep the number of spare plants in the calculation too, rather than assuming they will fit without using room.
Add trays from overlapping sowings and the larger pots created by potting up, then compare that peak with usable bench area. A schedule can fit during germination and overflow later, when fewer plants fit on each tray. The Spacious Greenhouse listing gives floor-area options from 47 to 70 m². To assess that space, sketch the benches using the exact variant's published dimensions and your measured tray footprints. Mark fixed obstacles and access routes rather than treating the whole floor as growing surface. If the greenhouse also holds mature plants, tools or other items, reserve their space before estimating how many propagation trays will fit at the busiest point.
Turn greenhouse floor area into usable bench space
Bench planning needs measurements for the exact greenhouse and the exact tray, not a rough estimate of plants per square metre. Check the interior dimensions and any layout restrictions for the option under consideration, then measure bench width and depth, tray orientation and access. A listed floor area covers more than the surface on which seedlings sit. Door clearance, a route to reach each bench, and space for handling trays, watering and routine greenhouse tasks all affect usable capacity. If existing crops share the area, reserve their space before planning starts. Make sure your sketch accounts for getting trays in and out, not just fitting them in place.
Mark zones on a simple sketch for germinating seedlings, plants approaching potting up and batches ready to move. They need not be separate benches, but the map reveals when stages compete for the same position. Keep a small capacity buffer for uneven growth or a delayed planting date, and decide which trays can leave first. The Classic aluminium greenhouse listing gives a floor-area range of 3.77 to 28.08 m². Use the selected option's dimensions to compare possible bench arrangements, including the access each arrangement needs. Check whether trays in every zone can be reached for routine care and moved out when their next stage is due.

Greenhouse capacity check 5
What to change when bench space is short
If the peak tray count exceeds available bench space, revise the sowing plan rather than crowding seedlings together. Set the number to match your intended planting, divide the work into realistic waves, or shift a later sowing so it does not overlap unnecessarily. Keep only a modest reserve for likely losses and decide what will happen to extras before they need larger pots. Do not leave surplus plants in undersized cells just because the bed is not ready; their roots and care needs continue to grow while they wait. If a crop can go to its final spot earlier, make that decision based on its readiness and the planting conditions.
Potting up creates more root room but does not automatically free a bench; larger containers may take more surface and remain indoors longer. Recalculate tray needs before making the move. A temporary second growing area only helps if it offers conditions suitable for the crop and reliable access for watering and checks; an unplanned location is not equivalent to a managed propagation space. If comparing lean-to greenhouse options as additional space, map the batches you would move there, their tray footprints and the room needed to handle them. This shows whether the proposed layout addresses your actual bottleneck. If no suitable extra space is available, adjust future sowings and bring root checks forward.
Update the schedule when planting is delayed
Build a response to planting delays into the calendar. If bed preparation or outdoor conditions push the date back, reassess root space, crop readiness and available bench area. Some seedlings may remain in their current containers for a while; others need potting up or a revised destination. Use the crop's guidance and a root check to judge how much longer they can wait, rather than assuming every plant can wait the same length of time. Do not solve a scheduling problem by planting outside before conditions suit the crop. Update the bench forecast as soon as the date changes, since plants already at the next stage may need room before the new date arrives.
Keep a brief propagation record: crop and variety, sowing and emergence dates, container size, date of each move, root condition at inspection and actual planting date. Note when roots first began to fill a cell and how much greenhouse space the largest overlap required. At season's end, use those observations to adjust sowing dates, pot sizes or batch sizes for crops that repeatedly waited too long. If you are considering a Limited Edition Aluminum Greenhouse for a future season, compare its proposed tray layout with that recorded peak demand. Your notes can help distinguish a recurring shortage of bench space from a sowing schedule that needs adjustment, rather than relying on memory.
Frequently asked questions
Are roots poking through a drainage hole a problem?
Not by themselves. A few roots at a drainage hole can be normal. Check a sample plug for a dense outer mat, circling roots and little loose growing medium, then consider how long the seedling still needs to stay in that container.
How often should I check seedling roots?
There is no single interval that suits every crop. Set reminders based on the expected growth rate, then check sooner if plants are growing faster than planned or their planting date has moved. Sample a few plugs rather than disturbing every seedling.
Can I prevent root-bound seedlings by starting them in the largest pots?
Not automatically. Larger containers use more growing medium and bench space, and may not suit very young seedlings. Match container size to the crop, growth stage and expected time indoors, and plan a potting-up step if needed.
Does wilting mean a seedling is root-bound?
No. Wilting can have several causes. Check moisture and growing conditions, then inspect a representative plug. A tightly matted root system combined with a longer wait may call for potting up; wilting alone does not identify the cause.
What should I do if the planting date is delayed?
Recheck root space, crop readiness and bench capacity. Pot up seedlings that need more volume, adjust later sowings where practical, and avoid planting outside before conditions suit the crop. Update your tray estimate because larger containers can take more room.
Preventing root-bound seedlings means matching their time in containers to the root space available. Set a realistic planting window, work backwards to schedule sowing and potting up, and choose containers for the expected time indoors. Inspect sample roots before they become tightly matted, and check that peak tray numbers—not just the first sowings—fit on accessible benches. Revising the plan as plants grow or planting conditions change helps avoid both undersized cells and a last-minute rush to find room.
