
When to Prick Out Seedlings into Larger Pots
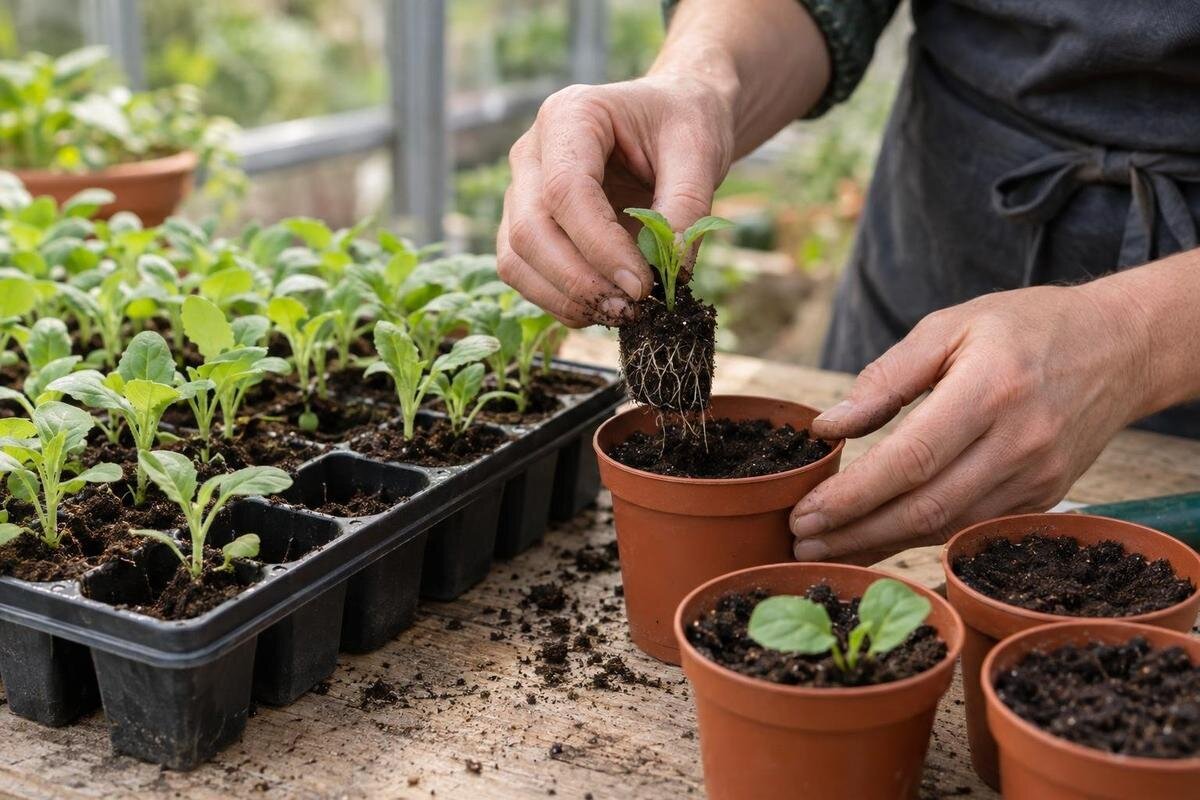
Seedling propagation
Seedlings rarely reach a single perfect day for moving. Look instead for a combination: true leaves are opening, roots can be lifted with some growing medium around them, and plants are starting to compete for space. Those signs give you a practical window for pricking out—separating seedlings from a shared tray into their own cells or pots—while helping you avoid both fragile, very young plants and a dense mat of roots.

01
Pricking out and potting up
Pricking out is the careful lifting of seedlings that share a shallow tray or small patch, separating them and placing them in individual cells or pots. The move gives each plant its own root space; it is not a reason to shift every newly emerged seedling into a large container. A seedling started singly in a cell does not need pricking out, though it may later need potting up as its roots fill that container. Keeping those two jobs separate prevents unnecessary handling and clarifies which plants actually need attention.
Think of readiness as a window, not a date on the calendar. The aim is to wait until a seedling can be handled, then move it before competition or intertwined roots make the job harder. Growth varies with species, conditions, medium and how closely the seeds were sown, so seedlings in the same tray may reach that window at different times. Use a calendar note to prompt an inspection, not to decide that every plant is ready. Check a few seedlings from different parts of the tray; edge plants may develop sooner than those in the centre.
True leaves are a useful timing cue
True leaves develop after the cotyledons, or seed leaves. Cotyledons often look simpler than the later foliage, although their shape varies by crop. Once one or more true leaves have unfolded, a seedling is generally easier to identify and handle than it was just after emergence. This is a helpful cue, not a universal leaf-count rule: leaf size, stem strength, roots and species-specific transplant advice all affect the decision. Look for a seedling that is actively growing, rather than relying on a tiny leaf tip that has only just appeared.
Do not wait for a large top if seedlings are already competing in a crowded tray, and do not move a tiny plant merely because its first true leaf has appeared if it is growing freely. Compare plants within each crop group rather than choosing only the tallest seedlings. Before lifting any, identify which will move and which will stay; this makes it easier to work without repeatedly disturbing the tray. Leave room for the source tray and receiving pots while you work, with their labels visible. If you are also comparing greenhouse sizes, the Classic aluminium greenhouse range runs from 3.77 m² to 28.08 m². That floor area does not tell you how much clear bench space a particular layout provides. Consider the work surface needed for inspecting and sorting seedlings separately from the space occupied by pots.
02
Roots reveal whether seedlings are ready
Roots can show whether a seedling is established enough to move and whether you have waited too long. In an individual cell, roots reaching the sides or base are a reason to inspect the plant, but one root at a drainage opening does not by itself mean it must be transplanted immediately. Look for a small, loose network of roots rather than a dense, circling mass. In a shared flat, gently ease a little medium away from one seedling near the edge and see whether its roots can be separated without force.
A seedling that lifts with a little medium around its roots is often easier to handle than one with bare, fragile roots. At the other extreme, a tightly woven root mat can make separation difficult and increase disturbance. Set the tray on a stable work surface while you inspect it, with space nearby for the plants you remove. Inspect only enough seedlings to understand the root condition; there is no need to uncover every plant before starting. Notice whether neighbouring roots come up together or release separately, since that distinction helps you judge the handling involved. When considering the aluminium lean-to greenhouse, listed from 3.69 m² to 14.34 m², compare the chosen layout and bench details rather than treating floor area as a count of tray positions. Allow access to the tray’s edge, where you can begin lifting without reaching across other plants.
Signs that crowding is affecting seedlings
A few leaves brushing against each other do not automatically mean it is time to prick out. Look for a pattern: foliage overlapping enough to shade nearby plants, roots beginning to tangle, or seedlings competing for the same small area of medium. Uneven growth across a tightly packed tray can also be a prompt to inspect. No single sign settles the decision, but several together suggest that waiting may make it harder to lift individual plants cleanly.
If the seedlings are growing evenly and their roots still separate easily, continue monitoring rather than moving them just to create a tidy tray. If a dense group cannot be separated without tearing roots, do not force every plant apart. Depending on the crop, it may be better to prick out the seedlings that lift cleanly and thin extras at the growing-medium surface. Avoid pulling surplus plants from right beside a seedling you intend to keep, since that can disturb its roots.

03
Not every seedling should be pricked out
Pricking out is not a required step for every crop. Seedlings started one per cell already have separate growing space, so leave them in place until they need another move. Some plants, including those with delicate or strongly tap-rooted systems, tolerate root disturbance poorly. For these, crop-specific instructions may call for an early move with the rootball intact or a different growing method. A general rule about waiting for a certain number of leaves should not override advice for the plant you are growing.
When one tray contains several crops, label each group and assess it on its own. A fast-growing group may be ready while its neighbours still need time, and sensitive seedlings may need gentler handling. Keep each label with its group throughout the move, rather than relying on leaf appearance to identify plants afterwards. If only part of a group is ready, retain its label in the source tray and add another to the receiving pots. This also lets you record which plants moved first without confusing varieties. The Limited Edition greenhouse range is listed from 3.77 m² to 28.08 m². When comparing layouts, consider where these separate groups would sit during the work and afterwards. A larger listed area alone does not establish that the planned benches will accommodate them or keep their labels easy to read.
Prepare pots and tools before lifting seedlings
Set up the receiving containers before taking seedlings out of their tray. Choose clean pots or cells with drainage holes and growing medium suited to the crop and its stage. Match the container to the roots you have inspected: it should accommodate them naturally, not force them into a folded bundle. Pricking out does not mean choosing the largest pot available. The immediate task is to give each seedling separate growing space; later potting up is a different decision. Where seedlings vary in size, you do not have to use one container size for the entire batch. A narrow tool, such as a dibber, plant label or small spoon, can help lift roots from below. Lightly moisten the new medium so it holds around the roots, but do not make it saturated. Fill containers without packing the mix hard, and label them before the seedlings are out of the tray.
If the source tray is dry, water it ahead of time so the medium is less likely to crumble away from the roots; let excess water drain before you start. Keep the tray, receiving pots and a place for finished seedlings within reach, and work in small batches so roots are not left exposed while you gather supplies. Prepare the holes, labels and lifting tool for that batch before touching the plants. Separate unused supplies from the active work surface so you can set a pot down without moving other items first. For greenhouse buyers, the Limited Edition greenhouse with built-in storage is listed from 5.52 m² to 28.08 m². Confirm the storage arrangement and measurements before assuming it will fit particular tools or supplies; storage space and the clear surface needed for handling seedlings serve different purposes.
04
Separate seedlings without gripping the stem
Loosen the medium around a seedling, then slide a dibber or similar tool underneath its root zone and lift gently. Hold the plant by a leaf or cotyledon rather than pinching its stem; stems are easy to crush. When seedlings are close together, work from the tray’s edge and ease the medium away from the roots before trying to separate them. Keep each lifted seedling out of the air for as little time as practical, then place it in a prepared container.
Handle a few plants at a time instead of emptying the whole tray onto the bench. If roots are woven together, ease them apart from below and stop if they resist; pulling on the tops can damage the plants. Choose the seedlings that release cleanly before tackling a stubborn clump. The aim is not to save every plant at the cost of damaging those you intend to keep. During a larger batch, the source tray, receiving pots and finished seedlings may all need temporary space. Arrange them so that a lifted seedling can go straight into its prepared hole rather than waiting on the work surface. The spacious orangery greenhouse is listed from 47 to 70 m². Check the selected layout and bench placement rather than assuming that its floor area shows where a potting station can go or how conveniently you can work there.
Plant at the right depth and settle the medium
Make a hole deep enough for the roots to point down without folding them upwards. Set the seedling at roughly the depth it was growing before, with roots covered and leaves above the medium. Firm the mix gently around the roots so the plant is supported, but do not press it into a hard mass. Some crops have specific planting-depth guidance, so follow that where it differs from the general approach. If roots will not fit without bending, choose a container that allows them to sit naturally.
Water gently around the base to settle the medium against the roots, then let excess drain. If the mix sinks and leaves roots exposed, add a little more rather than burying the leaves or growing point. Check the result after watering: the seedling should remain supported at the intended depth, not lean because the hole has been left open around its roots. Correct the medium around it gently rather than pressing down on the plant. Keep each pot labelled, and place it where you can reach it for watering and inspection without confusing it with the original tray. The Oasis pyramid greenhouse is listed from 5.53 m² to 18.9 m². Compare the chosen model’s dimensions and planned benches when estimating space for newly potted plants, including access to the pots at the back rather than just those along the front edge.

05
Care after pricking out
After transplanting, place seedlings in bright, sheltered conditions similar to those they were used to. Avoid an abrupt move into harsh direct sun or a more exposed spot while the roots settle. Greenhouse conditions can change quickly over a sunny day, so pay attention to the growing area and follow crop-specific guidance rather than aiming for one temperature or light level for every plant. Keep the medium evenly moist, checking individual pots because small containers can dry at different rates, but do not leave them saturated.
A brief pause in growth does not necessarily mean the move has failed. Check that the medium is moist and the stem is intact, then watch for leaves remaining firm and new growth as signs of recovery. Compare these observations over time rather than judging the batch immediately after watering. Avoid repeatedly lifting seedlings to inspect their roots or applying concentrated fertilizer by default; follow the growing-medium and crop instructions. Keep newly moved pots together as a labelled group so you can distinguish them from plants that have not yet been transplanted. Leave enough space to reach them without moving or reaching over other trays. The T-shaped orangery greenhouse is listed from 16.52 m² to 30 m². Use the selected layout to assess accessible bench positions, not area alone, especially where several groups will need separate attention.
Use a small trial when the signs do not match
Sometimes the signs point in different directions. A seedling may have true leaves but little root growth, or roots may be crowded before the top looks substantial. Check the crop’s needs and inspect a few plants before deciding what to do with the whole tray. If the roots are ready and neighbouring plants are competing, move a small group first. If a seedling is still too fragile and has room to grow, leave it in place and check again rather than forcing a transplant.
For the next batch, note the date you inspected it, the leaf stage, root condition and whether seedlings were easy to separate. These observations are more useful than a fixed number of days because they describe how your plants actually developed. If you moved a trial group, record what you saw during recovery before deciding whether the remaining seedlings need the same treatment. Keep the notes specific to the crop and batch rather than turning one successful move into a rule for everything you grow. Also note how long the source tray and newly potted plants occupied the same work area. The Prestige greenhouse range is listed from 3.77 m² to 28.08 m². Compare the selected layout and bench options with that temporary overlap, not just the number of pots moved at once; both the unfinished tray and completed pots still need a place.
Frequently asked questions
How many true leaves should a seedling have before pricking out?
There is no fixed number that suits every crop. One or more unfolded true leaves is a useful sign that a seedling is easier to identify and handle, but check root development, crowding and crop-specific guidance too. A seedling with only one true leaf may be ready in a crowded tray, while another can wait.
Can I prick out seedlings that only have cotyledons?
Usually it is easier to handle seedlings once their first true leaves have opened. Cotyledon-stage plants are small and can be fragile, but some crops are moved young to limit root disturbance. Follow the crop’s guidance and avoid lifting a seedling by its stem.
What should I do if the roots are tangled?
Moisten the tray if the growing medium is dry, then ease seedlings apart gently from below. Do not pull hard on stems or force roots apart. If the roots will not separate with little disturbance, follow the crop’s guidance; thinning extra seedlings may be safer than trying to save every plant.
Should I water seedlings before pricking them out?
If the tray is dry, water it ahead of lifting so the growing medium holds together around the roots. Let excess water drain; saturated medium is harder to work with. After potting, water gently to settle the medium around the roots, then allow the containers to drain.
Do seedlings need to be hardened off after pricking out?
Pricking out and hardening off are different steps. After transplanting, give seedlings a bright, sheltered place with conditions similar to those they were used to, and avoid an abrupt move into harsh sun or a more exposed spot. Acclimatize them to outdoor conditions later, when they are ready.
Pricking out is easiest when the signs agree: true leaves are developing, roots can be lifted with some medium intact, and crowding is beginning to matter. If they do not agree, check the crop’s needs and a few plants before moving the whole tray. That keeps the decision tied to the seedlings in front of you rather than to a date on the calendar.
