
Seedlings Collapsing in the Greenhouse: Recognizing Damping Off
Greenhouse growing guide
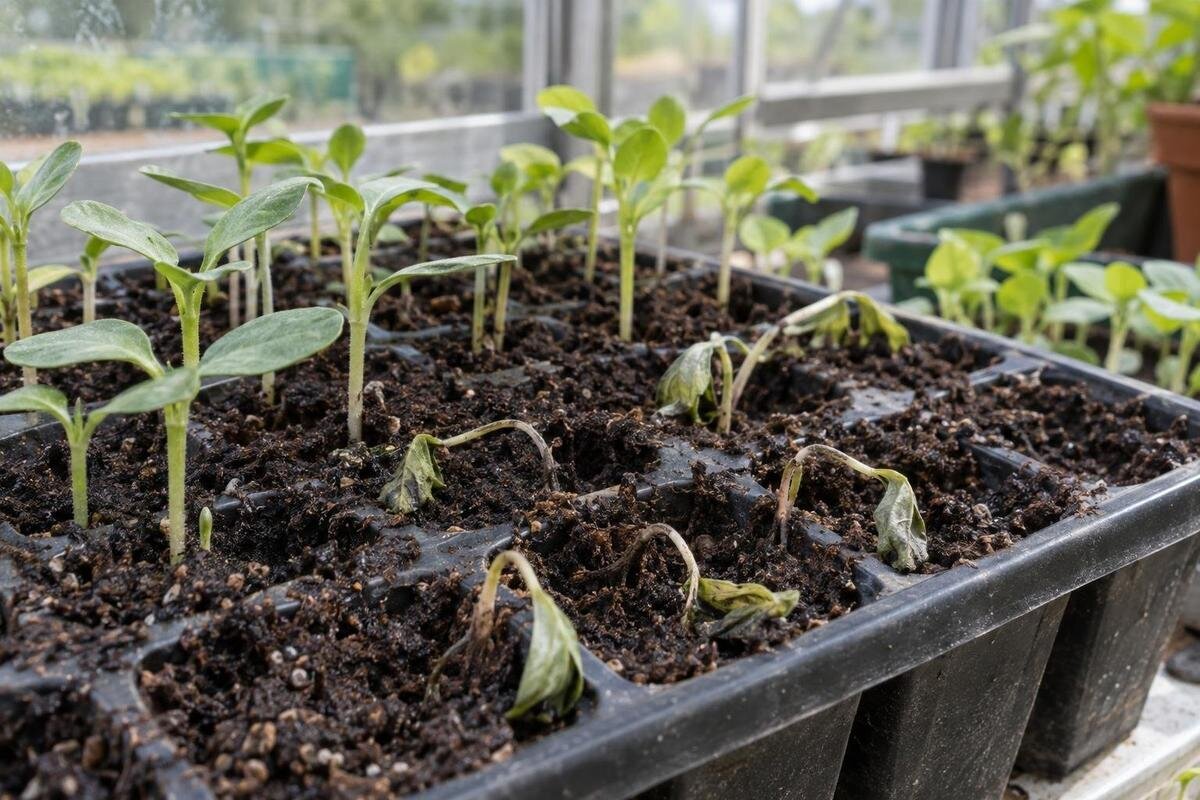
Greenhouse seedlings that suddenly topple at the growing-medium line may have damping off, but the symptom is not a diagnosis. Look for a softened or constricted stem base, compare affected seedlings with healthy ones, and note the pattern across the tray. Water stress, root disturbance, physical injury and other problems can look similar. Clean handling helps limit spread, while repeated losses or uncertain signs call for a plant-health specialist. This guide covers the clues to inspect, practical hygiene and the information that makes follow-up more useful.

Propagation-area planning 1
The clearest sign is at the stem base
Damping off is a broad name for diseases that can affect seeds before emergence and young seedlings soon after they emerge. A seed may rot without producing a shoot, or a new seedling may develop a weak, narrowed or water-soaked stem base. The affected area is often at or just below the growing-medium surface; it may look translucent, brown or grey. The seedling can topple while its upper leaves still appear green. Roots may also be discoloured or soft. Both stages can occur in one sowing, but absent shoots alone do not identify the cause. These are warning signs, not proof of one particular pathogen.
Inspect the transition between stem and medium rather than judging by leaves alone. If doing so will not disturb the tray, lift one fallen seedling with a little surrounding medium and compare its collar and roots with those of a healthy neighbour. A clear constriction or soft lesion at the base is more informative than general wilting, though root damage can also affect the stem. Note whether the base looks pinched, mushy, dry, cut or intact. Photograph it before removal, and check more than one plant; a single injured seedling may not represent the whole batch. Avoid squeezing a fragile stem, as handling can create damage that is difficult to distinguish from the original symptom.
Map the pattern before changing conditions
Inspect the pattern across a tray before changing several conditions. Losses may be isolated, grouped in a small patch or concentrated along an edge; a row that never emerged may point to a problem that began before shoots appeared. Note whether seedlings of one age or crop are affected, and whether nearby trays remain healthy. Look for a pattern that follows a watering route, bench position or contact between trays. A cluster can suggest a shared exposure, but it cannot confirm an infectious cause: uneven moisture, local temperature differences, sowing depth or a damaged cell can create similar gaps.
Write down the crop and variety, seed source or lot if known, sowing date, medium, tray history, watering method and when the collapse first appeared. Note recent changes such as moving a tray, opening a vent, applying fertilizer or removing a humidity cover. Mark affected cells on a sketch and photograph the tray before discarding plants. If possible, record medium moisture and conditions near the seedlings at the time you inspect them. For a planned workspace, Bloomcabin Prestige Greenhouse with Metal Base is listed in sizes from 3.77 to 28.08 m²; match detailed dimensions to benches and aisles rather than using floor area alone to estimate tray capacity.
Propagation-area planning 2
Other causes of seedling collapse
A seedling that stretches towards light and then flops usually has a long, thin stem above the medium, unlike the softened collar associated with damping off. A plug that has dried can cause sudden wilting; saturated medium can impair roots without producing the same stem lesion. Recently transplanted seedlings may droop after root disturbance. A bent or severed stem may point to handling or pests, so look for a clean break, chewing or damage above the medium. Compare roots and stems with an unaffected plant from the same sowing. Several problems can occur at once, so these clues do not rule infection in or out on their own.
Check whether symptoms follow one location, one watering event, one tray or one batch. A hot, bright area, a cool edge or a blocked airflow route can produce local stress, while a repeated patch may also reflect contaminated material. A map narrows the questions but does not provide a diagnosis. If losses recur in one corner, record conditions there and elsewhere at comparable times before moving every tray and losing the original pattern. When considering a Classic Aluminium Greenhouse, check ventilation and layout details in the product information; the model name and area range do not show how air moves around trays or whether a planned bench will fit.
Conditions that can favour damping off
Persistently wet seed-starting mix, poor drainage, crowded seedlings and stagnant air can create conditions that favour damping off and make plants harder to inspect. Reused containers, contaminated medium, dirty scoops, splashing water and plant debris can carry disease organisms between sowings. A cover used to retain humidity can also keep the surface wet if it stays in place after seedlings emerge. Temperature matters in relation to the crop: a cool-sensitive species and one suited to cooler starts need different conditions. None of these factors confirms damping off; several unrelated problems can occur in the same greenhouse environment.
Keep the medium evenly moist rather than saturated, empty standing water, and follow crop-specific guidance for light, spacing and temperature. Ventilate when appropriate, while avoiding a sudden chill or rapid drying. Remove humidity covers as seedlings emerge according to the crop’s instructions, and check the medium instead of watering by calendar alone. Air movement should not blast some cells dry while others stay wet. Do not make the whole structure hotter or drier because a few stems collapsed. When comparing the aluminum lean-to greenhouse with other models, check opening locations and ventilation specifications against your tray layout; the greenhouse type alone does not establish air exchange.

Propagation-area planning 3
Contain a suspected problem carefully
When damping off is plausible, keep the affected tray apart from healthy batches without dragging wet mix across the bench. Photograph it, label the crop and sowing date, then remove seedlings that have collapsed along with the medium attached to their roots. Contain this material for disposal and follow local waste guidance; do not scatter suspect mix through other pots or beds. Use a dedicated tool or clean it before returning to healthy trays. If nearby seedlings remain upright, inspect and monitor them rather than automatically removing the entire sowing. Avoid carrying the suspect tray over healthy foliage, and clean up any drips promptly.
Keep healthy batches under crop-appropriate care, but do not share drainage water or tools with the suspect tray. A pesticide or whole-greenhouse disinfectant is not a default response; it may be unsuitable if the cause is water stress, root injury or another problem. If you are considering more space for propagation, the Spacious Greenhouse page lists versions from 47 to 70 m². Treat that as a stated floor-area range, not evidence of partitions, separate climate zones, benches or quarantine facilities. Confirm the actual layout and access before buying; extra floor area alone does not isolate a batch.
Clean trays, tools and work surfaces
Remove loose soil, roots and plant debris before any disinfection step; disinfectant cannot be relied on to work through a layer of organic residue. Empty trays into contained waste, wash off stuck medium, and scrub cell openings, corners and drainage holes where debris can remain. Clean benches and reusable tools too, especially handles and edges that contact hands or tray bottoms. If you use a product labelled for that item and setting, follow its directions for dilution, contact time, rinsing and handling. Products differ, so do not improvise a mixture or combine cleaners. Let cleaned containers dry fully before stacking or refilling them.
Keep clean supplies separate from used items: unopened mix and unused pots should not sit beside trays waiting to be washed. Label containers for clean and suspect tools, and avoid placing washed trays back on a contaminated bench. The Limited-Edition Aluminum Greenhouse with Built-In Storage listing identifies a storage feature, but does not establish its capacity or suitability for propagation supplies. Verify the storage dimensions and intended use, and keep clean tools in a closed, dry container rather than relying on built-in storage alone.
Propagation-area planning 4
Use clean seed-starting mix and careful watering
Start new sowings with fresh medium suited to seed starting and containers that have been washed. Follow the medium and seed labels rather than adding fertilizer or other amendments by default. Do not reuse mix from a tray with suspected damping off for another propagation batch. Keep bags closed and dry between uses, use a clean scoop, and avoid setting an opened bag on the greenhouse floor. Garden soil can vary in drainage and cleanliness and may not behave reliably in small cells. If a package is wet, torn or contaminated by soil or plant debris, set it aside instead of mixing its contents with unused medium.
Water gently so seeds and young roots are not displaced, then allow excess to drain rather than leaving trays in standing water. Bottom watering can reduce splash in some setups, but remove leftover water and do not pass it from tray to tray. Use a clean watering container and avoid dipping tools into drainage water. If losses continue despite cleaner handling, note the water source and any shared reservoir; a plant-health adviser can help assess whether they matter. For workspace planning, Limited Edition Aluminum Greenhouses are listed from 3.77 to 28.08 m²; check dimensions and where mix handling, watering and drainage can fit instead of treating floor area as work surface.
Arrange trays for inspection and separation
Arrange trays so labels remain readable and each batch can be inspected without moving neighbouring seedlings. Leave room to lift one tray out, wipe a spill, reach the watering point and clean around the bench. Group trays by sowing date or crop so you can connect symptoms to a seed lot or routine; do not mix identified batches just to fill gaps. Keep newly sown trays separate from emerged seedlings when their cover or moisture needs differ. Avoid overcrowding that blocks inspection or makes fallen seedlings difficult to notice. Use stable labels that will not wash off, and update them if a tray is moved.
Before buying or rearranging benches, sketch doors, vents, the water point and planned tray positions at peak sowing. A plan is more useful than assuming all advertised floor area becomes bench space. The T-Shaped Orangery Greenhouse listing identifies a T-shaped model, but its shape alone does not show usable bench runs, access clearances or a route from clean supplies to the washing area. Check the actual layout and dimensions to see where each task can take place. Arrange the work areas so fresh trays and used containers can be handled separately, and set aside a place to observe a suspect batch without putting it among healthy seedlings.

Propagation-area planning 5
When to get a plant-health diagnosis
Ask for a specialist diagnosis if seedlings continue to collapse in new batches after affected material has been removed and basic hygiene and crop-appropriate watering have been reviewed. Specialist input is also worthwhile when several species are affected, stem-base signs are unclear, losses are costly, or you need a reliable answer before choosing a treatment. A repeated problem across trays may involve seed, mix, water, environmental conditions or handling; changing all of them at once can hide the cause. Photos help with triage, but may not distinguish a pathogen from root, water or temperature stress.
Contact a regional plant diagnostic clinic, agricultural extension service, university plant-health lab or qualified crop adviser, and ask what they need before sending a sample. They may request affected seedlings with roots and the stem base intact, nearby growing medium, close-up photos and a healthy comparison plant. Include the crop and variety if known, sowing and symptom dates, seed and medium details, tray reuse, watering history, greenhouse conditions and any products already applied. Keep samples from different trays separate and retain their labels. Follow the receiving service’s packaging and shipping instructions; requirements differ, so do not assume how to store or mail a sample.
Make the next sowing a small, traceable trial
Once affected seedlings are removed and equipment is clean, make the next sowing a small, labelled trial rather than repeating the full batch immediately. Use fresh suitable medium and clean containers, follow crop-specific instructions, and record watering and greenhouse changes. Where practical, change one controllable factor at a time; if you change the medium, tray, watering and temperature together, a better result will not show which change helped. Record the number of emerged, healthy and affected seedlings by tray, and note when any new symptoms appear. Inspect the stem base after emergence, not only when plants fall over.
Choose a greenhouse and bench arrangement for the actual sowing schedule, not just a catalogue footprint. If you are comparing layouts for a trial batch, the Pyramid Greenhouse listing shows models from 5.53 to 18.9 m²; confirm clearances, usable floor dimensions and bench placement in the full product details. A structure cannot prevent damping off on its own: dependable propagation also depends on clean trays, crop-appropriate moisture and airflow, separated batches and regular checks. If the characteristic stem-base lesion returns, pause sowing in that medium and seek diagnosis rather than guessing at a treatment.
Frequently asked questions
Can damping off spread from one tray to another?
Yes. Contaminated growing medium, drainage water, tools, hands or plant debris can carry disease organisms between trays. Keep a suspect tray separate, avoid sharing standing water, and clean tools and work surfaces before handling healthy batches. Nearby losses do not, by themselves, reveal how the problem spread.
Can a collapsed seedling recover?
A seedling with a softened, narrowed stem base has usually lost its support and is unlikely to recover. Remove it with the medium attached to its roots. If it toppled without a lesion at the base, check plug moisture, roots and signs of physical damage before assuming damping off.
Does damping off mean I watered too much?
No. Wet medium and poor drainage can increase risk, but a collapse can also result from drying, temperature stress, pests, root disturbance or injury. Contaminated materials may be involved as well. Check the stem base and the pattern across the tray; watering history alone cannot confirm the cause.
Can I reuse medium from an affected tray?
Avoid reusing medium from a tray with suspected damping off for another seedling batch. Remove it with the affected plants and follow local waste guidance. Use fresh medium suitable for seed starting in clean containers; drying or storing used mix does not establish that it is safe to reuse.
When should I seek a specialist diagnosis?
Ask for advice if losses continue after hygiene improvements, affect several batches, are costly, or show unclear symptoms. Contact a local plant-health adviser or diagnostic service and ask what to submit. They may need seedlings with roots and stem bases intact, nearby medium, photos and a record of growing conditions.
A fallen seedling is a reason to inspect, not a reason to assume damping off. Check the stem base, compare the pattern across the tray, and record what was happening before making changes. If infection seems possible, separate the affected batch and restore clean handling without disrupting healthy seedlings unnecessarily. When losses continue or the symptoms remain ambiguous, a plant-health specialist can help identify the cause. That diagnosis, paired with a small and well-recorded next sowing, gives you a clearer basis for improving greenhouse propagation.
