
Straight-Sided vs Curved-Wall Greenhouses: Usable Space
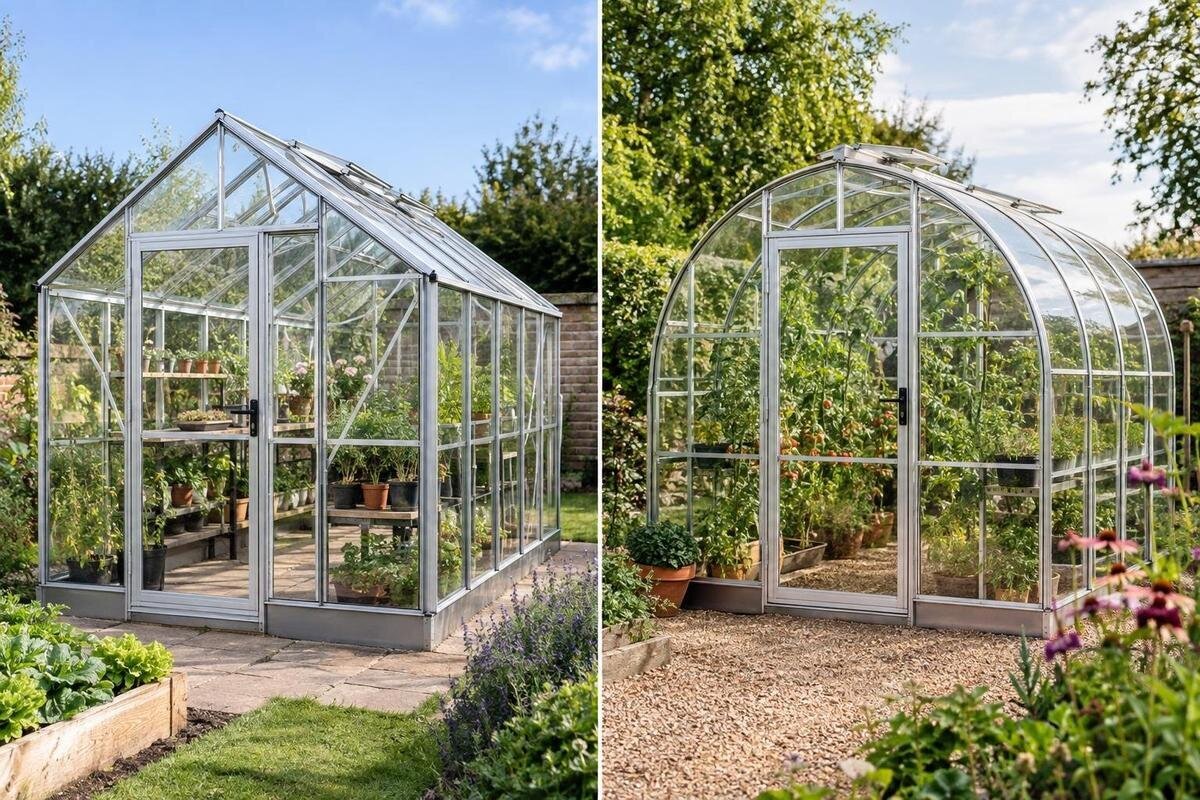
Greenhouse planning
Two greenhouses with similar footprints can feel different once benches, pots and a path are added. The difference often shows up at the edges: a vertical sidewall can keep more headroom beside a bench, while an inward-curving wall can bring the roof or glazing closer to tall plants and shelves. That is a geometric tendency, not a promise about every model. To compare fairly, work from the interior cross-section for the exact size and test it against the layout you intend to use.

Floor area and usable perimeter space are different
Floor area and usable perimeter space answer different questions. A plan-view area tells you how much ground the greenhouse encloses, but not the height above its outer strips or how far a bench can extend before its top meets a slope. A perimeter strip is useful only if a chosen item fits there: a bench of a given depth, a shelf at a set height, a tray, a pot or a working position. Each has a different minimum clearance. A low seedling tray may fit under a slope that would crowd a taller container plant; a standing work surface also needs room for hands and access. What counts as usable depends on the task, not one universal height.
Keep floor area, clear perimeter width and usable perimeter length as separate figures. Note the inside width at floor level, the width that still meets your chosen headroom, and how far along each side that condition continues. A short section may suit a small shelf but not a full-length bench, especially near a door or brace. The Spacious Greenhouse is listed from 47 to 70 m², yet that range alone cannot show whether a bench fits beneath its side profile. Use the listed area to judge scale, then check the plan and section for the exact configuration. Measure both sides separately if the layout or profile differs across the greenhouse.
How the wall profile changes edge clearance
On a cross-section, a straight-sided greenhouse has a vertical lower wall before the roof rises or angles inward. Straight-sided describes the sidewall, not a flat roof. A curved-wall greenhouse has a wall or roof-wall transition that sweeps inward as it rises, though the curve may begin at floor level or above a short upright section. Those starting points create different edge clearance at bench height. A curved roof above a vertical lower wall also has a different side profile from a continuous arch that begins near the floor. An arch in a photograph alone does not tell you which arrangement you are looking at; check where the inside wall stops being vertical.
Trace the interior profile rather than relying on catalogue language or a perspective image. The key is the horizontal position of the inside surface at each height: a curve that moves inward can reduce space over a side bench, while a short vertical wall retains more room until the curve begins. Names such as Pyramid Greenhouse describe a form, not the clearance along either side. Ask for a dimensioned section of the precise configuration, including the wall-to-roof junction, and check whether dimensions refer to inside or outside faces. If the end and side profiles differ, request the section that matches the location where you plan to put a bench.
Compare internal width, length and height
A like-for-like comparison uses the internal dimensions of configurations you could actually choose, not sketches scaled to the same outside width. Check inside floor width and length, floor or base level, sidewall height and roof peak where these are shown. A thick frame, base profile or low wall can reduce the clear space inside the nominal footprint. If widths or heights differ, record those differences instead of treating the result as a pure shape test. A wider greenhouse may leave more room at the edge simply because it is wider; note where each profile gains or loses space rather than crediting every difference to the wall curve.
Apply the same test to both drawings: one bench depth, one shelf height and one minimum working clearance. Compare each side at the shelf top, then above it for plants and hands; a board that fits may still leave a cramped working position. Do not stretch a perspective picture or scale one wall curve by eye, because changes in width or eaves can shift the usable line. The Classic Aluminium Greenhouse is one named model to evaluate by its selected size and section, just as you would any alternative; the model name does not establish edge headroom. If a drawing gives only exterior dimensions, seek the interior measurements before comparing.
Measure clearance on the interior cross-section
Begin with a dimensioned cross-section, its floor line and the inside face of the wall or glazing. Read heights from the floor you will stand on, not from an exterior base if the finished surface sits higher. At several positions from centre to side, mark vertical clearance to the inner roof or wall. Pay particular attention to the planned bench’s back and front edges, and to the top of a container on that bench. Clearance measured over empty floor can be generous even when the same vertical line above a raised work surface runs into the roof. Confirm that the drawing is to scale and keep its units consistent with your layout measurements.
Choose a task-based clearance threshold, such as the space needed above a shelf or the height required by a crop, rather than assuming a universal number. On the section, mark that height above the floor, bed or bench surface, as appropriate. Find the horizontal span over which the interior profile provides the required clearance. Compare where that span ends on each side: the inward curve or roof slope determines how far the usable space extends towards the perimeter at the chosen height. If the same section holds along the internal length, multiplying the clear span by that length gives a rough area with the required overhead clearance, before fixtures and end effects. Repeat the measurement where the profile changes. Apply it to the selected Bloomcabin Prestige Greenhouse configuration, not a photograph.

Bench depth and shelf height need separate checks
A perimeter bench needs both a footprint and clear space above it. Mark its depth on the floor plan, then carry its back and front edges onto the cross-section. With a vertical wall, the inner face stays at roughly the same horizontal position through the straight-wall portion, which can make shelves or pots beside the wall easier to place. If the wall curves inward above a low bench, the bench itself may fit while upper foliage or a rear shelf meets the sloping surface. Check not just the bench board, but also the deepest pot and expected plant spread. Measure the available depth at bench height, and show any gap needed between the bench’s back edge and the inside wall.
Test every shelf level separately. A high shelf can project into the curved profile even when a lower one clears it, and a plant on the shelf needs more room than the board alone. Leave access for watering, picking and cleaning; check that the shelf will not obstruct any vent or door shown for that configuration. Frame posts or braces can interrupt an otherwise clear run, and fixtures should be installed only at locations supported by the design. When reviewing the Lean-To Greenhouses page, use the exact section for the chosen configuration as you would for any model; the category name is not a measurement of shelf depth or side height.
Place crops by mature height and canopy width
Plants make the edge-height question three-dimensional. Record the finished height of the bench or bed, the crop’s expected mature height and its approximate canopy width, then place that outline on the section. A stem may fit within the available height while leaves, fruit or a training line extend into the roof curve; trellised plants also need room for their supports and for reaching along the row. If the profile narrows towards the top, moving tall plants towards the centre may give their foliage more clearance, but it can reduce aisle width or displace a bed. Test the whole row, not just one plant, and allow for the space needed to tend it.
Shorter plants, trays or low pots may use a lower perimeter zone, but access and the crop’s light needs still matter. Measure from the bed or bench surface, not the floor, and include the pot or container if it takes up height. Check how much uninterrupted length is available before an end wall, post or door interrupts the planting strip; one clear section may not fit a full row. When considering the Limited Edition greenhouse, obtain the profile for the selected configuration before assigning tall crops to its edges. The product name alone says nothing about wall shape, and a photograph cannot show the clearance behind mature foliage.
Keep the aisle clear in the finished layout
Edge space competes with circulation. Draw benches, beds and storage at their actual depths, then measure the clear aisle between their nearest edges. Pots, leaf growth, handles and watering equipment can narrow a route that looks generous on an empty plan. Decide whether you need to pass with a tray, work at the bench or reach both sides of a bed, and use those same access requirements when comparing wall shapes. If you routinely carry a particular tool or container, include its width and the room needed to manoeuvre it. A straight wall may make a side bench easier to align, but only the remaining aisle shows whether the complete arrangement works.
Check the route from the door to the far end as well as the broadest point in the centre. Door openings, any door swing, end-wall benches and an inward-curving section near an end can create a pinch point that a middle cross-section misses. A width section explains headroom at one slice; it does not show every lengthwise obstruction. If the side profile or storage changes near the doorway, use another section or plan detail before counting that strip as walkable or plantable. Judge the path after the chosen fixtures are drawn in, not from the empty shell.
Account for frames, doors and built-in storage
Nominal floor area can include places you will not plant. Mark the base, frame, corner posts, braces, door clearances, fixed benches and any built-in storage on the plan. Use internal clear dimensions where possible; the outside footprint can hide space taken by the structure or leave a gap between the measurement and finished floor. Keep equipment access and any ventilation openings in mind if they are part of the chosen configuration. A post or cabinet may have little effect on total area but break the continuous length needed for a long bench; an end door can make an otherwise promising perimeter location impractical.
Storage needs particular care in the area calculation. The Limited-Edition Aluminum Greenhouses with Storage listing gives a range from 5.52 to 28.08 m², but the name and area range do not show how much of a specific configuration is available for planting. Check the exact plan to see whether storage sits in a separate section, occupies an interior bay or changes the route to the door. Count only the area accessible for the job you intend to do, not every square metre inside the outline. If storage is shown differently between configurations, compare the version actually under consideration.

Test the cross-section against a scaled floor plan
Use the cross-section and floor plan together to test your layout. Draw the inside outline at scale, then add bench or bed depths, the central aisle, door area, storage and the space you need to reach plants. Transfer the cross-section’s clearance limits to the bench and crop positions on the plan. Repeat near the centre and at each end if the roof, wall or fittings change along the length. For a non-rectangular option, including the T-Shaped Orangery Greenhouse, a section through one wing may not describe the junction or the other perimeter runs. Check the actual plan and use separate sections to assess clearance along each distinct run.
To get a clearer sense of the planned layout, use removable tape on a clear floor to mark the bench and aisle widths. On the drawings, place pots at the outside edge of each bench and sketch the mature canopy; this exposes collisions that a bare outline hides. Compare two profiles with the same number and depth of benches, the same aisle and the same crop outlines, then note any changes needed to make them fit. If a curved edge pushes a bed inward, include the resulting loss of central growing room or path width; moving the bed does not create additional space.
Choose the profile that suits your growing layout
Straight-sided walls often suit layouts that rely on a continuous vertical zone for side benches, shelves or trained crops, provided the wall height and inside width meet the actual measurements. A curved wall can still serve a lower perimeter bed or a layout centred on the main growing area if its clearances and access are sufficient. Neither label guarantees more growing room: one profile can gain headroom at the edge while another configuration offers more width or a different roof height. Even a straight wall may meet a low roof transition sooner than expected. Choose for the bench depths, crop envelopes and aisle you need, rather than an abstract winner.
Keep a short comparison record for every selected configuration: internal width and length, where the curve or roof begins, clearance above each working surface, usable length along each side and aisle width after benches are added. Use that record to identify the trade-offs that matter to your layout. A model that accommodates a higher shelf may still leave less aisle space, while a wider option may fit the same benches despite a lower perimeter profile. Record any bench, shelf or crop that must move, and the effect on the rest of the plan. This makes the final choice a comparison of complete working layouts rather than isolated heights or area figures.
Frequently asked questions
Does a straight-sided greenhouse always have more usable space?
No. A vertical lower wall often provides more headroom close to the side, but the result depends on the greenhouse’s width, wall height, roof junction and the clearance your layout needs. A narrower straight-sided model may offer less useful perimeter space than a wider greenhouse with a curved wall.
Can I use the outside footprint to plan a bench?
Not on its own. Outside dimensions do not show the space taken by the base and frame or the height above the bench. Check the interior dimensions and the cross-section, measuring clearance from the finished bench surface rather than the floor.
How can I check whether a bench will fit?
Mark the bench depth on the plan, then check the cross-section above its back and front edges. Include the height and canopy width of the plants or trays you expect to keep there. Leave room to reach and work; the right clearance depends on the bench and its use.
Can a curved-wall greenhouse have perimeter shelves?
Yes, if the actual profile leaves enough space for the shelf, its contents and access. A lower shelf may fit where a higher one does not. Check each shelf level against the interior cross-section, and do not assume the wall is designed to support attachments.
Do square metres tell me which wall shape is better?
No. Square metres describe area, not how that space is distributed or how much headroom is available at the sides. Use the listed area to compare overall scale, then test the exact interior width, profile, obstructions and layout against the same growing needs.
The useful question is not whether straight or curved walls are better in general, but where the chosen cross-section leaves enough room for your actual bench, plants and access. A measured interior profile turns a greenhouse outline into a working layout, showing which edge strips can carry shelves or crops and which should remain clear. Compare exact configurations, and the space decision becomes more reliable than a square-metre figure alone.
