
Cleaning or Replacing Greenhouse Glazing Seals
Greenhouse repair
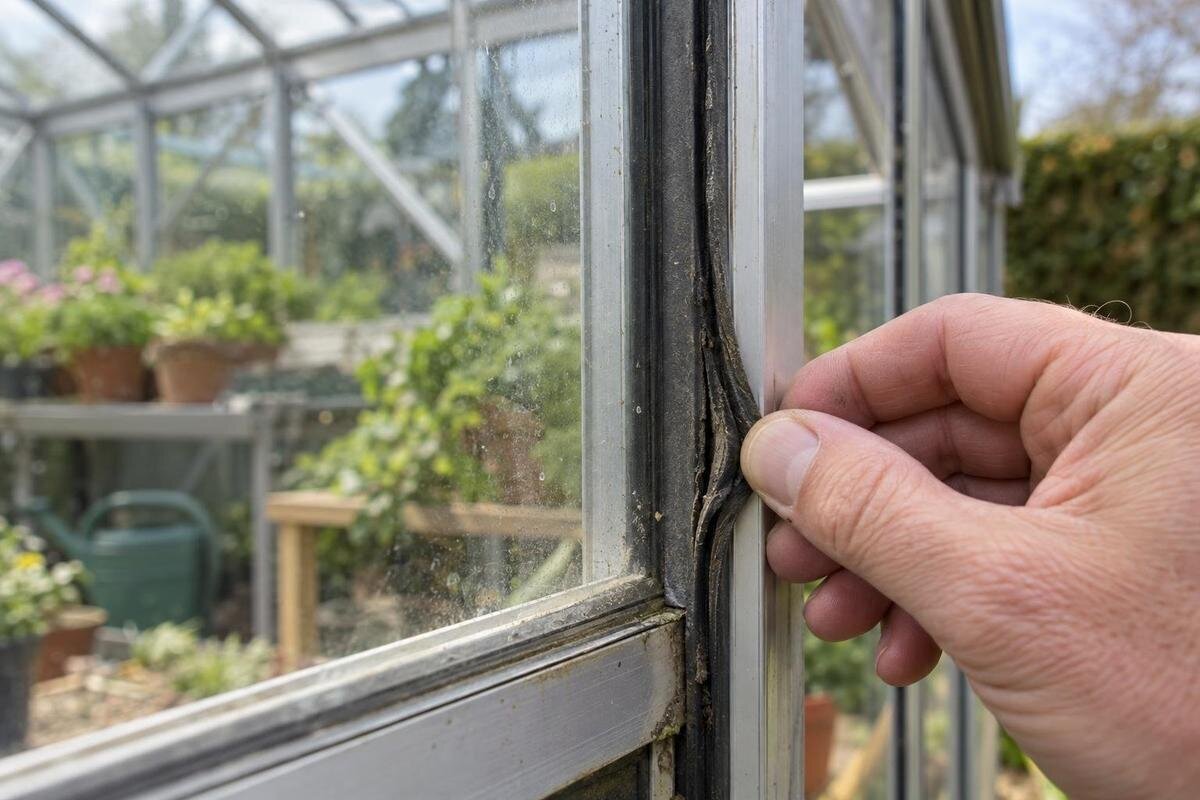
Greenhouse glazing seals collect grime, but cleaning is useful only if the seal itself remains intact and seated as designed. Splits, brittleness, shrinkage, permanent flattening or a loose fit cannot be washed away. Any replacement must match the greenhouse's glazing system; a generic strip that looks close is not proof of compatibility. This guide explains how to distinguish dirt from wear, inspect safely and gather the right details before requesting a replacement.

01
When cleaning is enough
Begin with what you can see without pulling the seal. Dust, soil splash or a film of algae can make an intact gasket look worn, especially along a lower panel or in a sheltered corner. If the strip remains continuous, has no split or missing section, sits evenly in its intended channel and keeps its general shape, cleaning may be enough. Try a small, accessible area first and compare it with a nearby uncleaned area. Make the comparison at the same joint rather than between seals in different locations, since they may have different profiles. Look separately at the surface dirt and the outline of the strip: removing a dark deposit does not necessarily close a gap beneath it. Colour alone is not a reliable test. Staining may be cosmetic, while a clean surface can still have a crack or a loose fit.
Cleaning cannot restore a profile that has cracked, become brittle, shrunk, flattened permanently or repeatedly slipped out of position. Washing removes surface dirt; it does not replace missing material or return the seal to its original dimensions. If a gap remains after cleaning, or an end keeps pulling away, treat it as a fit or wear issue rather than dirt. Record where it occurs and ask whether that profile is available as a separate, manufacturer-approved part. Let the area dry before judging it, and do not try to stretch, glue or patch the old seal as an improvised fix.
What a glazing seal does—and why the profile matters
Glazing seals sit where a greenhouse panel meets its glazing system. Depending on the design, a seal may cushion an edge, help keep a panel seated or limit water and air movement at the joint; other retainers can also play a role. That is why a strip that resembles a gasket is not automatically the component responsible for holding the glazing. Use the part name in the greenhouse manual or parts drawing where available. Match that label to the location you are inspecting, rather than assuming every dark strip around a panel has the same function. In your notes, distinguish the seal itself from the adjoining panel edge, glazing bar and retainer. A damaged retainer or panel edge can be mistaken for a seal problem during a quick visual check.
Profiles can differ by cross-section, panel thickness, location, material and retention method. A roof, wall, door or corner may use a different seal from another part of the same greenhouse. A close-looking strip can still fit poorly or leave a gap. Confirm the manufacturer's part number, or ask the supplier to identify the profile from the model and drawings. Keep the complete model name in your enquiry, including any version details shown in your records. For example, the Limited-Edition greenhouse with storage name identifies a complete greenhouse configuration; it does not identify the seal fitted at a particular joint. If you are also considering a new greenhouse, keep its specifications separate from the information used to identify parts for your existing one.
02
Visible signs of a worn greenhouse seal
Look for splits or cracks, crumbling edges, a section that has become unusually hard or brittle, or a strip that has shortened and pulled back from an end or corner. A lasting flat spot is another warning if the seal no longer contacts the panel and frame as it should. Note any area where it is torn, twisted, visibly out of its channel or no longer continuous. These physical changes are more informative than a dull colour or light surface staining, which may be cosmetic.
Check more than one point along an accessible run. Damage limited to a short section may call for a different parts request from a pattern repeated around several panels; a supplier needs to know which you are seeing. Describe the pattern precisely: one pulled-back end, several cracked corners or a continuous strip that appears flattened. Note where the affected run begins and ends, without assuming that the whole run needs replacement. Do not tug at the seal to test whether it will come free, since that could disturb the glazing system. If other components also look worn, ask for a broader assessment before ordering multiple seals. Keep model identity and condition separate in your records. The Bloomcabin Prestige Greenhouse listing can serve as a model reference when that is the greenhouse named in your paperwork, while your inspection notes describe the actual repair concern.
How to clean seals without damaging them
Follow the greenhouse manufacturer's care instructions first, since the seal, panel and frame may not all tolerate the same cleaners. Where the manual permits, use clean water and a small amount of mild detergent with a soft cloth or sponge. Work only on an area you can reach safely, lifting loose dirt without scraping or pressing hard against the glazing. Rinse or wipe away residue as directed, then let the joint dry so you can see its condition clearly. If the instructions specify a particular cleaner or method, use that instead.
Do not assume that solvents, strong degreasers, abrasive powders, stiff brushes, sharp blades, oils or silicone sprays are suitable. They may affect the seal or nearby surfaces, and a coating can hide damage rather than repair it. Avoid directing a pressure washer at glazing joints unless the manufacturer says it is appropriate; forceful water could disturb a loose component. Do not smear household caulk or adhesive over a worn strip unless the manufacturer specifies it as an approved repair. Stop if cleaning would require removing the seal or shifting a panel.

03
Inspect seals from a safe position
Make a slow visual check from a stable, safe position, following each accessible glazing line rather than looking only at the place where water appeared. Note where a strip meets a corner, ridge or change in direction, where its ends join, and whether it sits consistently in the channel. Look for visible gaps, displaced ends and differences between adjacent sections. If roof-level seals cannot be seen from the ground, do not climb onto the greenhouse or lean on glazing to reach them; have a qualified installer inspect them.
Photograph an overall view and clear close-ups from a safe location, then mark each finding on a simple sketch or describe it as roof, side wall, door or another position. Give each affected area a consistent label so the supplier can connect a close-up to its location on the greenhouse. Include the date and weather conditions; temperature can affect how a seal feels, so one impression on a cold day should not decide the repair. Record visible changes rather than assigning a cause you cannot confirm. If you see movement, cracked glazing or a loose panel, stop the inspection and keep clear of the affected area. If concerns extend beyond seals and you begin comparing complete structures, the Spacious Greenhouse page belongs with those purchase notes. Keep the condition record for the existing greenhouse available when discussing whether repair remains worthwhile.
Why a leak alone does not prove seal failure
Water marks around glazing deserve attention, but they do not by themselves prove that a seal has failed. Water can travel along a frame before appearing inside, and condensation can collect on a panel without coming through an exterior joint. A damp patch beside a seal is therefore a reason to investigate, not enough evidence to order a replacement. Record the moisture and the seal's visible condition as separate observations. Look for a visible split, pulled-back end or clear gap in the same location, without trying to force water through the joint.
Clean and dry the accessible area as the manual allows, then record where moisture appears after ordinary weather. Note whether you observed water at the joint itself or only found a mark later; those are different observations and should not be presented as the same evidence. Do not seal over a suspected gap as a test, use a high-pressure hose or dismantle glazing as a diagnostic shortcut. If the path remains unclear, an installer can assess whether the issue involves a seal or another part of the glazing system. Resolve that question before comparing repair with replacement. If the assessment identifies wider work, you can include Classic Aluminum Greenhouses in a complete-structure comparison, using the findings about your existing greenhouse to define what you are replacing and why.
04
How to identify the correct replacement profile
Before ordering, identify the greenhouse make and exact model, plus any serial, batch or order number shown on paperwork or labels. Locate the manual's parts diagram and note the drawing label or spare-part code for the seal. Record where it is used and which glazing type is installed, if known. The same greenhouse may use more than one profile, so a description such as “roof gasket” or “side seal” is a useful starting point, not enough to guarantee the right part.
Do not choose a generic strip solely because its width looks close in a photograph or a loose piece resembles the listing. Dimensions, cross-section and the way the seal engages with the panel or retainer all matter; confirm the requirements with the manufacturer or installer. Ask the supplier to distinguish a confirmed match from a possible candidate, and record which model and location their answer covers. That prevents a recommendation for one joint from being treated as approval for every seal on the greenhouse. Do not remove an attached seal just to take a sample, especially around glass. If parts support for the original model cannot be confirmed, discuss the remaining repair options before considering a full replacement. The Lean-To Greenhouses listing may form part of that purchase comparison, but its model name cannot establish compatibility with an older greenhouse.
What to include in a parts request
Make a parts request easy to answer by connecting the symptom to one component. Include the model name, serial or purchase reference, approximate age if known, manual page or drawing code, glazing material if known, and the seal's location. Say whether the damage affects one short length or several runs, and mention any label or visible profile detail. Be clear about what you have not been able to verify rather than guessing; that helps the supplier distinguish a parts-identification question from a general maintenance concern.
Add one wide photo showing the greenhouse and clear close-ups of the seal in place, taken without moving it. Label the images to match the locations in your written request, and distinguish an overall view from a detail of the damaged area. Include a ruler only if you can hold it safely beside the part without pressure; a photo may help identify the area but does not confirm compatibility by itself. Ask whether the supplier needs a particular view, measurements, a sample or an installer inspection, rather than removing a sample on your own initiative. State whether you want identification only or also information about ordering the confirmed part. If you are separately enquiring about Limited Edition Aluminum Greenhouses, make that a new-structure request so the supplier does not confuse a prospective purchase with the model whose seal needs attention.

05
When to involve an installer
Get professional help if the seal is on a roof or otherwise out of safe reach, if glazing is cracked or loose, or if identifying the part would mean moving a panel. Some greenhouse systems rely on components working together, and appearance alone may not show whether a seal is simply weathered or also involved in retaining the glazing. A qualified installer can consult model-specific instructions and assess the joint without relying on a guessed profile.
Do not pry out an installed seal, lift glass or polycarbonate, alter a glazing bar, drill the frame or add an unapproved fastener as a workaround. If the manufacturer provides a documented replacement procedure, confirm that it applies to your exact model and glazing type; arrange professional work if any step involves unsafe access or moving fragile glazing. When discussing the job, clarify whether it covers identifying the part, replacing the seal, handling adjacent glazing or assessing other worn components. These are distinct tasks, and the scope should reflect what the inspection finds. An installer can also advise whether the rest of the structure needs wider work. If you then consider a complete greenhouse such as the T-Shaped Orangery Greenhouse, use the repair assessment to inform that decision rather than treating a difficult-to-reach seal as sufficient reason to replace everything.
When replacing the whole greenhouse may make sense
A seal-only repair is the narrower option to assess when the frame and glazing are otherwise serviceable, the correct profile can be confirmed and the damage is limited to that component. Ask whether the manufacturer's replacement part is available, whether nearby seals also need inspection, and whether fitting the part affects adjacent panels. One cracked strip does not automatically make the whole greenhouse obsolete. Conversely, several deteriorated runs, unidentified parts and other worn components may justify a broader condition assessment before you spend on piecemeal repairs.
If the original part cannot be identified or supplied, do not substitute a near match or make an unsupported alteration to the glazing. Ask the manufacturer or installer what approved options remain, then compare the scope of repair with the condition of the frame, glazing and other components. Separate a confirmed parts problem from an unanswered enquiry: not yet knowing the seal code is different from being told that no suitable replacement is available. Keep those distinctions clear when weighing the work involved. If the review supports replacing the complete greenhouse, compare models, footprint and layout against your current needs. The Pyramid Greenhouse listing is one option for that complete-model comparison. The decision should address the greenhouse as a whole, rather than assume that changing its design is the answer to one worn strip.
Frequently asked questions
How can I tell whether a greenhouse seal needs cleaning or replacing?
Dirt or staining may come off while the seal remains continuous, seated and in good shape. Cracks, brittleness, shrinkage, lasting flattening or a loose fit are signs of wear that cleaning cannot reverse. Let a cleaned area dry before judging its condition.
Can I use a generic weather seal if it looks similar?
Not without confirmation. Profiles can differ by location, glazing thickness and how they fit the frame or retainer. Use the manufacturer's part number or ask the supplier or an installer to identify a compatible replacement for your exact greenhouse.
Can I cover a split with silicone or caulk?
Do not treat caulk or adhesive as a general substitute for a glazing seal. Use a sealant only if the greenhouse manufacturer specifies it as an approved repair for your model and location. Otherwise, ask about the matched part and the correct repair method.
Does moisture near a panel prove the seal has failed?
No. Water can travel along a frame before appearing inside, and condensation may be mistaken for a leak. Look for physical damage at the seal, but ask an installer to assess the joint if confirming the cause would require disturbing the glazing.
Can I remove an installed seal to measure its profile?
Do not remove a seal around installed glazing just to measure it. That may disturb the panel and can be unsafe, particularly at height. Check the manual and part code first, then ask the supplier what information or professional inspection is needed.
Cleaning remains useful when a seal is intact and merely dirty. Once its shape, continuity or fit has failed, the important task is to identify a matched part, not to make the old strip look cleaner. A careful visual record, model details and a manual reference make a parts request more useful. Where glass or roof access is involved, leave removal and assessment to a qualified installer. With the right information, you can judge whether a focused seal repair is appropriate or whether the greenhouse needs a broader review.
