







A generous garden sauna with its own terrace
Osa 350 outdoor sauna – 3.5 × 3.5 m, panoramic glazing and thermowood terrace
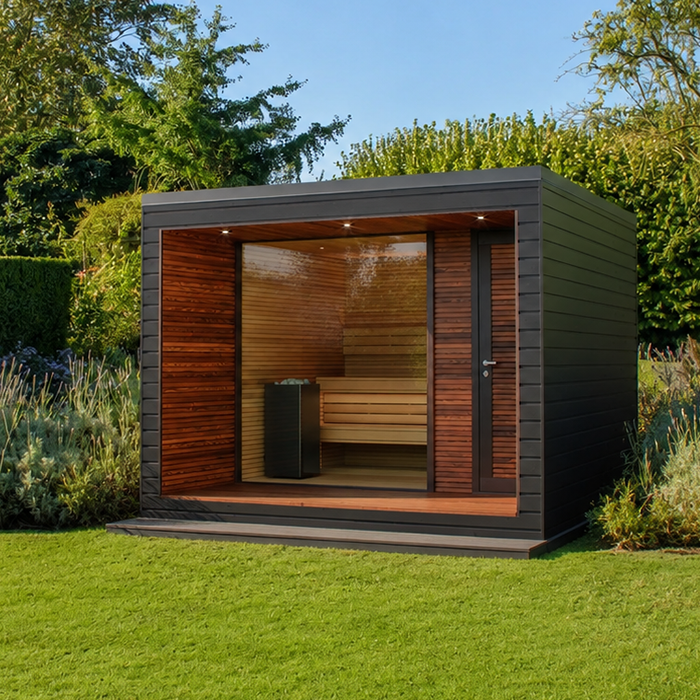
The Bloomcabin Osa 350 is a generously sized outdoor sauna, approximately 350 cm wide, 350 cm deep and 266 cm high. Its 12.25 m² layout brings together a sauna room and an integrated terrace made from oiled thermowood. Wide panoramic glazing draws daylight inside while giving users an open garden outlook. Thermally modified timber, insulated construction and dedicated lighting for both areas create a complete outdoor retreat. The Osa 350 is intended for customers who want a permanent garden wellness space rather than just an individual sauna cabin.
Settle the position only after checking the full technical and delivery requirements. Foundation work, power provision and access arrangements depend on the final orientation of the Osa 350. Consult the documents supplied for your chosen specification, and discuss each preparatory task with the appropriate trades well in advance. To compare alternative structures and their required garden space, browse other designs in the Bloomcabin sauna collection.
Size and equipment
Key details of the Osa 350
At approximately 350 × 350 × 266 cm externally, the Osa 350 occupies a substantial, clearly defined volume. Site assessment must also account for how its terrace entrance will meet existing paths and planted areas. Plot the complete outline where the sauna is proposed, then show the adjoining circulation and approach space on your plan. You can then compare the building realistically with the house, boundaries and vegetation, revealing restricted access before committing to the position.
350 × 350 × 266 cm
A 12.25 m² footprint gives the Osa 350 the character of a separate room in the garden. Beyond checking that the available ground is large enough, consider whether the scale suits the plot and nearby landscaped areas. If the sauna will stand close to the home, review sightlines through the windows and provide a short, secure route linking the house, garden and sauna. Thoughtful positioning makes each move between the indoor room, terrace and home more convenient.
Oiled thermowood terrace
An oiled thermowood terrace is built into the sauna, defining a useful threshold outside the enclosed room. It can hold footwear and towels and provide a place for brief pauses during use. Choose surrounding surfaces that limit soil and splashed water reaching the timber. A stable path back to the house also improves access on dark or rainy days.
Panoramic glazing
Broad glazing fills the room with natural light and turns the surrounding garden into part of the sauna setting. Point the glazed elevation towards a view that will remain pleasing during use. A hedge, wall or modest planting scheme can provide a visual frame and help the building sit comfortably within the landscape. Keep such features sufficiently distant, however, so they neither obscure the panes nor hinder access.
Digital controls with optional Wi-Fi
An electrically powered sauna heater and digital controller are specified for the Osa 350, with optional Wi-Fi available for certain configurations. Confirm before purchase whether your particular package contains the heater, controller and wireless function. The specification documents for that package determine what is supplied. Power arrangements must be designed around the selected equipment and properly prepared where the sauna will stand; an ordinary outdoor socket will not meet these requirements.
Layout
A single retreat combining sauna room and terrace
The enclosed room opens straight onto its adjoining terrace, allowing an easy routine of entering, taking fresh-air breaks and returning indoors by the nearby path. Because this deck belongs to the overall Osa 350 layout, excessive furniture or stored items will quickly reduce its usefulness. Arrange movable pieces so that people can pass safely, the door opens freely, the panoramic glazing remains exposed and light from the outdoor fittings reaches the intended areas.
Study the proposed outlook in morning, afternoon and evening light before fixing the orientation. Panoramic glazing can focus attention on the most appealing side of a garden, although illumination inside will increase visibility into the room after dark. Consider sightlines from nearby windows, paths and neighbouring land alongside the outward view. Any privacy screen needs enough separation for airflow, routine inspection and straightforward washing of the panes.
The Osa 350 works best when its considerable scale is treated as a deliberate feature of the landscape. Direct routes and visual breathing room help the building feel settled rather than squeezed into place. Restrained borders or low planting can soften the meeting point of deck and lawn. Avoid vigorous growth beside the walls or roof, where it would impede washing, examination and upkeep. Choose a position that balances seclusion with easy access to every exterior face requiring maintenance.
Wood finishes
Timber used inside, outside and across the terrace
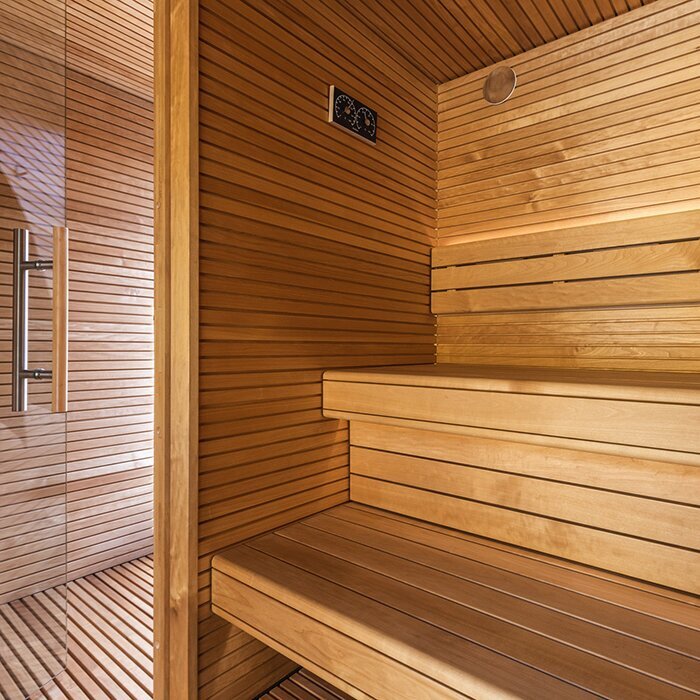
Lacquered, thermally modified softwood forms the outer cladding, while pale internal lining gives the sauna a restful timber finish. These materials experience quite different conditions. Rain, sunlight and grime affect the outside; heat, humidity, regular contact and repeated sauna sessions affect the interior. Select cleaning methods and maintenance products for the particular finish being treated. Strong multipurpose chemicals or incompatible coatings may discolour or otherwise alter a surface.
Heat treatment helps the wood cope with variable exterior conditions, although periodic attention is still necessary. Timber naturally develops colour variation, minor superficial traces and differences between grain patterns. Examine it routinely, especially where moisture could linger. The interval between treatments of the oiled deck will vary according to weather exposure and frequency of use. Prepare the surface by cleaning and thoroughly drying it, then apply an appropriate product in the manner stated by its manufacturer.
Roof and insulation
Insulation to walls, roof and floor for regular sauna sessions
Insulation is incorporated into the walls, floor and roof of the Osa 350, separating the warm room from exterior conditions. Warm-up time and temperature behaviour will still vary with the initial indoor temperature, airflow, door-opening frequency and heater settings. Insulation cannot take the place of effective ventilation or correct operation of the fitted appliance. For heating, use and airing, refer to the instructions supplied for both the actual sauna specification and its particular heater.
Weather protection above is provided by an overhanging EPDM roof. Decide at the design stage where runoff will go, ensuring it cannot gather beside the base, across the entrance or along surrounding paths. Locating the sauna under large projecting branches will increase fallen leaves and twigs while complicating maintenance. Retain practical access to the eaves for future checks. Do not use the roof for storage, walk on it or regard it as an area that can support occupants.
Lighting
Independent illumination for the terrace and sauna interior
IP65 LED spotlights provide light across the deck and around the doorway after sunset. They help reveal edges, wet areas and objects underfoot, but cannot compensate for an obstructed or insecure approach. Design the route so users need not cross planting beds or rough ground. Review the result in darkness, adjusting the surrounding arrangement where necessary to reduce intrusive light towards the home or adjoining properties.
Dimmable LED strips are positioned below the benches and behind the backrests. Their concealed placement provides softer illumination than a prominent ceiling fitting, with brightness adjustable for different tasks. Use a stronger level while entering, tidying or washing, then lower it for a more restful session. Operate every light and control as specified. The combination of electricity, humidity and high temperatures means that alterations to wiring, fittings or controllers should be left to an appropriately competent professional.
Heater controls
Coordinate the Osa 350 with suitable electric sauna equipment
The room, electric heater, controller and sensors are designed to operate as one coordinated installation. Assembly and initial setup vary with the equipment package ordered. Clearances, electrical connections, controls and normal use must follow the Osa 350 documentation together with the manual for the fitted appliance. Give both sets of information to the installer before work starts and obtain a competent review of the proposal. Unapproved component changes could undermine proper performance, safe operation or installation quality.
Available heater functions are managed through the digital controller. Where Wi-Fi forms part of the ordered package, complete its additional preparation and setup steps as directed. Read the displays, adjustment procedures and shutdown controls before operating the sauna. Remote activation does not remove the need for a physical inspection first: verify that nothing has been left over the heater or close to its hot surfaces, including towels, cleaning supplies and miscellaneous accessories.
Plan the complete electrical installation with a suitably competent contractor, covering heater output, cables, protective measures, controls and final connection for the chosen package. In Ireland, ask a Registered Electrical Contractor to determine whether the proposed supply involves Restricted Electrical Works and to issue any applicable completion certificate. Provide the Osa 350 and heater specifications early so cables and connection points can be positioned before assembly. Extension leads and makeshift connections are inappropriate for this permanent outdoor installation. Keep the system off if damage, unusual odours or electrical problems appear, and arrange competent investigation before reuse.
Siting, delivery and construction
Complete the foundation, site and unloading arrangements in advance
Install the Osa 350 on a stable, accurately levelled foundation extending beneath its entire footprint. A concrete slab is regarded as the preferred option. Check its location, elevation and outer measurements against the model documents before construction begins. It must provide enduring, even support without introducing distortion into the structure. Loose shims or isolated packing points are not an effective remedy for irregular ground. Give the foundation contractor the exact model information and intended orientation before work starts.
Site preparation must provide a reliable route for both rainfall and wash water to escape. Shape the gradient and nearby surfaces so moisture flows away instead of collecting beside the building or its wooden elements. Preserve sufficient clearance around all sides of the Osa 350 for future access to the glazing, cladding, eaves and technical zones. Permanent screens, dense vegetation or cumbersome furniture may obstruct servicing and cleaning, so place them only after the assembly and maintenance clearances have been confirmed.
Unloading requires either a forklift or crane. Survey the journey between the public road access and the planned set-down point rather than checking only the final space. Vehicle width, turns, surface strength, gradients, gates, tree growth, overhead services and further obstructions may restrict the lorry or lifting machinery. Discuss the plan early with the delivery operator or relevant specialist, who must assess the individual site. Both the vehicle and lifting machine need reachable, load-bearing standing areas of adequate size; an apparently open patch may not qualify.
Assembly through to first operation
Install the prefabricated sections correctly and inspect the finished work
Prefabricated sections of the Osa 350 are joined together at the chosen location. Reserve an unobstructed work zone, keep delivered pieces clean and protected, and leave every prepared service point reachable. Boxes, wrapping and components cannot encroach on lifting space, vehicle movements or foundation work. Follow the model-specific assembly instructions throughout. Seek technical guidance before making extra holes, service openings or modifications that might affect structural parts, insulation layers or weather seals.
Examine every delivered piece for apparent transit damage before construction, recording any concern clearly. Once assembly finishes, carry out a joint review of the accessible parts. Confirm that doors travel freely, glazing is intact, and all fittings, connections and cladding are present and properly secured. The deck also needs to be tidy, unobstructed and secure underfoot. Operate technical systems only when connection has been completed correctly and the relevant manuals permit testing. Afterwards, retain the sauna, controller and heater documents together in an accessible place.
Complete every technical task, fit out the room and clean it before routine use begins. Take time before heating to understand the controller display, available settings, ventilation, lights and methods of shutting the system down. Verify that both the doorway and approach are unobstructed. Each prospective user of the Osa 350 must understand how to exit promptly and halt operation whenever necessary. Cover these essential operating points with the whole group before sharing a session.
Day-to-day operation
Preparing for a session and drying the sauna afterwards
Finish all preparation before starting the warm-up cycle. Clear and clean the floor and benches, taking away any damp fabrics remaining from earlier use. Put drinking water and fresh towels somewhere convenient without encroaching on the heater zone. Leave muddy or wet footwear outside on the deck to reduce moisture and dirt carried indoors. Begin with enough illumination to see the seating, controls and floor properly. Reduce the brightness only when the space is ready, walking areas are clear and loose belongings have been stored safely. Limit each session to a duration and heat level that remain comfortable, leaving immediately if you become unwell. When the sauna is shared, users need to remain attentive to each other. Add water or create infusions solely in the way permitted by the fitted heater’s manual. Excess liquid, inappropriate substances and accessories resting against heated parts may harm the appliance and are therefore unsuitable. The adjoining deck gives users an outdoor pause area between periods in the sauna. Especially in wet conditions, remove footwear, towels and anything else that could cause a stumble. During winter or colder weather, manage the temperature transition at a pace that suits your wellbeing. An exposed terrace also calls for a practical all-weather approach. Keep a robe or towel nearby, but never where it narrows the doorway or walking line.
At the end of use, clear away debris and carry damp towels, mats and all other fabrics out of the room. Open the designed ventilation points long enough for benches, internal timber and the wider sauna space to dry thoroughly. Never store wet belongings inside while the room is shut. After temperatures have fallen, inspect the space for lingering moisture and remove anything overlooked. This leaves the Osa 350 dry, uncluttered and ready for a future session.
As both a threshold and exposed deck, the terrace will collect grit, soil and foliage. Sweep these materials away while they are dry whenever practical, before dampness binds them to the boards. Clear pooled water rather than letting it sit on the wood. From time to time, move planters, mats and portable furniture to inspect and wash the concealed areas beneath. Items that trap rain or continually prevent ventilation should not be left there indefinitely.
Routine cleaning and upkeep
Appropriate treatment of interior timber and floor grilles
What is the gentlest way to clean inside?
Vacuum or collect loose material and hair from the grilles, floor and seating whenever required. Use minimal water on washable areas, choosing a cleaner intended for sauna wood and avoiding harsh chemicals or saturation. Lift out a floor grille only where its construction permits, and return it after every surface has dried. Include the less accessible spaces below seating in inspections, but do not dismantle or interfere with electrical equipment.
Glass and exterior finishes
Targeted upkeep for glazing, cladding, deck and roof
Wash the panoramic panes using clean, soft cloths and an appropriate glass product. Avoid abrasive pads and utensils that could leave scratches. Prevent surplus cleaner from draining across the timber beside the glazing. While working, wipe the edges and frames, then look over exposed fittings for deposits, movement or deterioration. Arrange professional evaluation if glass is damaged or a component no longer operates correctly. Do not attempt to adjust glazing or hardware unless the proper instructions specifically cover the task.
Treat the lacquered outer boards and oiled thermowood deck according to their respective finishes. Begin with gentle cleaning, then wait until the wood is thoroughly dry before using the designated maintenance treatment. Try an unfamiliar product on a discreet patch and comply with its maker’s directions. Deck oil or cleaner may be incompatible with the lacquered cladding, so never assume one treatment suits both. Add another coating only after confirming compatibility. For comparisons with alternative dimensions and forms, browse the Bloomcabin outdoor sauna collection.
Inspecting the roof and nearby area
Clear leaves, small branches and debris from the EPDM covering without using sharp implements that could pierce it.
From ground level, routinely look for changes around drainage points, exposed joints and the roof perimeter.
Prune nearby growth before it rubs repeatedly on glazing, cladding or roofing, and preserve open inspection access.
Following unusually severe exposure, examine the deck and outer wood again and seek expert assessment of apparent damage.
Keep all drainage routes unobstructed, preventing rainfall from pooling beside the base or across the doorway.
Maintain a record of servicing and care so changes in the sauna’s condition can be followed over time.
Explore the Osa 350 in our shop