
How to Prevent Seedlings Becoming Root-Bound Before Planting
Greenhouse growing guide
Seedlings usually become root-bound because they stay in a small cell longer than the crop can comfortably tolerate, often while the final bed is still being prepared. The answer is not simply to move every plant into a large pot. Plan backwards from the planting window, match container volume to the time each batch must wait, and reserve room for the larger plants. Checking a representative root ball helps you act before roots form a tight, circling mat.

Greenhouse space check 1
What root-bound seedlings look like
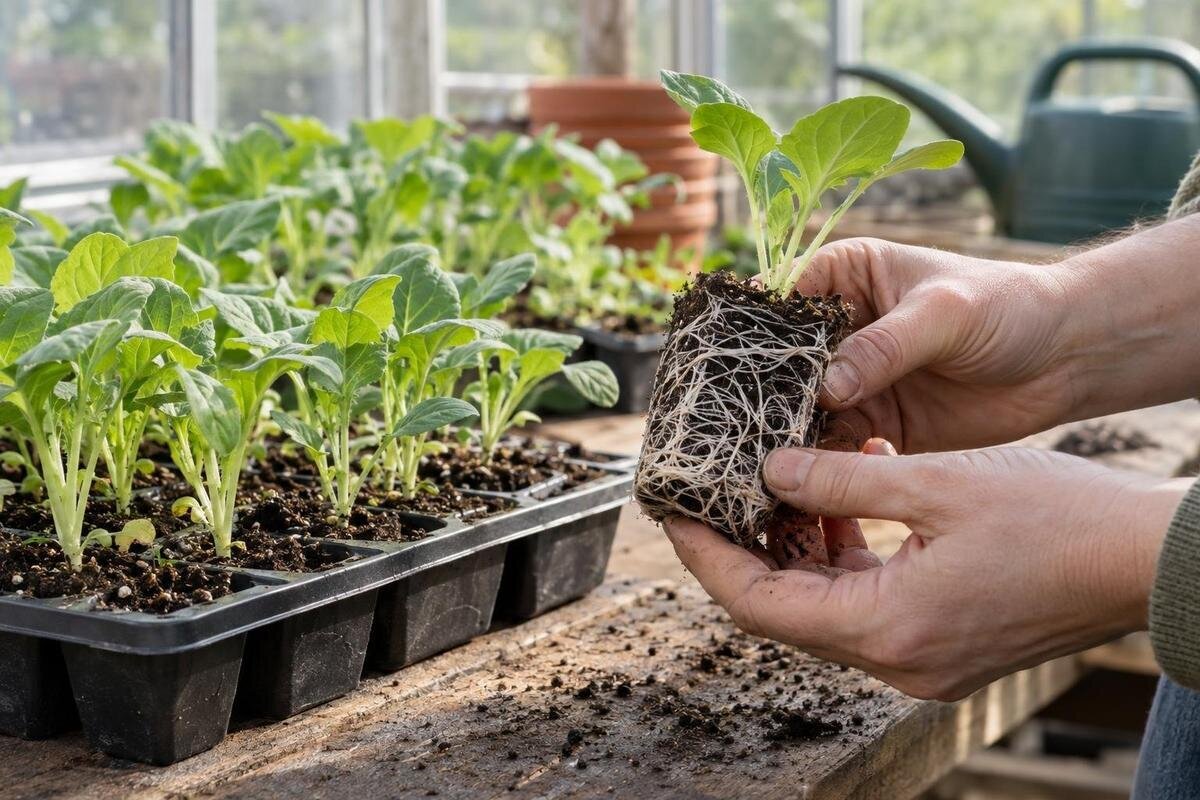
Root-bound describes a root system that has used most of the space in a cell and is beginning to circle, knot or form a dense layer against its sides and base. It is different from a young plug with a few roots visible at the edge: roots need to reach the cell wall for the compost to hold together when the plant is lifted. If a seedling is large enough to handle, ease one sample from its cell and inspect the full plug rather than judging by a single root at a drainage opening. Avoid repeatedly pulling seedlings out, which disturbs them; one representative sample from each sowing is usually more informative.
A densely rooted plug may be hard to keep evenly moist because there is little compost relative to the amount of root growth, so it can dry quickly and the plant may wilt between checks. Slow growth or pale leaves alone do not prove root crowding; light, watering, temperature and nutrition can also affect a seedling. Look for a combination of tight roots and a cell that is clearly full, then review the growing conditions as well. This avoids potting on plants that still have room and missing those already forming a mat. If only one tray is affected, compare its position and watering with other trays before changing every container.
Set a planting window before sowing
Choose a likely planting window for each crop before deciding when to sow. Base it on crop-specific guidance and on the readiness of the final bed or container, rather than using one date for every seedling. A plant can be tall yet not ready to move, or compact and well rooted while its bed is still being prepared. Define readiness for that crop: the right stage of growth, a root ball that holds together without being congested, and planting conditions that suit it. If weather or bed preparation could shift, write down a window instead of treating a calendar date as fixed. This is especially useful when one sowing is intended for several beds.
Count backwards through each stage: sowing and germination, growth in the first cell, any potting-on interval, and acclimatisation where needed before planting outside. Use crop-specific timing guidance, then allow for slower or faster development and the work required to prepare the bed. If you sow too early, you lengthen the time seedlings must be held in containers; a larger pot can postpone the bottleneck but cannot make an unsuitable planting date arrive sooner. Note planned and actual dates, since your records show whether a crop consistently needs more or less nursery time. Make a separate line for each sowing if batches will be planted at different times.
Greenhouse space check 2
Choose cell volume for the expected wait
Cell volume should suit the crop and the expected wait, not simply the number of seeds you want to fit on a tray. Fast-growing seedlings, or plants that will remain in the nursery longer, may need more root room than slow-growing crops moving on promptly; follow crop-specific advice and compare it with your own batches. Smaller cells save space at first, but contain less compost and can dry sooner. Larger cells offer more volume, yet use more space from sowing onwards and may be unnecessary for plants moving on quickly. Where several seedlings share a cell, thin or separate them according to crop guidance so they do not compete for the same limited root space. No single size suits every species and schedule.
Cell choice changes the layout after potting on: a tray of small cells may fit neatly, while the next pot size can take substantially more area. The listing for T-Model Orangery Greenhouse shows area options from 16.52 m² to 30 m². Treat a listed area as a starting point for comparing overall space, not as a count of benches or trays. Sketch the growing layout, including access for watering, labelling and moving plants, then check whether it still works after seedlings move up. You may find that the potting-on stage, not propagation, limits how many seedlings you can raise.
Check the root ball before potting on
Check seedlings at a planned point in their growth, then repeat the check as roots start to appear at cell edges. A plug that comes out intact with roots spread through it may be ready to pot on even if they have not become tightly packed. Roots circling around the base, forming a thick layer at the sides or pushing through several drainage holes are stronger prompts to act. Notice how quickly the cell dries and whether growth has stalled, but do not rely on either sign alone because conditions can cause similar symptoms. Inspect a few plants from each sowing, especially where germination or growth has been uneven, rather than assuming every seedling is at the same stage.
Record which batches need potting on first, rather than moving every seedling simply because it belongs to the same sowing. Before inspecting a whole tray, identify where any larger pots will go so that plants needing attention are not left waiting for space. If you are planning a new nursery, the Pyramid Greenhouse listing offers area options from 5.53 m² to 18.9 m². Use your root checks to establish how many seedlings will need larger containers at the same time. That gives you a more useful starting point for planning capacity than assuming the entire tray will move on together.

Greenhouse space check 3
Pot on before roots form a dense mat
Pot on when roots have filled enough of the plug to keep it intact but before they become a tight spiral or solid mat. Move the seedling into a clean container with suitable fresh potting compost and more room for continued growth, choosing the next appropriate size rather than the largest pot available. Keep the root ball as undisturbed as possible, handle the plant by a leaf or the compost rather than pinching its stem, and follow crop-specific instructions about planting depth. Water the compost in after potting and return the plant to conditions suitable for that crop. Label each batch; younger seedlings can otherwise be confused with newly potted plants.
Count the containers before starting a large potting-on session, including any original sowing trays that will remain in use afterwards. A partly finished batch can occupy both trays and individual pots, so allow for that overlap rather than assuming the old tray space will immediately become free. When comparing the Aluminium Greenhouses with Storage – Limited Edition, with listed area options from 5.52 m² to 28.08 m², include room for this working stage in your layout. The same count helps you decide whether there is room for a second potting on, whether to divide the work into smaller batches, or whether to reduce the next sowing.
Count capacity through every container stage
Calculate capacity by following every crop through the nursery, rather than counting only seed trays. Note how many cells you sow, how many plants you expect to keep after thinning, and how many pots they may need at each stage. Include batches that overlap: one group might be in small cells while another has already been potted on. Measure the actual trays and pots you use, then reserve access for inspection, watering and moving plants. Record different tray footprints instead of assuming they all occupy the same area. A simple sketch or notebook often reveals the pinch point: it may be the first potting-on week, when each seedling needs more space, rather than the initial sowing.
For a first comparison, the Bloomcabin Prestige Greenhouse listing shows area options from 3.77 m² to 28.08 m². A listed greenhouse area is not the same as the bench surface available, so compare product details with your own tray measurements before relying on it. The same calculation applies to a space you already have: add positions for the larger-pot stage, leave access, and keep some capacity unallocated for slower batches or replacement sowings. A nursery planned to full capacity leaves no room for delays; a few spare positions make the schedule easier to manage.
Greenhouse space check 4
Leave room for larger plants and working access
Allow for plants to occupy more room as they grow, and plan the positions needed after potting on rather than relying on the initial cell pattern. As leaves expand, trays placed too close can shade one another and become harder to inspect or water evenly. Keep labels visible, separate different stages where possible, and avoid crowding trays simply to make a calculated total fit. Include a route to move plants in and out without disturbing neighbouring pots. If the planned area is near capacity, reduce simultaneous sowings or use another suitable growing place instead of compromising access to every plant.
For the Spacious Greenhouse, listed area options run from 47 m² to 70 m². Even when considering a larger footprint, draw the trays and pots at their actual size and allow for the largest seedlings you intend to hold. Pots fitting side by side does not necessarily mean the plants above them have enough room. Mark paths, watering access and the space needed to lift a tray without catching neighbouring foliage. This checks a different constraint from the container count: whether you can still tend and move the plants once their leaves have expanded.
Separate root crowding from growing stress
Warmth, light and moisture affect how quickly seedlings develop and how fast a small cell dries. Check trays more often when growth is rapid or conditions make cells dry sooner, rather than relying on one fixed watering routine. Give plants the light their crop needs and enough spacing to see the compost surface and inspect growth. A tall, weak seedling may need a review of light or crowding rather than a bigger pot; a short plant can still have a congested root ball. Use the roots and the growing conditions together when deciding what to change. Potting on will not correct every problem that slows top growth.
Make inspection access part of any greenhouse comparison, including the Aluminium Greenhouses range, listed from 3.77 m² to 28.08 m². The area range alone does not establish the light, ventilation or bench positions available in a particular setup. Consider where you could reach individual trays to check moisture and lift a sample plug, rather than judging the layout only by how many trays fit. Within any structure, plants in different positions may not grow at the same pace. Keep the quickest batches under closer review instead of potting every seedling on the same day simply because they were sown together.

Greenhouse space check 5
Plan for a delay in the final planting date
If the final bed is not ready when a batch should be planted, do not move plants outside into unsuitable conditions merely to free a tray. First assess whether they are root-bound, whether a next-size pot is available, and whether the nursery can support the extra time. Pot on again if roots need more room and the crop can be maintained in a larger container; if the delay is brief and the plug still has space, keep checking it. Avoid using extra fertiliser as a substitute for root volume, and remember that hardening off prepares plants for a change in conditions, not for a lack of space. The aim is to hold each batch responsibly until its actual planting window.
Reserve space for delayed batches before you need it, and keep the plants due for planting soonest easy to reach. If you are considering a Wall Greenhouse, its listed area options of 3.69 m² to 14.34 m² provide a starting point for mapping that reserve against your intended tray layout. The useful question is whether the spare positions will hold the larger containers a delayed batch may require, not merely its current tray. If there is no capacity for that stage, adjust future sowing numbers or stagger batches rather than expecting the nursery to accommodate every delay.
Use sowing records to prevent repeat bottlenecks
Keep a record for each crop that links sowing to planting: date sown, cell or pot used, when roots reached the edge, date potted on, and the date the plant went into its final bed. Note how the plug looked and whether growth was faster or slower than expected, as well as the number of plants you actually used. If you raised more than the bed could take, those extra seedlings may have occupied space another batch needed. These notes need not be elaborate. A few consistent details can show whether to sow later, choose a different first cell, stagger batches or increase the number of potting-on positions next season.
Record the nursery layout alongside the dates, including the greenhouse model or available area and the bench positions used. If comparing the Limited Edition Aluminium Greenhouses, listed from 3.77 m² to 28.08 m², distinguish the chosen size from the actual arrangement of trays and pots. That lets you compare batches raised in the same space rather than attributing every crowded tray to a lack of overall area. Use the dates and root-ball notes to distinguish sowing too early from choosing cells that were too small for the wait or holding too many overlapping batches. Change one part of the plan at a time, then compare the next batch.
Frequently asked questions
How can I tell whether a seedling is root-bound?
Inspect the whole plug, not just one root at a drainage hole. A few roots at the edge can be normal; a dense layer, circling roots or a mat at the base suggests the cell is becoming crowded. Check a sample from each sowing, as seedlings do not always develop at the same rate.
Do roots coming through a drainage hole mean I must pot on?
Not by themselves. Roots can reach an opening before the rest of the plug is crowded. If the seedling is large enough to handle, check whether roots are spread through the plug or forming a dense mat, and consider how quickly the cell dries and how soon planting is planned.
Should I move a seedling straight into a much larger pot?
Usually, choose the next appropriate container rather than the largest one available. A large pot takes more nursery space, and the compost around a small root system can be harder to manage. The crop, its expected time in the nursery and the planting schedule should guide the size.
What should I do if planting is delayed?
Check the root ball and the time the seedling is likely to remain in its container. Pot on if roots need more room and the nursery can support the larger pots. If the plug still has space, keep monitoring it. Do not plant into unsuitable conditions just to free a tray.
Can extra feeding prevent seedlings becoming root-bound?
No. Feeding cannot provide more root space or make up for seedlings being held too long in a cell. Base feeding on the crop’s needs, but prevent crowding through suitable cell volume, timely potting on and a sowing schedule that fits the planting window.
Preventing seedlings from becoming root-bound is mainly a scheduling task: start with the planting window, choose cells for the expected wait and reserve room for every potting-on stage. Inspect root balls before they become dense, while also checking light, moisture and other growing conditions. If planting is delayed, move plants into an appropriate larger container where needed and reduce future sowing overlap. A record of what filled each tray, and when, makes the next plan more reliable.
