
Greenhouse Tomato Blossom-End Rot: Why Fertiliser May Not Help
Greenhouse tomato care
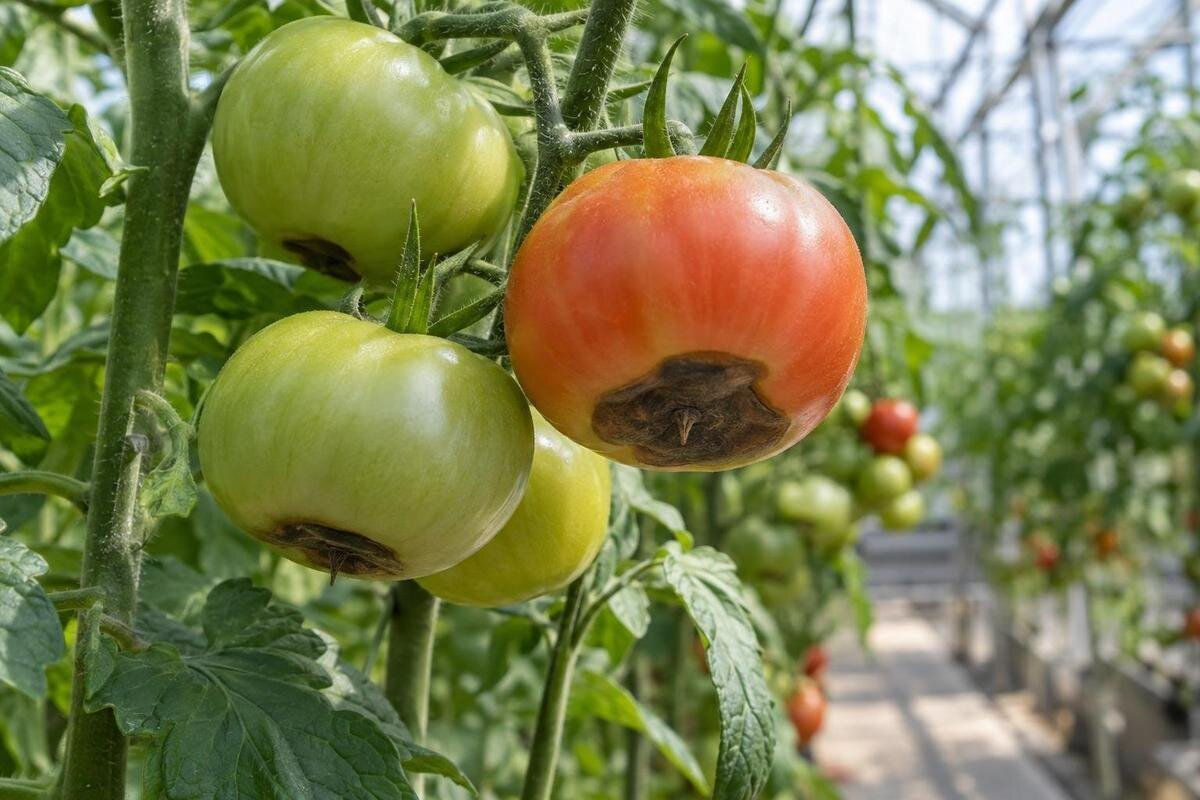
Blossom-end rot can spoil a tomato while it is still green, leaving a dark, sunken patch opposite the stem. It is commonly linked with calcium, but the first response should not be to add fertiliser. Calcium may be present in the soil or growing medium and still fail to reach developing fruit in adequate amounts. Uneven moisture, stressed roots, salts and fast growth can all affect that supply. The useful question is not simply whether the plant needs more calcium, but what is preventing the fruit from receiving it—and whether the damage is definitely blossom-end rot. This guide explains the symptom, likely lookalikes and what to check before changing feed.

What to check before adding fertiliser 1
Recognising blossom-end rot on a tomato
The typical first clue is a small, pale or water-soaked patch at the blossom end, opposite the stalk. As the tomato grows, the patch can enlarge, turn tan, brown or almost black, and become depressed, dry or leathery. It may be roughly round, but its edge is not always neat. The mark can appear while a fruit is green; waiting for it to ripen will not make it disappear. Compare several fruits rather than assuming every dark mark has the same cause, and note whether the damage is confined to the blossom end or appears elsewhere.
Blossom-end rot is a physiological breakdown of fruit tissue, not an infection at its outset. Damaged tissue can later be colonised by moulds or bacteria, so an older lesion may become soft or fuzzy and no longer look typical. Leaves can remain apparently healthy, and other fruit on the same plant may be unmarked. That variation is possible because each fruit develops separately; neither a healthy canopy nor one affected tomato proves or rules out a calcium-delivery problem. A photograph can help you record how the patch changes, but it cannot establish the cause by itself.
How to tell blossom-end rot from other fruit damage
Look first at where the mark starts and what its edges look like. Blossom-end rot is centred at the blossom end. Splits usually appear as radial or circular cracks, often around the stem end, while sunscald tends to affect an exposed side and may look bleached, pale or papery. Insect feeding and knocks are more likely to leave holes, scars or irregular bruises. These patterns help narrow the possibilities, but they are not proof: damaged skin can rot secondarily, and some fruit diseases also produce sunken spots.
Inspect several fruits, including an unaffected one, and look at both ends rather than judging from a single close-up. Some rots, including anthracnose, can produce sunken lesions; their appearance may change as they develop, so avoid naming a pathogen from a photograph alone. Note whether the patch began at the blossom scar, whether it is spreading, and whether other symptoms are present on the plant. If the damage does not fit the usual pattern, is spreading quickly or occurs alongside wilting or unusual leaf symptoms, seek a closer horticultural diagnosis.
What to check before adding fertiliser 2
Why fruit can lack calcium when the soil contains it
Tomato roots absorb calcium in water, and the plant carries it mainly in the xylem, the tissue that transports water upwards. Calcium does not move readily from one part of the plant to another once it has been deposited. Leaves usually lose more water than fruit, so a developing tomato may receive less of the calcium moving through the plant. The blossom end can be especially vulnerable as the fruit expands. This helps explain why vigorous leaves and an apparently adequate calcium result from a soil test can occur alongside damaged fruit.
Blossom-end rot is therefore better understood as a shortage of calcium reaching fruit tissue than as reliable evidence that the growing medium contains no calcium. Water availability, root activity, salts and plant growth can all affect delivery, sometimes together. A test result is useful, but consider it alongside pH, salt levels, root condition and watering history. It describes the sampled medium, not how steadily calcium has reached each fruit. When planning tomato beds or containers in a structure such as the Oasis Pyramid Greenhouse, keep the growing area distinct from the overall greenhouse footprint in your notes. Record which plants share a bed and which have separate root balls. This makes it easier to compare their conditions without treating all tomatoes under the same roof as one uniform crop. The important distinction is between calcium being present around the roots and calcium reaching the tissue where the damage occurs.
How watering patterns affect calcium uptake
Uneven moisture is a useful place to investigate because it affects both root activity and the movement of water carrying calcium. A tomato that dries markedly between irrigations and then receives a heavy soak can experience interrupted uptake, even if the total amount of water over a week seems generous. At the other extreme, persistently saturated growing medium reduces the air available around roots and can impair their function. The aim is a root zone that stays reasonably even and aerated, not a wet surface or a fixed number of watering sessions.
Check moisture near the roots, not just at the surface, and compare affected plants with unaffected ones. In pots and grow bags, inspect individual root balls: a shared schedule may not wet them all evenly, and containers can respond differently to sun, plant size and growing medium. Look for blocked or misplaced outlets and make sure excess water can drain away. Note what you find before watering and check again afterwards, rather than judging the whole routine from freshly wetted compost. When considering a layout such as the Limited Edition greenhouse with built-in storage, include room to reach containers and inspect irrigation outlets, as well as room for the plants themselves. You need to be able to check the least accessible plant, not only the one beside the door. Record uneven wetting separately from the watering schedule: knowing when water was supplied does not establish where it reached.

What to check before adding fertiliser 3
Heat and humidity change water use in a greenhouse
Greenhouse conditions can change how quickly tomatoes and their growing medium lose water. Hot, sunny periods can raise the crop’s water demand, while humidity affects transpiration, the process by which leaves release water. Because calcium travels with water and fruit and leaves do not transpire equally, those conditions can influence how calcium is distributed. Their effects depend on the crop, the root zone and the conditions over time; high heat or humidity alone does not confirm the cause of a particular lesion.
Observe conditions at the plants rather than assuming that the whole greenhouse has the same temperature, shade or air movement. A sheltered corner, a dense canopy or a position close to glazing may experience different conditions from another part of the crop. Compare positions at similar times, noting which plants are shaded or exposed during the hottest part of the day. This gives more useful context than a single observation made elsewhere in the greenhouse. For anyone considering the Prestige greenhouse, ventilation and crop positions belong in the layout discussion; the model name alone does not describe conditions around the fruit. Ventilation can alter temperature and humidity, but changing it is not a guaranteed cure for blossom-end rot. Keep observations of the greenhouse climate alongside root-zone moisture checks, so that a hot afternoon is not treated as an explanation without considering whether the roots had a steady water supply.
Root health and growing-medium conditions
Roots need both water and air to function. Waterlogging, compacted soil, a restricted root volume, root injury or disease can reduce uptake even when the growing medium contains nutrients. Disturbance during cultivation or transplanting may also stress roots. In a container, the small volume means that moisture and salt levels can change more quickly than in a bed. These conditions do not prove blossom-end rot, but they make the roots and their surroundings important parts of the investigation.
If the problem recurs, test the soil or growing medium rather than guessing from the fruit. Depending on the growing system, useful results may include calcium, pH and soluble salts, sometimes reported as electrical conductivity. Excess salts can make water uptake harder, while pH affects nutrient availability. Results from soil, compost and other media need different interpretation, so ask the testing service how to collect a suitable sample. Describe the affected growing area and explain whether nearby plants in another bed or container remain unmarked. If you are planning several growing areas in a Bloomcabin Orangerie, allow for access to inspect and sample each one. Keep sample labels tied to the actual bed or container rather than simply writing the greenhouse name. That way, a result can be considered alongside the drainage and root conditions in the place it represents, rather than being applied indiscriminately to the whole crop.
What to check before adding fertiliser 4
Why extra fertiliser is not a reliable cure
Fertiliser supplies nutrients; it does not automatically improve the route by which calcium reaches a fruit. Adding a general feed when the problem is interrupted water uptake, damaged roots or poor drainage may leave the cause untouched. Excess soluble fertiliser can raise salt levels around roots, making it harder for them to take up water. Too much nitrogen can also encourage vigorous growth, which may add to the risk when fruit is developing under stressful conditions. A dark patch alone cannot show which nutrient, if any, is lacking.
Calcium products are not interchangeable solutions either. Lime can change pH as well as supply calcium, so using it without a pH result may create a new imbalance. Other nutrients, including potassium and magnesium, can affect calcium uptake when levels are excessive, but changing their supply without evidence is not a sound diagnosis. Spraying calcium on leaves is not a dependable substitute for root uptake and water movement. Before buying another feed, list what you already use, how much you apply and when you last changed it. Include both general feeds and separate supplements, so that the review covers the whole feeding routine. Whether tomatoes are grown in one of the Classic aluminium greenhouses or another structure, a feeding decision needs to address the growing medium and crop. A greenhouse specification cannot identify a nutrient shortage, and adding several products at once makes subsequent changes harder to interpret.
What to record before changing the routine
Start by checking that the fruit damage matches the usual pattern, then note which plants and fruits are affected. Record the fruit’s stage, where the patch sits, and whether the issue appears on one plant, several plants or one part of the greenhouse. Write down recent irrigation, feeding and periods of unusually hot or bright weather. The lesion may reflect conditions during earlier fruit development, so today’s moisture level alone cannot explain when the damage began.
Compare affected plants with nearby unaffected ones. Check whether their growing medium feels different at root level, whether outlets deliver water as expected, and whether drainage is consistent. If affected plants cluster in one position, mark that position on a simple sketch and add your observations of shade, airflow and watering. For a layout being considered around a lean-to greenhouse, the same sketch can identify where you would need access for these checks; it need not be a detailed construction plan. Give each bed or container a recognisable label and use it in your notes and photographs. Take a wider photograph showing the plant's position as well as close-ups of the fruit, and date both. This keeps the location and symptom connected when you review them later. If you need a soil or medium test, retain the watering and feeding notes so that the result can be interpreted in context.

What to check before adding fertiliser 5
Reducing the risk for developing fruit
If your checks point to fluctuating moisture, aim for a more even supply without keeping the roots waterlogged. Adjust irrigation to the growing medium, container or bed and the conditions around the crop; there is no single schedule that suits every tomato. Confirm that water reaches the root ball and that excess can escape. In a hot spell, check moisture more often rather than automatically applying a large amount at the end of a dry period. Make changes gradually enough that you can see how the plants respond.
Hold off on extra feed unless the crop or a test gives a clear reason for it. If a result confirms a specific shortage or imbalance, choose a correction suited to that medium and follow appropriate horticultural guidance. The damaged patch will not heal, so assess the effect on fruit that develops later. Keep a dated note of the adjustment and distinguish fruit already marked from newer fruit when reviewing progress. One damaged tomato remaining on the plant does not show that the adjustment has failed. If you are also considering a layout for the Limited Edition aluminium greenhouse, use what you have learnt to plan access for watering and inspection. Check whether you could reach each root zone without moving other containers or disturbing plants. Treat that as a practical layout decision, separate from correcting the current crop's moisture or nutrient problem, and continue observing how the plants respond.
When to seek a closer diagnosis
Ask for help if the lesion does not begin at the blossom end, has unusual rings or growth, or appears alongside widespread wilting, leaf damage or root problems. Blossom-end rot can also be followed by secondary decay, which makes an old fruit difficult to identify by appearance. A horticultural adviser or plant diagnostic service can review clear photographs and, if needed, a sample. Include the affected and unaffected fruit, the dates you noticed the symptoms, and notes on watering and feeding.
A repeated crop problem may justify reviewing the growing setup, but changing the greenhouse is not a treatment for a calcium-delivery disorder. First establish whether the issue lies with water access, roots, the growing medium or another fruit problem. Separate observations from explanations when discussing it with an adviser: describe where the damage began and what you found around the roots, then explain what you suspect. Include any changes already made, so that advice is based on the current routine rather than the original one. If you later compare structures such as the T-Model Orangery Greenhouse, use those findings to identify practical requirements for layout, watering access and ventilation. Check the relevant product details rather than assuming that a different shape or model will prevent recurrence. The useful outcome of the investigation is a clearer understanding of the growing conditions to manage, not simply a reason to replace the structure.
Frequently asked questions
Does blossom-end rot mean there is no calcium in the soil?
No. The growing medium may contain calcium, but roots may not take it up steadily or enough may not reach the developing fruit. Moisture swings, root stress and high soluble-salt levels can all affect delivery.
Should I add calcium as soon as I see a dark patch?
Not automatically. First check that the symptom fits blossom-end rot and review root-zone moisture, drainage and recent feeding. If you suspect a nutrient imbalance, have the soil or growing medium tested and interpret the result before choosing a correction.
Can daily watering still be part of the problem?
Yes. A daily schedule does not show whether water reaches each root ball evenly. A container may dry between sessions, while another spot may stay saturated. Check moisture where the roots are rather than relying on the schedule alone.
Will the affected tomato recover?
No. The damaged tissue will not return to normal, even if the cause is corrected. Changes to moisture or feeding are intended to support fruit that develops afterwards; judge their effect on newer fruit, not on an existing patch.
Is every dark, sunken spot blossom-end rot?
No. Some fruit diseases and physical damage can also cause sunken or dark areas, and an old blossom-end-rot lesion can develop secondary mould or decay. Check where the mark began and how it changes; a photograph alone may not settle the diagnosis.
A dark patch at the blossom end is a sign to investigate, not an automatic instruction to add calcium. Confirm that the symptom fits, then look at moisture through the root zone, drainage, root health and the growing medium. Fertiliser is useful when there is a demonstrated need, but it cannot reliably correct disrupted water uptake or a different diagnosis. Since damaged tissue will not recover, judge any change by the condition of fruit that develops afterwards.
