
Can a Central Island Bed Work in Your Greenhouse?
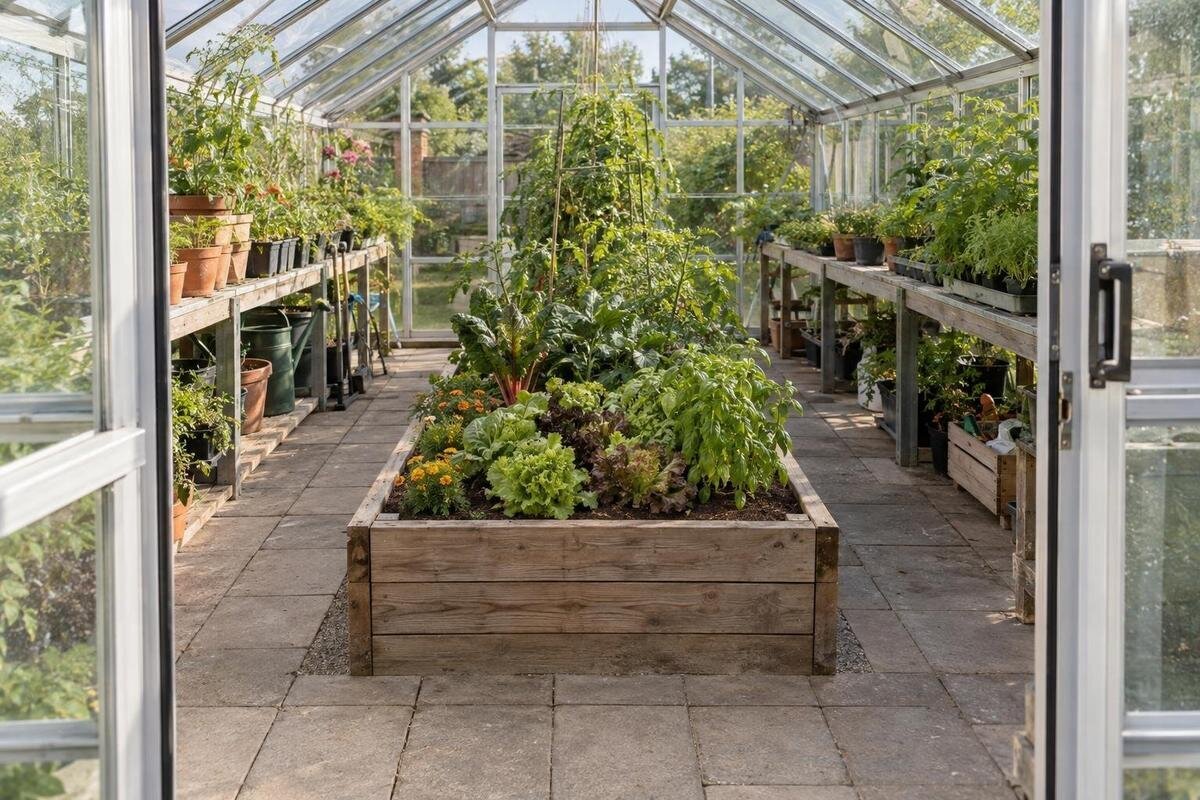
Greenhouse layout
A central island bed can work in a greenhouse, but only when the routes around it remain useful after the bed, equipment and mature crops are accounted for. Its main advantage is access from more than one side; its cost is that it divides open floor into separate aisles. Compare it with perimeter planting using the greenhouse's internal dimensions, not the outside footprint or listed area alone. Then test whether you can reach the soil, turn with a tray or watering can, and carry out routine care without stepping into the bed or brushing through plants. A simple plan often settles the question before you build.

What a central island bed changes
A central island bed sits apart from the greenhouse walls, leaving an aisle along each long edge and, where the plan allows, access at the ends. It can be a raised structure or an in-ground growing strip; the term ‘island’ describes its position, not how it is built. Its main advantage is access from both long sides, so you do not have to reach across the full bed width from one edge. If one side is blocked by a shelf or stored item, however, the layout loses part of that advantage. The bed, walking routes and fixed fittings all have to fit within the same internal footprint. It need not be perfectly centred, but it must leave usable access.
Think of the floor as both growing area and working area. An island replaces one open route with separate aisles, which can leave awkward strips beside the walls if the measurements are not planned. A perimeter arrangement keeps the centre open, but its beds may be difficult to reach if they are too deep or blocked by shelves. A neat top-down drawing can hide these pinch points: a path may look continuous but end at a wall or become too tight beside a container. Compare how much planted surface you can reach and whether a clear route connects the entrance to your tasks. The number of beds, by itself, tells you little.
Measure usable width before choosing a bed
Start with the selected greenhouse's clear internal width and length, not its outside footprint or listed area alone. The frame, door opening, fixed benches or storage, and projections along the sides can reduce the space available for paths. The Classic aluminium greenhouse models are listed with areas from 3.77 m² to 28.08 m²; those figures indicate a range, but cannot tell you whether a chosen size leaves two useful aisles. Use the dimensioned plan for that version and note which measurements are internal. Record the clear width at the narrowest point as well as the unobstructed door opening; an outside measurement can overstate the room available for beds.
Here is a simplified illustrative comparison only; these are not available product sizes or recommended clearances. In a 3.0 m-wide clear interior, a centred 0.9 m island leaves 1.05 m on each side. Two 0.45 m perimeter beds would instead leave a single 2.10 m central aisle. In this simplified cross-section, both arrangements use 0.9 m of width for planting, but organise the walking space differently: two routes beside the island or one broad route beside perimeter beds. Benches, frame projections and containers change the calculation, so add actual fittings before judging comfort. The figures show the trade-off, not a layout to copy.
Test reach from both sides
Reach is the main reason to choose an island: you can tend the bed from opposite sides rather than leaning across its full width from one path. Do not choose the width by appearance alone. Stand where each aisle would be, or mark it with tape, and try the movements you will repeat: setting out seedlings, watering the middle, removing weeds, tying a stem and picking from the far edge. Can you work without putting a foot on the soil or stretching across fragile plants? A reach that feels easy for one gardener may be awkward for another, so use your own reach and ordinary tools as the test. If the centre is difficult to reach from either side, reconsider the bed width.
Allow for plants at their mature size, not only the bare bed line. Foliage, stakes, strings and trellises can occupy the space an arm or tool needs; a path that looks generous before planting may feel narrow once leaves spread into it. Mark the expected crop width and supports, then leave a working margin between them and the walking line. The Wall Greenhouse range is listed with areas from 3.69 m² to 14.34 m², but area alone does not establish whether a chosen plan has room for an island. Check the individual internal width and wall-side arrangement: a second path needs real floor space, not just a line on a sketch.
Keep the aisles connected
An aisle is useful only if it connects the places you need to reach. Trace a route from the entrance to both sides of the bed, then decide whether you need to pass around an end or move between aisles. Mark the actual door opening, the space needed to operate it, and any bench or fixed item at an end. A door may use part of the floor you had counted as a turning area, so do not leave it blank on the drawing. If the two paths meet only through a narrow gap, that gap is the pinch point even when each long side appears generous. The aisles do not have to be equal, but both should serve their intended tasks.
Test turning separately from simply standing beside the bed. Someone walking in empty-handed may fit through a gap that is awkward with a tray, compost tub or watering can, especially if the route ends at a wall. Draw the item you carry most often, or walk a marked route with it, and see whether you can turn without shifting stored objects or stepping over a crop. The Limited Edition aluminium greenhouse models offer another range to compare; for any model, use the chosen size's plan to check the door opening, aisle continuity and turning space rather than inferring them from its listed area.

Check the layout against daily care
Use routine care as another reach test. For each row, ask whether you can direct water where it is needed, inspect leaves on the wall-facing side, remove weeds and harvest without leaning across another row. If a watering can or hose is part of the routine, trace how it gets from the door to the bed. A hose crossing a narrow aisle can obstruct movement, while a can that has to pass over plants signals an awkward route. The same check applies when collecting produce or taking away trimmed material: your hands and what you are carrying both occupy space. Picture the whole task, from fetching a tool to leaving the greenhouse, rather than just standing beside the bed.
Soil work adds different constraints to occasional watering. Filling a bed, adding compost, replacing a plant or carrying a tray requires a route in and out, not merely an arm's reach from the edge. Decide where a bucket can be set down without blocking the way, and whether you can reach every working edge with the tools you use. An island may make both sides easy to inspect, but it can funnel loose leaves, soil and tools into the same narrow paths. Give everyday items a planned place instead of using the remaining aisle as overflow storage; otherwise, a layout that worked on paper can lose its clearance during ordinary use.
When perimeter beds are easier
Perimeter planting can be easier to organise when one clear route matters more than access from two sides. A bed along each wall with a central aisle, or a bed on just one side and an open strip opposite, can preserve a direct path from the entrance to the far end. The open centre can make it simpler to carry a tray, turn or put down a temporary container. The trade-off is reach: each bed is worked from its inner edge, so its depth should suit the gardener and the crops. A wide perimeter strip may have an unreachable outer part even while the central aisle is generous. Assess bed depth and plant reach alongside aisle width.
Compare outlines rather than assuming every greenhouse has the same usable shape. The T-Model Orangery Greenhouse range is listed with areas from 16.52 m² to 30 m², but total area alone does not show the uninterrupted width available for an island in a chosen version. On a plan with corners or changes in direction, follow each route around them and check that it ends at a usable work point rather than a wall or fixed item. Draw island and perimeter alternatives within the same internal boundary, with the same door position and equipment. That makes it easier to see whether one layout gives you more reachable bed edge or a more continuous aisle.
Leave usable space at the ends
The short ends deserve their own measurement. They determine whether you can reach the end plants, pass from one side aisle to the other, or turn while carrying something; they also show whether the bed is accessible around its ends or only along its sides. You do not need to cultivate every end edge, but do not count a difficult corner as productive bed space until you can tend it. Mark the door and any end bench at its full depth, then set the bed length so the final plants remain accessible. A shorter bed may preserve a useful turning area. Whether that is worthwhile depends on the work you want to do and the route you need.
When considering a different model, use its own dimensions rather than transferring a sketch from another greenhouse. The Bloomcabin Oasis Pyramid Greenhouse range is listed with areas from 5.53 m² to 18.9 m²; those figures do not establish the layout of a selected version. Mark every doorway, inset and fixed feature, then trace the path from the entrance to the far end of the bed. If you cannot walk a full loop, decide whether two side routes still give you access to all the planted soil. The word island matters less than the edges you can actually reach and the space available for the tasks at each end.
Plan for mature plants and stored items
Draw the crop plan at mature size. A row of young seedlings leaves a different corridor from a crop with spreading foliage or a stem tied to a support, so show expected canopy and support positions as well as the soil. Let the intended picking and pruning side inform row placement; avoid setting supports where they turn a regular path into an obstacle. If you plan several kinds of crops, estimate which ones may reach across the bed edge and mark that growth beyond the bed. A nominal aisle is not clear if foliage, ties or tools routinely project into it. This is not about fitting in the greatest number of plants; it is about keeping each plant reachable as it grows.
Small items can take more floor space than expected when they are left where work happens. Include a watering can, trays, a bucket, a trolley or a work surface if it will stay in the greenhouse, rather than assigning every spare corner to planting. The Limited Edition greenhouse with built-in storage is listed with areas from 5.52 m² to 28.08 m², and its description identifies built-in storage. Check the stated location and dimensions for the exact version before plotting an island nearby. Use the available details rather than guessing how much room the storage takes, then preserve the access needed to use it.

Compare two layouts on the same plan
Once you have internal dimensions, make two plans at the same scale: one with the island and another with the same crops arranged along the perimeter. Add fixed features before drawing the beds, including the door opening, side projections, storage and any benches. Mark bed boundaries, planted width, aisle width and turning area separately, so the total area is not mistaken for plantable space. Use the same crop list and mature spread on both plans, then compare which bed edges you can reach and where the narrowest route occurs. Graph paper is enough for this exercise; you are testing the layout, not trying to predict a harvest.
When reviewing Bloomcabin Prestige Greenhouse models, compare the exact selected size rather than assuming every version has identical clear space. The listed area range runs from 3.77 m² to 28.08 m²; use the relevant dimensioned drawing if the design depends on a narrow margin. Mark the bed and paths at scale, or use tape on a comparable clear floor to represent the bed edges. Walk through with the largest tray or container you usually carry and test a turn at the ends. A route that works only when the greenhouse is empty should not be treated as a reliable aisle.
Use a practical fit test
Choose an island if you can reach the planned planting from both sides, keep the paths clear along their full length, turn or pass at the ends as your routine requires, and account for mature growth and stored items. If one of these works only by stepping on soil, moving something each visit or reaching over a crop, revise the bed's width or length. The Spacious Greenhouse range is listed with areas from 47 m² to 70 m², but that area range alone does not decide whether an island or perimeter layout is more workable.
Do not assume that a symmetrical plan is the most useful one. An island can be offset if one side needs more room for a door, equipment or crops, as long as both working edges remain accessible. It can also stop short of an end to leave space to turn. With perimeter planting, leaving one side less planted may preserve a route for carrying and moving between work areas. These adjustments matter more than whether the beds look balanced from above. Keep the arrangement that supports the jobs you intend to do without making a path, bed edge or corner difficult to use.
Frequently asked questions
How wide should a central island bed be?
There is no single width that suits every gardener and crop. Choose a width you can tend from both sides without stepping onto the soil or reaching over plants. Mark it out, include any supports, and check that the remaining aisles work for the tasks and tools you use.
Do I need a path all the way around an island bed?
Not necessarily. Clear access along both long sides may be enough if you can reach the planted areas and carry out routine care. Check the ends too: leave access where you need to turn, reach end plants or move between aisles, and do not count an inaccessible corner as usable growing space.
Are perimeter beds better in a small greenhouse?
They can be simpler when a central bed would split a narrow room into tight paths. Perimeter beds leave the centre open, but a deep bed may be difficult to reach from its inner edge. Compare the actual bed depth, aisle and door access rather than relying on the greenhouse's total area.
Can I reach an island bed after the plants have grown?
That depends on the mature spread of the crops and the space used by stakes, strings or trellises. Plan for those as well as the bare bed, and leave room between foliage and the walking line. If growth is likely to block access to the middle, reduce the bed width or reconsider the layout.
What should I measure before laying out the beds?
Use the chosen greenhouse's internal dimensions and mark the door opening, fixed fittings, bed edges, narrowest aisle and turning areas. Compare an island and a perimeter layout on the same plan. Then test the route with a tray or container you regularly carry and account for mature plants.
An island bed is a layout choice about access as much as cultivation. It earns its place when its width suits your reach, both working sides remain clear, and routes still work around the door, equipment and growing crops. Where that cannot be achieved, perimeter planting can preserve a simpler main aisle while still providing useful growing space. Draw both arrangements with the same crops and fixed items; the plan that works for watering, harvesting and cleaning up is the one worth keeping.
