
Recognising Damping Off in Collapsing Greenhouse Seedlings
Greenhouse growing guide
A tray of newly emerged seedlings can look sound and then collapse within a short period. Damping off is one possible explanation when the lower stem darkens, narrows at compost level and can no longer support the plant. However, similar losses can follow waterlogged compost, root damage or other stresses. Read the signs alongside the tray pattern and growing conditions before treating the whole batch as diseased.

Propagation-space check 1
The clearest sign is a damaged stem at compost level
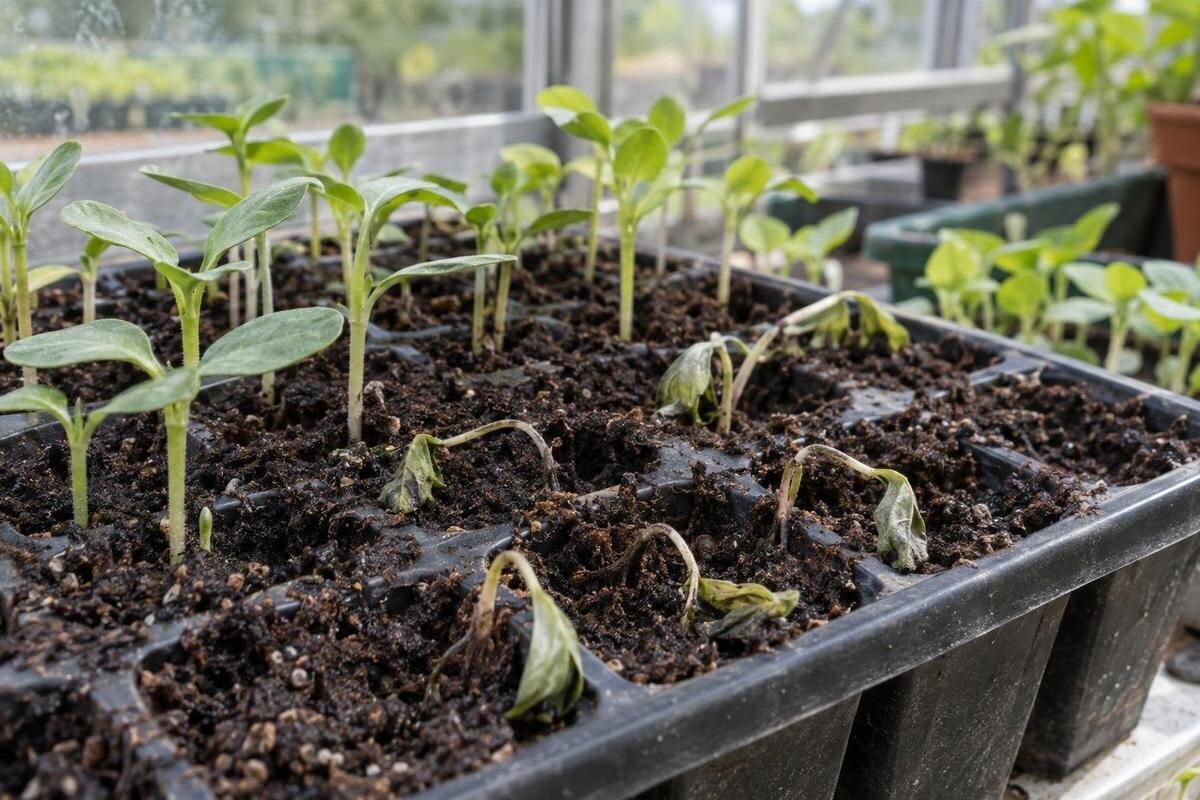
Damping off is a name for a group of seedling diseases associated with several soil-borne fungi and fungus-like organisms, rather than one pathogen that can be recognised from a single symptom. The clearest post-emergence warning is a lower stem that becomes dark, soft or water-soaked where it meets the compost, then narrows into a pinched section. The top may remain green at first, but the weakened stem can no longer support it, so the plant bends or lies across the tray. Symptoms can develop quickly in very young plants, although the pace varies. Once the stem is constricted and collapsed, that seedling is unlikely to regain normal upright growth.
Look closely at the collar, the short section of stem at compost level, rather than judging by limp leaves alone. The roots may be sparse, brown or soft, and there may be a darkened lesion around the stem; not every affected plant shows every sign. Losses can appear in small patches or among seedlings of a similar age, but a lone fallen plant does not prove infection. Note whether the damage is at the compost line, higher up the stem, or mainly on the roots. Its location is a useful clue for what to inspect next, not a diagnosis by itself. Foliage may stay green for a time even as the stem weakens.
Missing seedlings need a different assessment
Before emergence, a disease associated with damping off can rot a seed or a newly germinated seedling below the surface. Look for gaps in an otherwise expected row, or a patch where seedlings have not appeared. If you gently open one missing cell, a soft, discoloured seed or sprout supports the possibility of decay; an intact seed offers little evidence either way. Avoid excavating every cell, since this can injure seedlings that are still developing and may not reveal the cause. Compare the timing with the crop’s germination guidance: some species take longer to emerge than others.
Poor emergence can also result from seed age or quality, sowing depth, unsuitable moisture, or conditions outside the crop’s needs. Compare cells from the same sowing and check the packet instructions before treating a gap as disease. Record the seed type or lot, sowing date and tray position, and keep labels visible so batches can be compared over time. Distinguish cells where nothing emerged from those where a seedling appeared and later disappeared; these are different observations worth recording separately. A bench plan helps keep those groups identifiable. When comparing a structure such as the Bloomcabin Prestige Greenhouse, mark your intended tray positions and access space on a measured layout. This lets you assess the proposed propagation area without assuming that the greenhouse’s overall floor area equals the space available for trays.
Propagation-space check 2
Other problems can also make seedlings collapse
Several other problems can topple seedlings. A plant with limp leaves but a firm, unmarked stem may be suffering root stress from overly wet or dry compost, damaged roots, or a sudden change in conditions. A stem cut or chewed above the compost line points away from the classic pinched collar and may suggest handling damage or a pest. Brown roots are not specific to damping off; poor drainage and other root diseases can produce similar signs. Look at the whole plant and growing medium, not only the fallen top, and note whether the stem itself is damaged.
Greenhouse heat, poor drainage, dense sowing and stagnant air can stress seedlings, while sustained moisture may favour some disease organisms. None of these conditions alone proves damping off, and healthy seedlings may share a greenhouse with an affected batch. Compare trays by species, sowing date and position: a problem in one lot differs from a similar pattern across several crops, but neither pattern confirms a cause. Note whether affected trays share a bench or watering routine, rather than grouping every collapse under the same explanation. Where keeping batches apart is difficult, review how you use the available space. The Spacious Greenhouse listing can form part of a comparison of larger structures, using your planned benches and access routes as the basis. Keep the distinction between extra floor space and a workable arrangement for separate batches clear.
Inspect the tray and record what you find
Before moving or discarding anything, make a quick record. Photograph the whole tray to show where losses occur, then take close views of the stem base and, if practical, the roots of one affected seedling. Lift it gently with a little surrounding compost rather than pulling on the stem. Note how many seedlings are affected, when you first noticed the problem, whether roots look firm or soft, and which nearby plants remain healthy. Use a clean tool for each inspection; compost carried on a dibber or label can make it harder to keep observations separate.
Compare the affected area with a nearby healthy part and with another tray from the same sowing, but avoid moving compost between them. Record watering, ventilation, recent changes in conditions and whether trays have stood in water. These details may reveal a shared growing condition and can also help a specialist later. Use consistent tray names in your notes and photographs so that a close-up can be traced back to its position in the greenhouse. Keep the bench and path clear enough to reach stem bases without brushing leaves or pots. For a new work area, compare the dimensions listed in the Aluminium Greenhouses range with your intended bench arrangement. Include the space you need to lift out a tray for inspection, not just the space occupied by trays at rest.

Propagation-space check 3
Separate affected seedlings before handling healthy trays
If damping off is plausible, separate the affected tray from healthy seedlings before the next watering or handling session. Mark it clearly and avoid placing it where drainage can run into other trays. Handle healthy batches first and suspect material last; then wash your hands and clean any tool or surface that contacted compost. If several trays are involved, keep them grouped by sowing lot rather than mixing their contents. This reduces avoidable movement of debris and makes later comparison easier. Avoid carrying a suspect tray through a crowded area where it could brush against healthy leaves.
Remove seedlings that have collapsed and any visibly rotted material with as little disturbance as possible. Do not reuse compost from affected cells or add it to a home compost heap; dispose of it through a suitable waste route instead. One fallen plant is not a reason to discard every tray: inspect neighbouring seedlings and watch for new symptoms, especially after watering. Keep the affected tray’s label with it so that separating it does not mean losing its sowing history. If you are considering a Wall Greenhouse as a separate holding area, assess its position, usable space and drainage in relation to healthy stock. A separate location is only useful if you can also manage the movement of trays, tools and water between the two areas.
Water according to the crop and the compost
Too much water is not the only cause of damping off, but persistently saturated compost can damage roots and create conditions favourable to some pathogens. Use a fresh seed-sowing medium that drains, and water according to the crop and seedling stage rather than a fixed calendar. Check the compost itself: the surface may look dry while the lower part remains wet, or one corner of a tray may hold more water than another. Empty standing water and avoid leaving pots submerged. Do not deliberately dry seedlings out; they still need moisture suited to their crop and stage.
Water gently at the base or from below if that suits the crop and tray, since reducing splashes can limit the movement of compost between seedlings. Bottom watering is not a cure, and shared runoff can carry debris; use clean water and do not pass water from a suspect tray back to healthy ones. Allow excess to drain and clean watering equipment if it has touched affected compost. When reviewing a watering routine, consider where the water goes after it leaves each tray, not only how it is applied. This is also a practical layout question when comparing the Limited Edition Aluminium Greenhouses. Check your intended bench and drainage arrangement against the available dimensions, with a clear place for watering suspect trays separately from clean stock.
Propagation-space check 4
Manage airflow, spacing and temperature together
Warm, humid conditions and close-packed seedlings can leave foliage wet and compost slow to dry, but ventilation should be managed without exposing young plants to abrupt stress. Space seedlings as the crop guidance allows; crowded leaves make inspection harder and limit air movement around the compost surface. Ventilate when the crop and conditions permit, and notice where condensation persists. Avoid treating a permanently open vent or a strong fan as a universal answer: excessive drying, cold draughts or sudden changes can create different problems. Review the plants, not just the greenhouse’s general feel.
Conditions may differ between the door, a corner and a densely filled bench. If you have a thermometer or humidity monitor, readings can help you compare times and locations, but observe the seedlings as well. Record where and when you took a reading; a single measurement away from the affected tray gives less useful context than observations tied to that tray’s position. Note any ventilation changes alongside the readings rather than relying on memory. When comparing a structure such as the T-Model Orangery Greenhouse, review the selected model’s ventilation details and access with your proposed bench positions in mind. These details help you assess the layout, but do not establish how air will move at your site. Follow species-specific growing guidance, since seedlings of different crops do not all need identical conditions.
Clean trays and tools between sowings
Reusable trays, pots, dibbers, labels, watering cans and bench surfaces can retain old compost or plant debris. After a disease concern, remove visible residue and wash equipment thoroughly. If you use a suitable disinfectant, follow its product instructions and check that it is appropriate for the surface. Cleaning must come first, because compost and other residue can shield material on the surface. Let equipment dry before storing or refilling it. Pay attention to cell corners, drainage holes and joints where debris collects; wiping only the tray rim leaves the main contact surfaces untouched.
Use fresh, clean seed compost for a new sowing rather than garden soil or medium recovered from affected cells. Keep unused compost away from dirty tools, and store clean trays separately from those awaiting washing. Make those storage areas easy to distinguish so that an empty tray is not mistaken for a cleaned one. Keep seed-lot labels with their batches rather than leaving loose labels among washed equipment. When considering the Aluminium Greenhouses with Storage – Limited Edition, check the actual storage configuration against what you need to keep apart. Plan where unused compost, clean trays and equipment awaiting washing would go; a storage area is useful only when its arrangement supports the routine you intend to follow.

Propagation-space check 5
Know when a specialist diagnosis is worthwhile
Ask a qualified plant-health adviser, diagnostic laboratory or experienced horticultural professional when the pattern is unclear, losses continue despite basic hygiene and moisture corrections, or several trays or crop types are affected. Confirmation is especially useful before treating a valuable batch or changing your whole propagation routine. A photograph can show the collar, but symptoms alone may not identify the organism. A professional may need to compare roots, stems, growing medium and the crop’s history. Do not assume that one fungicide, home remedy or adjustment will address every case.
Before arranging a diagnosis, ask the service what it wants to receive. It may request fresh symptomatic seedlings, surrounding medium, images of the tray, and details of the seed lot, compost, watering and recent conditions; sample requirements vary. Keep material separate from healthy stock and avoid mixing it with samples from unrelated trays unless the adviser requests this. Record which changes you have already made and when. A concise history helps distinguish a recurring disease concern from a growing-condition issue without relying on guesswork.
Use your observations to plan the next sowing
For the next sowing, combine clean equipment with fresh seed compost and instructions specific to each crop. Avoid sowing much more thickly than needed, because crowded seedlings are harder to inspect and have less space around them; follow crop-specific guidance for sowing depth and germination conditions. Keep batches labelled, water according to their needs, and make changes to moisture, spacing or ventilation deliberately. If losses return, changing one factor at a time makes the result easier to interpret than changing several at once. Note what you changed and whether the same symptoms appear again. Compare seedlings at a similar stage of development, and retain the earlier notes so that you are comparing recorded observations rather than impressions.
A simple propagation plan can mark where clean trays start, where healthy seedlings are kept, and where a suspect tray can be held without sharing drainage or tools. It need not mean buying a new greenhouse; a tidy, clearly separated bench may be enough. Use the difficulties recorded during the affected sowing to identify what needs changing: access for inspection, separation between batches or somewhere to put used equipment. If a new structure is part of that plan, compare the Pyramid Greenhouse configuration and dimensions with your tray layout and site measurements. Its shape does not establish disease performance. The useful question is whether your proposed arrangement makes inspection and separate handling practical. The aim is not a guarantee against disease, but an easier routine for spotting problems early and tracing where they began.
Frequently asked questions
Does one fallen seedling mean the whole tray has damping off?
No. A single collapse can have several causes, including accidental damage. Check the stem base and roots, note where other seedlings are affected, and watch nearby plants. Avoid discarding unaffected trays solely on the basis of one fallen seedling.
Can a seedling recover after its stem narrows at compost level?
A seedling with a visibly pinched, collapsed stem is unlikely to recover, because the stem can no longer support it. Remove it carefully with the affected compost. Keep remaining firm seedlings under observation; an upright appearance alone does not establish that they are free of disease.
Should I apply a fungicide as soon as I see a seedling collapse?
Avoid choosing a treatment on the basis of collapse alone. Damping off and non-infectious problems can look alike, and a treatment aimed at one cause may not help another. Seek advice if losses continue or the cause is unclear, and follow product directions if a crop-protection product is recommended.
Can I reuse the tray and compost?
Do not reuse compost from cells with affected seedlings. A tray may be reused after all compost and plant debris have been removed, it has been washed thoroughly and, where appropriate, it has been treated with a suitable disinfectant according to its instructions.
What information should I give a plant-health specialist?
Ask first what sample they need. Useful details may include clear photos, the seedling and its growing medium, the seed lot and sowing date, and notes on watering and recent greenhouse conditions. Keep material from different trays separate unless the specialist advises otherwise.
A fallen seedling is a clue, not a verdict. A damaged, constricted stem at compost level is a stronger warning than limp leaves alone, particularly when similar losses appear in a patch. Compare the roots, tray pattern and growing conditions, contain affected material, and record any changes you make. That gives the next sowing a cleaner start and leaves you with more useful evidence if the problem returns.
