
Comparing Gravel, Brick and Paving Inside a Greenhouse
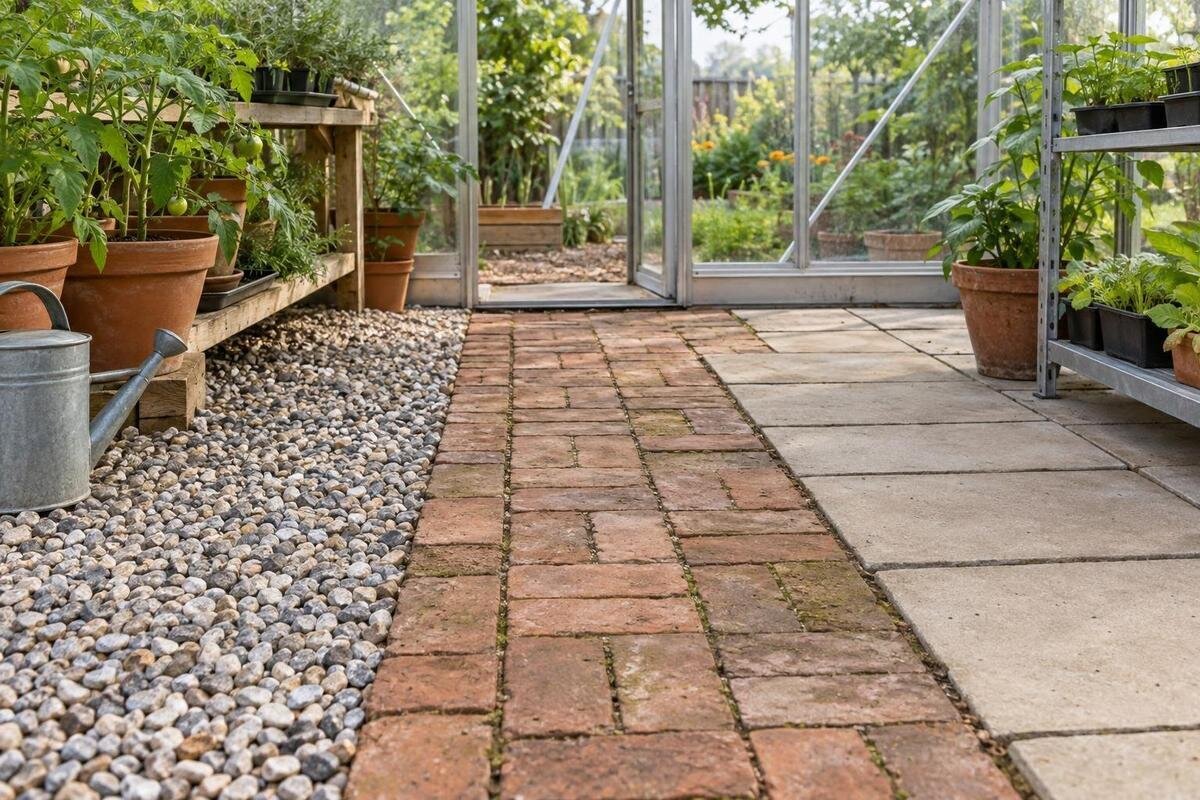
Greenhouse floor guide
A greenhouse floor affects more than appearance. It determines how steady the main route feels, how easily you clear compost and leaves, and where irrigation water travels. Gravel, brick and paving can each suit a different routine, but the visible walking surface is not the structural base that supports and anchors the greenhouse. Compare the finishes against the work you do inside, the areas that will remain planted and the site’s drainage before deciding how much of the floor to cover.

Before you choose 1
Floor finish and greenhouse foundation serve different purposes
Treat the greenhouse foundation and the walking surface as two separate parts of the plan. The foundation supports the frame and provides the fixing arrangement specified for the selected greenhouse; the floor finish is the surface underfoot. A prepared layer may sit beneath that finish, but it has its own job. Gravel spread inside, bricks laid for a path or paving slabs can look substantial without being designed to support or anchor the structure. A neat walkway therefore does not prove that the greenhouse has a suitable base. Establish the model’s support requirements before deciding where the finished floor begins and ends.
Obtain the drawing for the exact model and size, then identify the frame line, fixing points, doorway, threshold and any foundation components. Where the supporting design or ground conditions are uncertain, have the work reviewed by a qualified groundwork professional; dimensions copied from a different greenhouse are not a safe substitute. Plan the floor so it does not conceal or interfere with details shown in the drawing. If the Bloomcabin Prestige Greenhouse is on your shortlist, ask for the drawing for that exact version to understand the base interface; the product name does not specify how the internal surface should meet it. Agree the junction before laying the finish, so the threshold and walking surface meet as intended.
Beds, work areas and walking routes
Make a scale sketch of what takes up the floor before comparing finishes. Mark open-soil beds, containers, benches, a potting or work area, storage and the everyday walking route. Decide whether you want continuous hard cover or firm paths with growing ground exposed. A full surface can simplify sweeping where you walk, but may be unnecessary beneath permanent beds; a narrow path uses less material but can feel awkward when you carry a tray or turn with a watering can. Draw the point where you set items down and where you pivot, not just a line from the door to the far end. Your routine determines how much floor needs to be firm.
Allow for door clearance and the space needed to reach plants or move pots; an aisle that looks generous on paper may be narrowed by a bench, hose or temporary tray. If the Spacious Greenhouse is on your shortlist, use the plan for the exact version to plot these clearances. Draw two alternatives—full coverage and a path-and-bed arrangement—and note how each could change if you later add benches or rearrange containers. This comparison shows where two finishes might meet and whether those boundaries would sit in places you cross often. Include access to work and storage areas as well as the main walkway; these routes are easy to overlook.
Before you choose 2
Gravel: water, footing and loose debris
Loose gravel is simple to picture, but its behaviour depends on particle size and shape, how firmly it is contained and what lies below. Water can pass between stones; that does not mean it will drain away. If the underlying soil or supporting layer holds water, it may remain below the gravel or travel to another part of the greenhouse. A base that accepts water can allow it to disperse, but this is a site question, not a guaranteed quality of the top layer. Ask how irrigation spills and routine cleaning water will behave rather than treating gravel as a drainage solution on its own.
Underfoot, loose aggregate can shift, scatter into adjacent beds or be dragged through the doorway. Gravel can be hard to sweep, and small dropped items—plant labels, clips or seed packets—can disappear among the stones; coarser material may be awkward for small pots or wheeled equipment. Check a sample with the footwear and tools you use. If you are considering the Classic aluminium greenhouse, settle the floor layout before estimating gravel coverage, and mark where loose stones should stop at the entrance, bed edges and firm work area. Expect to rake displaced material back and remove leaves or compost by hand; a clear boundary also helps keep gravel out of growing soil.
Brick: joints, grip and cleaning
Brick creates a more defined walking surface than loose aggregate, but the units and joints still affect how even it feels. Grip and ease of cleaning depend on the particular brick’s face, the joint finish and whether units remain flush. A rough face can feel different from a smooth one, yet may hold dry compost or fine debris. Uneven units or damaged joints can catch a shoe edge or make it harder to move a small pot or trolley. Look at an actual sample of the brick and joint finish rather than relying on a photograph, and consider how it feels when damp as well as dry. A unit sitting higher than its neighbour is more noticeable when you are carrying something.
Joint care is part of the choice: plant debris, seeds and fine soil can settle between units, making sweeping less thorough. The ease of lifting or repairing a brick depends on how the floor is installed, so establish whether later adjustment is possible before benches or beds make access difficult. For a lean-to greenhouse, map the entrance route and growing areas on the relevant plan before deciding where the brick path should run. Check where the path meets exposed soil or another finish, since debris from either side can mix at the boundary. Pay particular attention to these junctions when comparing layouts, as they need to remain clear and level where people pass.

Before you choose 3
Paving slabs: surface texture and cleaning
Paving slabs create broad, defined units and can have fewer joints than small-format brick, depending on the sizes selected. That may make dry debris easier to sweep from the walking surface, but a smooth finish can become slippery when wet and a strongly textured finish can hold soil. Compare the actual surface, joint treatment and edges, not colour alone. If possible, test a sample with the footwear you use and sweep a little dry potting mix from it. This gives a more realistic sense of cleaning and grip than a product photograph; individual paving finishes vary, so do not assume one sample represents them all.
A paved floor is useful only if its units sit steadily on a properly prepared supporting layer. A slab that rocks, settles or leaves a raised edge can create a trip point; ground preparation and installation matter as much as the visible pattern. Nor is paving automatically waterproof: water may pass through joints or travel across the surface depending on the units, joints and underlying layers. If you are choosing a Limited Edition aluminium greenhouse, compare the proposed slab arrangement with the exact model plan so the edges and entrance can be resolved without obscuring the greenhouse base. Check the transition to exposed soil too, and ask a qualified professional about ground or drainage concerns rather than expecting a paving pattern to solve them.
Where irrigation water goes
Plan drainage as part of the floor decision. Irrigation spills, water draining from pots and water used for routine cleaning need a route that does not leave the usual walkway persistently wet or send water somewhere unsuitable. Gravel may admit water between stones, brick joints may admit some, and paving may carry it across the surface; none predicts the result without knowing the jointing, bedding, sub-base and ground below. An open-looking finish can still sit over water-retaining material, while a tightly jointed finish can shed water towards a low point. Distinguish water passing through the surface from water leaving the site.
Observe where water stands after ordinary watering and note low spots, damp patches and the paths you cross; if rain enters the greenhouse, note that too. A porous top layer is not a remedy for a drainage issue if the layers underneath cannot receive water. Where an outlet or the ground’s ability to absorb water is uncertain, have the drainage question assessed by a qualified professional rather than creating an improvised route. When planning the interior of a T-Model Orangery Greenhouse, mark beds, hose routes and walkways on the plan. Consider whether water from pots will stay near the growing area or cross a path that needs to remain dry. Drainage design and floor finish must be coordinated, but they are not the same job.
Before you choose 4
Cleaning and hygiene on a greenhouse floor
Routine hygiene is mostly about removing leaves, spilled compost, standing water and other debris before it accumulates; a hard finish does not make a greenhouse sterile. Brick and paving give a defined path to sweep, but soil can remain in joints or textured faces. Gravel can be raked and cleared by hand, yet small debris may mingle with stones and be harder to remove selectively. Think about where leaves gather and whether you can reach edges behind benches, containers and fixed equipment. Easy access for inspection may matter more than a surface that looks clean in a photograph. Pay attention to bed edges, where spilled soil can mix with the path.
Consider what happens after a spill. Compost on pale paving, dark gravel or jointed brick presents different visibility and clean-up tasks, so compare an actual sample in the light the greenhouse receives. Damp organic matter left on any surface can become slippery and harder to clear; remove it rather than allowing it to accumulate. For a Pyramid Greenhouse, mark the clear floor areas on the plan to see whether you can sweep around benches and planting zones. Choose transitions that let you collect debris rather than push it into soil or under a fixed structure. Also consider whether your usual brush can reach the joints or edges that need attention.
Access around the entrance, benches and storage
Set out the entrance, paths, benches, large pots, hose and storage before choosing material. The route should reflect what crosses it: shoes may cope with loose gravel, while small containers, trays or a trolley call for a more even path. Check the door’s full opening movement and make sure the floor change at the entrance is not an unexpected lip. Keep the route clear of places where a hose can snag or water can collect. If a growing bed interrupts the route or meets another surface, make the boundary obvious and stable rather than leaving a loose edge where people step. Consider whether bulky items can be moved without crossing a bed or wheeling over an uneven patch.
Storage changes how often a path is used: a corner accessed occasionally has different demands from the route to everyday tools. If you are considering a Limited Edition greenhouse with storage, consult the exact layout to locate storage access and work zones before deciding where gravel, brick or paving should meet. Mark the routes where you carry supplies, places where you set a tray down and access needed for cleaning. If a main route crosses a change of finish, make that transition easy to see and cross, including when footwear is damp. The most comfortable finish is the one that suits those movements, not necessarily the one used over the greatest area.

Before you choose 5
Routine maintenance for gravel, brick and paving
Compare upkeep over a season, not only on the day the floor is finished. Loose gravel may need to be raked back into place and debris removed by hand; once it mixes with soil, separating the two can be tedious. Brick asks for attention to joints and to units that become uneven, while paving needs clean joints and steady edges. Frequency depends on the chosen materials, traffic, water use and how much plant debris reaches the floor. Ask the installer what regular care and repair options apply to the exact material, rather than relying on a general description of brick or paving. Active planting or frequent watering may mean more regular clearing.
Think about repairability before placing permanent benches or beds over a surface. Could you reach a damaged or stained area? Can you obtain matching units or aggregate? Could a section be lifted without disturbing nearby planting or the greenhouse base? The answers depend on how the floor is put together, so confirm them rather than assuming every brick or slab can be replaced individually. If you prefer quick sweeping, favour a stable finish with joints and texture you can maintain; if you are willing to rake and pick out debris, gravel may remain practical. Consider whether a later change to bed layout would make the finish difficult to alter. Choose the work you will actually keep up with.
Choosing a finish for your greenhouse routine
Use your main priority to narrow the choice. If you prefer a loose-surfaced path, investigate gravel—but confirm what happens to water below it and accept that small debris is harder to sweep. If you want a firm path made from individual units and can manage joint care, compare brick samples. If broad areas and straightforward sweeping matter most, examine paving, with close attention to wet grip, texture, edge stability and where water moves. None is automatically best: a finish that works on the main path may be inconvenient beside an open bed or potting bench. Look again at the door and the routes you use most often; they may change your preference.
Test both layout and material before committing. Place a sample on the intended route; set a pot down, move a tray past it and imagine collecting spilled compost. Check where the finish ends, how it meets exposed soil and whether water has a clear destination. Then align the selected floor with the actual greenhouse base drawing and have ground preparation reviewed where required. A small, well-planned walking route may meet the real need better than covering everything; a continuous finish may make sense when all areas are used regularly. If two options remain close, compare the routine work each requires rather than choosing on appearance alone. Let your use of the space and the site settle the choice.
Frequently asked questions
Is gravel a good floor for a greenhouse?
It can suit a lightly used walking route if you are prepared to rake it and the layers below allow water to disperse. Loose stones are less convenient for frequent sweeping, small pots or wheeled equipment. Check a sample underfoot and confirm how the prepared ground will handle irrigation water; gaps between stones do not guarantee drainage.
Which greenhouse floor is easiest to clean?
A stable brick or paving surface is usually easier to sweep than loose gravel, but the result depends on texture and joints. Rough faces and joints can hold soil, while smooth finishes may be slippery when wet. Compare samples and consider where compost or leaves will collect before choosing.
Will gravel, brick or paving drain irrigation water?
Not automatically. Water may pass between gravel stones or through some joints, but its onward route depends on the supporting layers and the ground. Paving may carry water across its surface. Look at the site’s actual low spots and drainage, and get qualified advice if the route or destination is uncertain.
Can paving replace the greenhouse foundation?
No. Paving, brick and gravel are floor finishes; they do not automatically provide the support or fixing arrangement required for a greenhouse. Use the drawing for the exact model and have the supporting work reviewed by a qualified groundwork professional where needed.
Should I cover the whole greenhouse floor?
Only if a continuous surface suits how you will use the space. A firm path beside planted beds can be enough, while benches, pots and storage may call for a broader walking area. Sketch the layout and mark the routes you use before deciding how much to cover.
The right greenhouse floor is the one that meets your walking and cleaning needs without promising drainage the ground cannot provide. Gravel, brick and paving each bring different compromises in footing, debris removal and water movement. Plan where beds and paths sit, keep the foundation as a separate decision, and choose the finish whose upkeep fits the way you work in the greenhouse.
