
Greenhouse Bed Barriers for Roots from Nearby Planting
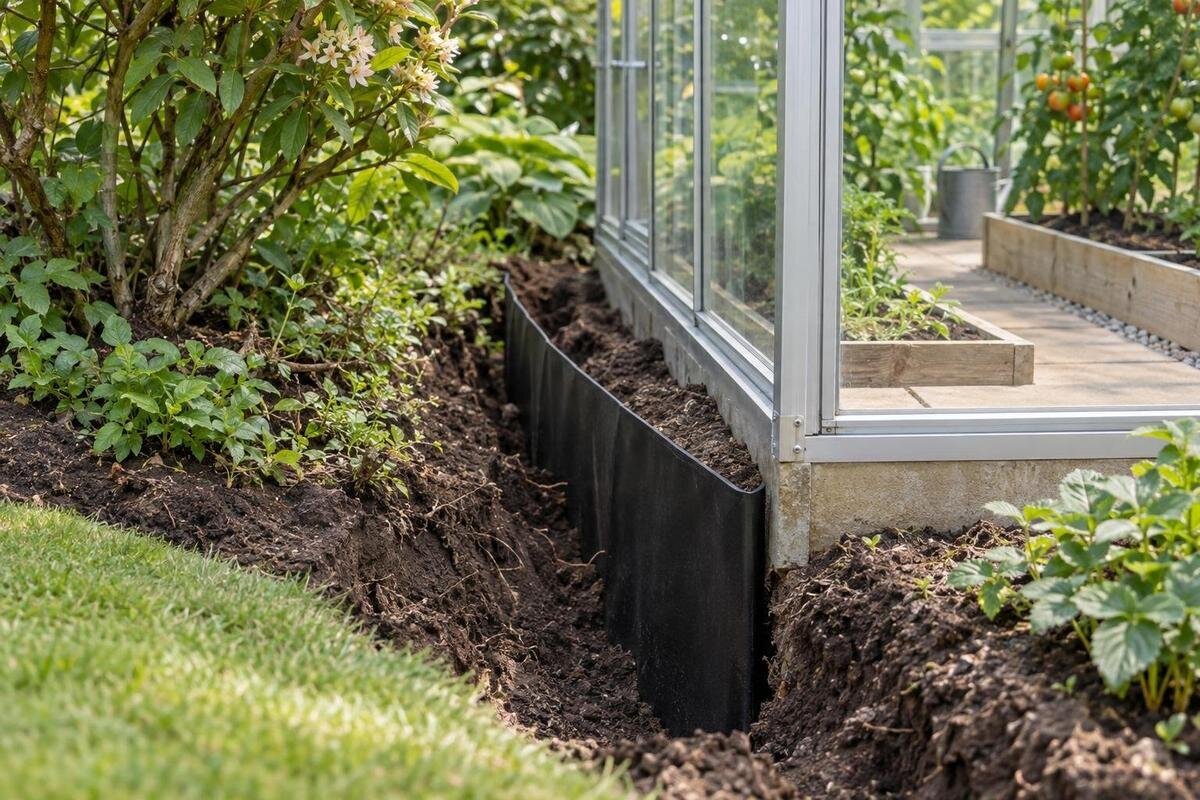
GREENHOUSE BEDS
Roots from nearby trees, hedges or shrubs can enter the cultivated soil of a greenhouse bed, but poor crop growth alone does not prove that this is happening. Confirming the source matters: a poorly placed barrier can leave an entry route open, interfere with drainage or damage roots that anchor established planting. This guide explains how to record evidence, distinguish root intrusion from other growing problems, assess effects on nearby plants and decide whether a boundary is appropriate. It also sets out what to check before choosing a material, because ordinary edging is not automatically made for root control. The aim is a workable growing layout without needless excavation or cutting.

01
How to recognise roots entering a greenhouse bed
Finding roots in a greenhouse bed is not, by itself, proof that a nearby tree or hedge has crossed the boundary. Crops, weeds and volunteer seedlings all produce roots, and cultivated soil can contain a dense mix. An unfamiliar, woody root emerging from one edge is more suggestive of outside planting, but appearance alone rarely identifies its owner. Do not pull hard to test it or cut it simply to see what happens. Photograph the point where it appears, note its direction and position, and disturb as little soil as possible.
Look for a recurring pattern rather than one isolated strand. Roots appearing along the same bed edge on separate checks, or a visible root continuing in from soil outside it, are stronger clues than a single fine root among crop roots. Note whether it is woody or fine and branched, but treat those features as observations rather than a species diagnosis. A substantial woody root may be important to the plant it belongs to, while fine roots can be difficult to identify. Label each photographed location on your sketch so that later observations can be compared with the same point. If the source is uncertain or nearby planting is valuable, pause before removal and arrange an informed assessment.
Map nearby planting before you dig
Sketch the greenhouse footprint, bed edges, trees, hedges, shrubs and irrigation points on one plan. Include paths, drains, raised edges and any proposed barrier route, then mark each root you have seen. A canopy edge is not a dependable underground boundary: roots may extend beyond it, and their spread varies with the plant, soil and growing conditions. No single distance from a trunk establishes a safe excavation line. Note whether the bed is in-ground or raised and where its sides meet the existing soil. Distinguish existing features from proposed changes so that the current layout remains clear. The map is not a root survey, but it can reveal conflicts and give an arborist useful context.
Record which plants are established, their approximate locations and whether there are several possible sources. A hedge may have many stems and overlapping roots; tree roots can intermingle with shrubs and greenhouse crops. Check whether each root seems to enter from outside the bed or belongs to a plant already growing in it, and note irrigation, low spots or disturbed ground that may affect where roots are visible. If you do not know the plant or its importance, ask an arborist or knowledgeable horticultural professional to assess it before excavation. Do not rely on the nearest trunk alone to identify the source.
02
Check whether roots explain poor crop growth
Patchy crop growth can make root competition plausible, especially if affected plants cluster near the same boundary, but it is not a diagnosis. Compare affected and healthy areas for soil moisture, irrigation output and drainage. A blocked dripper, uneven watering, compacted soil, excessive fertiliser, disease, pests or shading can produce similar symptoms. Check whether the pattern follows the roots or instead follows a watering line, planting date or crop row. Keep notes on the crop, position and watering rather than removing soil across the whole bed; symptom patterns are useful clues only when compared with actual root evidence.
Where access permits, inspect a small, already exposed edge or loosen a little surface soil by hand; do not dig a trench to follow a root. Compare several points along the affected side with a less affected point, and photograph findings with a simple scale. If outside roots are confirmed and recur in a defined area, a boundary may be worth assessing. If no root evidence appears, investigate irrigation or crop causes first. For a new greenhouse, carry these observations over to the proposed bed plan rather than choosing the overall size in isolation. The Limited Edition Aluminium Greenhouses listing spans 3.77 m² to 28.08 m². Those figures describe model area options, not the usable bed space left after paths. Mark the affected edge on each layout under consideration to see which arrangements would place a growing bed beside it.
Protect structural roots before planning a barrier
Roots hidden in soil cannot be judged reliably from the visible portion alone. Some larger roots contribute to anchorage, and cutting one to make a trench or fit edging may affect a plant's stability or health. The result depends on the plant, its condition, the root and the work, so there is no universal distance from a trunk that makes excavation safe. The same caution applies to removing soil, raising the ground or driving posts close to established planting. If a proposed barrier route is near trees or mature shrubs, arrange a qualified arborist's assessment before work begins.
Ask the arborist to identify areas where excavation should be avoided and discuss alternatives, such as a different bed edge, a smaller bed, containers or no barrier. Mark those areas on the plan when comparing greenhouse positions, rather than treating the barrier route as a separate decision. Compare the footprint of the selected T-Model Orangery Greenhouse with these areas; its listed area range is 16.52 m² to 30 m². Show the proposed beds and ground preparation as well as the finished structure. This allows the assessment to cover the work needed for the whole layout, including any conflicts between the greenhouse position and the proposed barrier.

03
Decide whether a barrier is the right response
A root barrier is not the only way to keep planting separate. If intrusion is limited to a narrow edge, moving or shortening the bed may preserve an undisturbed buffer; if the layout allows, containers or a different growing arrangement may avoid excavation. These alternatives still need enough root space for the chosen crops, suitable drainage, stable support and workable access. Do not move a bed into a path or reduce it without checking what will grow there. If the source is a plant you intend to remove, identify it first and choose control suited to that plant rather than enclosing the whole greenhouse bed.
A barrier is more plausible when the source and route are reasonably clear, intrusion recurs at a defined edge, and a safe installation route exists. It is a poor substitute for diagnosing widespread weak growth or dealing with shade, irrigation faults or soil conditions. Compare a barrier with the practical alternatives on the same sketch: show which bed edge would move, how much growing space would remain and where access would run. If moving the greenhouse is an option, include the Pyramid Greenhouse in that measured comparison. Its listed range is 5.53 m² to 18.9 m². Compare complete layouts to see whether relocation would separate the bed from the affected edge without sacrificing necessary growing space or access.
Design a continuous boundary without blocking drainage
Draw the proposed barrier as a line between the identified source and the bed, not as an unexamined sheet laid across the whole growing area. A root-control product must match the roots, soil and site; no single depth or route suits every tree or shrub. Gaps at joins, ends or around obstructions can leave a route in, while a barrier can redirect roots along it or around its ends. Ask the supplier or installer how joints and terminations are intended to work, and have the route reviewed against important roots and underground services before excavation.
Keep water movement in the plan. A barrier should not turn the bed into a sealed tray or leave irrigation water with nowhere to drain; check how existing drainage will continue and whether the chosen boundary changes it. Plot the greenhouse frame or foundation, bed edge, irrigation and inspection access together instead of deciding each in isolation. For a layout that includes storage, show that space separately so it does not disappear into an overall area allowance. The Aluminium Greenhouses with Storage – Limited Edition listing gives an area range from 5.52 m² to 28.08 m². Use the chosen model information to distinguish growing space from storage and access, then mark where the barrier ends and drainage arrangements would sit in relation to each.
04
Verify barrier material and installation requirements
Do not assume that edging board, ordinary landscape fabric, pond liner or leftover plastic sheet is suitable as a root barrier. Check that a product is specified for buried root control and for the conditions in which it will be used. The manufacturer's instructions should address matters such as burial, joints and exposure; ask about any restrictions near edible crops or soil. If the documentation does not cover a point, ask the supplier rather than infer performance from thickness, colour or a product name. A waterproof sheet and a root-control barrier are not automatically interchangeable.
Plan the work with someone qualified to assess both the barrier product and nearby planting. Ask how the barrier is supported, how its ends are treated and how drainage remains open; do not accept an installation that requires cutting unidentified woody roots just to make the line continuous. The Bloomcabin Prestige Greenhouse listing identifies a metal foundation. That product fact does not establish whether a root barrier is suitable, how deep it should be or whether nearby roots can be disturbed, so check the two plans separately.
Fit bed edges and paths to the greenhouse layout
Once the greenhouse dimensions are known, draw the interior to scale and mark each bed, access aisle, door opening, storage area, watering point and the edge that needs protection. Leave workable access to inspect and maintain the barrier boundary; a narrow strip hidden behind a bed makes future checks difficult. Record the internal length, width and intended soil depth of each bed separately from the greenhouse dimensions. This makes it easier to compare the root space available when a bed is narrowed, shortened or moved. Check the proposed arrangement against the crops you intend to grow, rather than preserving the original plant count regardless of the space left. A published greenhouse area is not the same as usable bed space once paths and equipment are included, so make a measured plan rather than estimating from appearance.
The Spacious Greenhouse listing covers 47 m² to 70 m². For the selected model, check its actual dimensions and any available layout information, then overlay the bed and barrier plan. Allow for paths, storage and equipment rather than treating the whole floor area as planting space. Trace how you would reach each protected edge with the beds planted and the storage space in use. If inspection depends on emptying a bed or moving equipment every time, reconsider the arrangement before buying materials. Adjust bed positions or access routes on the drawing and compare the growing space that remains. The layout should provide room for both crops and routine access to the boundary.

05
Coordinate root work with greenhouse installation
For a new greenhouse, assess the likely root-sensitive zone before ground preparation. Mark the proposed footprint and beds, check what lies beyond each bed edge, and arrange an assessment of mature planting before trenching or other substantial ground disturbance. Where relevant, ask the greenhouse installer and arborist to coordinate: foundation preparation, barrier route, watering and drainage should not conflict. Avoid letting an assembly date force a hurried decision about cutting roots. With an existing greenhouse, changing the internal bed layout or crop arrangement may be worth considering before excavating beside the frame.
Write down the agreed route and what should remain undisturbed; photographs of the bed edge before work can help with later checks. For a new or replacement layout, plot the footprint of the chosen Aluminium Greenhouses model using its specific dimensions, alongside site measurements and the areas identified as sensitive to root disturbance. Keep the same version of this plan available to everyone involved, with bed edges, foundation work and the barrier route clearly distinguished. If the route changes during planning, update the drawing before work begins and check the revised arrangement with those carrying out the work.
Monitor the bed after a layout or barrier change
After changing a bed edge or installing a barrier, keep simple records of where new roots appear, which crops are affected, how soil moisture varies and whether drainage remains as expected. Compare the same marked points rather than relying on memory, and note watering, crop and any soil work alongside root observations. Look at accessible barrier ends or exposed portions from the surface, but do not start an excavation to chase a root. If growth changes, remember that crop symptoms can have several causes and are most useful when recorded with the surrounding conditions.
If roots reappear, compare their position with the original records: are they entering at the same point, near an end of the barrier or somewhere previously unaffected? Check whether they could belong to a crop or weed rather than nearby planting. Have the original route and material reviewed before extending or deepening a barrier, since further excavation may increase risk to established plants. When planning a Wall Greenhouse, allow access for these later checks, particularly along the bed edge nearest established planting. Mark the intended inspection points on the layout so they remain identifiable after planting.
Frequently asked questions
How can I tell whether a root belongs to a nearby tree?
Not every root in a greenhouse bed comes from outside it. Look for a root visibly entering from the surrounding soil or a repeat pattern along the same bed edge. Fine roots can be difficult to identify by appearance, so record where they appear and have uncertain woody roots assessed before cutting.
How deep should a greenhouse root barrier be?
There is no universal depth. It depends on the source plant, its root pattern, the soil, the site and the barrier product. Follow the manufacturer's instructions and have the proposed route assessed, especially near established planting. Copying a depth from another garden could leave gaps or lead to unnecessary excavation.
Can I cut a root that has crossed into the bed?
Do not cut an unidentified root simply because it is in the bed. A woody root may have a structural role, and its importance cannot be judged from its exposed length alone. Photograph it and ask an arborist or relevant horticultural professional to assess it before deciding whether any removal is appropriate.
Will a raised bed or plastic liner stop roots?
Not automatically. An open-bottom raised bed can still admit roots from below or through its sides, and a liner intended for another purpose may not be designed for root control. Check that any product is specified for underground root control and is suitable for the bed's drainage and intended crops.
Could root competition be causing weak greenhouse growth?
It is possible, but weak growth has many causes. Compare evidence of incoming roots with soil moisture, irrigation output, drainage and the crop pattern. If no external roots are confirmed, investigate growing conditions first. Seek crop-specific advice if the cause remains unclear.
Plan a boundary only after the source and route are credible, and judge it against the needs of both the crop bed and established planting. A suitable barrier must fit the soil and drainage, provide the required continuity and be installable without unjustified damage to important roots. Where a safe route is unavailable, changing the bed position or growing arrangement may be more responsible. Keep a record of root locations and crop conditions so later checks can show whether the problem has changed.
