
Why an Automatic Greenhouse Vent Opener Stays Closed
GREENHOUSE TROUBLESHOOTING
An automatic greenhouse vent opener that stays closed may be working normally: many respond to the temperature at the actuator, not to a warm forecast or a general impression that the greenhouse feels hot. If the vent does not move as the greenhouse warms, possible causes include a temperature below the opening threshold, a model-specific setting, resistance, an obstruction or a damaged part. Work through these possibilities using the manual for the exact opener. Do not force or heat it; note readings and take photographs first.

Identify the opener and greenhouse model
A closed vent is a symptom, not a diagnosis. Start by finding the manufacturer and model number on the opener, then note which vent it operates and whether that vent is in the roof or a side panel. The greenhouse model matters too. Similar-looking openers may have different operating temperatures, movement, adjustment methods or permitted loads, so instructions for a different model are not a safe substitute. If a label is hard to see, use a photograph of the accessible parts or check the original paperwork. Do not remove a loaded arm or cylinder just to reach a label.
Take clear photographs of the opener label, its bracket and the closed vent, but only from a safe position. Do not climb onto the greenhouse frame or roof to get a better view. A catalogue name can help when asking for the structure’s documentation: the Classic aluminium greenhouse listing identifies a greenhouse line, but that name alone does not identify the opener or the vent fitted to a particular structure. Include both model details in any enquiry. Keep the manuals and notes about later adjustments together so the next person checking the vent does not have to guess.
Check the temperature where the opener senses it
Many automatic openers respond to temperature at a sensor or actuator, rather than to a forecast or a general impression that the greenhouse feels hot. Air beside the roof or side vent can differ from the air near plants or in the middle of the structure. If the opener’s own location has not reached the opening temperature stated in its manual, a closed vent may be normal. Some units also have separate opening and closing temperatures, so do not assume that one figure describes both directions.
Place a suitable thermometer close to the opener, without touching or covering it, and compare that reading with the manual. Note whether the sensor is in direct sun, in shade or close to a frame, as those conditions can affect the local reading. Do not warm the actuator with a flame, hair dryer, hot water or another artificial heat source: that is not a controlled test and may damage the equipment. If the unit has an electronic sensor or display, use the location and reading procedure specified for that model.
Keep a simple record of temperature and vent movement
A short log is more useful than checking once and relying on memory. Record the time, temperature beside the opener, vent position and whether you can see any movement. Add the greenhouse’s humidity reading if available, along with relevant conditions such as direct sun or shade at the sensor. These notes help distinguish a vent that never begins to move from one that opens only part-way or works intermittently. Take dated photographs from the same safe position when they show a change in the vent or linkage.
Compare the log with the trigger and response information in the exact opener manual. If the recorded temperature stays below the stated opening point, investigate the sensor location and normal conditions before looking for a mechanical fault. If the opening point is reached and the vent remains closed, move on to the manual’s adjustment instructions and a visual inspection. Do not invent a waiting time if the manual does not give one. Humidity is useful context, but it does not establish a temperature-operated opener’s trigger unless that model specifically uses humidity.
Use only the adjustment described in the manual
Some openers have a documented adjustment; others are designed to operate without a user setting. Where an adjustment is provided, the manual should explain which part it controls and how to use it. A temperature setting and a limit on how far the vent travels are different things. Do not turn a screw, collar or nut simply because it looks adjustable, and do not take apart a sealed actuator. If you make an authorised adjustment, record the original position and change only what the manual directs.
Before changing a setting, distinguish the greenhouse model from the opener model in your notes. The lean-to wall greenhouse listing identifies a type of structure, but the category name alone does not say which vent or opener is supplied. Use the actuator’s own instructions to identify the adjustment and its purpose. Record the starting position in the way the manual describes, along with the temperature beside the opener and the vent’s position. After an authorised change, add the new setting and observed response to the same record. This makes it clear what was changed and what happened afterwards, rather than leaving a sequence of unexplained turns. If the manual does not explain how to recognise or record the setting, ask the supplier before proceeding. Keep adjustment notes separate from observations of rubbing or obstruction: changing a temperature setting is not a substitute for investigating restricted movement.

Check whether the vent is heavy, stiff or binding
The opener may be reaching its operating temperature but struggling against resistance. Look, without forcing the vent, for a panel that rubs the frame, a hinge that appears damaged, a catch that has not released, or a linkage that is visibly under strain. A vent that starts to move but stops part-way suggests a different problem from one that remains completely still, though neither observation proves the opener is faulty. Do not pull the panel to test it or disconnect the opener unless the manufacturer’s instructions say how to do so safely.
For a replacement opener, separate the greenhouse’s overall size from the requirements of the moving vent. The Limited Edition aluminium greenhouse range is listed from 3.77 m² to 28.08 m²; those floor-area figures are not a vent-load rating. In your comparison notes, put the exact vent identification alongside the proposed opener’s stated load limit and compatibility conditions. Record any missing information as unknown rather than estimating it from a photograph or from the greenhouse’s size. Describe the movement problem separately: whether the panel stays shut, begins to lift, or stops at a particular point. That description helps explain the enquiry without presenting an observation as a diagnosis. Ask the manufacturer or supplier to clarify the match if the specifications are incomplete. A replacement should be selected for the documented vent requirements, not simply because it resembles the existing actuator or is advertised for a small or large greenhouse.
Look for anything blocking the vent’s path
Inspect the full visible movement path, not just the closed edge. Plant stems, ties, clips, loose cords, tools, labels or other equipment can catch on a vent as it begins to lift. Check whether a screen, shade material or added fitting touches the panel or linkage. Also look for debris at the hinge line and signs that the panel catches against the frame. Distinguish an object lying in the vent’s path from damage or misalignment in the vent itself; removing a loose object is not the same task as repairing a fitting. Photograph anything that appears to interfere instead of reaching into an awkward or elevated area.
Clear only items that can be removed safely and in line with the greenhouse instructions; do not prise the vent open, dismantle a bracket or climb onto a roof. Note exactly where an obstruction was found: at the closed edge, beside the hinge, against the arm or elsewhere along the visible path. If it can be removed safely, retain that note when recording what the vent does afterwards. Avoid describing the problem as resolved until you have observed its subsequent operation under the conditions specified in the manual. If a fitting appears damaged, identify the structure when enquiring about parts. The T-Model Orangery Greenhouse name can help the supplier identify the greenhouse, while a photograph shows the location of the affected fitting. Describe which part touches which, rather than simply reporting that the window is stuck. This gives the supplier a clearer starting point without requiring you to dismantle the assembly.
Inspect the bracket and alignment without dismantling
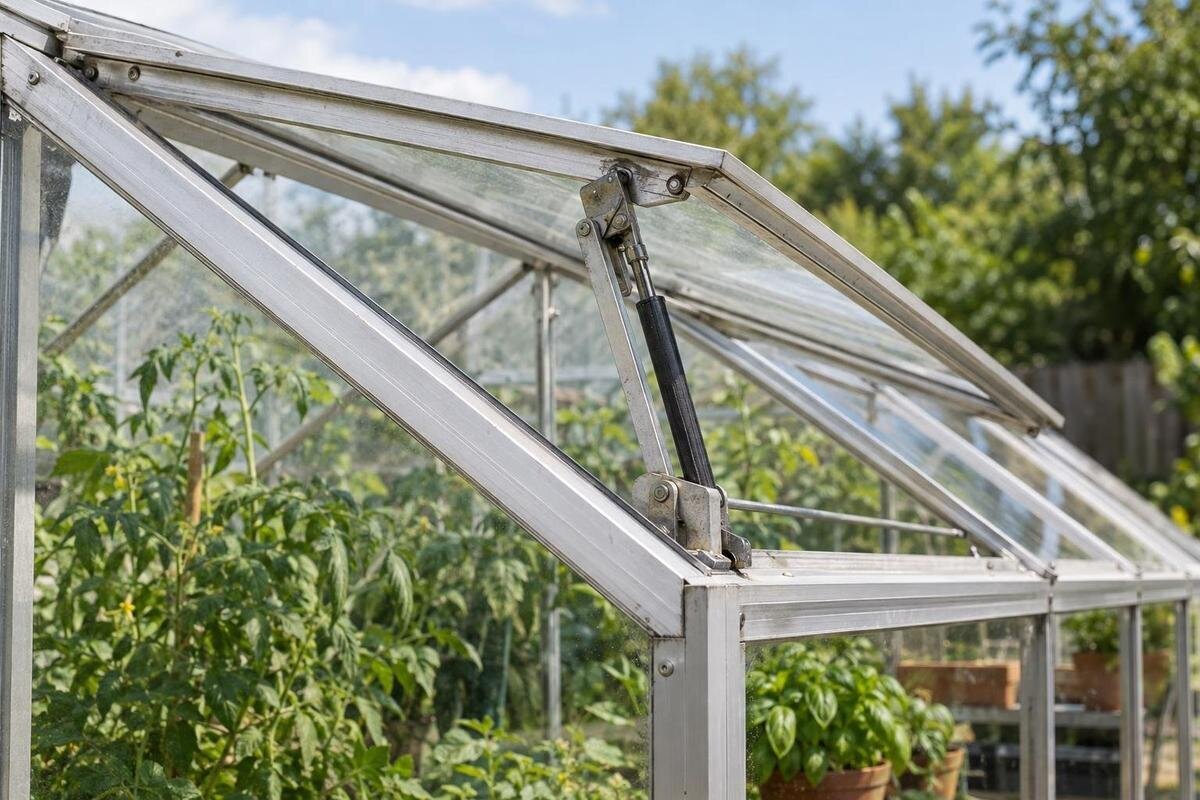
From a safe position, compare the opener’s bracket, arm, pins and visible fixings with the diagram in its manual. Look for an obviously loose or bent bracket, a missing clip or an arm that appears to rub against the frame. The intended angle and mounting position are model-specific: an arm that looks slightly different from another greenhouse’s installation is not automatically fitted incorrectly. Do not tighten unfamiliar fixings, add improvised spacers or reposition the bracket by trial and error.
When comparing the installation with a diagram, make sure the drawing applies to the exact greenhouse, vent and opener combination. The Pyramid greenhouse is a named catalogue model, not a standard for opener fit. Identify the fixed bracket and the bracket attached to the moving vent, then compare their visible positions with the relevant illustration without adjusting them. Keep a wider photograph showing the relationship between the parts as well as any close-up of a suspected problem. A close-up alone may not show where the arm sits in relation to the frame. In your notes, distinguish a visible discrepancy from something you cannot see clearly; do not describe a hidden pin or fixing as missing. If the bracket is moving, the frame looks distorted or the instructions do not match the installation, leave the mechanism alone. Ask the supplier or a qualified installer to assess the discrepancy rather than trying different mounting positions.
Check for a device-specific power or mechanism fault
First establish from the manual whether the opener is temperature-operated, electronically controlled or uses another control system. If it has a display, indicator or user-accessible power supply, check only the items the manual identifies; do not open a control housing or handle wiring. On a mechanical unit, look for visible damage or a disconnected linkage, but do not dismantle a sealed actuator. A damaged casing, a visibly bent part or a mechanism that does not behave as described in the manual is a reason to stop and seek advice, not to force a movement test.
Keep observations about the controls separate from observations about the moving parts. Record any display or indicator exactly as it appears, rather than interpreting it as a fault code unless the manual does so. For a mechanical unit, describe visible damage or a disconnected linkage without trying to determine what is happening inside the actuator. Include the structure’s identity in these notes: if it is a limited-edition greenhouse with storage, use that model description rather than size or appearance alone. Also note any known installation or adjustment work before the problem appeared, clearly separating what you know from what you suspect. If two openers behave differently, record each opener’s identity, local temperature and observed movement separately. That comparison may be useful to the supplier, but it is not proof that either unit has failed or that the two can safely be exchanged. Leave any replacement decision until the particular mechanism and its symptoms have been identified.

Know when to stop and ask for help
Stop the inspection if the vent is overhead and cannot be viewed safely, the panel or glass is cracked or loose, a bracket is shifting, or the vent seems capable of dropping. Do not stand beneath an unstable opening, prop it with an improvised object or work in conditions that make the panel difficult to control. A repair that requires removing a loaded component, reaching onto the roof or working on damaged glazing should be assessed by the greenhouse or opener supplier, or by a qualified installer.
A useful request for help should make the inspection understandable without asking someone to reconstruct events from scattered messages. Begin with the greenhouse and opener model names, then describe the symptom: no movement, an attempt to lift, or opening only part-way. For a Prestige greenhouse, include that catalogue identity alongside the details on the opener’s label. Add the relevant temperature readings and times, the manual instructions you followed, and any authorised adjustment already made. Include humidity readings if you recorded them, but distinguish them from the temperature used to assess opening. Choose photographs that show both the whole assembly and the specific area of concern. State where you stopped and why, especially if there is unstable glazing, a moving bracket or unsafe access. This keeps the request focused on what needs assessment and makes clear which checks remain undone, without presenting an uncertain cause as a confirmed fault.
Compatibility checks before ordering a replacement opener
Before ordering an opener, verify that it is intended for the exact vent and mounting arrangement. Check the manufacturer’s information for the opening and closing temperatures, permitted load, movement and any stated compatibility requirements. Use the greenhouse and opener manuals together; a generic description such as automatic window opener is not enough to establish that a particular unit suits a particular vent. If the greenhouse has more than one type of opening, check each vent rather than assuming a single answer applies throughout.
Keep the proposed purchase specific to the opening that needs attention. If you are considering a Spacious Greenhouse, ask for the vent and opener details for the exact configuration rather than treating the greenhouse name as a hardware specification. If you are replacing only an opener on an existing structure, compare the proposed unit with the identified vent and mounting arrangement, not with a catalogue photograph of a complete greenhouse. Separate the information into what is already known and what still needs clarification: the greenhouse model, vent identity, opener model, operating settings and compatibility requirements. Resolve gaps before ordering rather than assuming that an unspecified detail matches the old unit. If the structure itself also needs replacement, review its proposed openings as a separate choice. The purpose is to obtain suitable hardware for the intended vent, not to replace a greenhouse simply because one opener has stopped moving.
Frequently asked questions
Can an automatic greenhouse vent opener stay closed even when the greenhouse feels warm?
Yes. The air near you or the plants may be warmer than the air around the opener’s temperature sensor. Compare a thermometer reading taken beside the opener with the opening temperature in that exact model’s manual before deciding it has failed.
How long should I wait for the vent to open?
Use the response time, if specified, in the opener’s manual. The actuator and surrounding air may not warm at the same rate, so there is no reliable waiting time that applies to every model. If the manual does not give one, ask the manufacturer or supplier.
Can I turn the opener’s adjustment screw?
Only if the manual identifies that part as a user adjustment and gives a procedure for your model. A screw or collar may serve another purpose, and not every opener is adjustable. Do not turn an unfamiliar part to make the vent open sooner.
Does high humidity make an automatic vent opener open?
Not unless the particular opener has a humidity sensor or control. A temperature-operated model responds to its specified temperature conditions. Recording humidity may help describe the greenhouse, but humidity alone does not show whether that model should have opened.
Is it safe to push the vent open to test the opener?
Do not force the vent or its arm. A panel may be heavy, the linkage may be under load, or the vent may be difficult to reach safely. Follow the greenhouse and opener manuals for any manual operation, and ask a qualified installer if the vent is unstable or overhead.
A closed vent is easier to diagnose when you separate temperature response from mechanical movement. Check the reading beside the opener against its manual, record what the vent does, then inspect only what is safely visible. A clear log, photographs and the correct greenhouse and opener models can help distinguish an expected response from a problem that needs a supplier or installer.
