
Straight Sides or Curved Walls: Usable Greenhouse Space
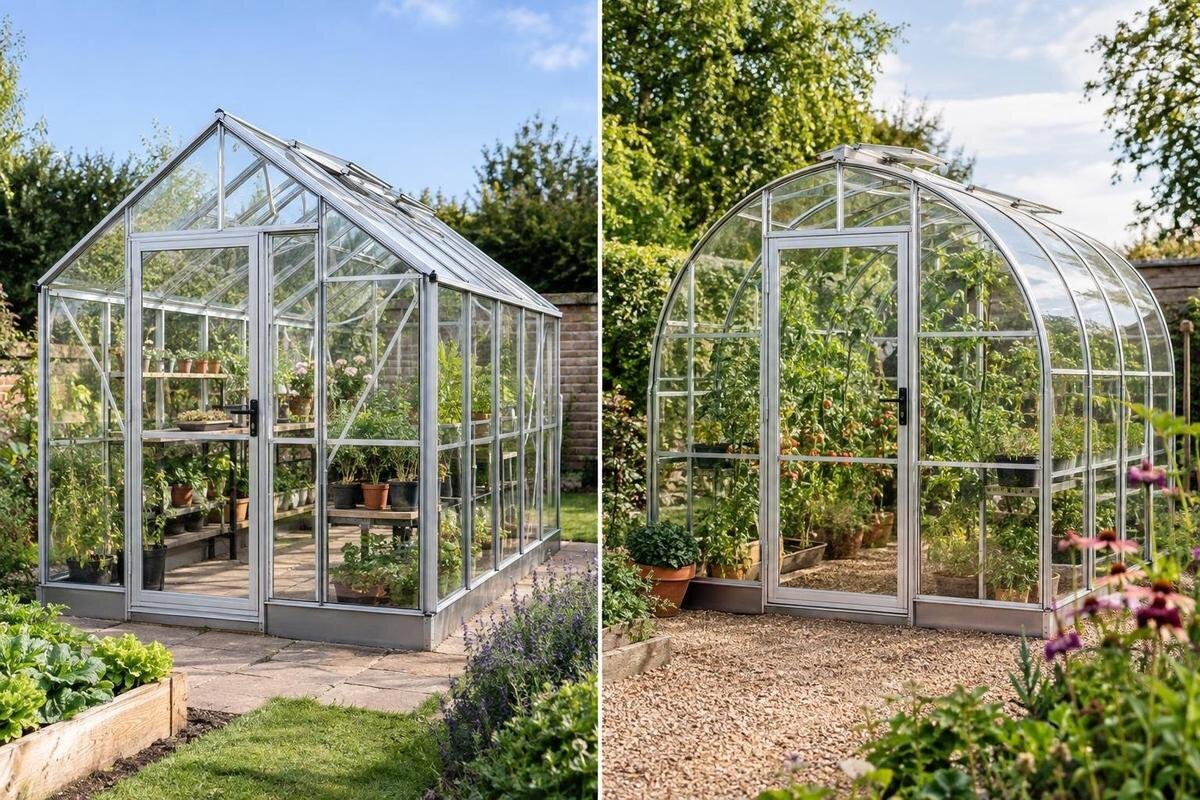
Greenhouse planning
Greenhouse dimensions can make one design look like a clear winner on paper, but the footprint is not the whole growing space. A vertical side wall and a wall that curves towards the roof may leave different headroom at the same point beside a bed, bench or shelf. To compare them fairly, match the exact base size and read a dimensioned cross-section alongside the floor plan. The useful question is not simply how many square metres are listed, but where you can stand, work and place plants without blocking the route through the house.

Footprint and usable space
Start by separating the ground footprint from the space you can actually use. A quoted area gives a useful size measure, but does not tell you how much of that outline has headroom for a person, a mature plant or a shelf. It also does not show how much floor remains once beds, benches, storage and a route from the door are placed. A greenhouse may have generous central height and still leave a narrow working strip along a low or sloping edge. The reverse is possible too: a smaller plan can suit your layout if usable height continues towards the sides. Treat growing area, working area and circulation as separate uses, even though they share one footprint.
The Spacious Greenhouse is listed in options from 47 to 70 m², yet that range alone cannot tell you where a bench will fit or how much clear floor you will retain. Treat a catalogue area as a way to shortlist, not proof that the floor is equally useful at every point. Before comparing profiles, decide what counts as usable for you: planted beds, pots, a workbench, storage, standing space or an unobstructed aisle. A dimensioned floor plan shows how these uses occupy the base; a cross-section shows how the boundary limits headroom above them. Both views are needed to judge the perimeter.
Reading a greenhouse cross-section
A cross-section shows a slice across the greenhouse, from the floor to the roof. It shows whether the side stays vertical, starts to curve near the ground, or blends into the roof, and where the eaves and ridge sit. Mark the clear internal width at heights that matter to your layout instead of looking only at the maximum width at floor level. For a bench, use its planned top; for a shelf, include the upper tier; for a tall crop, consider the full height of its support. Clear measurements between internal surfaces are more useful for this exercise than external overall dimensions, which do not show how much room the frame takes up.
For example, the T-Model Orangery Greenhouse is listed in sizes from 16.52 m² to 30 m². That range tells you that different area options are available; it does not make every option interchangeable for a shelf or crop layout. Ask for the section for the exact size and configuration, and confirm whether each measurement is internal and clear. If the drawing gives only external dimensions, ask for the clear width at bench height and the height to the point where the side profile turns inward. Without those details, a side-by-side visual comparison can conceal a meaningful difference.
Perimeter clearance with straight sides
With a straight-sided profile, the wall remains upright over a vertical stretch before meeting the roof. That creates a predictable strip alongside the wall: a bench or narrow shelf can be positioned close to it without the wall immediately leaning over the working surface. The advantage is most apparent when you want uninterrupted low- and mid-level space, or when you plan to work along a side bed. It does not mean that every point near the edge has standing height; the roof above the eaves may still slope inwards, and the wall itself may be lower than you expect.
Compare the wall height with the jobs you want to do there. Measure from the inside floor to the eaves, or to the point where a pitched roof begins, then consider the depth of any bench and the height of its plants. A vertical wall is useful only if that clear band is high enough for your layout. The Aluminium Greenhouses listing spans 3.77 m² to 28.08 m²; whichever size you consider, check the selected model's profile rather than assuming a larger footprint automatically extends the usable strip at the side. A narrow unit may have vertical clearance but still leave too little width for a bench and access beside it.
Perimeter clearance with curved walls
A curved wall changes clearance continuously rather than at a clear wall-to-roof junction. Depending on where the curve begins, the interior boundary may move inwards as it rises; a shelf can therefore have ample room at the bottom but little clearance over its upper tier. Profiles vary: some curves start close to the floor, while others begin higher. Do not treat the word curved as a complete specification or assume every curved greenhouse has the same amount of side space. A generous centre does not, by itself, tell you whether you can reach or place pots along the perimeter.
Use the chosen section to identify the clearance at the height of each planned bench or shelf. Short trays or low pots may fit below a curve where a person, climbing support or upper shelf would not. The Pyramid Greenhouse is listed from 5.53 m² to 18.9 m²; if you are comparing it or another model, use the drawing for the selected size to establish side clearance rather than inferring the shape or clearance from its name or area. This matters especially when a bed runs the full length: its edge may be accessible at floor level but awkward to reach once foliage fills it.

Benches and shelves beside the walls
Check bench depth and height together against the wall profile. A narrow potting bench may fit where a deeper work surface would push its front edge into the main route. For an upper shelf, check the space above it for plants and the space between tiers for reaching pots. Sketch each bench and shelf in plan and section, using the depth and height you expect to install. Think about access to rear pots too: a shelf can fit beneath a curve on paper yet be awkward to use if you cannot reach behind the front row.
If storage is part of the chosen layout, count its boundaries separately from plant-growing and circulation areas. The Aluminium Greenhouses with Storage – Limited Edition listing identifies a built-in storage option and spans 5.52 m² to 28.08 m², but that range does not give the dimensions of a compartment in the size you want. Ask for the plan for that exact version, then mark storage access, benches and the aisle together. This avoids treating a named storage space as spare growing floor or discovering that the shelves you intended would obstruct the way into it.
Height requirements for tall crops
For tall crops, assess the complete vertical envelope, not just the height of the ridge. Include the bed or container level, the expected plant height and the height of any cane, trellis or other support. At a curved or sloping side, the upper part of a plant may approach the wall even when its pot fits comfortably below. Put taller crops where the drawing offers sufficient clear height, and use perimeter areas with less headroom for lower crops or propagation trays. Use realistic mature dimensions for the variety and growing method you expect; the greenhouse's maximum height alone will not answer this.
Check the working space for each row as well. A tall support beside a bench may occupy part of the route or overlap the area needed for another crop, while moving it towards the centre may narrow the aisle. Mark support positions and expected plant spread on the floor plan, then check those points against the section. The Bloomcabin Prestige Greenhouse is listed in area options from 3.77 m² to 28.08 m²; those figures do not specify crop-height clearance, so use the exact size's documented internal heights before assigning tall plants to the perimeter.
Door access and clear routes
A cross-section cannot tell you whether the greenhouse is easy to enter and work in; pair it with the plan. Draw beds, benches and shelves around the proposed door, leaving a continuous route from the entrance to the back. Consider what you carry, such as seed trays, watering cans or harvest containers, and whether you can pass or turn without moving pots. A route that looks open before planting can disappear when foliage expands. Include enough space to reach each bed, rather than drawing only a narrow line on the floor. If the selected door swings open, mark its path so it does not take up space allocated to a bench.
For a Wall Greenhouse, listed from 3.69 m² to 14.34 m², compare the exact plan with the building-side boundary as well as the internal aisle. In a lean-to layout, the wall-side edge is not another open passage, so the position of benches and the entry matters especially. Confirm the doorway's clear opening and approach on the supplied drawing; do not assume that the nominal footprint tells you how conveniently you can reach the far end or both sides of a bed.
Roof shape and openings
Straight sides and curved walls are only one part of the section. A straight wall can meet a sharply sloping roof, so tall items may still need to sit nearer the ridge. A curve that continues towards the roof produces a different ceiling line from one that meets a short, separate roof section. Check both the wall-to-roof transition and the height above the centre, then note any doors, vents or internal fittings that affect planned shelf positions. The tallest point matters for headroom, but it does not tell you the width available at bench height.
The Limited Edition Aluminium Greenhouses options are listed from 3.77 m² to 28.08 m²; do not assume the cross-section is the same for every choice just because the collection name is shared. Confirm the exact model, size and configuration with the seller, and ask which dimensions refer to the exterior and which to clear space inside. A useful drawing identifies the eaves, ridge, vertical side run or start of the curve, and relevant openings. That makes it possible to compare matching growing layouts instead of relying on a product name or roof silhouette.

A like-for-like comparison
To make a fair straight-versus-curved comparison, hold the basic variables steady. Compare the same approximate external length and width, orientation, door access and intended bench positions; otherwise you may be judging a larger plan rather than the wall shape. On each drawing, use the inside floor line as the reference and mark the same heights for a bench, lower shelf, upper shelf and plant support. Note the clear width at those levels, plus the wall height before the roof or curve begins. A simple side-by-side table is enough; the aim is to see where clearance changes, not to estimate theoretical crop capacity. If drawings use different scales, rely on written dimensions or put them at the same scale before comparing silhouettes; a larger illustration is not proof of more clearance.
Then mark out each floor plan in the garden with tape or a temporary outline, including the door approach, benches, storage and aisle. This helps you test whether you can stand, reach or turn within the space allocated to each task. Use a straight edge or cardboard to represent how far a shelf or work surface projects into the aisle, then check its planned height separately against the section. Allow for plants at their expected mature width as well as height. This is a visual planning check, not a replacement for the supplier's dimensions. Compare the layouts to see whether the vertical side strip or the particular curved profile better accommodates your benches, plants and access.
The dimensions to confirm
Before settling on a layout, list the dimensions that control your use: inside floor width, clear side height, width at the top of each bench or shelf, eaves height, ridge height and the position of openings. For a high shelf, note the headroom above its front edge as well as at the wall; those measurements can differ under a curve. Add the actual lengths and depths of benches, shelves, planters and storage. Do not rely on outside width alone when a curve slopes inwards, and do not assume a straight side makes the whole greenhouse equally tall. If the specification sheet does not show internal clearance at the relevant heights, ask for a dimensioned section of the exact model and size.
Keep external dimensions and internal clearances in separate columns so that you compare equivalent measurements. Beside each option, record any layout changes it would require: a shallower bench, a lower shelf, a different position for tall plants or less space for storage. This makes the trade-offs visible rather than reducing the choice to a single area figure. If a dimension is missing, leave it marked as unconfirmed instead of estimating it from a photograph. The finished comparison should show which planned uses fit comfortably and which would need to change.
Frequently asked questions
Does a straight-sided greenhouse always provide more usable space?
No. A straight wall can preserve vertical clearance along part of the perimeter, but the wall height, roof slope, width and layout all matter. A curved profile may provide useful clearance at the heights you need. Compare the interior widths at your bench and shelf levels rather than relying on the profile labels alone.
Can I fit shelves beside a curved wall?
A shelf may fit there, but its usable depth and height depend on the curve. Check the clearance above both the back and front edges, leave room to reach the pots, and confirm any frame attachment points with the manufacturer. A shelf can fit on the floor plan yet be awkward if its upper tier meets the wall profile.
Which measurement should I compare first?
Start with the clear internal width at the height where the top of your bench or shelf will sit. Then check the side height and clearance above it. For tall plants, include the planned support and compare it with the profile at that position. Use the drawing for the exact size, not an overall maximum width.
Does the same floor area mean the same growing space?
No. Total area does not show how much space is needed for access or storage, or where the roofline narrows the usable space above the floor. Draw beds, benches and an aisle on a floor plan, then compare that layout with a cross-section to check clearance for plants and shelves.
Where should tall plants go in a curved-wall greenhouse?
Place them where the cross-section provides enough clear height for the plant and its support. This may be nearer the higher part of the roof if the curve reduces clearance at the perimeter. Check the floor plan too, so supports do not obstruct the door or aisle, and use realistic mature dimensions for your chosen variety.
Choose the profile by the clearance you need at the edges, not by silhouette alone. Straight sides can provide a more consistent vertical strip; curved walls change usable width as height rises, and roof pitch affects both. Match the base size, compare the selected cross-section at bench and crop heights, then place beds, shelves and the route on its floor plan. That is how to judge whether the perimeter will work for the way you garden.
