
Choosing Greenhouse Bed Mulch: Moisture and Slug Risk
Greenhouse growing guide
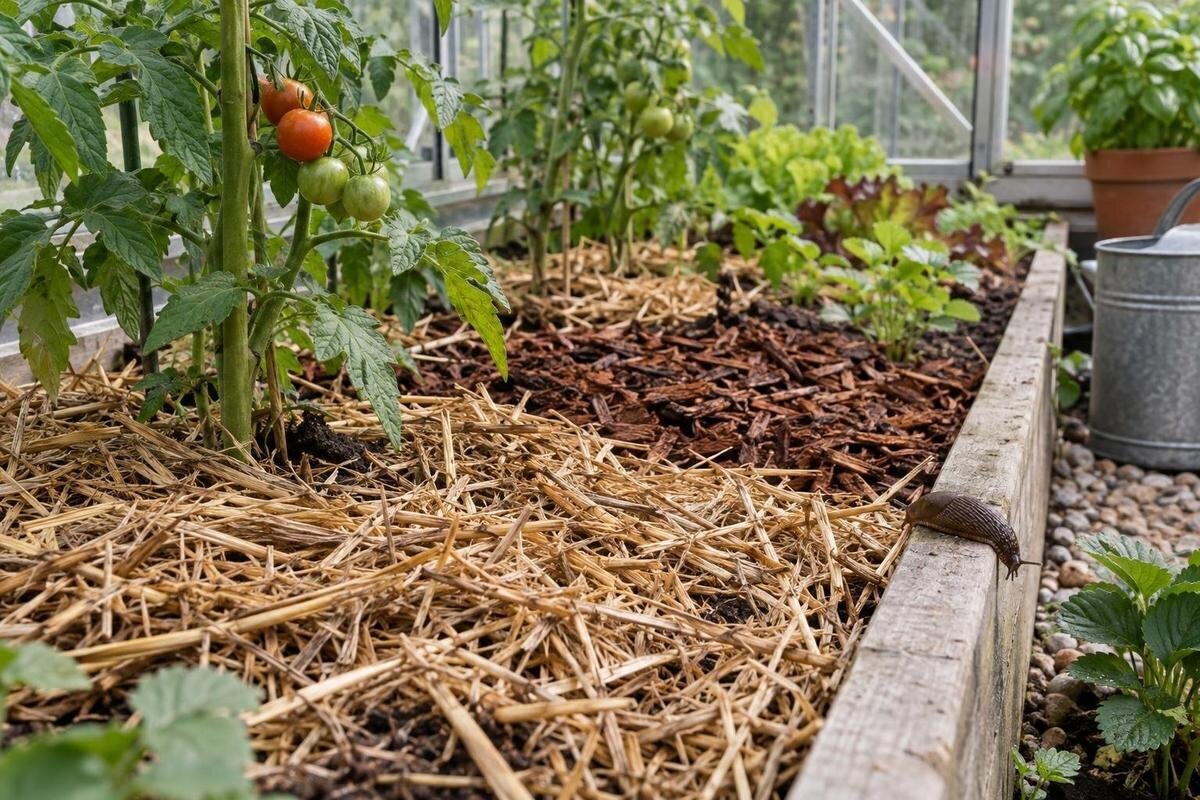
Mulch behaves differently under cover: rain usually does not reach greenhouse beds, so irrigation supplies their moisture. A layer can slow surface evaporation, yet conceal damp pockets where slugs may shelter. The best choice depends on how quickly each bed dries, how water reaches the roots and whether you can lift the material to inspect it. Test a small patch before covering a whole bed, then keep or change the layer according to the soil beneath and the slug activity you actually find.

Before you choose 1
Plan bed access before spreading mulch
Treat each greenhouse bed as a managed watering zone. The roof normally keeps rain from replenishing soil directly, so mulch does not remove the need for deliberate irrigation. Nor can it correct poor drainage or uneven water delivery; if water pools or one end stays dry, address that before adding a layer that makes the surface harder to see. Mulch can slow evaporation from exposed soil, but drying also changes with sunlight, ventilation, crop canopy and the position of watering points. Identify the problem you want to address: rapid surface drying, soil splash or exposed soil. If none is troublesome, leaving the bed bare may be easier to monitor. Investigate a constantly wet bed before covering it.
Draw the beds, paths, watering points and places where you need to reach stems or lift the cover. A test patch works only if you can reach it without stepping on roots or disturbing neighbouring plants. The Wall Greenhouse listing spans models from 3.69 m² to 14.34 m²; use the chosen model's plan, rather than the whole range, to estimate accessible bed area. Keep mulch out of doorways and routes where it will be dragged around, and leave room to replenish it without carrying material over plants. If space allows, keep a small uncovered patch for comparison. The useful measure is the surface you can manage, not the greenhouse's total area.
Read soil moisture below the surface
Air humidity and soil moisture are different measurements. Condensation on glazing, humid air or damp foliage does not show whether roots have enough water. Conversely, a dry-looking surface beneath a loose layer can sit above moist soil. Check the bed at a consistent depth near the crop's active roots, in more than one place. A simple soil probe or repeatable hand check can help if you use the same method each time. Compare a central point with a bed edge rather than sampling only by the door. Crop, soil mix and bed depth all affect what a reading means, so record different crops or growing media separately.
Take a reading before watering and again after the water has had time to reach the root zone; an immediate surface check tells little about deeper moisture. Compare covered and uncovered patches only when crop, soil and irrigation are similar, or mulch will not be the only difference. The Limited Edition Aluminium Greenhouses listing spans 3.77 m² to 28.08 m². If planning a new layout, use the chosen footprint to decide where separate bed zones can be checked. Record results by bed zone rather than treating one damp corner at the entrance as representative of every bed.
Before you choose 2
Coarse plant mulches: straw and other loose materials
Loose straw and other coarse plant material can leave air spaces and are usually easier to lift than a fine, packed layer. That does not make them dry by definition: the underside can stay damp after watering, especially where foliage shades the bed or material has settled. Check the source and suitability of material intended for food-growing beds, and remove pieces that are mouldy or beginning to mat. Woodier materials break down more slowly than soft leaves, but keep them on the surface unless crop-specific guidance supports mixing them into the root zone. Even a coarse layer can compact if repeatedly pressed or saturated, so inspect its condition rather than relying on its appearance from above.
Keep loose material away from stems and crowns, and inspect beneath it after the first few irrigations. If a bed is slow to dry, thin the layer or confine it to the faster-drying section; if the surface dries quickly, add gradually rather than burying the bed in one application. When changing material, remove the old cover instead of hiding one layer under another, so you can judge which one is damp. The T-Model Orangery Greenhouse listing shows models from 16.52 m² to 30 m². For a multi-bed plan, calculate the actual surface for each mulch type in the chosen layout before estimating material quantity.
Fine organic layers: compost, leaves and clippings
Fine materials settle together. Leaf pieces, fine compost and dried clippings can form a close layer that holds moisture at the soil surface, but a thick or wet mat may limit air movement and be difficult to inspect. Use mature, suitable compost sparingly if it fits the crop's nutrient plan: unlike an inert cover, compost contributes organic matter and nutrients. Applying it as a surface dressing does not mean the whole bed automatically needs feeding. Nutrient content varies, so an unknown compost is not a reliable way to solve a moisture problem. Fresh grass clippings can clump when laid wet or thick; if used, keep the layer loose and light, then check it regularly.
Leaf mould is usually looser than sifted compost, but its condition still matters: dry leaves can shift, while wet leaves may bind together. If a fine layer turns slimy, smells sour or stays wet, lift it and choose a thinner or coarser cover rather than topping it up. A small trial shows how quickly a material settles in your own bed; note its texture and behaviour after irrigation. If space for tools or spare material matters, the Aluminium Greenhouses with Storage listing ranges from 5.52 m² to 28.08 m². Its name does not state storage capacity, so verify the chosen layout before assigning the space to mulch bags.

Before you choose 3
Gravel, fabric and film: check water paths
Gravel or another mineral cover does not break down like straw, but it still affects what you can see and reach. Slugs can shelter under stones, fabric edges or any damp gap; a hard-looking surface is not automatically slug-proof. Water may pass through loose aggregate, but the route and rate depend on particle size and the soil below. Film or an impermeable sheet changes the route more substantially: surface watering may run towards planting holes or edges rather than wet the full root zone. Before covering the bed, decide where water will enter and check that soil between planting points receives it. A small trial can reveal runoff paths before a full sheet hides them.
Choose a cover you can lift or open without damaging plants, and keep edges accessible for inspection. With fabric or film, watering can be difficult to judge if the irrigation method is settled only after covering; with mineral cover, wet patches and slugs can remain hidden below. The Pyramid Greenhouse listing gives a model range of 5.53 m² to 18.9 m². When comparing a greenhouse footprint with a permanent cover, base material quantities on the intended bed surface, not the overall area. If a cover cannot be lifted easily, plan access for checking the soil without pulling at roots.
Slug risk depends on damp shelter
Mulch does not create slugs, and greenhouse beds can have slugs without any cover. Risk increases when a material provides a damp, undisturbed hiding place. Look beneath the mulch and along bed edges, under trays and behind items left on the floor. Slugs may arrive on plants or enter through openings, so finding one under a cover does not prove that mulch is the only source. Slime trails or fresh feeding damage are reasons to inspect nearby shelter, not to blame one material immediately. A layer can look dry by afternoon and still have been damp underneath overnight, so check conditions as well as the material type.
Inspect often enough to spot a pattern, noting where slugs or damage appear, whether the bed was damp and which material covered it. Lift a small section rather than disturbing every bed. Keep dead leaves and discarded plant pieces from collecting beneath the layer, and avoid piling mulch against stems, pots or walls. If one patch repeatedly stays damp and attracts activity, thin or remove the cover there, then check again before changing the whole greenhouse. The aim is to reduce persistent shelter while keeping a cover where it is useful; an uncovered bed is not automatically slug-free.
Before you choose 4
Water deliberately beneath mulch
Watering should follow the crop and soil beneath the cover, not a fixed calendar or the look of the mulch. Dry straw may sit above moist roots; a wet underside may show that the bed is already retaining moisture. Direct water to the soil rather than paths, then check whether it spreads along the row or leaves dry pockets. With film or dense fabric, confirm that water reaches each planting point and the soil between them. After irrigation, allow water to move into the bed before checking below the layer. Do not increase watering simply because the top feels dry; change the amount or frequency gradually and observe the result before applying the same change to every bed.
Different areas may dry at different rates under one roof, so check the ends and middle of long beds, plus sections shaded by mature foliage. The Spacious Greenhouse listing spans 47 m² to 70 m²; for a footprint in that range, plan where each bed can be inspected and watered instead of treating the whole growing area as one moisture zone. In any greenhouse, a single reading can miss uneven delivery. If one part remains dry despite damp mulch, check the water route and the bed before adding another layer.
Keep mulch clear of stems and crowns
Leave an open margin around each stem, crown and transplant so damp material does not sit against tender growth and you can inspect the base. There is no universal layer depth for every material or crop: coarse straw settles differently from chopped leaves or compost. Follow advice for the chosen material and crop, then start with a modest, even layer that can be lifted easily. If it sinks or compacts, loosen or reduce it instead of topping up automatically. Keep the bed surface accessible for checking moisture, removing leaves and tending plants. Do not hide the point where a transplant enters the soil beneath a thick layer.
Planting distance and bed shape affect the margin you can leave; one continuous strip can bridge several stems, while separate patches may be easier to keep clear. The Prestige Greenhouse listing spans 3.77 m² to 28.08 m². When comparing models for a bed-and-mulch system, use the chosen plan to check whether you can reach plant bases and lift the cover from the paths. Consider how you will remove the material without pulling at plants or shifting soil around their roots. The stated greenhouse area alone does not describe that working space.

Before you choose 5
Calculate mulch from the covered bed area
Estimate mulch from the bed surface you intend to cover, not from the greenhouse's total area. Subtract paths, borders, pots and sections you plan to leave bare; mark crops and watering zones separately. This avoids buying more material than needed and makes it easier to adjust one treatment without changing the whole bed. If crops are planted in stages, cover only areas where a layer suits the crop; direct-sown rows may need an open surface for emergence unless crop-specific advice says otherwise. Keep a sketch showing the material, date, irrigation points and damp or slug-prone spots. Update it when crops or watering arrangements change, so later comparisons remain useful.
The Aluminium Classic Greenhouse listing gives models from 3.77 m² to 28.08 m², but the stated area is not the amount of soil you will cover. Draw beds and the route needed for watering and inspection on the actual model plan, then decide which surfaces benefit from mulch. To compare straw with bare soil, make the patches as similar as possible in crop, substrate and water delivery. Work out material quantity from the measured area and the material's own packaging guidance, not by multiplying the greenhouse's total area.
Review the layer after watering and crop changes
Check a new layer after its first few watering cycles: material may settle, shift or reveal a damp patch that was not obvious when dry. Repeat the check when foliage has grown enough to shade the bed, after a crop is removed and whenever the watering pattern changes. A cover that worked at planting can become too dense as leaves collect or its pieces break down. Lift just enough to inspect the soil below, then adjust the affected section rather than changing every bed in response to one observation. Check again after a longer interval between waterings, when the pattern of gradual drying may be clearer.
At the end of a crop, clear accumulated dead leaves and inspect the soil surface before refreshing the mulch. Do not move material from a bed with unexplained pest or plant problems to another bed; keep it separate until you know whether it is suitable to reuse. If reusing a cover, remove debris and check its condition before spreading it again. Note where slugs appeared, whether moisture persisted and what watering change followed. Those observations make the next choice more specific than a general rule about straw, compost or gravel. A useful system is one you can water through, lift, inspect and adjust as growing conditions change.
Frequently asked questions
Does a greenhouse bed always need mulch?
No. If the soil stays evenly moist, drains well and does not dry too quickly, bare soil may be easier to inspect. Mulch is useful when it solves a clear problem, such as frequent surface drying or soil splash; it need not be added automatically.
Does mulch increase slug risk in a greenhouse?
A thick, damp layer can provide shelter for slugs already in or entering the greenhouse. Check beneath it and along bed edges, especially after watering. Slugs may also shelter elsewhere or arrive with plants, so use what you find to decide whether to thin or remove a particular patch.
Which mulch is best for a humid greenhouse?
There is no single best material for every bed. Coarse straw is usually easier to lift than a fine layer, while leaves, compost or clippings can settle into a damp mat. Test a small area and consider both how water reaches the roots and how easily you can inspect beneath the cover.
Should I water more after adding mulch?
Do not change watering solely because the top layer feels dry or damp. Check the soil below at a consistent depth, then check again after water has moved towards the roots. Adjust the routine only when readings show that the previous pattern no longer suits the bed.
Should mulch touch plant stems?
Leave a clear margin around stems and crowns. Material touching a plant base is harder to inspect and may stay damp there. The margin depends on the crop and the cover, so leave enough space to see the base and tend the plant as it grows.
Choose according to what the bed is doing under cover: whether soil dries between waterings, whether water reaches the roots and whether the underside stays damp enough to shelter slugs. Start with a small, reachable area, record what happens after irrigation and adjust the material or coverage locally. If checks show that the bed already holds moisture well, leave it uncovered. A useful layer earns its place without hiding soil conditions or making slug inspections harder.
