
Planning a Greenhouse Beside a Garage
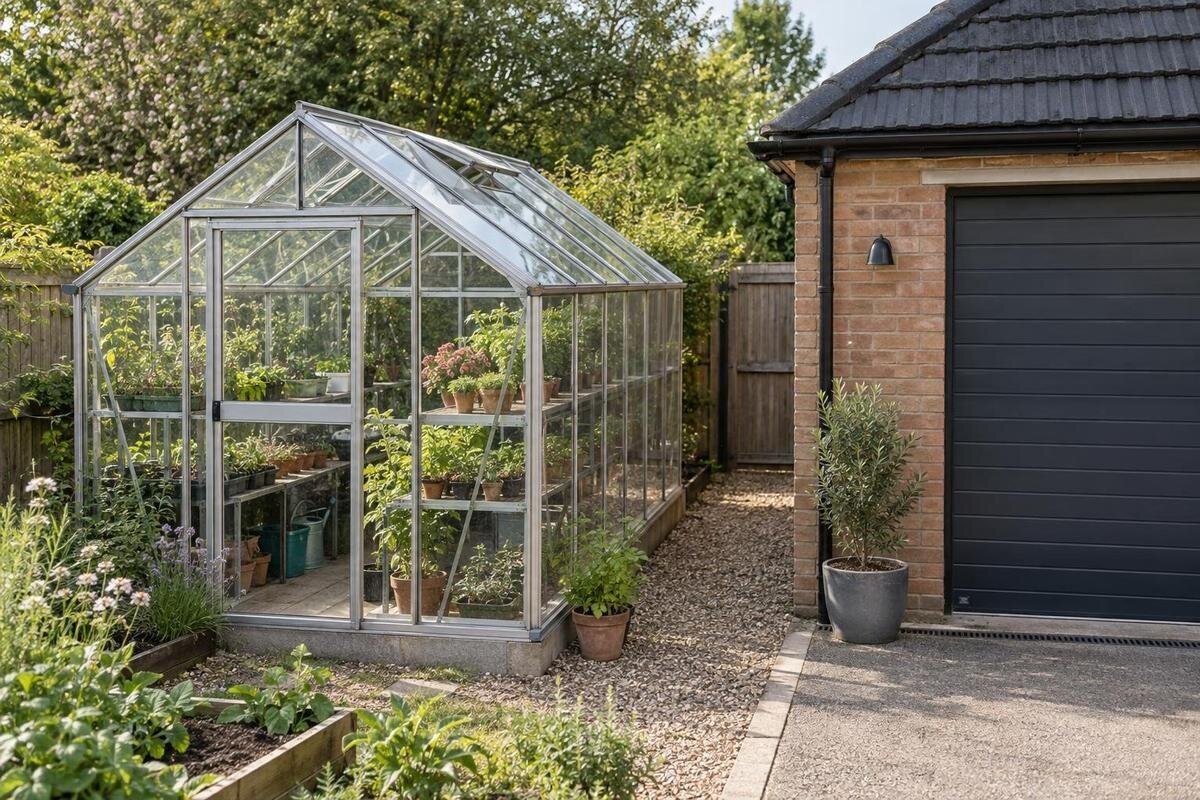
Greenhouse location guide
The space beside a garage may look convenient for a greenhouse, but the building affects sunlight, rainwater flow and access. The first question is not simply whether a structure fits in the gap. Decide whether you mean a separate greenhouse beside the garage or one fixed to it, then test that choice against the garage’s everyday use and the exact model’s footprint. A scaled sketch, seasonal shadow notes and photographs make these checks far more reliable than measuring the empty strip once.

Freestanding beside the garage or attached to it?
A freestanding greenhouse stands beside the garage without being connected to it. That avoids relying on the garage wall for support, but you still need space for cleaning, inspection and access to gutters, pipes or wall fittings. The eaves, downpipe, roof shadow and ground drainage also affect its position. An attached greenhouse uses the garage wall as part of the structure, so the connection needs both structural assessment and weatherproofing. These are different arrangements, even if their growing areas appear similar on a catalogue page. Compare the space each requires, including access along the garage side, rather than judging only by the enclosed floor area.
Draw both versions before committing. In the freestanding sketch, show how you will reach the wall and greenhouse sides; in the attached sketch, show the exact wall section and connection to be assessed. The Wall Greenhouse range is identified as a lean-to option, but that category name does not confirm that a particular garage wall, finish or fixing arrangement is suitable. Treat the product type as a format to compare, not approval to attach it. Check the selected model’s instructions and have an appropriate professional review the proposed connection, including how the joint with the garage will be weatherproofed.
Measure the side space on a scaled plan
Start by drawing the garage wall, not just the empty strip. Mark the building corners, roof edge and gutter line, downpipes, doors, windows, vents, taps, meters and anything fixed to the wall. Record openings and the direction in which each door travels. Add the intended greenhouse as an outside outline, then note its entrance and the space needed to use it. A simple scale plan lets you see where an eave, door or service route conflicts with the proposed footprint before you start choosing a position. Measure at more than one point if the wall or paving varies, and record kerbs, steps or changes in level that reduce usable width.
Take photographs from both ends of the proposed area and from the garage entrance, and label the viewpoint and date. Keep one measured sketch with them so a photo cannot be mistaken for a dimensioned plan. The Pyramid Greenhouse range lists area options from 5.53 m² to 18.9 m²; that range helps compare scale, but it is not the external footprint of the exact model. Use the chosen model’s full plan, including any projections and door position, then place those dimensions on your drawing. Write measurements beside features rather than trying to estimate them later from photographs.
Check the garage wall before considering an attachment
Look carefully at the proposed wall section and note what is actually visible: cladding, render, joints, cracks, damp marks, windows and existing fittings. A finished surface does not necessarily reveal what is behind it or where a frame can be fixed. Mark vents, meters, pipes, cables and access panels so the attachment will not cover equipment that must remain reachable. If the wall is already being repaired or has visible damage, include that information when seeking advice rather than treating the greenhouse as a way to conceal it. Photograph the area from ground level and identify the intended connection points on the plan, without assuming the outer finish provides support.
Ask the greenhouse supplier or installer for the exact wall and connection requirements for the chosen model, then have a qualified building or structural professional assess whether the garage can support the proposed arrangement. That review needs to cover more than the frame’s position: it should address fixings, wall construction, weatherproofing where the structure meets it and any work that could affect existing services. Do not rely on the garage’s fascia, gutter or an apparently solid finish as a support. If the wall cannot be confirmed as suitable, compare a separate layout instead. Ask the professional which drawings or information they need before they assess it.
Trace garage roof runoff to its outlet
Mark the full roof edge above the proposed greenhouse, including gutters, joints, downpipes and the points where water leaves them. A downpipe can discharge away from the wall and still affect the greenhouse area if the outlet or ground fall directs water back. Take photographs from ground level and, where practical, observe the area after rain. Note drips, overflow marks, splash zones and any wet patches, rather than assuming the gutter always carries water away from the greenhouse. Include roof sections that drain toward the side passage, not only the length directly above it.
Keep the existing drainage route accessible and show it on the plan. Water can collect in the narrow space between garage and greenhouse, making access and upkeep unpleasant; persistent water at the proposed base also needs attention before a model is selected. Do not use the greenhouse frame or base as a solution to garage roof drainage, and do not improvise a new outlet. If the water path is unclear, the ground holds water, or a discharge would need changing, get site-specific advice from a qualified drainage professional before fixing the layout. These observations also help distinguish roof runoff from rain falling directly into the passage.

Record seasonal shadows, not just today’s sunlight
Garage shade shifts as the sun moves and changes through the year, so one bright-day photograph is not enough. Draw the garage and candidate greenhouse with a compass orientation, then record shadows from fixed viewpoints at several times of day on representative dates. Mark the date and approximate time on each photograph. A site-specific shadow tool can help you picture other parts of the year, but compare it with observations on the actual plot. Pay particular attention to the area where plants or work surfaces would sit, not only the greenhouse roof. A lower winter sun generally produces longer shadows than a higher summer sun, so record more than one season.
Use the shadow notes to judge whether the intended growing area receives the light you want, and whether a small shift away from the garage changes the result. Do not expect a bigger greenhouse to fix a shaded position. The T-Model Orangery Greenhouse range is listed from 16.52 m² to 30 m², but those area options say nothing about sunlight at your site. Plot the exact chosen model on the shadow diagram and check where its floor area falls in relation to the garage shadow. If the greenhouse will serve year-round, compare the seasonal records rather than judging from summer conditions alone.
Keep garage doors, vehicles and everyday routes clear
Test the garage as it is used, not as it looks with everything shut. Show every door’s full movement on the plan, including an overhead door or side entrance, and mark the space needed for a parked vehicle, opening car doors, cycles or equipment and people walking past. Check that the greenhouse entrance will not face directly into a route used for reversing or carrying bulky items. Walk the usual route with the garage open and the proposed position marked out, rather than relying only on measurements from a top-down sketch. Repeat the check with a vehicle parked in its usual place.
Keep access to wall-mounted services, a tap, downpipe or storage area that must be reached, and consider how panels or fittings could be cleaned and repaired. If storage is part of your greenhouse shortlist, the Aluminium Greenhouses with Storage – Limited Edition listing names a storage option; check its exact model layout against the paths you have drawn. A storage feature should not occupy the only route to a garage door or service point. If vehicle movement remains close, ask a professional to review whether the proposed position needs more separation.
Plan a suitable base and room for upkeep
Identify what the greenhouse would stand on: soil, paving, an existing slab or a change between surfaces. Note drains, covers and changes in level, but do not assume that a flat-looking area or garage apron is an adequate base. The chosen model’s installation instructions and the actual ground conditions need to be considered together. The Prestige Greenhouse with metal foundation listing names a metal foundation, but that fact alone does not establish what base or anchoring is suitable on this site. Have the foundation and fixing plan checked by the appropriate professional; a product feature is not a site assessment.
Allow space to clean the greenhouse, inspect the garage wall, reach gutters and deal with routine repairs. There is no useful universal gap to quote: the working space depends on which surfaces, pipes, doors and fittings need access, as well as the exact greenhouse layout. A narrow passage that can be seen on a drawing may be difficult to use once a door opens or a downpipe needs attention. Think about how you would reach the wall and panel edges after benches or shelves are in place, not just on installation day. Confirm maintenance access before choosing an attachment or deciding how close a separate structure can sit.
Compare exact outside dimensions, not just floor area
An area figure gives only one part of the comparison. For the exact model under consideration, check its outside length and width, overall height, roof projections, base dimensions and the position of the door. Add the open-door area and any access needed to operate vents or reach stored items. Use the manufacturer’s drawing rather than estimating from a product photograph or a similar-looking greenhouse. Put those details on the scaled site plan; this reveals whether the greenhouse fits without taking over a door path, drainage route or maintenance gap. Note separately which measurements come from a plan and which you have taken on site.
The Aluminium Greenhouses range covers options from 3.77 m² to 28.08 m². Treat that as a range of listed areas, not a promise that a particular size will fit beside the garage. Narrow down to one model and variant, then compare the dimensioned drawing with the available site. Keep the product name and model size on the plan so any installer quote or professional review refers to the same greenhouse rather than a family name. If a range has several configurations, record the exact selection before discussing the base and access.

Check the door position and internal working space
Once the outside outline fits, check whether the layout works from inside. Decide where a clear route will run between the entrance, beds, staging or shelves and whether the garage wall blocks access to one side. Any vents or opening parts included with the selected model need to remain reachable after installation. Also check how plants, pots and tools will be carried in and out without crossing a vehicle route. Test the planned route with ordinary tasks, such as carrying a tray or moving a watering can; these practical movements can reveal a conflict a rectangle does not show.
When you review the Limited Edition Aluminium Greenhouses range, use the drawing for the exact model and variant to check the internal layout. Compare the door position with your planned approach and working route, and ask for clarification if the opening arrangement is unclear. If a bench, storage area or plant bed would leave no clear passage, revise the arrangement on paper before fixing the greenhouse beside the garage. A photograph of a similar model is not a substitute for checking these details.
Bring the whole site plan together before ordering
Put the measured sketch, marked photographs, shadow notes and runoff observations in one file. Add the chosen model’s drawing, outside footprint, door movement, proposed base and the places where garage services need access. Mark the layout on the ground using a safe, removable marker or string, then walk it from the garage entrance and garden approach. Check the doors and routes while they are open, and look at the wall and downpipe positions from ground level. This simple full-scale check can expose a tight turn or unreachable gap that the page drawing does not make obvious. Mark any part of the plan that still needs professional confirmation.
Use the finished plan to compare only models whose size and type suit the site. The Spacious Greenhouse range is listed from 47 m² to 70 m², so consider it only where the full external footprint and access space can be accommodated. Before choosing an attachment, confirm the wall’s suitability and the proposed weatherproof joint with a qualified professional. For either layout, check applicable local requirements with the relevant authority or a qualified local professional rather than relying on a guessed standard distance. Resolve any outstanding points that could affect the position or model before ordering.
Frequently asked questions
Is a freestanding greenhouse easier than an attached one?
A freestanding layout avoids using the garage wall as part of the greenhouse support, but it still needs a suitable base and enough access for cleaning, repair and garage maintenance. The building can affect sunlight and runoff either way. Compare both sketches against your routine before choosing.
Can I fix any lean-to greenhouse to a garage?
No. A lean-to label identifies a format, not approval for a particular wall. Check the selected model’s instructions and have a qualified professional assess the wall construction, proposed fixings and weatherproof joint before relying on the garage as support. Keep services and wall maintenance accessible, too.
How much space should I leave between the greenhouse and garage?
There is no single distance that fits every site. The gap depends on doors, gutters, wall fittings, drainage, maintenance access, the model and any applicable local requirements. Draw the actual routes and tasks, then check the layout with the installer or relevant professional rather than using a guessed standard.
How can I tell whether the garage will shade the greenhouse?
Record the orientation and shadow positions from fixed viewpoints at several times and on representative dates, and label photographs with the date and time. A site-specific shadow diagram can help, but check the actual plot too. One sunny-day view will not show how the shadow changes through the year.
What if rainwater from the garage roof reaches the greenhouse area?
Mark the gutters, downpipes and outlets, then observe the ground after rain from a safe position. Keep existing drainage accessible and do not treat the greenhouse base as a remedy. If water pools or an outlet needs changing, get site-specific advice from a qualified drainage professional.
A workable garage-side layout gives the greenhouse suitable growing space while preserving garage access, drainage and room for maintenance. If an attachment leaves unresolved questions about the wall or weatherproof joint, a separate structure may be simpler. The best position is one where the seasonal light suits your plans, runoff is accounted for and both buildings remain easy to use. Choose from the measured, model-specific plan rather than the apparent convenience of the wall.
