
Checking Self-Watering Containers for Greenhouse Use
Greenhouse watering guide
Self-watering containers can make greenhouse watering easier to manage, but they do not remove the need to check moisture. Their reservoirs, wicks or capillary bases, refill openings and overflow outlets all need to suit both the crop and the place where the pot stands. On paving, spilled water cannot soak into the ground, so a small leak may spread across a walkway or collect beside a bench. Before planting, examine the container’s water path, decide where excess water will go and test the arrangement in its final position.

Before choosing a container 1
How a self-watering container supplies water
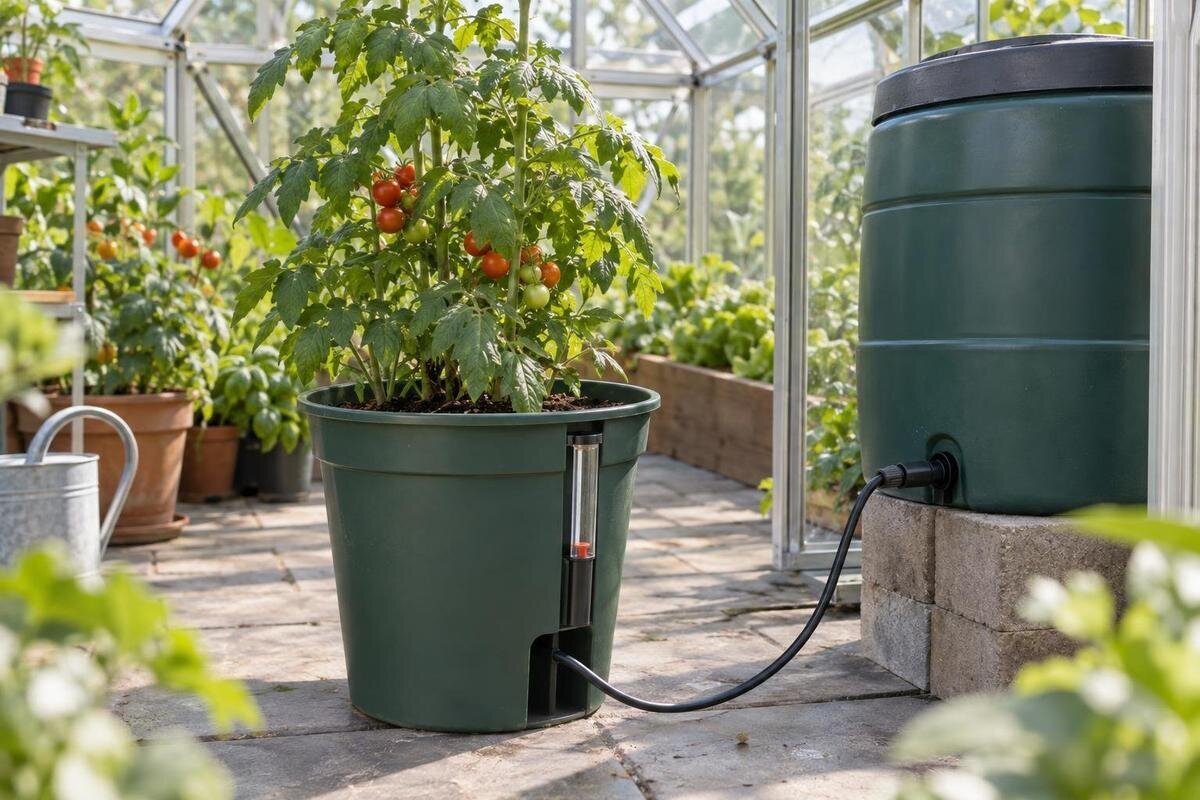
A self-watering container holds water in a reservoir beneath or beside the growing medium. A wick, capillary bridge or shaped base lets moisture move from that store into the medium; a fill tube may provide access without disturbing the plant. Designs vary: some keep the reservoir and compost apart with a platform, while others rely on contact through a wick or insert. Read the manufacturer’s diagram to identify what holds water, how it enters and where the medium should sit. Visually similar pots can have different filling limits and set-up steps, so do not assume one design works like another. If the instructions call for initial watering from above, include it before judging the system.
Treat the reservoir as a buffer, not an automatic controller. It has a finite capacity and cannot judge whether a crop needs water; a level indicator, if fitted, reports the tank rather than every part of the root zone. In a greenhouse, changes in warmth, light, air movement and plant size alter demand, and pots in different positions may dry at different rates. A full reservoir does not prove that the compost is evenly moist, while a single reading cannot tell you how quickly the water level is falling. Check the growing medium as well as the stored water, particularly while you learn how the container behaves.
Reservoir access and refill indicators
Check the refill opening before choosing a container. A clear, accessible opening is easier to use without spilling water into the compost or over the rim; a narrow pipe can be awkward once foliage spreads around it. If there is a float or level indicator, find out how to read it and identify the maximum filling level in the instructions. Check whether you can see the scale from your normal standing position. The opening, cap, indicator and any removable insert should also be accessible for inspection as described in the instructions. If there is no indicator, make sure the reservoir can still be checked without moving the plant.
Think about how you will approach the pot after it is in place, rather than judging its convenience while empty. Reaching over a bench, shifting neighbouring containers or lifting a full pot to check a gauge can make routine inspection harder. The Bloomcabin Prestige Greenhouse listing covers sizes from 3.77 to 28.08 m²; its stated area alone does not show whether each refill point will be reachable in your layout. Sketch the proposed positions and check the route to every opening before filling. If you plan several containers, make sure you can inspect them individually rather than assuming one visible reservoir level represents the whole group.
Before choosing a container 2
Overflow and runoff on a paved floor
Find the overflow outlet, if the design has one, and note its height in relation to the reservoir’s fill point. An outlet can direct excess water only if it remains unobstructed and has somewhere to discharge. Before planting, place the container where it will stand and add water slowly, following the instructions, while watching for the outlet to work. Check whether a saucer, decorative sleeve or the floor itself blocks it. If the planter has no overflow, find the manufacturer’s maximum fill instruction and stop at that level; do not assume the reservoir will prevent overfilling by itself.
Paving changes what happens after a spill: water may run along the surface, collect in a low spot or cross a walkway instead of soaking away. When planning containers for a Wall Greenhouse, listed from 3.69 to 14.34 m², trace the likely runoff route across the actual floor. Check whether there is a drain and whether water reaches it or collects elsewhere. Keep likely runoff away from doorways and the route you walk through. A tray can catch drips, but it needs inspection and emptying; it is not a substitute for a clear overflow route. Check the surrounding paving as well as the space immediately beneath the pot.
Managing root-zone moisture
A reservoir system should supply the root zone without leaving the whole growing medium submerged. Contact through a wick or capillary base is intentional, but water above the design fill level or an outlet that cannot drain can create much wetter conditions than the container is meant to provide. Saturated medium contains less air around roots, which can impair root function. Follow the specified filling level, and do not add extra wicks, block a drain or alter the reservoir to increase the supply. If the water path is unclear from the instructions, find out how the design works before planting rather than testing an improvised arrangement on a mature crop.
Check moisture at more than one depth. A dry-looking surface does not prove that the lower root zone is dry, especially when water is drawn up from below; equally, a wet layer at the base does not show that the upper medium is receiving enough. Before planting, fill the system as instructed and use the intended growing mix to see how moisture spreads from the wick or base. Afterwards, inspect the medium near the roots instead of relying only on its surface or a reservoir indicator. If one area stays wet while another dries, review the wick contact, growing medium and fill level before adding more water.

Before choosing a container 3
Match the growing medium and crops
The growing medium is part of the watering mechanism, not just a filler. A reservoir planter needs a mix that can transfer moisture from its wick or contact point through the root zone while leaving room for air and drainage. Very coarse material, a gap between the wick and compost, or a compacted layer may interrupt that movement; a dense mix that stays wet can make the lower zone slow to dry. Check the container manufacturer’s recommendations for suitable media and initial wetting. Do not assume that a mix which works in a freely drained pot will behave in the same way when water is supplied from below.
Plants differ in root depth, growth rate and how quickly they use water, and demand can change as they mature. Group containers with broadly similar moisture needs so that a shared checking routine does not conceal a different requirement. Keep plants with substantially different preferences in separate containers rather than relying on one refill pattern for all of them. When planning crops for a Pyramid Greenhouse, listed from 5.53 to 18.9 m², mark these groups on the floor layout and allow for their mature size. Decide which pots need separate moisture checks, rather than treating every container in the enclosure as a single watering group.
Measure usable greenhouse floor space
Measure the area that containers can actually occupy. Start with the greenhouse floor, then account for benches, permanent shelves, stored equipment, door clearance and the path you need to walk through. Include the full planter footprint, any attached reservoir or tray that extends beyond the pot, and enough room to reach the rear row. A tight arrangement can hide leaks until water has spread across the paving. Mark positions with empty pots or tape before buying a full set, and check the layout with the door and movable furniture in their usual positions. Leave access to the floor beneath containers so you can see and clean up a spill.
The Spacious Greenhouse is listed in sizes from 47 to 70 m². That published area is a reference for the enclosure, not a plan of usable planting space or an indication of how much floor remains after benches and access routes. For the size you are considering, use the actual dimensions and layout information, then count only the clear space where a container can sit and still be reached. Do not estimate planter capacity from greenhouse area alone. Include the path to the plants, room to refill them and a route for any overflow.
Before choosing a container 4
Plan the route for refilling
Plan how water will reach the containers, not just where the pots will stand. If you use a watering can, check the route from the water source to each refill opening without leaning across delicate plants or stepping onto a wet patch. If you use a hose, consider where it will lie while you work so that it does not cross the main walkway. Allow room to approach with the equipment you normally use. A layout that looks accessible when empty may become awkward once plants fill the gaps, so include their expected growth when checking the route.
The Aluminium Classic Greenhouse listings cover 3.77 to 28.08 m². For the enclosure size you select, trace a complete refill route from the entrance or water source, through the container rows and back out. Clustering pots can shorten that route, but the inner containers may become harder to reach. Check the arrangement with empty containers before filling them: wet growing medium and stored water make them heavier to move. Aim to refill each pot where it stands, without shifting neighbouring containers or leaving equipment across the path.
Account for trays, benches and storage
Include objects that affect cleaning and spill control in the floor plan: trays, risers, spare pots, watering cans and storage areas. A tray should not conceal an overflow hole or make a leak impossible to spot. If containers sit on a bench or shelf, check where water leaves that surface and whether it can drip onto the paving or items below; do not assume a bench is designed to handle routine runoff. Leave a way to inspect and empty trays, and to wipe the floor beneath them. Catching drips is useful only if you can see when the tray needs emptying and identify any continuing leak.
The Aluminium Greenhouses with Storage – Limited Edition listing gives area options from 5.52 to 28.08 m². If your greenhouse includes storage, mark its footprint separately from the space intended for planters. Consider what will be kept beside or below the containers: items that need to stay dry should be outside likely splash and overflow routes. Spare pots and supplies should not block access to a reservoir or drain. Check the boundary between the growing and storage areas in particular, so that a convenient place to put equipment does not become an obstacle when you need to inspect a leak or clean the floor.

Before choosing a container 5
Allow for light and airflow around plants
Light and airflow can vary between positions in the same greenhouse and affect how quickly different pots use water. Tall foliage may shade smaller plants, while tightly packed containers can make it harder to move around and inspect the back row. Observe the proposed positions at different times of day and note where direct light falls; do not assume a reservoir will remove the need to check a shaded plant. Keep doors, vents and working routes clear in line with the greenhouse instructions. Revisit the arrangement as plants grow, since spacing that works for seedlings can become crowded later.
When arranging containers in a Limited Edition Aluminium Greenhouse, listed from 3.77 to 28.08 m², compare the proposed crop positions rather than assigning every pot the same refill routine. Note which plants shade their neighbours and whether you can still inspect the pots beneath spreading foliage. If two crops need different positions, leave room to separate them rather than forcing them into one watering group. Observe the conditions on site as the plants develop. A reservoir supplies water through its designed path; it cannot compensate for unsuitable light or make a crowded position easier to inspect.
Test the container before planting
Before adding plants, assemble the container and run a trial with the intended growing medium in its final position. Follow the manufacturer’s filling and first-wetting instructions, then watch the overflow, the paving and the upper and lower parts of the medium. If there is a level indicator, check that it responds as described, and confirm that the fill opening remains accessible. If water appears under the pot, at a seam or outside the planned catchment, identify the route before planting rather than relying on a tray to hide a continuing leak. Repeat the check after moving the container or changing its medium.
If you are considering a T-Model Orangery Greenhouse, listed from 16.52 to 30 m², use the layout for your chosen size when planning this trial. Include the pot, its tray, the space needed for refilling and the intended overflow destination, rather than testing the container in isolation. Once planted, compare reservoir readings over time and check moisture near the roots. Use those observations to adjust refilling instead of assuming a fixed interval. Repeat the relevant checks if you move a pot or change its growing medium, since the earlier trial no longer represents the complete arrangement.
Frequently asked questions
How often will I need to refill a self-watering container?
There is no reliable refill interval based on reservoir size alone. Water use changes with the crop, its growth and greenhouse conditions. Observe how quickly the level falls after planting, and check the growing medium as well. Set a routine from those observations rather than assuming the tank will last a particular number of days.
Does every reservoir planter need an overflow?
No. Designs differ, so check whether the container has an overflow, a maximum fill mark or another way to manage excess water. If it has an outlet, make sure it is clear and that water has somewhere to go. On paving, test this before planting.
Why can the compost surface be dry while the reservoir still has water?
Water drawn up from below may not reach the surface evenly, and the wick, growing medium or contact between them can affect how it spreads. Check moisture at more than one depth and follow the container’s set-up instructions before adding more water.
Can I place the container directly on the paving?
Only after checking how the base, overflow and surrounding floor work together. A pot can sit over its outlet or conceal a leak, and paved surfaces do not absorb spills. Test the container in its intended position and keep a way to inspect the floor beneath it.
Is a saucer enough to manage a leak?
Not necessarily. A saucer may catch drips, but it can also fill, conceal an outlet or overflow. Treat it as a catch for minor drips, not as the whole drainage plan; inspect and empty it, and confirm where excess water will go.
On a paved greenhouse floor, the most useful test is a filled container in the place where it will stay. Confirm that the refill point is reachable, excess water has a clear route and the growing medium is moist at root depth without remaining saturated. Check again as conditions change and plants grow, since both water use and access can shift. A reservoir is a buffer, not a substitute for observation; choose a design whose operation you can see and maintain.
