
When Do Soil-Moisture Sensors Help Greenhouse Watering?
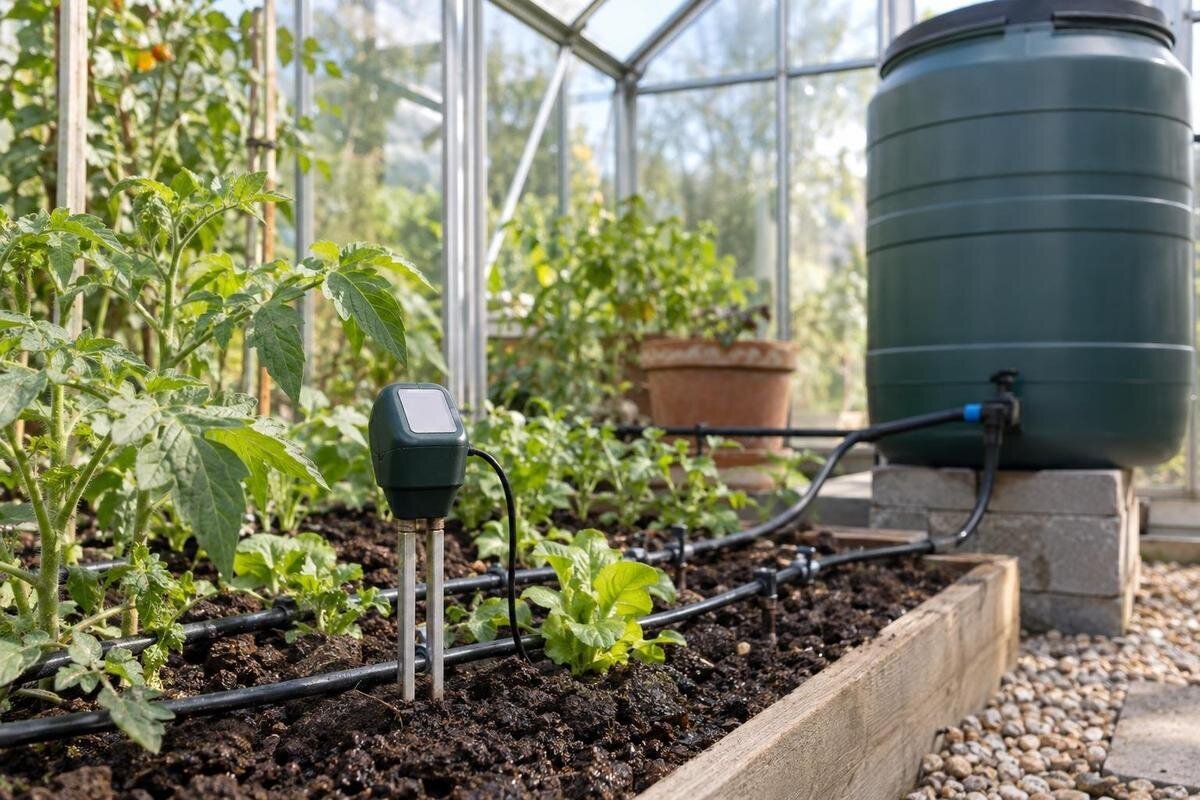
Greenhouse watering
A soil-moisture sensor can make greenhouse watering more consistent, but only when it measures the part of the growing medium that matters to the crop. A number on a display is not a universal instruction to water: probe technology, position, substrate and irrigation layout all affect what it means. Treat the sensor first as a measuring aid. Establish a baseline in the actual medium, compare readings with a manual check and observe a complete watering cycle before allowing a controller to act on them. Those steps show when automation adds useful evidence—and when it merely repeats a poor measurement.

01
What a soil-moisture reading represents
A soil-moisture sensor reports a condition around its sensing element, not the water status of every root in a bed. Different devices may estimate volumetric water content, measure soil-water tension or use another electrical response; the displayed value, units and useful range therefore depend on the sensor. A percentage from one model is not automatically comparable with the same percentage from another. Even an accurate probe can give a misleading impression if its tip sits in a wetter or drier pocket than the roots you are managing. Read the instructions to learn what the output represents before setting a target. A trend from the same sensor is often more useful than one isolated reading because it shows how that particular spot changes.
That trend can help you avoid watering by habit: you can see whether moisture readings continue changing after irrigation, how quickly a chosen spot dries under current conditions, and whether a schedule repeatedly waters too early or too late. It cannot explain why a reading changed; a shifted probe, a new mix or a different sampling location may produce a different signal. When planning beds in the Aluminium Classic Greenhouse, listed in sizes from 3.77 m² to 28.08 m², consider which planted areas each reading will represent. Record that location alongside the readings so you can interpret the trend consistently.
When a sensor is worth using
A sensor is most useful when you face the same watering decision regularly and cannot easily judge moisture by looking at the medium. Examples include beds that dry unevenly, containers with different moisture retention, or crops that need more frequent attention as they establish or fruit. A recorded trend can reveal a pattern that a quick surface glance misses. It can also help when more than one person cares for the greenhouse: a marked checking point and a shared record make decisions less dependent on one person’s judgement of how the top layer feels. Its value rises when the crop, medium, probe position and watering method stay consistent, allowing a fair comparison between readings.
It may add little to a small collection of pots you inspect closely, especially if the probe will be moved between them or used in a medium for which it was not designed. One sensor should not be expected to settle every decision where plants, bed depth or exposure differ. The lean-to greenhouse range is listed from 3.69 m² to 14.34 m², but a compact area does not guarantee uniform moisture: an exposed edge, a sheltered bed and a container may dry at different rates. Consider whether you will use the reading often enough to maintain the device, and whether you can make a hand check when the result seems unexpected. An untested automatic system is not necessarily more reliable than a simple routine.
02
Match the sensor to the growing medium
Choose a sensor made for the medium you intend to monitor. Mineral garden soil, peat-free potting mix, coir and other container substrates can hold and release water differently, so a scale or threshold developed for one mix may not transfer to another. A probe designed for beds may also be difficult to position reliably in a shallow pot. Check the stated medium, measurement range, insertion method and whether the output is a relative signal or a calibrated value. If separate beds use distinct mixes, treat them as different monitoring conditions instead of averaging their readings. The same applies to a raised bed filled with a blend unlike the surrounding ground. If the supported media are unclear, ask before buying rather than guessing from the probe’s shape.
Sensor technology matters too. Some instruments estimate water content from electrical properties; others report soil-water tension, and each quantity answers a slightly different question. Salts, temperature, compaction and air gaps can affect readings, with the effect depending on the design, so consult the maker’s notes rather than assuming the display is exact. When planning growing space in the Limited Edition Aluminium Greenhouse range, listed from 3.77 m² to 28.08 m², identify which beds and containers will use the same mix. This gives you a basis for grouping comparable readings without treating every growing area as identical.
Map growing zones before placing probes
Draw a simple plan of beds, containers, crop groups, emitters and irrigation zones before placing sensors. Look for places that are genuinely different: one bed may receive more sun, another may be sheltered, and a container may drain more freely than a soil bed. A representative sensor belongs in an ordinary planted area within the zone it is meant to describe, not at the wettest point or driest edge merely because it is convenient. If a location is unusual, monitor it separately or check it by hand rather than letting it stand in for everything. Compare readings at similar points in the watering cycle to see whether a difference persists. The sketch helps distinguish real variation from a misplaced probe or poor contact with the medium.
Match each reading to the area that shares one watering decision. Beds or containers that receive different irrigation, use different media or have markedly different exposure may need separate checking points. That does not mean fitting a probe to every pot; compare a few representative positions and add coverage only if their readings repeatedly diverge. If you are comparing the T-Model Orangery Greenhouse sizes, which range from 16.52 m² to 30 m², sketch the proposed irrigation zones within each layout rather than choosing a sensor count by floor area. Label each probe with its bed, crop and medium to make later readings easier to interpret.

03
Put the probe in the active root zone
Place the sensing element within the active root zone, at a depth that reflects the crop and growing medium. A probe left at the surface mainly follows surface drying, while one pressed against the base of a container may report a wetter layer that roots do not experience in the same way. There is no single depth that suits every crop or bed; follow the sensor instructions and consider the root depth of the plant at its current growth stage. In mixed plantings, do not treat a reading from one crop’s root zone as a direct guide for another with different roots. Revisit the depth as plants grow or as the medium settles, and keep the position consistent when comparing readings.
Keep the sensor in firm contact with the medium without crushing or compacting it, and insert it in the orientation recommended by the manufacturer. An air pocket at the sensing surface can distort the reading; repeated removal and reinsertion can also change contact conditions. With drip irrigation, avoid placing the probe directly under an emitter, where it may record a small wet spot, but do not move it so far away that it no longer reflects the roots supplied by that line. For a layout in the Pyramid Greenhouse range, listed from 5.53 m² to 18.9 m², mark the beds and emitters on your plan before choosing the probe position. Mark its final location for repeat checks.
Build a baseline in your own growing medium
Calibration has two meanings in practice: an instrument may have a formal calibration procedure, and a gardener may establish a useful working baseline for one bed. Follow the manufacturer’s instructions for formal calibration; not every device is user-adjustable. Never assume that readings in air, tap water or a generic reference chart will calibrate a probe for soil or potting mix unless its manual explicitly says so. If the instructions allow calibration in the growing medium, use the same medium, moisture conditions and insertion method the sensor will encounter in service. Record the units and settings, and keep the procedure consistent so later comparisons are meaningful.
To build a practical baseline, take readings at a fixed location before watering, after applying water evenly and after it has had time to drain or redistribute. At each point, inspect the medium at roughly the sensor’s depth and note whether it feels dry, lightly moist or wet for that crop and mix. Avoid drawing conclusions immediately after irrigation if water is still moving through the medium; follow the device guidance and observe when the value settles. This is not laboratory calibration, but it can reveal a probe that stays unchanged, jumps unpredictably or disagrees with its surroundings. If you are planning beds in the Limited Edition greenhouse with storage, listed from 5.52 m² to 28.08 m², establish the baseline in the planted bed rather than trying to derive a target from the greenhouse’s overall area.
04
Set control thresholds from observed readings
Do not choose a trigger value from a generic online chart or copy a percentage from another sensor. First observe the range of readings as your own medium moves from adequately watered to the point at which the crop needs attention, using the same probe position and a manual check. The target depends on crop, growth stage and medium; the sensor’s scale and response also matter. Set the trigger within a tested operating range rather than treating any number as universal. Keep a short record of conditions alongside readings, including the date, recent watering and major changes in weather, ventilation or plant size. This context can help explain a gradual shift that might otherwise look like a fault.
Then decide what the controller is meant to do: start irrigation when a threshold is crossed, allow scheduled watering only when a condition is met, or pause watering when the medium is already moist. These are different control behaviours, so read both sensor and controller instructions. Where supported, separate start and stop thresholds, with a gap often called a deadband, can prevent repeated switching around a borderline reading. When planning irrigation for the Prestige Greenhouse, available in listed sizes from 3.77 m² to 28.08 m², assign control rules to the beds supplied by each valve. Find out what happens if the sensor signal is missing rather than assuming the system will stop or continue safely.
Check the controller and water delivery
Test the complete watering response before leaving a sensor in charge. Confirm that the controller recognises the probe, shows the expected units or signal and reacts in the way described in its instructions. After a supervised test cycle, check the medium at more than one representative point: a controller can act correctly on a signal while water reaches one part of a bed unevenly. Look for a mismatch between the reading and the planted area, and investigate placement, settings or delivery before changing the threshold. Do not assume a sensor’s brand or connector makes it compatible with every controller. Confirm compatibility for the exact components and the control behaviour you intend to use.
A moisture reading does not determine how long irrigation should run, how evenly it spreads or whether a container drains correctly. Those questions depend on the watering equipment and layout, so check the system’s stated compatibility and observe where water actually arrives. If the controller requires electrical connections or settings you are unsure about, use its instructions or ask a qualified installer; this guide is about interpreting moisture, not wiring. Start with supervision: observe what happens after each action, note any overshoot or missed area, and avoid leaving an untested automatic sequence to run unattended. Check the result again after moving an emitter or changing the watering programme.

05
Use hand checks to verify readings
Keep a manual check as an independent reference, particularly while establishing a baseline and whenever a reading looks out of character. Inspect a small sample or use a suitable hand tool at the same depth as the probe, a little away from its sensing element so you do not disturb contact. Compare moisture rather than just looking at the surface: the top can be dry while the deeper root zone remains moist, or surface watering can wet the top without reaching deeper roots. A consistent method makes your checks more useful than an occasional finger test in a different spot. Note whether the sample is evenly moist or has damp and dry patches.
Record the manual observation beside the sensor reading and the time since watering; after several cycles, patterns are easier to interpret. For a larger layout, such as those you might plan within the Spacious Greenhouse range of 47 m² to 70 m², establish a route across representative beds rather than checking only the nearest one. There is no need to inspect every square metre. Cover each distinct crop, substrate or irrigation zone while assessing whether the probe represents it. If readings agree repeatedly, you can reduce the frequency of manual checks without eliminating them. The comparison can also reveal a probe that has shifted.
Recheck the setup as plants and conditions change
Revisit the sensor whenever the crop, medium or irrigation arrangement changes. A seedling’s shallow roots, a mature plant’s larger root system, a newly filled container and a shifted drip line can all change which point is representative. Moving a probe, topping up a bed or replacing part of a mix also changes its local contact and baseline. Mark the position or keep a simple sketch, then note the reason and date if it must be moved. If the reading changes suddenly without a matching change in the medium, inspect the installation and compare it manually before increasing or withholding water. Seasonal changes in light and ventilation can alter drying speed too, so older records need context.
Routine care should follow the device manual: keep connectors and the sensing element in the condition specified, avoid bending or scraping a probe, and store it as instructed if it is not designed to remain in the growing medium. Recheck after cleaning, repositioning or a long period out of use. A persistent gap between sensor and hand checks may point to unsuitable media, poor contact, a failed unit or an incorrect setting; it is not a cue to keep shifting the watering threshold until the display looks convenient. A dependable record makes those causes easier to separate and tells you when the probe needs checking or replacing.
Frequently asked questions
Can a soil-moisture sensor tell me exactly when to water?
Not on its own. It records conditions around its sensing element, while a crop’s needs depend on the root zone, growing medium and growth stage. Use the reading with a tested operating range and a check of the medium at root depth; do not treat one displayed number as a universal instruction.
Can one sensor cover several greenhouse beds?
It can represent beds that share similar growing media, exposure and watering, but one probe may not describe areas that differ in those respects. Compare readings at representative points and keep separate records where results consistently diverge. You do not necessarily need a probe in every pot.
Do I need to calibrate a new sensor?
Follow the manufacturer’s instructions. Some sensors have a formal calibration procedure, while others are not user-adjustable. In either case, establish how readings compare with the actual medium and a consistent hand check before relying on a threshold.
Can a sensor run irrigation automatically?
Only if the sensor and controller are compatible and the controller is set up to use the signal as intended. Test the response under supervision and check that water reaches the intended growing areas. Keep a manual check in your routine, especially while establishing the settings.
What should I do if the reading disagrees with a hand check?
Do not change the watering threshold straight away. Check that the probe is at the right depth, has good contact with the medium and is in a representative spot. Compare again using the same hand-check method, and consult the instructions if the mismatch continues.
Soil-moisture sensors improve greenhouse watering when they give repeatable information about a representative root zone and that information agrees with checks of the growing medium. Choose a compatible device, place it consistently, establish a baseline in your own medium and observe the watering response over several cycles. Keep manual checks in the routine, especially after changes to planting or irrigation. If readings no longer match conditions around the roots, investigate the probe position, substrate, calibration or water delivery before adjusting the threshold.
