
White Crust on Greenhouse Soil: Test Before Treatment
Greenhouse growing guide
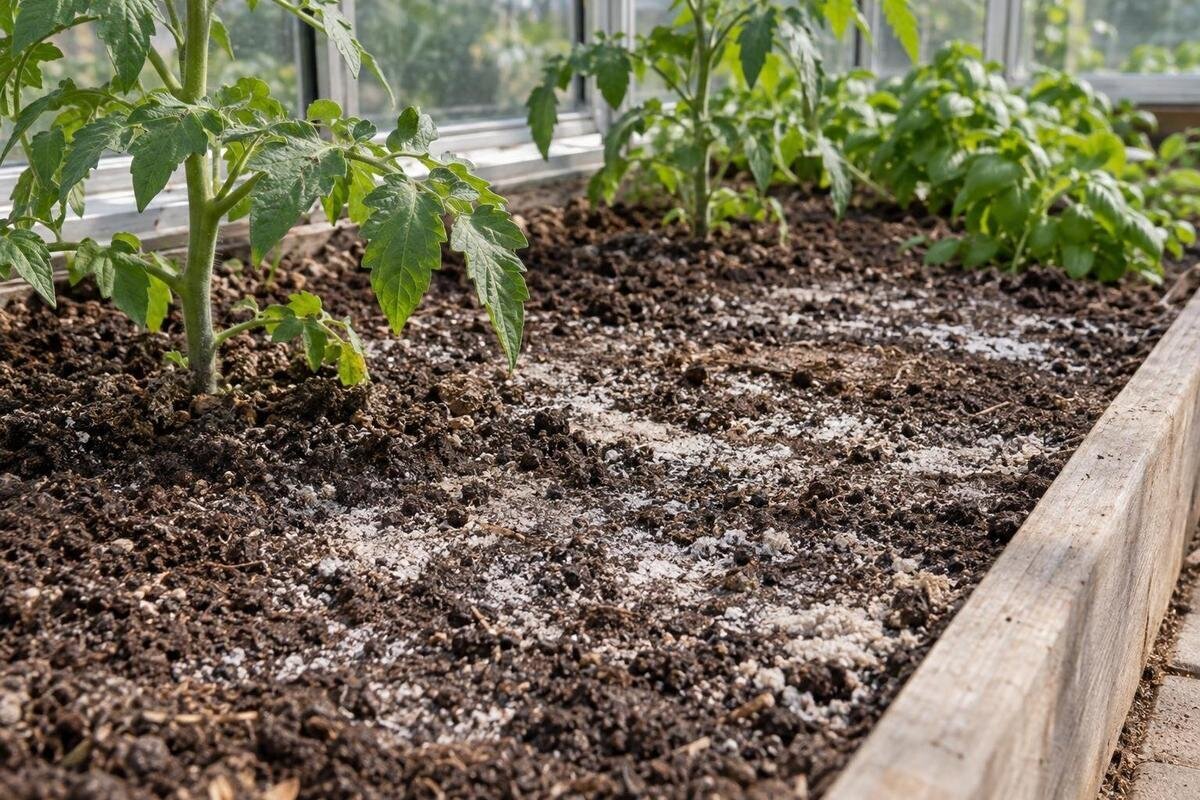
A pale crust on greenhouse soil is a symptom, not a diagnosis. It may be soluble salts left as water evaporates, minerals precipitating from irrigation water, a surface growth, or pale particles already present in the growing mix. Those causes can look similar, yet the response differs: extra fertiliser can worsen a salt problem, while scraping away a mineral film will not change the water that leaves it behind. Before flushing, acidifying or applying a fungicide, map the deposit and test irrigation water and root-zone medium as separate samples.

Possible causes of a white soil coating
A soluble-salt deposit forms when water carries dissolved ions to a surface and then evaporates. Fertilisers can supply those ions, but irrigation water also brings dissolved minerals and salts. A crust may show where evaporation has concentrated residue; it cannot identify the substances, measure their amount or reveal what is happening throughout the root zone. A thin layer at the surface may sit above a different condition lower down. The crop, growing medium and a suitable test matter more than the whiteness or thickness of the coating.
Hardness-related mineral scale may leave a pale, chalky residue; carbonate precipitation is one possibility, not a diagnosis for every deposit. Fungal or algal growth can also look pale, especially after a film dries, while perlite or other light-coloured particles may simply be part of the substrate. Crystals, powder, a slick film or a fibrous patch can help you decide what to investigate, but these clues overlap. Compare the soil with nearby pots, irrigation fittings and uncovered trays, and do not choose a chemical treatment from colour or texture alone.
The deposit’s position can guide sampling
Photograph the bed before brushing anything away, then mark the affected patch on a simple sketch. Note whether it sits around an irrigation emitter, along a bed edge, beneath a pot, over a fertiliser band, in a low spot or across the whole bed. Record whether the material is on the growing medium or also on a pot rim, leaf, tray or fitting. A ring around one outlet suggests checking that delivery point; a similar coating across several beds calls for a broader comparison. Location narrows the questions but does not prove the cause.
Observe the area through an ordinary watering and drying cycle rather than soaking it as a homemade test. Note where the coating returns first and which crops or growing media show the same pattern. Keep a surface scraping separate from a root-zone sample, and label an affected patch separately from an unaffected comparison. Give each location a simple reference on your sketch so that photographs and samples can be matched later. If you are planning a larger growing area, the Spacious Greenhouse has listed options from 47 to 70 m². Use the drawing for the chosen size to mark proposed beds and comparison points; the area range alone does not show their arrangement.
Watering and feeding records narrow the search
Write down the water source, irrigation method, fertiliser or other additions, and any recent changes. Include dates and the bed or crop they applied to. A changed supply or a recent feed may be relevant, but a long-standing routine does not rule out gradual accumulation. Keep the record factual: note what was used rather than labelling it too much or too little before testing. In a covered greenhouse, direct rainfall may not reach the bed, so irrigation and drainage determine much of the water movement; do not assume rain will wash residues out.
Look for a relationship between the coating and how water or feed is distributed. One dripper, mixing batch or container group may have a different history from the rest of the greenhouse. Record that history against the affected zone rather than averaging it with unrelated beds. If you cannot recall a feed quantity or date, mark it as unknown instead of guessing; the distinction will help when you interpret the results. When planning crop zones in a Classic aluminium greenhouse, with listed options from 3.77 m² to 28.08 m², label the proposed beds and irrigation groups on the chosen floor plan. This gives each observation a clear location without suggesting that the greenhouse itself provides separate growing areas.
What to test in irrigation water
Test the water used on the affected bed independently of the soil. Ask a horticultural laboratory which panel suits your crops; electrical conductivity (EC) and pH are useful starting data, while alkalinity or bicarbonate and selected ions can help explain mineral or salt concerns. Hardness and alkalinity are related in some waters but are not interchangeable measurements. Sodium and chloride may be relevant in some cases, and the laboratory can advise whether other ions need checking. If you use more than one supply, test and label each one separately rather than combining them.
Collect the sample from a point that represents the water reaching the greenhouse, using the laboratory’s container and handling instructions. If water is stored, blended or treated before use, record that process; where it may affect results, compare incoming and delivered water separately. Label each sample with its source, collection point and date, and use the same names in your watering record. This avoids confusing a result from the original supply with one from water delivered to the bed. If you are considering a lean-to Wall Greenhouse, the listed area options run from 3.69 m² to 14.34 m². Mark the existing water source and intended sampling point alongside the model plan so you can assess access in the actual site layout.

How to sample greenhouse growing media
Do not use the crust alone as a substitute for a growing-medium test. Ask for analysis of representative root-zone material; if the laboratory can assess a surface deposit, send it separately and label where it came from. Take several small portions from the same affected zone and combine them only when the crop, medium and management are alike. Keep a visibly different patch as its own sample, with a comparable unaffected zone separate. Mixing material from every bed can dilute a localised result and make the test less useful.
Follow the laboratory’s instructions for depth, amount, timing and packaging rather than taking a convenient scoop from the top. Identify the medium in each container or grow bag, and sample it separately from in-ground soil; different mixes and sampling methods should not be combined in one result. Record recent irrigation and feeding, since recent inputs can influence readings. Before collecting anything, label the containers with the zone references from your sketch and distinguish surface material from root-zone material. For a planned combination of beds and containers, Limited Edition aluminium greenhouse options are listed from 3.77 m² to 28.08 m². Check the exact floor plan for access to each proposed sampling zone, including those behind containers or beside a planted bed.
How to read EC, pH and alkalinity results
EC estimates the amount of soluble ions in a test extract. It is an indicator of dissolved salts, not a list of individual nutrients and not a diagnosis of which input caused them. The extraction method matters: results from different soil-to-water ratios or procedures cannot be compared as though they were identical. Read the method and units on the report, and use the laboratory’s crop-specific interpretation. A single EC threshold is not appropriate for every crop, medium, growth stage and test method, so avoid applying a figure from a different situation.
pH answers a different question: how acidic or alkaline the tested water or medium is. It does not measure salinity. Water alkalinity describes its capacity to neutralise acidity; repeated irrigation with high-alkalinity water can influence medium pH over time, depending on the crop and substrate. Hardness relates chiefly to calcium and magnesium and may help explain deposits, but the visible crust still needs investigation. Keep each result beside its sample reference, units and test method rather than copying the number alone into your records. If you are dividing a T-Model Orangery Greenhouse into crop zones, its listed options range from 16.52 m² to 30 m². Number the beds on the specific plan so that each report can be traced to the correct growing area.
Surface growth and pale particles in the growing mix
Use texture only as a clue. A dry, gritty or powdery residue may be mineral, while a slick film or fine threads may suggest algae or fungal growth; the appearance can change as a surface dries, so it is not a reliable identification test. Some fungi live on decaying organic matter without being a plant disease, while a white layer cannot rule a disease in or out. Look separately at the plants and note whether the coating spreads after damp periods. Describe what you see rather than naming a pathogen by colour.
Inspect the mix itself and nearby surfaces. Uniform white grains throughout a new potting mix may be a component such as perlite; a mark on a pot rim or pipe may be residue left as water dries there, rather than a soil condition alone. Record whether the pale material occurs within the mix, only on top, or on adjacent surfaces. If growth or plant decline persists, take photographs and seek a suitable horticultural diagnosis before applying a fungicide. When planning containers and beds in a Pyramid Greenhouse, available in listed sizes from 5.53 m² to 18.9 m², check where you could inspect both the growing surface and the plants. Use the actual layout drawing rather than assuming the model name indicates a particular internal arrangement.
Match treatment to the test result
Use water and medium results together. If root-zone EC is high according to the interpretation for that crop and test method, compare it with the water result and feeding record to identify likely inputs. Do not add feed to address a white coating or signs of stress unless analysis indicates a need. If the irrigation water supplies much of the dissolved load, changing fertiliser alone may not stop deposits returning. If pH or alkalinity is the main concern, any adjustment needs to reflect the medium, crop and water analysis. Avoid acidifying soil or water because of appearance alone.
Leaching is not an automatic remedy. Its suitability depends on water quality, bed drainage, crop tolerance and where the dissolved salts are located. More water is not automatically safer, and scraping off the visible crust removes neither salts below it nor their source in the irrigation supply. If EC is not elevated, investigate mineral precipitation, surface growth or particles instead of using a salt treatment. When results conflict or the crop is affected, ask the laboratory or a qualified horticultural adviser to interpret the report before making a substantial change.

Keep a record of water and bed results
Once you have a likely explanation, keep a simple record for each bed: crop, medium, water source, feeding changes, deposit location, sampling method, date and test result. Mark the zone on a plan and note whether the coating returned after ordinary irrigation. Repeat tests using the same sampling and analysis method; a trend is more useful than comparing EC results from different extraction procedures. Where possible, compare water and medium results from a similar period, so a change in the supply is not confused with a change in the bed.
Clean tools between zones and keep surface scrapings away from root-zone samples. Follow the laboratory’s instructions for storage and transport, and do not leave a sample exposed in the greenhouse while waiting to send it. Keep the labelled sampling kit separate from fertilisers, with a copy of the bed map and a record of which samples have been collected. A storage area can be considered as part of this routine, without assuming it is suitable for holding samples. The Limited Edition greenhouse with storage has listed options from 5.52 m² to 28.08 m². Check the storage section’s plan and dimensions against the equipment you intend to keep there; the total area does not tell you what will fit.
Planning access for soil and water checks
Before setting out a greenhouse bed, draw the ground beds, pots or bags, paths and water points you intend to use. Keep different crops or media in identifiable zones if you want comparable test results; potting mix, grow-bag medium and in-ground soil are not interchangeable samples. Plan a route to each bed edge and repeated sampling location without crossing a planted area. The usable layout matters more than a headline floor area when you need to see where deposits start and return to the same sampling point later.
Treat catalogue area as a first comparison, not a guarantee of a particular internal arrangement. The Prestige greenhouse has listed options from 3.77 m² to 28.08 m²; compare the exact configuration with the growing system and access you need. Mark a route from the entrance to the water points and each sampling zone, allowing for the pots, bags or beds shown on your own plan. Keep a copy of that plan with the test records so you can return to the same locations. A layout cannot prevent dissolved minerals or excess salts, but clearly identified beds and water sources make it easier to collect meaningful samples and assess whether a correction has worked.
Frequently asked questions
Does a white crust always mean I have used too much fertiliser?
No. Fertiliser can add soluble salts, but minerals in irrigation water, evaporation, surface growth and pale particles in the growing mix can look similar. Review your watering and feeding records, then test the water and growing medium separately. Do not add or reduce fertiliser solely because the soil surface has turned white.
Can I identify salts by colour or texture?
Not reliably. A powdery or crystalline surface may suggest mineral residue, while a film or fine threads may suggest growth, but their appearance can change as the soil dries. Use those observations to decide what to sample, not to identify a substance or choose a treatment.
Should I scrape the crust off or flush the bed?
First take a photograph and, if useful, collect a small amount of the surface deposit separately from the root-zone sample. Scraping does not remove dissolved salts below the surface. Flushing is not suitable for every bed: water quality, drainage and crop tolerance all matter, so do not soak the soil just to remove a visible coating.
Which tests should I request first?
Ask a horticultural laboratory about testing irrigation water and growing medium as separate samples. Electrical conductivity (EC) and pH are useful measurements, while water alkalinity and selected ions can help explain mineral or salt concerns. The laboratory can advise which additional tests suit your crop, water source and growing medium.
What if EC is within the expected range but the coating remains?
An EC result within the expected range does not explain the coating on its own. Check that the sample came from the affected root zone and that the interpretation suits the crop, growing medium and test method. Mineral residue, surface growth or particles in the mix may need further investigation. Avoid treating the bed for excess salts when the results do not support that diagnosis.
A white surface can come from very different processes, so the useful diagnosis is the one that fits both the mapped pattern and the test results. Keep the water sample separate from the bed sample, interpret EC and pH using the correct method and crop guidance, and leave the surface alone until the evidence points to a cause. If the results do not support a salt problem, investigate mineral deposits, growth or substrate particles rather than treating the soil by appearance.
