
Greenhouse Tomato Blossom End Rot: Why Fertiliser May Not Help
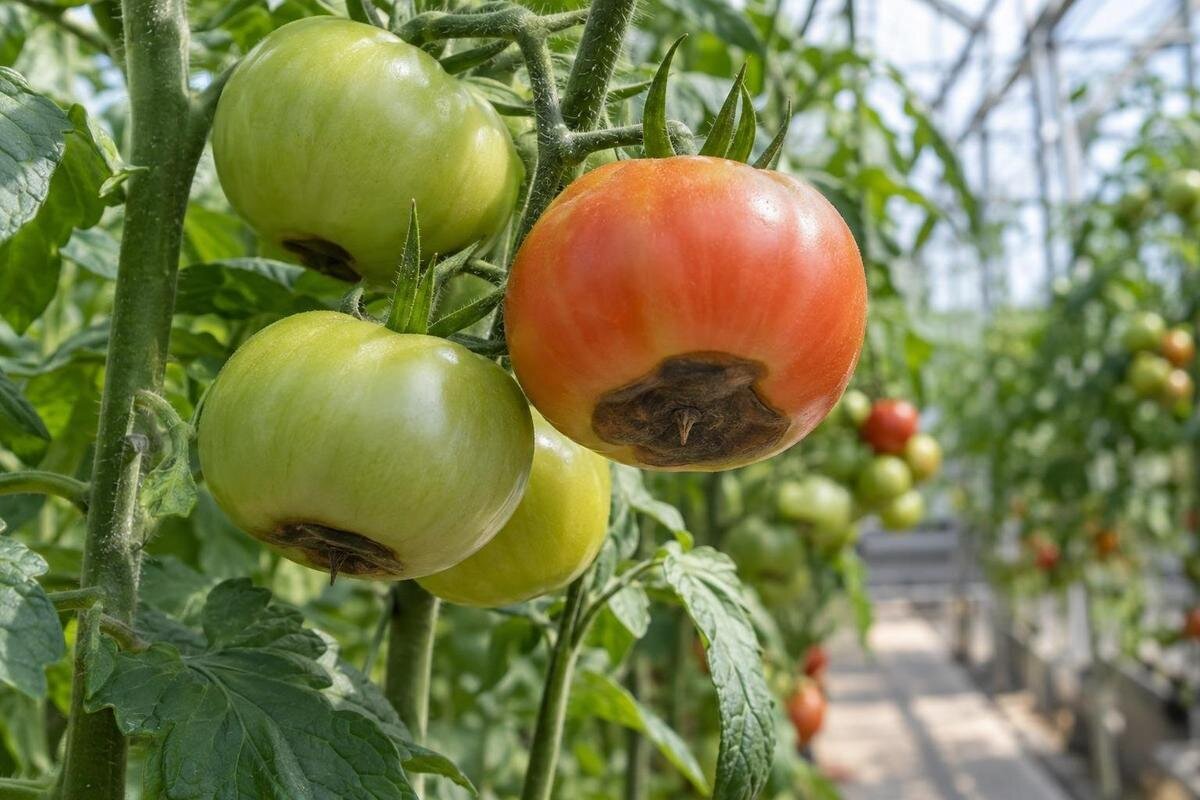
GREENHOUSE TOMATO PROBLEMS
A dark, sunken patch on the end opposite a tomato’s stalk is alarming, especially when nearby fruit looks healthy. Blossom-end rot is a physiological disorder linked to too little calcium reaching a developing fruit; it does not prove that the growing medium contains too little calcium. In a greenhouse, uneven root-zone moisture, damaged roots, excess salts or rapid fruit growth can interrupt uptake. Adding fertiliser without checking those conditions may miss the cause or worsen the balance. This guide helps you distinguish the usual symptom, look for shared stresses and decide what evidence should guide an amendment.

Before adding calcium 1
What blossom-end rot looks like
The blossom end is the end opposite the stem and green calyx. Blossom-end rot generally begins there as a small, pale or water-soaked patch. As it enlarges, the tissue turns brown to very dark, becomes sunken and may feel dry or leathery. It often develops while the tomato is still growing, although the fruit can continue to colour. The damaged area may affect one fruit even while others on the same plant look sound. A mark centred on the flower scar fits the usual pattern better than one on the shoulder, stem end or exposed side, but location alone does not confirm the cause. Some fruit develop a broad patch; others show a smaller spot.
Check the whole tomato as well as the damaged tissue. The patch can spread and become cork-like; mould may grow on dead tissue later, so secondary growth does not automatically rule blossom-end rot out. Take a clear photo while the fruit is attached, including the calyx and blossom scar, then take a close-up of the affected area. Record whether the fruit is green, colouring or ripe and whether the lesion has changed since the previous inspection. If possible, include an unaffected fruit from the same cluster for comparison. Use natural light and avoid filters: a close-up without the fruit’s position or stage is much less useful for diagnosis.
Distinguish blossom-end rot from other fruit damage
Other fruit damage deserves a look before you call it blossom-end rot. Sunscald is more likely to mark an exposed side, often starting pale or papery; cracking follows a split in the skin rather than forming one patch at the flower end. Some fungal or bacterial fruit rots also cause sunken, dark or water-soaked areas, sometimes with rings, spreading edges or visible growth. Punctures, rubbing and bruising can leave local marks too, and more than one problem can affect a fruit. These are tendencies, not a photo key: darkness, softness or mould alone cannot identify the cause.
Compare the lesion’s position, the tomato’s ripeness, whether there are several marks, and whether nearby leaves or stems also look abnormal. Inspect more than one fruit and, if possible, an unaffected tomato from the same truss. Illustrated diagnostic guidance from university extension services, including UC Integrated Pest Management and Cornell Cooperative Extension, can help you compare typical signs. If a lesion is mainly on the side or stalk end, spreads quickly, or appears with other plant symptoms, widen the diagnosis. Seek local horticultural advice rather than treating every dark patch as a calcium shortage.
Before adding calcium 2
Why calcium can be present but unavailable to fruit
Tomato roots take up calcium dissolved in the root-zone water. The plant moves much of it upwards in water through the xylem, where it reaches growing tissues. Calcium is not readily redistributed from mature leaves to fruit through the phloem, and leaves generally lose more water through transpiration than fruit. A rapidly expanding tomato can therefore receive too little calcium at its blossom end at a critical stage, even when leaves look healthy and the growing medium contains calcium. The lesion indicates a local problem in fruit tissue, not a direct measurement of the soil. This is why symptoms can appear on only one or a few fruits at first.
Availability and delivery are separate questions. Root uptake depends on calcium in solution, steady access to moisture, functioning roots and the growing medium’s chemistry. Repeated drying and heavy rewetting, waterlogged or damaged roots, high soluble salts, or a nutrient imbalance can all interfere; rapid fruit growth adds demand. Several factors may overlap, so the spot cannot identify which one occurred. Total calcium in a soil test does not necessarily show whether it was available to the plant at the right time. Greenhouse size is a separate buying decision, not a remedy for calcium delivery. If you are also planning a new growing space, the Pyramid Greenhouse listings range from 5.53 to 18.9 m²; compare the chosen footprint with your intended beds and access routes.
Use the pattern across plants to narrow the cause
Map where affected fruit occurs before altering feed or watering. If symptoms are limited to one plant or one line of containers, inspect that area’s irrigation, drainage, root condition and exposure. If several plants in different parts of the greenhouse show lesions at similar fruit stages, ask whether the same feed, irrigation practice or flush of growth affects them all. One variety or cluster may point to timing or fruit-load differences, but it does not establish a cause. Look for repeat patterns across several inspections; one affected tomato is a weak basis for a whole-greenhouse treatment. Note whether apparently healthy plants share the same watering line.
Write down the date, plant, truss or fruit, approximate fruit stage, recent watering and feeding changes, and any hot spell. Mark the affected area on a simple greenhouse sketch. This provides a sequence instead of a memory-based guess and lets you compare plants sharing the same bed or watering line. Keep later photographs from a similar angle so changes are easier to compare. If your records reveal plants that are difficult to reach, include inspection access in any future layout plan. The Limited Edition Aluminium Greenhouses with Storage listings range from 5.52 to 28.08 m²; use the actual plan to check whether you could reach each row without overlooking plants at the back.

Before adding calcium 3
Check root-zone moisture before watering more
Moisture around active roots matters more than a quick glance at the surface. A dry top layer can hide damp media below, while a wet surface can conceal a dry centre in a container. Check at a consistent depth in several places, including affected and unaffected areas. In a bed, note whether water reaches the root zone evenly; in pots or grow bags, check each unit rather than assuming one is like the next. The aim is consistent access to water, not permanently saturated soil or a fixed daily schedule. Weather and fruit load can change how quickly plants use water, so one check on one afternoon is not enough.
Look for practical causes of uneven supply: a kinked or blocked line, a leaking point, water running off, compacted patches, or containers drying faster than the bed. Root-zone saturation can also restrict oxygen and impair uptake, so simply watering more may make matters worse. Adjust timing to the medium, plant size and conditions, then check the result rather than relying on a calendar alone. Make observations on more than one day and, where possible, at similar points in the watering cycle. For a future greenhouse, map the watering route alongside the bed positions. The Prestige Greenhouse listings cover 3.77 to 28.08 m²; compare the intended footprint with the space you need to reach irrigation lines and check moisture in each bed.
Inspect roots and test the growing medium
Roots can be stressed by prolonged saturation, drying, physical damage or restricted space, and any of these may reduce water and nutrient uptake. Look for broader signs such as weak growth, persistent wilting despite damp media, or poor drainage, but none is specific to a calcium problem. If a container plant can be checked without tearing apart the root ball, note whether the medium is waterlogged or extremely dry. Avoid digging around greenhouse-bed roots just to inspect a fruit lesion; unnecessary disturbance can add stress and obscure the original pattern. If several plants struggle in one patch, mark that area separately for further checks.
Testing the growing medium can help distinguish low availability from excess salts or an unsuitable pH, but sampling must match the system. Garden soil, potting mix, grow bags and hydroponic nutrient solution are not interchangeable samples; use a test method intended for that material or ask a laboratory for advice. Take separate samples from clearly different beds or media rather than blending them into a result that hides local variation. Follow the test method’s sampling instructions, since a number is only useful when the sample and measurement are appropriate. If you are planning a larger growing space, the Spacious Greenhouse listings cover 47 to 70 m². Mark distinct beds and container groups on the proposed plan so you can keep their observations and test results separate.
Before adding calcium 4
Review fertiliser before adding calcium
Before applying a calcium product, list every input already used: complete fertiliser, slow-release feed in a potting mix, compost, lime and any recent amendment. Some products add other nutrients or soluble salts as well as calcium; lime also changes pH. Excess soluble salts can make it harder for roots to take up water, while an excessive supply of nutrients such as potassium, ammonium or magnesium may interfere with calcium uptake. The likelihood depends on the growing medium and product formulation, so do not infer a deficiency from one symptom or copy a neighbour’s feeding routine. Keep labels and application dates with your notes.
Use a test result and the product label to decide whether an amendment is appropriate; do not combine lime, soluble calcium and a stronger general feed in the hope that one will work. Calcium sprays may not reliably correct the fruit tissue, because calcium moves poorly from leaves to fruit and uptake through the fruit surface can be limited. An already sunken lesion will not be reversed by any feed, and there is no universal calcium product or rate for every growing system. Feeding records also matter when planning mixed beds and containers. If you are comparing the Aluminium Greenhouses, listed from 3.77 to 28.08 m², identify those growing areas on the layout and keep a separate record of the medium and feed used in each.
Consider greenhouse heat, humidity and airflow
Greenhouse conditions influence plant water demand, but they do not diagnose blossom-end rot on their own. A hot, bright spell can increase water use and speed fruit growth; humid or still conditions can also alter transpiration, and the effect of airflow depends on the crop and structure. A warm day is therefore a reason to check root-zone moisture and plant response, not proof that a calcium feed is needed. If you have suitable monitoring, note conditions at plant height and compare them with the period when symptoms began. Outdoor weather reports alone may not reflect conditions inside the greenhouse.
Record whether symptoms follow unusually hot days, closed-up periods, heavy shade or a dense canopy, and compare affected and unaffected positions. Avoid changing fertiliser, watering, shading and ventilation all at once; otherwise you will not know which change mattered. Manage the greenhouse using its own safe operating guidance, and make changes in response to observed conditions. When choosing a structure for a particular site, compare its product details with the planned crop and position. The Lean-to Greenhouse listings range from 3.69 to 14.34 m², but a model name or floor area alone does not describe the temperature, humidity or airflow your plants will experience.

Before adding calcium 5
What to do with fruit that is already affected
Fruit tissue already damaged by blossom-end rot will not heal, and the patch may remain dark or become more corky as the tomato grows. Removing an affected fruit does not correct the cause, although taking badly damaged fruit out of a crowded crop may make later inspection easier. Keep a record before discarding it, especially if you need to compare fruit from several plants. If the patch softens, spreads or develops mould, reconsider whether blossom-end rot is the only issue: secondary organisms can colonise damaged tissue, and other fruit rots may look similar. A change in appearance is a reason to reassess, not proof of the original cause.
Once you have identified a likely stress, correct that part of the system: improve consistency of root-zone moisture, address a confirmed root or drainage problem, or adjust nutrients when a suitable test supports it. Follow product directions and keep other variables steady where practical. Judge the change on fruit that develops afterwards; the marked tomato cannot serve as a recovery test. Keep crop-care changes separate from decisions about replacing the structure. If replacement is already planned, the Limited Edition Aluminium Greenhouses listings span 3.77 to 28.08 m². Use this season’s records to identify specific layout needs, such as better access to an awkward bed or space for separately watered containers.
Track new fruit and seek a diagnosis when needed
Track fruit that develops after the change and record which plant and truss it belongs to. Compare it with earlier observations at a similar fruit stage, rather than judging progress by the appearance of an old lesion. Keep the date of each watering or feeding adjustment alongside the crop notes so you can distinguish earlier damage from later results. If the problem repeats, revisit the root-zone observations and consider testing the correct growing medium. Seek a local horticultural adviser or laboratory if symptoms spread, other parts of the plant are abnormal, or the visual pattern does not fit typical blossom-end rot. The aim is to identify what remains unexplained, rather than repeat a treatment simply because it has already been tried.
For useful advice, bring together photos of the whole plant, fruit and blossom end, plus the growing system, watering routine, recent weather and fertiliser labels. Ask whether the pattern points to water delivery, root health, nutrient balance or a different disorder; a fruit photo alone cannot establish the medium’s calcium status. Before the next crop, review which beds or containers repeatedly dried or stayed wet and plan checks at those points. If that review is part of a new greenhouse purchase, the T-Model Orangery Greenhouse listings range from 16.52 to 30 m². Compare the proposed bed and container positions with the problem areas in your current layout, keeping routine monitoring access in the plan.
Frequently asked questions
How do I recognise blossom-end rot on a greenhouse tomato?
Look for a brown or very dark, sunken area centred on the end opposite the stem, often on a developing fruit. Its position and appearance are clues, not proof. Side lesions, rings, spreading damage or visible growth call for a wider diagnosis.
Does blossom-end rot mean the growing medium has no calcium?
No. Calcium may be present, but inconsistent moisture, root stress, high soluble salts or nutrient imbalance can interfere with uptake and delivery to the fruit. A lesion does not measure calcium in the growing medium; use a suitable test before adding more.
Should I add calcium fertiliser straight away?
Not automatically. Check root-zone moisture, root health and feeding history first. If the problem repeats, test the right growing medium using an appropriate method. Calcium products can affect other parts of the medium’s chemistry, so follow test results and product directions.
Will the damaged part of a tomato recover?
No. Damaged tissue will not heal as the fruit grows. Correcting an underlying problem may help later fruit, but the existing patch can remain or become more corky.
Can blossom-end rot spread from one plant to another?
Blossom-end rot is a physiological disorder, not a contagious infection. However, mould or other organisms may colonise damaged tissue, and infectious fruit problems can look similar. Recheck the diagnosis if lesions do not fit the usual pattern or other plant symptoms appear.
Blossom-end rot is a reason to investigate calcium delivery, not an instruction to add calcium. Confirm that the lesion is at the blossom end, compare its pattern across plants, check root-zone moisture and roots, then review feeding history or test results before changing inputs. Fruit already marked will not recover; the meaningful test is whether later fruit develops normally after a specific, evidence-led correction. Keep the photographs and notes together: they make the next decision more reliable than a single fertiliser addition.
