
Does a Central Island Bed Work in a Greenhouse?
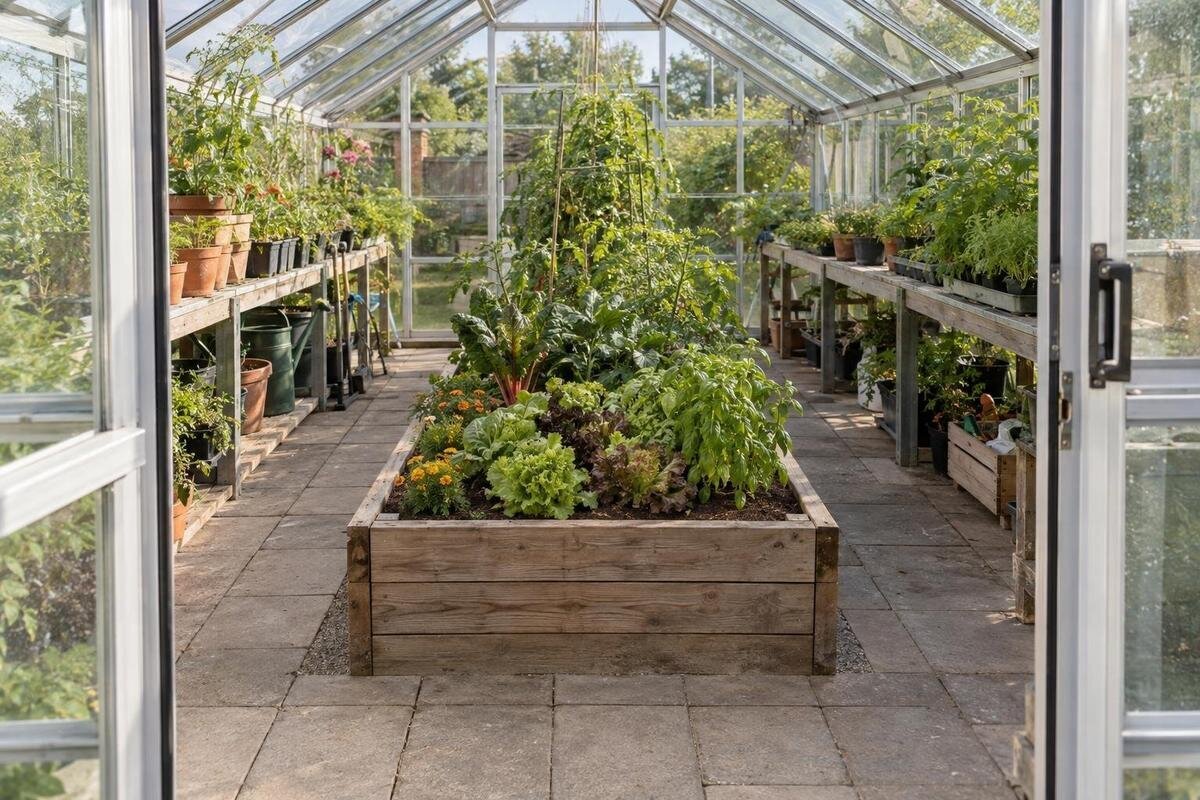
Greenhouse layout
A central island bed works only if the space around it remains genuinely usable. It gives access from both long sides and can make a broad planting area easier to tend than a deep bed against one wall. In return, it divides the greenhouse floor into extra routes and can leave little room to turn or reach the ends. The choice is less about headline floor area than clear internal width, bed reach, entry position and the space your routine jobs require. Compare it with perimeter beds on the same measured plan; if either side path becomes a squeeze, an island is unlikely to be the easier layout.

What a central bed changes
An island bed sits away from the greenhouse walls, so you can approach it from both sides instead of tending a deep bed from one edge. That access can make a broad planting area easier to work: you can check leaves, harvest or remove a plant without leaning across the whole bed. It also creates a defined growing zone in the middle and leaves some perimeter space available for other uses, if you plan those uses separately. Access at the short ends is a separate question; calling a bed an island does not guarantee that there is room to walk around it. The benefit is practical only when the bed's depth and position let you reach the crops without stepping into the growing area. It may be especially useful if a bed against one wall would otherwise be too deep for you to tend comfortably.
The first rough comparison is the footprint, not the catalogue area. Classic aluminium greenhouses are listed from 3.77 m² to 28.08 m², but an area figure does not show the inside width or the space left beside a bed. Draw the bed and all walking routes inside the outline of the exact size you are considering. Use the area range to identify possible sizes, not as proof that one suits an island. Look at length as well as width: a bed might fit across the middle but still interfere with a direct route from the entrance to the far end. If you cannot leave a usable path on each long side, the outline may fit on paper without working as an island.
Check reach from both sides
Reach is the main advantage to test, not assume. Stand in the path you plan to use and see whether your hand reaches the centre of the bed without stepping onto growing soil, leaning on plants or stretching across a row. People differ in reach and in how far they are comfortable leaning, so use your own ordinary working posture rather than a universal bed-width rule. Test both long sides and all four corners: a bed may be accessible in the middle but awkward at the far corner, where the route narrows. Also check whether you can hold a small tray or tool as you work. Being able to touch a leaf does not necessarily mean you have enough room to harvest, prune or remove the plant.
Repeat the check with mature plants in mind, not an empty bed. Leaves, supports and fruit can occupy the space your hand needs, and a plant spreading over a side path can turn two-sided access into one-sided reach. The Lean-to Greenhouse range is listed from 3.69 m² to 14.34 m²; the stated area does not determine whether a central bed is reachable in any selected version. Mark bed width and likely crop spread on the interior plan, then test the rows from each path. If one route lies beside a fixed feature or close to the wall, its usable width may be less than the drawing suggests, making a perimeter arrangement simpler.
Measure the two side paths
Measure the clear interior width before dividing it between a bed and paths. An outside footprint is not the space available for walking, so use internal measurements for the exact size and note any fixed projections shown on the plan. Record the narrowest usable point along both sides, not just the width at the middle of the greenhouse; a support, wall detail or angled corner can restrict one route. Then sketch the bed, both paths and any margin at the perimeter. Assess each path separately: extra space on one side does not compensate for an aisle too narrow to use on the other. Repeat the check near the entrance and far end, where a doorway or frame may affect movement.
For illustration only—not a product size or a recommended clearance—imagine a clear internal width of 2.4 m and a bed 0.8 m wide. The remaining 1.6 m has to cover both side paths and any edge margins; it can be divided in different ways, but the arithmetic cannot tell you whether each route feels comfortable or stays clear after planting. Limited Edition Aluminium Greenhouses are listed from 3.77 m² to 28.08 m². Use the measured width of the particular size for this exercise rather than treating the published area range as a layout dimension. If pots or tools will sit in either strip, allow for them instead of counting the full strip as walking space.
How perimeter beds compare
Compare both arrangements inside the same greenhouse outline and for the same crops. With perimeter beds and one central aisle, you tend each bed from its inner edge, so its depth must suit your reach to the outer row; planting right to the wall can make the far side awkward. An island reverses that trade-off: its centre is approached from two directions, but it requires a path on both long sides and a clear purpose for any outer strips. Count reachable planted area, not just the sum of bed widths. A wide bed that you cannot tend comfortably is not equivalent to a narrower bed with clear access. Also map where you will walk most often: an island can divide one straightforward aisle into two narrower ones.
An island layout is most convincing when it solves an actual access issue, such as a perimeter bed that would otherwise be too deep to reach. It is less persuasive if the same greenhouse can hold shallow perimeter beds beside a simple route without pinched side aisles. The T-Model Orangery Greenhouse options are listed from 16.52 m² to 30 m², but that area range does not show how either arrangement sits inside the chosen outline. Draw both options with beds, routes and edge margins in place, then compare the path you will use to reach every row. Keep the crop list constant so a larger planted area in one sketch does not hide a less accessible one.

Keep the entrance and bed ends clear
An island can leave two side paths yet still obstruct movement at the front or back. Trace the route from the doorway to each long side, to the far end and back out; note where you would turn while carrying a watering can, seed tray or harvested crop. Include the opening area of a swinging door, if the chosen design has one, and avoid placing a bed corner where you need to step through or pause at the entrance. If you can enter from only one end, each side aisle may end in a dead end; decide whether you need to circle the bed or can complete your routine by returning along the same path. The answer affects where the bed can stop.
Decide whether you need to walk around the short ends or can tend the whole bed from its two long sides. An end passage connects the side aisles and lets you continue around the bed; without one, you may need to return along the aisle you entered. Allow separate working space at an end if you need to tend plants there. The Pyramid Greenhouse range is listed from 5.53 m² to 18.9 m²; for the exact size you are reviewing, mark the entrance and bed corners on the same sketch. Check each turn with what you normally carry, rather than merely walking through empty-handed. This helps you distinguish space needed for circulation from space needed to work at the bed.
Plan for mature plants and routine care
Plan the bed as if crops have reached their expected mature spread. Draw foliage or support zones as well as the soil edge, especially where leaves will overhang a path or stems need tending from either side. Check access during sowing, watering, harvesting, pruning and clearing spent material; a route that works for a small transplant may disappear once both rows are full. Think about where you can stand while reaching for centre plants and whether you can remove a damaged or finished crop without brushing the neighbouring row. Your planting plan should keep both working edges accessible through the part of the season when the bed is busiest. If a crop needs support close to the aisle, mark that footprint before setting the bed width.
Small routines also need a place: a watering can, hose, bucket or harvested produce can temporarily narrow an aisle. The Limited Edition Aluminium Greenhouses with Storage range is listed from 5.52 m² to 28.08 m². The product name identifies a built-in-storage option, but the name alone does not tell you where that storage sits in a particular size. Check its position and dimensions before laying out the bed; do not count storage as spare floor area unless the selected plan shows it outside the routes. Decide where tools will go while you tend plants, and keep a clear way to reach and leave the bed without shifting equipment each time.
Find the usable internal dimensions
Use a dimensioned internal drawing for the exact model and size, not an external width or a general area figure. You need the clear inside length and width, the positions of supports or other fixed features shown on the plan, and the entrance location. Measure the bed and path at their narrowest points after allowing for those features; a central bed can fit within the outer outline while one aisle pinches beside a support or door opening. Keep a distinction between nominal area and the portion left to move through and plant after beds, frame projections and storage are accounted for. If the interior plan uses a different reference point from the outside dimensions, make sure you are comparing like with like.
Bloomcabin Prestige Greenhouse options are listed from 3.77 m² to 28.08 m². That range gives you an overview of the available areas, but you still need the internal dimensions of the version you are considering. Find its drawing and mark the measured interior rather than scaling the product photograph. If internal dimensions are not clear, ask for the relevant plan before settling on a bed footprint. Keep assumptions written beside the sketch—especially around an unlabelled corner, doorway or fixed feature—so you can revisit them instead of relying on visual estimates. Use the same measurements for your island and perimeter sketches to make the comparison consistent.
How greenhouse size affects the choice
A larger greenhouse does not automatically make an island the better option. A wide central bed may be worthwhile if you grow enough plants to justify two-sided access; if your plants fit into narrower perimeter beds, one direct central route may be simpler to walk and maintain. Long routes also mean more distance to carry a watering can or reach the far end, while an island can split the journey into parallel aisles. Compare the amount of reachable bed area with floor space taken by paths, not just the number of beds. Added planting edges are useful only if there is still a clear way to tend them.
The Spacious Greenhouse range is listed from 47 m² to 70 m², but a larger stated area does not show whether the chosen bed width, entry position and turning space work together. It may give you more layout choices, yet the exact internal outline still matters. Mark the route from the entrance, each planting edge and the places where you need to turn; if an island leaves unused perimeter strips while crowding its two side paths, a different bed shape may use the floor better. Unplanted space is not automatically wasted: it may be what keeps the routes practical.

Test the plan on the greenhouse floor
Before building a bed, mark its proposed soil footprint on the actual greenhouse floor with low-tack tape, string or pieces of cardboard. Mark each path separately, the door-opening zone and fixed items from the internal plan. Walk along both sides carrying ordinary things you use, such as a watering can or tray, and turn at the points where you would harvest or leave. The purpose is to notice a snag: a tight corner, a spot where you have to step into the bed, or a route blocked by the door. Shift the outline while everything is easy to move, then check that the marked paths remain continuous from the entrance.
Then test reach, not just passage. Stand on each side and pretend to tend the centre and far corners; use cardboard or garden canes to represent mature foliage at the bed edge. If a task only works by leaning across plants or walking on the soil, mark that part of the bed as difficult to access instead of counting it as fully usable. Change one thing at a time—narrow or shorten the bed, shift it, or redraw it as perimeter planting—and walk the revised route again. A plan should be straightforward during routine care, not only when the greenhouse is empty and the bed is bare.
Choose the arrangement you can maintain
Choose an island when two-sided access is valuable for your planting, the bed stays within your comfortable reach from either side, and both paths remain useful with mature crops and everyday items. Choose perimeter beds when you prefer one clear central route or the available width will not support a reachable central bed plus two side aisles. A hybrid can suit a long plan: a smaller central bed in one area with perimeter planting elsewhere, provided the route does not become a sequence of bottlenecks. There is no universal minimum greenhouse size that answers this; the internal outline, doorway and your work pattern decide it.
Before settling on one arrangement, write down your regular tasks and check each against the drawing: reach the far row, enter and leave, turn with tools, water and clear plants. If any task requires stepping over the bed or moving something stored in the route, the plan is relying on a workaround. Prioritise access to every planted surface over filling every available strip with soil. A modest island with two workable edges may suit you better than a large one surrounded by narrow paths; conversely, a perimeter bed is not automatically easier if it is too deep to reach.
Frequently asked questions
Does an island bed need a path at both ends?
Not always. If you can enter both long-side paths and reach all the plants from them, you may not need to walk around the short ends. An end passage lets you move between the side paths without returning to the entrance. Leave working space at an end if you need to tend plants there.
How wide should a central bed be?
There is no universal width that suits every gardener or crop. Check that you can reach the middle and corners from both paths without stepping onto the soil or leaning across plants. Allow for mature foliage, not just the bed when it is empty.
Can a small greenhouse fit an island bed?
It depends on the inside dimensions and layout rather than a single size threshold. The bed needs to leave usable paths on both sides, as well as access at the entrance and any turns you need. Compare the same greenhouse with a perimeter-bed plan before deciding.
Does an island bed provide more growing space?
Not necessarily. Its surrounding paths use floor area, although access from two sides may make a wider bed easier to tend. Compare reachable planted space with the space taken by paths; do not count every square metre of the greenhouse as growing area.
How can I test the layout before making the bed?
Mark the bed, paths, door-opening area and fixed features on the floor. Walk both routes with the items you usually carry, then test your reach from each side. Use an outline of mature plants too, so you can spot access problems before the bed is in use.
A central island is worth choosing when its two-sided access solves a real reach problem and the surrounding paths stay clear after planting. Compare it with perimeter beds on the same internal outline, including mature crop spread, the entrance and the turns you need. If ordinary care becomes awkward, a simpler perimeter or hybrid arrangement is a better fit than an island that only works on an empty plan.
