
Gravel, Brick or Paving for a Greenhouse Floor?
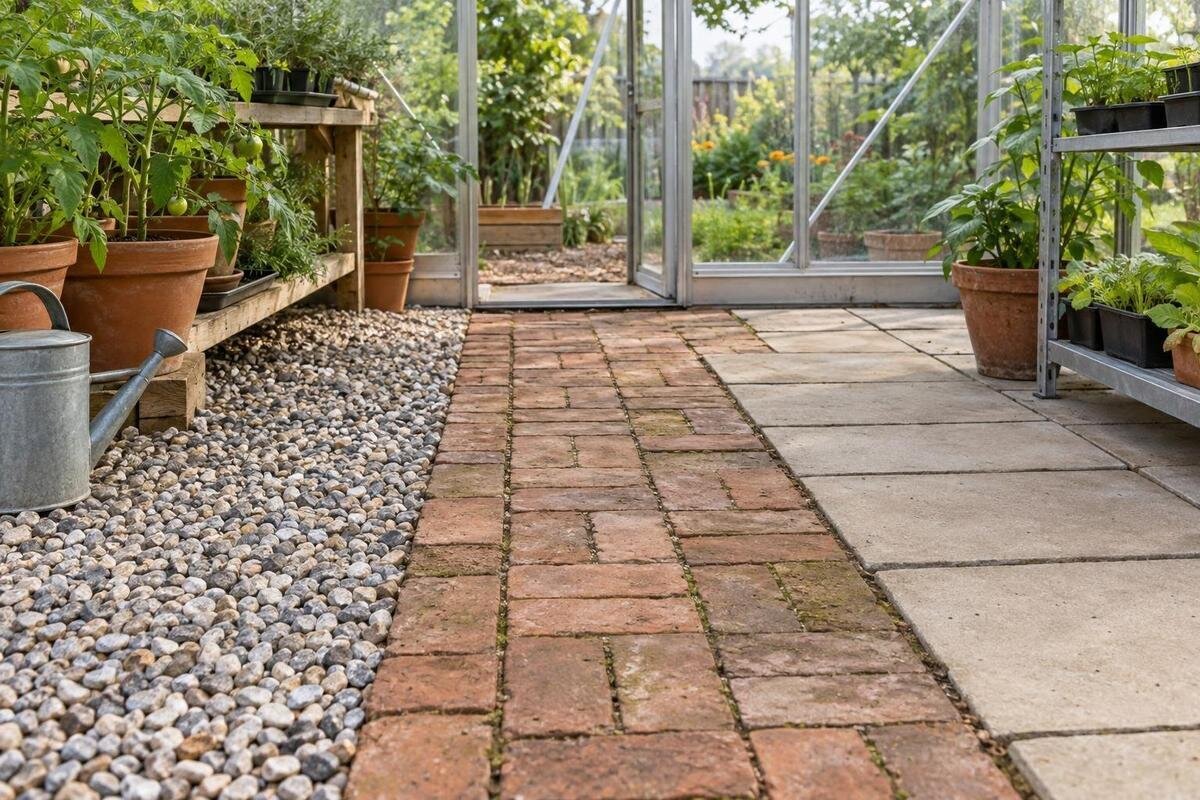
Greenhouse floor guide
Choosing a greenhouse floor is about more than appearance. You need a surface that suits the way you move plants and tools, can be kept tidy and sends irrigation water somewhere sensible. Gravel, brick and paving each behave differently underfoot, at their joints and when water reaches them, but none guarantees good drainage on its own. Just as importantly, the floor finish is not automatically the greenhouse’s structural foundation. Use the base information for the exact model to understand what supports and anchors the frame, then plan the interior surface around that detail and the conditions on your site.

Buyer checklist 1
Match the floor to greenhouse work
Start with what you do in the greenhouse, rather than with a material sample. If you mainly grow plants in open beds, you may need a firm route to the door and work area without covering every part of the ground. If you shift trays, bags of potting mix or a loaded wheelbarrow, a continuous surface that does not move under small wheels may matter more. Think about where you stand to water, where pots are set down and where spills are likely. The floor plan should support these everyday tasks, not just look tidy when the greenhouse is empty.
Sketch the beds, shelves, workbench and walking routes before ordering materials. Include room to turn while carrying a tray and to stand clear as the door opens. Use the layout for the exact greenhouse, not a product photo. If the Spacious Greenhouse is on your shortlist, identify the exact version when requesting its relevant base drawing. On your sketch, distinguish areas that need a firm, easily swept surface from areas you want to keep open for planting. This lets you compare floor layouts against the work you expect to do, rather than treating the whole interior as one uniform surface.
Gravel: footing, upkeep and drainage
Water can pass between gravel stones, so the surface may show less sheet runoff than a tightly laid paved finish. That does not mean the water disappears: compacted ground, a dense layer below or a low point can hold it underneath. Gravel can also shift where people walk repeatedly, leaving hollows or an uneven route. Small wheels may be harder to push across loose stones, and a pot may not sit as steadily as it would on a firm path. Look at the stone size and shape in person, and judge how the surface feels underfoot rather than choosing from a photograph.
Loose stones need a defined edge to keep them in the intended area; otherwise they can scatter into beds, door tracks or the garden beyond. Leaves, potting mix, petals and spilled fertiliser can fall between the stones, making quick sweeping difficult. Raking may restore a disturbed surface, but it will not remove fine material that has mixed into the gravel. If you regularly move pots on wheels or want to clear spills thoroughly, a firmer path through the busiest area may be easier to maintain. Gravel may still suit a lower-traffic area, provided the layer beneath it and the route for water have been considered.
Buyer checklist 2
Brick: joints, texture and maintenance
Brick creates a surface from smaller units, with a joint between each one. Compared with large paving units, smaller bricks can help a path fit around beds or follow a simple curve. They also create more seams where soil and plant debris may collect. How even the path feels depends on the bricks, the laying pattern and the supporting layer. Brick faces vary in texture and in how they behave when wet, so inspect a sample rather than assuming that a traditional-looking brick will provide the footing you want.
Check that the chosen brick is intended for a walking surface, then ask how the joints will be finished and cleaned. Water might travel across the face, pass through some joint arrangements or collect where the supporting layer is low; the word “brick” alone does not tell you which. Plan the edges against beds and the greenhouse frame so units do not rock or creep into the route. If you select the Aluminium Classic Greenhouse, use its exact variant’s base plan to locate the frame and doorway. Consider the brick border as part of the path layout, including how you will sweep soil from the edges and keep the entrance clear.
Paving: firm footing and surface runoff
Paving units can make a firmer route than loose gravel, which can help when you carry trays, set down pots or move a small trolley. A relatively smooth surface is often quicker to sweep, although soil can still collect in the joints. A textured surface may feel different underfoot and hold debris differently, so look at a sample rather than judging only by colour or appearance. Check how the surface feels when damp as well as dry; do not assume that every paving finish provides the same grip.
Many paved surfaces direct water across the top rather than allowing it to soak straight through, although the units and joints affect the result. Water can collect if the finished levels send it towards a doorway, a bed or another low spot. Think about where it should go before choosing the paving and joint treatment. If a Lean-to Greenhouse is under consideration, check the model’s base and installation details before planning a paved edge alongside the building wall. Agree how the finished floor will meet that edge; do not use paving to conceal an uncertain water route.

Buyer checklist 3
How water moves through and across the floor
Consider every source of water inside the greenhouse, including irrigation, drained pots and any wash-up you expect to do. A useful plan shows where water lands, how it moves across or through the chosen surface and where it can disperse. A floor that looks dry when unused may behave differently when you water several beds or clean up a spill. Check likely low points, including areas under benches where water may be less visible. The floor finish is only the uppermost part of that route; it cannot show what is happening in the ground beneath it.
Gravel and some jointed finishes allow water through the top layer, but that is useful only if the layers below can receive it. A tight paved surface may send water elsewhere, but only if the route and receiving area have been planned. These are different ways of handling water, not a choice between a surface that drains and one that does not. For a Limited Edition Aluminium Greenhouse, mark the base position on your site sketch alongside the watering areas and likely low points. Follow each proposed water route beyond the floor surface. If you cannot establish where runoff will go, ask a qualified groundworker to review the ground and proposed floor.
Cleaning and hygiene inside the greenhouse
For practical hygiene, focus on whether you can remove leaves, spilled potting mix and other plant debris from the floor. Gravel makes sweeping difficult because material can lodge between stones; brick and paving are easier to sweep across, but their joints can collect fine soil. A surface with a very rough texture may need more attention than a smoother one. Consider where you will set down dirty pots and tools so that loose soil does not get carried along the main route every time you move between planting and watering.
Think through the clean-up you are likely to do, rather than assuming that any one material will be maintenance-free. Check how the chosen surface should be cleaned, and make sure water used for cleaning will not simply pool where you need to walk. Leave access to the edges and the spaces beneath benches so plant debris can be removed. When planning the interior of a T-Model Orangery Greenhouse, include cleaning access in your layout. Consider whether you can reach beneath the proposed benches and clear the perimeter without moving everything onto the main path. This helps you judge the floor finish in the less accessible areas as well as the open walking route.
Buyer checklist 4
Access for people, pots and equipment
Choose a surface with the way you move through the greenhouse in mind. Carrying a tray, turning with a watering can and pushing a wheelbarrow put different demands on a route. Loose stones can shift underfoot or make small wheels harder to push; an uneven brick path may catch a pot; and a smooth paved surface still needs to be checked when damp. Give particular attention to the equipment you use most often, rather than judging the path only as a walking surface. If more than one person works in the greenhouse, take their preferences into account rather than assuming that one surface will feel comfortable to everyone.
Allow for turning and carrying, not just a straight line from the door to the plants. Mark out the route and any tight corners before laying the floor, then check that it does not narrow at a bed edge or obstruct the doorway. For a Pyramid Greenhouse, use the exact plan to locate the entrance and frame before marking the route. Walk through the proposed layout with the trays or equipment you normally carry, including the turn towards the work area. If access is a particular concern, discuss the layout and surface with a suitably qualified professional rather than relying on a general rule about floor finishes.
Paths and open planting beds
The entire greenhouse floor does not have to be finished in one material. A paved or brick path can provide a firmer walking route while planting areas remain open to the ground. You might also use a different finish in a potting area than along a low-traffic edge. This can keep the surface focused on the jobs that need it, but mixed materials require a tidy transition. Contain loose gravel at the boundary with a bed or paved path, and consider how spilled soil from an open bed will reach the walking surface.
Plan the route around the places where you work, not just around the greenhouse walls. Think about where pots, bags of mix and tools will be set down, and whether those areas will need a surface that is easy to sweep. If you are considering the Limited Edition Greenhouse with Built-in Storage, request the layout for the exact configuration before settling on a permanent route around the storage. Include space to approach the storage and carry items between it, the beds and the work area. Mark temporary places for bags and pots too, so they do not occupy the route you have planned to keep clear.

Buyer checklist 5
Greenhouse flooring and the structural foundation
The floor finish and the structural foundation answer different questions. Gravel, brick or paving describes the surface you walk on. The foundation or base is the arrangement intended to support the greenhouse frame and provide anchorage as required by its design. A floor finish cannot automatically take over those structural functions. A slab or another surface could serve more than one purpose only if the relevant design details confirm that it is suitable for the exact greenhouse and site.
Ask for the model-specific base and installation information before deciding where the floor should stop, meet the frame or sit in relation to the doorway. The listing for the Prestige Greenhouse with Metal Foundation identifies a particular offering; the words in a product name do not establish how an interior finish should meet the base or what the surrounding site needs. Confirm the required support and anchoring arrangement from the relevant documentation, and ask for clarification if the detail is not clear. Do not assume that a layer of gravel, a brick border or paving by itself is an acceptable base.
Thresholds, edges and installation planning
Before work begins, agree how the finished floor will meet the entrance, frame and surrounding ground. A change in level can affect how easily you carry pots through the door, while a poorly planned edge can leave gravel loose or let soil wash onto a path. Consider where water may collect at the threshold and whether the floor surface will interfere with any part of the specified base arrangement. These details depend on the selected model and site, so avoid relying on a generic floor depth or a rule of thumb for the finished level.
Give the installer or qualified groundworker the exact greenhouse model information, its base details, a site sketch and your proposed floor finish. Ask them to confirm the frame position, floor boundary, doorway level and water route as one coordinated plan. Agree the sequence of work too, so a finished surface does not cover or obstruct a detail that needs to remain accessible. If the ground or runoff route is uncertain, have it reviewed before choosing the final material. That preparation makes it easier to compare gravel, brick and paving on their real merits: how they feel, how they clean and how they handle water in the layout you intend to use.
Frequently asked questions
Does gravel automatically solve greenhouse drainage?
No. Water can pass between the stones, but it still needs somewhere to go. If the layer underneath is compacted, slow-draining or low, water may collect below the gravel. Check the underlying ground and the planned route for runoff rather than choosing a surface by its appearance alone.
Can I lay bricks or pavers right up to the greenhouse frame?
Only if the model’s base and installation details allow for that arrangement. The finished floor level, frame position, anchoring and doorway all need to work together. Check the exact model documentation and confirm the proposed edge detail with the installer or a qualified groundworker before laying the surface.
Which greenhouse floor is easiest to clean?
A firm, relatively smooth paved area is often easier to sweep than loose gravel, but joints and surface texture affect the result. Brick and paving joints can collect soil, while debris can settle between gravel stones. Consider the surface sample, the way you use the greenhouse and how you plan to clear spills.
Can I pave only the paths and leave planting beds open?
Yes, a mixed layout can keep direct planting areas open while providing firmer routes to the door and work areas. Plan how the path meets the beds so loose material and soil do not migrate into each other, and consider where irrigation water will travel at those edges.
Will paving stop water from pooling?
Not by itself. Paving can direct water across its surface, but the finished levels and a suitable place for runoff to go matter. Joints may also affect how much water passes through. If the route is unclear, ask a qualified groundworker to review the site and proposed floor detail.
Gravel, brick and paving can all work as greenhouse flooring, but each brings a different balance of footing, clean-up and water movement. Choose around the way you use the space, and decide whether you need a whole-floor finish or only firm paths through planting areas. Then coordinate the floor with the exact greenhouse base detail and the site’s drainage. Treating the walking surface and structural foundation as separate decisions helps prevent a tidy-looking floor from obscuring a more important support or water-management issue.
