
Collapsing Greenhouse Seedlings: Spotting Damping Off
Greenhouse growing guide
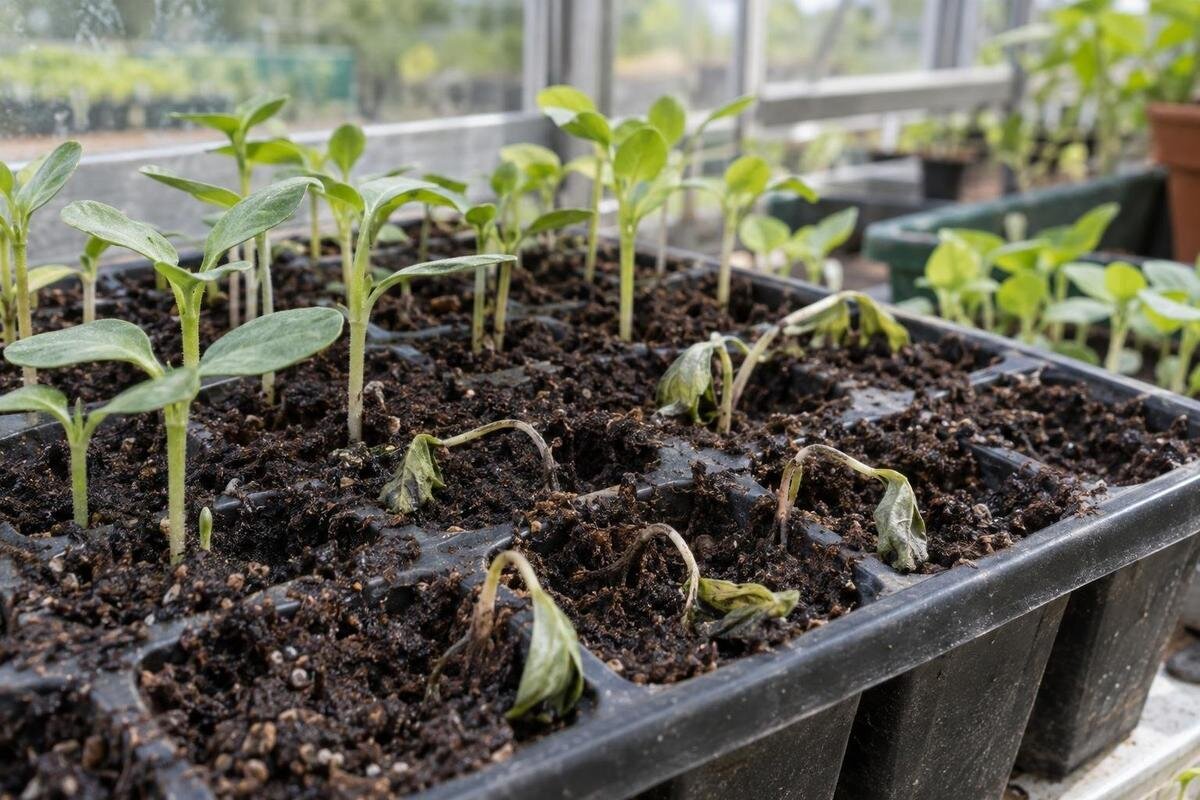
A tray with several seedlings suddenly leaning or falling can raise concern about damping-off. The strongest clue is often a narrow, dark or water-soaked section of stem at the surface of the seed-raising mix, but collapse alone does not establish the cause. Too much or too little water, root stress, temperature swings, pests and handling damage can look similar. Compare affected seedlings with healthy ones, inspect where the stem fails, and check the tray’s moisture, drainage and recent care. Hygiene helps limit disease carry-over, while persistent or unclear losses may need confirmation from a plant-health specialist.

Greenhouse layout checks 1
What damping-off looks like
After emergence, the clearest warning is a lesion at or just below the surface of the seed-raising mix. The stem may become water-soaked, brown or translucent, then narrow into a distinct waist. The seedling bends or collapses at that point, sometimes while the leaves above it still look green. In some cases, roots also look brown or soft, but root colour alone is not a reliable diagnosis. Look for a weakened stem base alongside wilting or sudden toppling, rather than relying on droop alone. The exact appearance varies with the crop, stage of growth and organism involved; a damaged collar is a clue, not proof.
Some affected seeds rot before shoots emerge, or new shoots die beneath the surface. You may see uneven germination or empty cells, but not a visible stem lesion. This pre-emergence loss is difficult to distinguish from poor seed viability, sowing too deeply, unsuitable moisture or a temperature outside the seed’s needs. Damping-off is a collective term for several mix- or soil-associated diseases, involving different fungi and fungus-like organisms; they do not all behave alike. Compare the sowing record and neighbouring trays, and describe the loss as suspected rather than confirmed if there are no seedlings to inspect. One empty cell is not a diagnosis.
Patterns of seedling loss across a tray
Look across the whole tray before removing plants. Note whether losses are isolated or clustered, whether they follow one edge or a particular water path, and whether seedlings of the same crop and age fail together. A cluster can fit a shared infection, but it can also reflect uneven watering, a blocked drainage corner, a cold spot, condensation dripping from above or a local spill. Several trays affected at once may point to shared mix, water or handling, but it is not proof. Compare affected seedlings with those that remain healthy, and note whether damage is increasing between checks rather than judging by a single snapshot.
Take a photo from above and a close view at mix level while labels are still in place. Write down the crop, seed batch, sowing date, mix type, watering method and where the tray sat; note when the first collapse appeared and which neighbouring trays remained healthy. A simple sketch of tray positions can reveal whether damage is concentrated near a drain, door or drip point. Avoid shaking trays together or carrying loose, wet mix across the bench while comparing them. These notes help you consider one likely cause at a time and give a specialist a clearer history if the problem continues.
Greenhouse layout checks 2
Inspect the stem, roots and mix
Lift one representative affected seedling carefully with a little mix around the roots; do not pull every remaining plant out just to inspect it. Use a clean tool, or wash your hands between suspect and healthy trays. At the collar, look for a narrow, soft, dark or water-soaked area and check whether the stem is intact above it. Note whether the damage begins below the mix surface or the stem appears snapped or cut. Inspect the roots for soft decay and compare them with those of a healthy seedling of similar age. Root colour by itself is weak evidence, and a close-up photograph cannot identify the pathogen.
Keep the tray and any sample labelled with the crop and sowing date while you inspect, so the symptoms remain tied to their growing conditions. Record what you find at the stem base and roots alongside your observations of the mix, rather than noting only that the plant has collapsed. Space beside propagation trays matters because close inspection is easier when you can lift one without brushing others. The Bloomcabin Prestige Greenhouse listing covers areas from 3.77 m² to 28.08 m²; check the selected configuration’s dimensions and usable bench area rather than treating its listed area as bench space.
Compare other causes of collapse
Dry or waterlogged mix can make seedlings wilt, but neither condition alone confirms or rules out damping-off. Check the mix below its surface: a dry top can hide moisture at root depth, while a wet surface does not show whether a tray drains freely. Roots stressed by standing water may look weak even without a clear collar lesion. If a seedling has simply dried out, its stem may remain intact; damping-off is more strongly suggested by a localised constriction or soft lesion at the base. The two problems can occur together, so review the watering history instead of choosing one explanation from the leaves alone.
Seedlings that are long and thin, leaning higher up the stem, or broken during handling may be collapsing for other reasons. Heat or cold stress can affect a wider group and may cause leaf or growth changes; feeding marks, cut stems or disturbed mix suggest pests or physical damage. Repeated failure to emerge may relate to seed quality or sowing depth rather than a visible post-emergence disease. Surface mould is not enough to identify the cause of a stem lesion. If you’re comparing greenhouse space for several sowing batches, the Spacious Greenhouse listing spans 47 to 70 m²; the listed area does not show how benches can be arranged, so check the selected layout for accessible, labelled trays.

Greenhouse layout checks 3
Manage moisture and drainage
Seedlings need moisture to germinate and grow, but mix that stays saturated can deprive roots of air and favour some damping-off organisms. Aim for evenly moist rather than waterlogged mix, following the crop’s sowing directions instead of a fixed universal watering schedule. Check below the surface and feel the tray’s weight rather than judging only by a dry-looking top. Make sure drainage holes are open and the tray is not left standing in runoff after watering. Seed size, cover, light and greenhouse conditions all affect how quickly mix dries, so reassess each tray rather than watering every batch identically.
Water gently so you do not dislodge seed or splash contaminated mix between cells. Bottom watering can limit disturbance at the surface, but remove trays from shared standing water after uptake; do not transfer water from a suspect tray to a healthy batch. Clean equipment if it contacts runoff, and prevent water from one tray or bench flowing into another. If using a humidity cover or mist, check whether droplets keep stem bases wet for long periods and adjust in line with crop needs. The Aluminium Greenhouses range is listed from 3.77 m² to 28.08 m²; check the selected layout for tray access, drainage and a watering route that avoids crossing clean batches.
Temperature, humidity and ventilation
Greenhouses can hold humid air and magnify daily temperature swings, so conditions around a covered tray or low bench may differ from those in the centre of the house. Check near the seedlings during the day and after a cool evening, especially if damage repeats in one position. A thermometer near the trays gives more useful context than a reading taken by the door or outside. Follow the seed packet or crop-specific guidance for temperature and germination; damping-off organisms do not all favour the same conditions, and no single setting prevents every case. Temperature stress may weaken seedlings without producing damping-off, so also inspect the stem base.
Where conditions allow, ventilate to reduce stagnant, persistently humid air and condensation, while protecting young seedlings from drying draughts or abrupt cold. Avoid crowding trays so tightly that air cannot move around the foliage, but keep spacing suitable for the crop and its stage. If a cover is used to support germination, follow the crop’s instructions about venting or removing it as seedlings emerge rather than leaving all trays sealed by default. The Lean-to Greenhouse listing spans 3.69 m² to 14.34 m²; check a specific layout for reach and working room instead of inferring airflow from the model name.
Greenhouse layout checks 4
Clean trays and tools before another sowing
After removing affected plants, clear loose mix and plant debris from trays, tools and work surfaces before sanitising; organic matter can interfere with disinfection. Wash reusable containers with detergent and water, rinse, then use a disinfectant labelled for that purpose exactly as directed, including any contact time. Do not mix cleaning products or guess a dilution. Check that the product is compatible with the container material, and let containers dry fully before refilling them. Clean bench edges, watering-can spouts and other places splashes may reach. Wash your hands between suspect and healthy batches; cleaning the tray alone can leave contaminated tools or debris behind.
Use fresh, clean seed-raising mix for the next sowing, and do not return mix from affected pots or cells to a new tray. Keep the bag closed when it is not in use and use a clean scoop; avoid setting it on a dirty floor or bench. Do not save suspect runoff to water another tray. Leave enough space to lift containers and set them on a clean surface after washing, rather than placing clean bases back into old residue. Fresh mix is not a substitute for clean containers and tools. The Limited Edition Aluminium Greenhouses range is listed from 3.77 m² to 28.08 m²; check a chosen plan against your tray-washing and clean-handling workflow.
Separate suspect seedlings from healthy batches
Move a tray with suspected damping-off away from healthy seedlings if practical, keeping its label with it. Handle it last during watering and routine checks, then wash your hands or clean gloves and tools before touching another batch. Avoid carrying wet foliage or loose mix over healthy trays, and keep runoff from the suspect tray separate; contaminated media, splashes and equipment can move pathogens. Do not shuttle the tray around to see whether it improves, as this can spread residue and make its original position harder to remember. If several trays are affected, map their positions before moving them and keep the holding area easy to clean.
Remove seedlings that have collapsed or show a clear collar lesion, together with loose mix around them, rather than leaving them among healthy plants. Do not reuse their mix for propagation; follow local waste guidance for disposal rather than assuming home composting will destroy the cause. Unaffected seedlings may be monitored separately if they remain vigorous, but watch for new lesions and avoid treating the whole bench as safe because one tray looks healthy. A separate place for a suspect batch helps keep clean and used items apart. The T-Model Orangery Greenhouse listing covers 16.52 m² to 30 m²; check a specific plan against the room needed to segregate and inspect trays.

Greenhouse layout checks 5
Planning and monitoring the next sowing
Before another sowing, choose one or two changes supported by what you observed: fresh mix, a cleaned tray, improved drainage, more careful watering, less crowding or a different tray position. Avoid changing every variable at once; otherwise, an improved batch will not show which correction helped. Label the crop, seed batch, sowing date and mix, and sow at the depth and density recommended for that seed. Keep a clean tray as a comparison if you are testing a change, and place it where you can monitor it without moving it through suspect areas. The Pyramid Greenhouse range is listed from 5.53 m² to 18.9 m²; plan bench use from the chosen dimensions and the number of batches you need to keep labelled and separate.
Inspect new seedlings regularly as they emerge and through early growth, looking for fresh constrictions at mix level before plants topple. Record when the first symptom appears and whether it follows a watering or environmental change. Maintain the moisture and temperature needed by the particular crop; abrupt drying can create another stress, so prevention is not achieved by simply withholding water or leaving vents open. Do not apply a fungicide just because seedlings collapsed: different causes need different responses, and any treatment must be appropriate for the crop and problem. Clean habits lower avoidable risk but cannot guarantee that every sowing will be disease-free.
When to ask for specialist confirmation
Seek specialist confirmation when losses keep returning despite sensible hygiene and moisture management, spread quickly across several trays, affect a valuable or unusual crop, or lack a clear collar lesion. Ask for help when whole rows fail to emerge and you cannot separate disease from seed or sowing issues. A local horticultural adviser, plant-health specialist or diagnostic laboratory may be able to assess symptoms; services and sample requirements vary. Explain what you have already changed and, if a sample may be needed, ask before applying a treatment. Different causes call for different responses, so extra water, stronger ventilation or a fungicide is not a reliable one-size-fits-all answer.
Before contacting a specialist, gather clear photographs of the tray and stem base, crop and seed details, dates, mix type, watering method, recent temperature and moisture observations, and a simple map of affected tray positions. Ask before sending live plants or mix, as packaging and sample requirements differ; a poorly prepared specimen may be unusable. Keep suspect trays separate while waiting. If you are comparing greenhouse space for propagation, the Limited Edition Aluminium Greenhouses with Storage range is listed from 5.52 m² to 28.08 m²; check the chosen layout and usable bench space rather than assuming listed area determines how trays can be inspected or separated.
Frequently asked questions
Does a pinched stem always mean damping-off?
No. A dark, narrowed or water-soaked stem at mix level is a useful warning sign, but physical damage, root stress and other problems can look similar. Check the whole plant and tray pattern; seek confirmation if the cause remains unclear.
Can damping-off affect seedlings before they emerge?
Yes. Seeds or shoots may rot or die below the mix surface, leaving gaps. Poor seed viability, sowing depth and unsuitable growing conditions can also cause poor emergence, so empty cells alone cannot confirm damping-off.
Should I water a seedling that has collapsed?
Check the mix below the surface and make sure the tray drains. Wilt can accompany both dry mix and disease, so do not add water automatically. Keep the crop’s moisture needs in mind without leaving trays in standing water.
Can I reuse trays and seed-raising mix?
Do not reuse mix from affected cells for propagation. Reusable trays can be washed and treated with a disinfectant labelled for that purpose, following its directions. Keep fresh mix and clean tools away from used containers and debris.
When should I seek a specialist diagnosis?
Ask for advice if losses recur, spread quickly, affect a valuable crop or do not show a clear stem lesion. Take photos and notes, and check sample requirements before sending plants or mix to a diagnostic service.
A collapsed seedling deserves a careful check, not an automatic label. Look for a constricted or water-soaked stem at mix level, compare the pattern across the tray and review moisture, drainage, airflow and recent handling. Remove affected material, keep suspect batches separate and clean reusable equipment before sowing again. When the picture is unclear, losses continue or a crop is important, a specialist can help distinguish damping-off from lookalikes and guide a proportionate response.
