
Root Barriers for Greenhouse Beds Beside Established Planting
Greenhouse bed planning
An established tree or shrub beside a greenhouse can send roots into a cultivated bed, but poor growth alone does not prove that has happened. Installing a barrier without checking the route can cut roots that matter to the plant’s health or stability. A sound plan starts with evidence, then maps the greenhouse and beds against the neighbouring planting before any digging. This guide explains how to investigate cautiously, distinguish a root barrier from an ordinary bed edge, and choose a layout or alternative that avoids unnecessary damage.

01
Why roots reach greenhouse beds
Tree and shrub root systems are not confined to the soil directly beneath their canopies. Their spread and density vary with species, age, soil, water and past disturbance, so the visible crown is not a dependable map of where roots are. A cultivated greenhouse bed can offer loosened soil and regular moisture that support fine roots from nearby planting. Roots may enter from the side or below even when the bed surface looks clear. Fine roots are easily missed in loose growing media, and a woody root in one spot does not show how widely smaller roots extend.
Root presence alone does not prove that a tree is causing poor growth. Neighbouring planting may use some of the same water and nutrients as crops, but the degree of competition depends on the site, season, plants and how the bed is watered. Crop stress can also come from uneven irrigation, shading, temperature, pests, disease or soil conditions. A tree beside the greenhouse is a reason to investigate, not a diagnosis or a reason to cut roots. Separate evidence that roots are present from evidence that they are affecting a crop.
Confirm root intrusion before digging
Look for a pattern before disturbing soil. Note which beds and crops are affected, whether symptoms begin along the edge nearest the established planting, and whether comparable plants further away behave differently. Record watering, weather, shade and how quickly soil dries at several points. Compare similar parts of the beds, because a sunnier edge can dry faster even without root competition. Use the same observation points each time and mark them on a sketch, rather than relying on a general impression that one side is struggling. Keep different crops separate in your notes: a comparison between similar plants is more useful than comparing unrelated crops with different growing requirements. Roots already visible at an open bed edge confirm their presence in that spot, not their route across the whole bed or their effect on the crop. Record visible roots separately from crop symptoms so that the two observations do not become a single assumption. Dated notes help distinguish a persistent pattern from a short spell of stress.
Check how water is delivered as well: blocked or uneven emitters, leaks and poor coverage can produce a dry strip that looks like competition. Yellowing or wilting is not a reliable root test. If a root is visible, photograph it in place and note where it lies rather than pulling or cutting it. If confirmation would need a test hole, trench or removal of soil, pause and get advice on a low-impact inspection method. Consult an arborist or tree-care professional when excavation could reach established tree roots; crop symptoms alone are not a reason to dig towards them.
02
Map the greenhouse, beds and nearby planting
Make a simple plan before buying a barrier or setting out a greenhouse. Mark the intended greenhouse base, each bed, paths, doors and fixed equipment. Add nearby tree trunks and shrub stems, visible surface roots, changes in ground level and any known buried services. Show the proposed root barrier separately from the foundation: a barrier around a bed does not make the greenhouse base root-safe, and a greenhouse footprint is not a map of the roots below it. Mark where you have observed something and where you are estimating. Give each bed a label so that notes about roots, moisture and crop growth can be matched to the same place. Include measurements between fixed features, rather than drawing everything by eye. If you are comparing two positions, use separate outlines and label them clearly; overlapping alternatives can otherwise obscure which bed edge belongs to which layout. Leave uncertain areas marked as uncertain rather than completing the plan with an assumed root boundary.
Do not draw a root-free line from the canopy edge; root patterns depend on the plant and ground, and may extend beyond the visible crown. A measured plan can reveal whether shifting a bed or path avoids a likely route altogether, though it cannot establish that excavation is safe. Published greenhouse floor area can help narrow choices: the Limited Edition Aluminium Greenhouses are listed from 3.77 m² to 28.08 m². Check the selected configuration’s measurements and place its actual footprint on the site plan; the range is not a clearance measurement.
What a root barrier can and cannot do
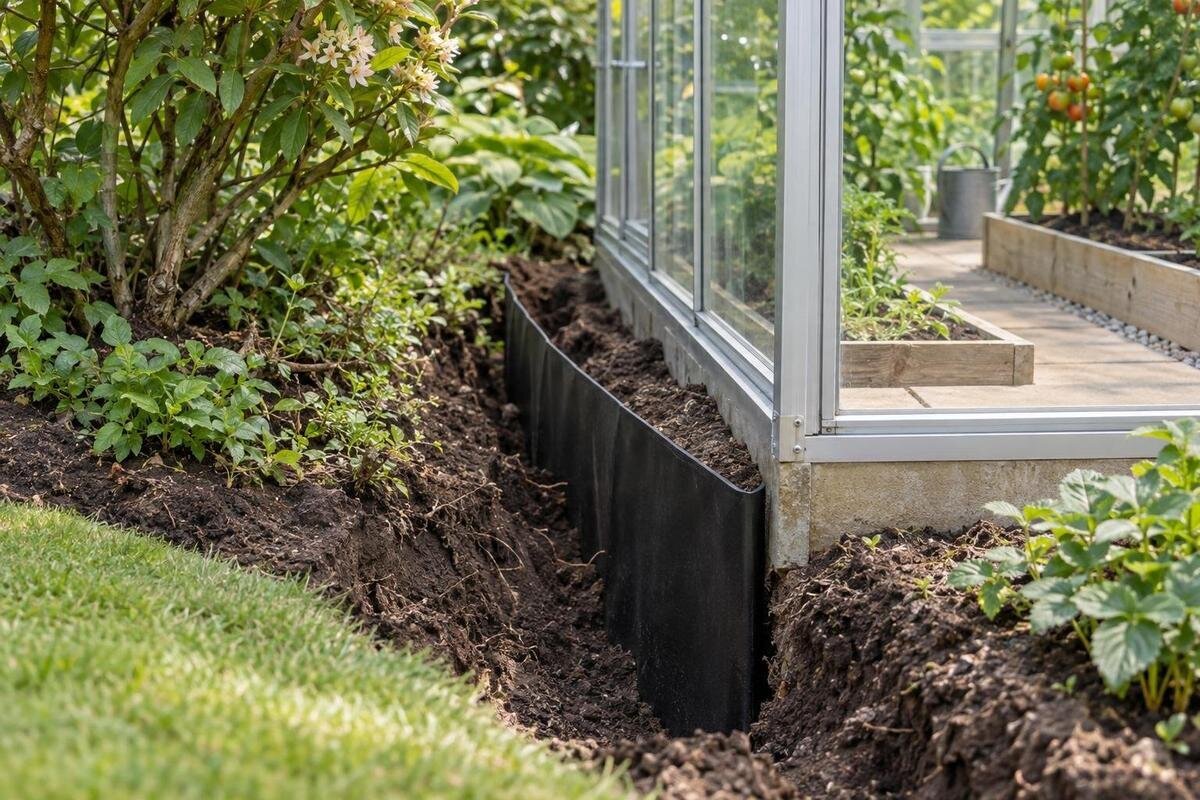
A root barrier is a physical system intended to intercept or redirect roots along a defined line. It is different from a bed edge that only holds growing media in place. A short or partial barrier addresses only the route it covers: roots may pass beneath its lower edge, travel around an open end or use an incomplete joint. It will not remove roots already in the bed, and it cannot be assumed to block every direction unless its design covers those routes. An intact-looking side does not rule out roots entering from below.
Before choosing a system, identify which sides of each bed need protection and where its ends and corners will sit. Follow the manufacturer’s stated depth, jointing and installation details rather than copying a generic dimension; appropriate design and safe excavation depend on the site. Check how the product handles drainage, what soil contact it is intended for and how the finished edge can be inspected. On the plan, distinguish a continuous boundary from separate lengths with open ends. This makes it easier to see which potential entry routes the proposal addresses and which remain outside it. If you are considering the T-Model Orangery Greenhouse, its listed area range of 16.52 m² to 30 m² provides a starting point for comparing sizes. Use the selected configuration’s measurements to draw the beds and trace the intended barrier around them, including every change of direction.

03
Bed edges, raised beds and root barriers
Raised-bed sides and root exclusion have different functions. An open-bottom frame retains growing media but leaves the bed connected to the soil below, so roots may enter from underneath or through a gap at the edge. A liner should not be assumed to stop roots unless it is documented for that use; thin sheeting or weed fabric may have a different purpose. Conversely, a sealed base can change drainage and how water moves through the bed. Do not add an improvised floor or wrap simply because roots have been found.
Check the barrier maker’s documentation for intended soil contact, use around food crops, construction, joints, durability and drainage. Ask for material information if suitability is unclear; thickness, colour or a broad claim such as root-proof is not enough to judge a system. Separate the components in your buying notes: the bed frame retains the growing media, while the proposed barrier needs to serve its stated root-control purpose. If a liner forms part of the design, record its intended function rather than treating every sheet material as interchangeable. Keep bed edges compatible with irrigation and access for cleaning or repair. When planning beds within a Pyramid Greenhouse, available sizes are listed from 5.53 m² to 18.9 m². Select the greenhouse layout and bed-boundary materials as separate parts of the project, each with its own specifications.
Protect established roots during site work
Roots can support a tree’s water uptake and anchorage. Their apparent thickness is not a reliable test of whether they are safe to cut, and damage from trenching can affect plant health or stability. Do not cut a root simply to fit a barrier panel, excavate through visible roots or bury the base of a trunk under added soil. A healthy-looking canopy does not establish that a root can be removed without consequence. The same caution applies to established shrubs where preserving the plant matters.
Ask an arborist or other qualified tree-care professional to assess the proposed trench and greenhouse base before work near established planting, especially where there is a mature tree, a slope, visible roots or existing damage. The assessment concerns the actual route and method, not simply the name of a barrier. The Bloomcabin Prestige Greenhouse listing identifies a model with a metal foundation; that detail cannot tell you whether a particular site installation will cross significant roots. If roots are uncovered or nearby planting changes during work, pause and seek advice rather than extending the excavation.
04
Allow for beds, paths and storage
Measure usable space inside the greenhouse rather than relying on the outside area alone. Draw beds, paths, the door opening and fixed equipment in their actual positions. Leave room to reach each bed for watering, harvesting, soil renewal and barrier inspection; a narrow strip that cannot be reached is not a useful maintenance route. Include the barrier line, its corners and its ends, so you can see whether it can be installed without cutting through another bed or blocking a path. Check access from the position where you would actually stand, not just whether a gap appears on the drawing. Consider how you would carry growing media to the bed and remove it during renewal without covering the boundary you need to inspect. Mark any corner that would require reaching across crops or moving stored items. These checks help distinguish space allocated to growing from space needed to keep the bed accessible throughout its use.
Storage and other fitted features can change the growing layout. The Limited Edition Aluminium Greenhouses with Storage are listed from 5.52 m² to 28.08 m². Check the selected configuration’s dimensions and layout information, and account for storage, the frame, entry and circulation before setting bed edges. Draw the storage space as a separate part of the plan rather than including it in the area assigned to beds. Then check whether stored items would obstruct access to a barrier end or joint. A greenhouse with enough overall area may still leave a bed corner hard to reach. Adjust the layout while it is still on paper, keeping both everyday access and occasional maintenance in view.
Use the greenhouse footprint to test the site plan
Compare the greenhouse footprint with the space where it can actually sit. Moving the greenhouse or shifting its beds farther from established planting may avoid a barrier trench, but only if the new position suits the ground, access and growing plan. A larger model is not automatically a safer solution: its base may occupy more of the area where roots are present, while a smaller one may still sit over a root route. Keep the bed layout and foundation location together on the plan, and consider how nearby planting will be maintained.
If a broad growing layout is required, the Spacious Greenhouse listings range from 47 m² to 70 m². Compare the chosen configuration’s measurements with the available ground and proposed bed edges. For each possible position, keep the same features on the drawing: the base, planting-side boundary, beds and access routes. This allows a direct comparison instead of judging one option by its overall area and another by its usable bed space. Record why a position has been retained or ruled out, such as an inaccessible bed edge or a proposed trench crossing visible roots. Resolve those site constraints before settling on a model size; choosing a larger footprint does not itself resolve a conflict with established planting.

05
Alternatives when excavation is too risky
If a barrier would require cutting important roots, change the growing arrangement instead of forcing the trench. Options include moving a bed to another part of the greenhouse, reducing or reshaping an in-ground bed, relocating the greenhouse if the site allows, or growing in containers physically separated from the surrounding soil. Each choice has trade-offs in access, watering and available root volume. Use crop-specific horticultural guidance when deciding container dimensions and drainage; an open-bottom raised bed does not provide that separation.
Keep established planting undisturbed when there is no safe route for excavation. A container or isolated bed still needs to suit the crop, drain appropriately and use material suitable for its intended soil contact. Compare alternatives against the particular problem you need to solve: moving a bed changes its location, while separating the growing media from the ground changes its connection to the surrounding soil. Neither choice should be treated simply as a different-looking bed edge. If moving the greenhouse is more realistic than digging, the Aluminium Greenhouses listings cover 3.77 m² to 28.08 m². Plot the base and beds at the proposed position, then compare the resulting growing space and access with your existing layout before choosing.
Monitor the bed edge over time
After installation, keep the site sketch and barrier instructions, and make brief notes on what happens at the bed edge. Where edges are visible, look for roots returning at joints or endpoints, signs of poor drainage and repeated crop stress in the same strip; observe rather than digging to inspect the system. A single fine root is not proof that a barrier has failed along its full length, but repeated entry at one point can help identify where the plan needs review. Label observations using the same bed names and locations recorded before installation. Note whether an observation is new or was already present, and keep dated photographs of accessible edges where these help show a change. Record any changes to watering or the bed layout alongside crop symptoms, so later comparisons retain that context. Note changes in nearby tree or shrub condition as well. The record should describe what you can see, without assuming that every change has the same cause.
For a wall-side layout, plan how the bed boundary will remain accessible once the greenhouse is in use. The Lean-to Greenhouse listings cover 3.69 m² to 14.34 m²; use the chosen configuration’s measurements to place the wall, beds and access route on the drawing. Identify which edges can be observed from the path and which would be concealed by the layout. Leave a practical way to check the accessible boundary without recurring excavation or dismantling the growing arrangement. If roots reappear, water begins pooling or established planting appears affected, use your location notes to explain the change when seeking site-specific advice. Pause before repairs rather than turning an inspection into a new trench. The aim is to keep both the growing area and neighbouring planting workable over time.
Frequently asked questions
How can I tell whether roots have entered a greenhouse bed?
Roots at an already exposed bed edge are evidence of their presence in that spot, but wilting or yellow leaves alone are not proof. Compare moisture and crop patterns across the bed, and get advice on a careful inspection if confirming the cause would mean digging.
Will a raised bed keep tree roots out?
Not necessarily. The sides of an open-bottom bed hold growing media, but the bed remains connected to the soil below. Treat a boundary as root control only when its documentation confirms that use and its design suits the site.
How deep should a root barrier be?
There is no single depth that suits every barrier, plant and site. Follow the system’s installation details and get an arborist’s advice where established roots may be affected. Do not dig to a guessed depth near a tree.
Can I cut a root to fit a barrier?
Do not cut a root simply because it is in the way. Its importance cannot be judged reliably by appearance, and cutting may affect the plant’s health or stability. Have the proposed barrier route assessed before excavation or pruning.
Will a root barrier stop all roots permanently?
No barrier should be assumed to cover every route. Roots may grow under it, around an end or through a gap or damaged joint. Check accessible edges over time, and seek advice before digging again if roots reappear.
A useful root-barrier plan begins with evidence and a site layout, not a deeper trench. Confirm whether roots are present, mark where the greenhouse and beds can go, then consider a documented barrier only if it can be installed without putting important roots at risk. Where a safe route is unclear, keep the established planting undisturbed and redesign the bed or growing arrangement, or get a site assessment before work. That approach respects both the greenhouse crop and the planting that is already there.
