
Can a Greenhouse Work Between Your House and Fence?
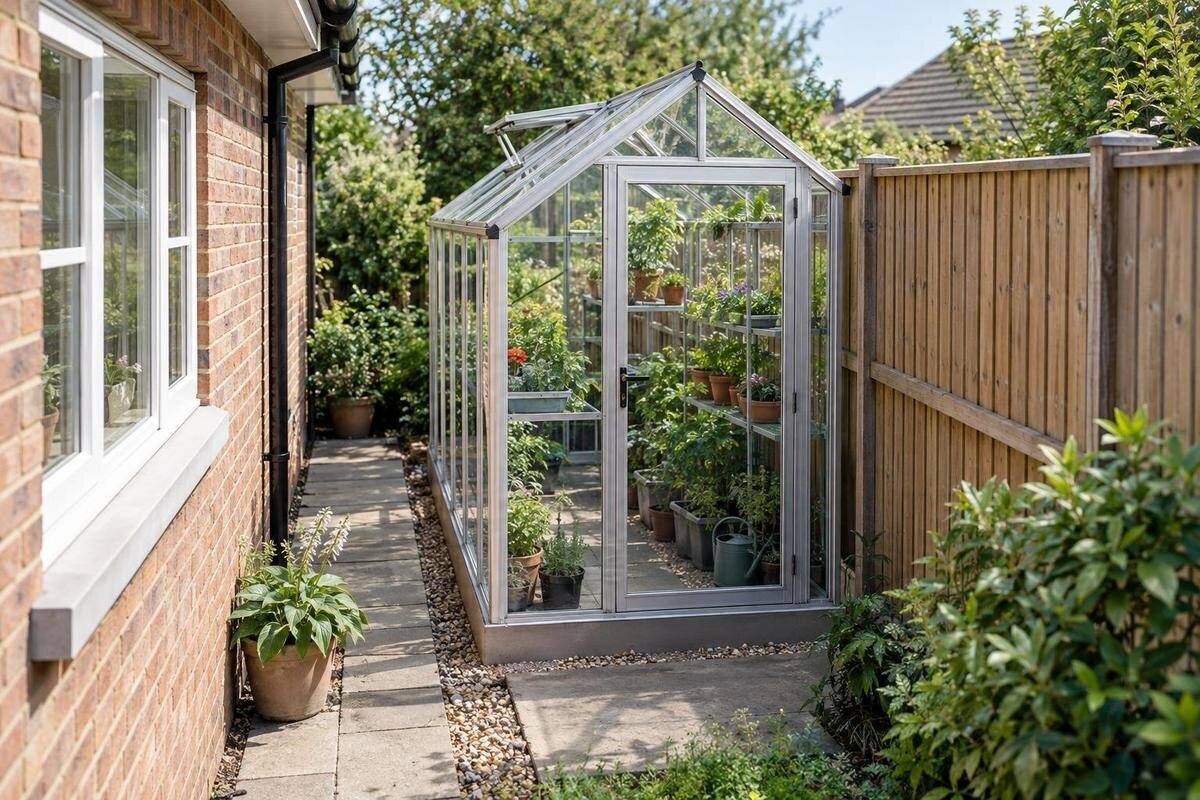
GREENHOUSE SITE PLANNING
A gap beside a house can look generous when it is empty, yet a fence post, roof overhang, downpipe or door route can make the usable space much narrower. The test is not whether a greenhouse’s advertised area sounds small enough. It is whether the exact model and size fit with the access needed to install, use and maintain it, while leaving workable growing room inside. A scaled site sketch, seasonal shade notes and a plan for water from both roofs make the decision more reliable than a quick tape measure across the widest point.

Measure the narrowest usable space
Begin with a measured plan of the whole passage, not a single width taken at either end. Measure at several points along its length, including the narrowest point, and repeat at different heights where eaves, wall fittings or fence rails project. A gap can taper or pinch around a downpipe, meter box, fence post, gate or change in paving. Mark these features, the usable length and any level changes on a simple sketch. Measure from the surfaces that will actually remain, including cladding, rails and fixed fittings, rather than from an assumed straight boundary. If the house and fence are not parallel, record regular cross-measurements so the drawing shows the taper instead of hiding it.
Compare the sketch with the exact greenhouse variant’s outside dimensions, not just its advertised floor area. The Aluminium Greenhouses range is listed from 3.77 to 28.08 m², but those figures do not tell you a particular variant’s width or length. Check the dimensioned plan for the base, roof edge and any gutters or other projections, and ask which measurement is described as the overall size if that is unclear. Add the door-open area and temporary assembly space separately. A model that fits only if every edge is measured optimistically leaves no room for real obstacles; resolve uncertain dimensions before treating it as a viable option.
Include working room around the greenhouse
Draw the greenhouse’s outside footprint, then mark the space needed to use and maintain it. Show where you would stand to open the door, clean exterior panels, check fixings and reach any service points. Include the ends as well as the long sides: a passage that is accessible at the entrance but blocked at the far end can make routine cleaning or a minor repair difficult. If one face can only be reached through the gap, check what access the manufacturer’s care instructions expect. There is no universal access strip that suits every model and site; the work you need to do and the product instructions both matter.
Do not treat the narrow strip between the house and fence as automatically usable access. If you could reach one side only by stepping over a drain cover, leaning over a fence or moving fixed equipment, include that limitation in your decision. A wall-style option such as the Lean-to Greenhouse may be worth comparing where the house is one edge of the proposed area, but its name alone cannot confirm compatibility with your wall or site. Check the exact variant’s dimensions, installation guidance, door position and maintenance access before deciding.
Check height, projections and the base
Check the side view as well as the plan. House eaves, soffits, windows, vents, exterior lights and pipes may project into the passage; fence rails, a leaning panel or a gate can do the same from the other side. The greenhouse roof edge or gutters may extend beyond its base, so compare the full outline with the house and fence rather than checking only the position of its uprights. Measure headroom at the tightest point and note anything that must remain reachable, such as a tap, meter or window that needs to open. Include the height and route of any existing pipework in the drawing.
Include the base or foundation in this check too, as it may define a different outline from the panels above it. The Prestige Greenhouse with Metal Foundation is one catalogue example whose name specifies a metal foundation; that does not show the dimensions of the option you might choose or how it meets your prepared surface. Confirm the selected variant’s base plan and installation requirements. If the design would be fixed to a wall or could affect access to building services, follow the manufacturer’s instructions and get site-specific professional advice where needed.
Trace runoff from both roofs
Map where rainwater goes from the house before placing anything beneath an eave or beside a downpipe. Mark the gutters, downpipes, outlets and places where water collects after rain; an overflow or leaking outlet can send water somewhere different from the intended route. Then consider the greenhouse roof separately. If its runoff would enter the same narrow strip, water may collect near a base, wall, doorway or path. The aim is to understand the existing flow and the space available for it, not to assume that the greenhouse can redirect water safely.
Take photos after rain if you are unsure, and add wet areas and flow direction to the sketch. Keep existing downpipes and drains accessible for inspection and clearing, and avoid covering an outlet with a frame, bench or storage. A paved strip is not necessarily an adequate drainage route just because water disappears during a brief shower. If water already pools against the house, the route is unclear, or runoff from both roofs would enter a confined space, ask a qualified drainage professional to assess a suitable approach for the site.

Record shade across the year
Shade in a narrow passage changes with the position of both buildings and the time of year. Draw the greenhouse outline on a site plan and note shadows cast by the house and fence at different times of day. Repeat the observations in more than one season where possible. Dated photos from the same points can show whether a bright midday visit hides longer periods of shade earlier or later. Include neighbouring structures and trees if their shadows reach the gap, but note each source separately so you can tell what is limiting light.
Relate the shadow map to what you intend to grow and where you would place beds or benches. A sunny roof area does not necessarily mean the whole growing level receives the same pattern of direct light, particularly if a wall or tall fence shades one side. Avoid making a year-round decision from a single summer snapshot or a general rule about greenhouse orientation. The useful result is a realistic record of when the proposed footprint is shaded, so you can judge whether it suits your plants and adjust the layout or location if needed.
Plan the route to the door
Mark the greenhouse entrance on the plan, then draw the route to it from the garden or house. Check whether the door opens into the fence, a wall, a path or the space where you need to stand. Do not assume that a door slides or swings in a particular direction until you have checked the model drawing. Allow for carrying trays and tools through without turning sideways around a sharp corner. If you use a wheelbarrow, hose or watering can, sketch the route with those items in mind rather than judging access by whether one person can squeeze through.
Include the open-door position, not just the closed footprint, and test the route with temporary markers or a full-size outline on the ground. When comparing sizes in the Limited Edition Aluminium Greenhouses range, listed from 3.77 to 28.08 m², draw the entrance for each option you are considering. This lets you compare the approach as well as the growing area. Check that you can reach the handle, open the door and carry a plant tray through without an awkward turn. Consider how the approach works when the ground is wet, too. If access depends on moving a bin or shifting garden furniture each time, count that as a practical constraint.
Plan the usable growing space
External width and usable growing width are different measurements. Frames, base details and fixtures take up space, and the interior may feel narrower once beds, shelves or pots are in place. Use the chosen model’s internal plan where available and draw your layout to scale: show the growing areas, the route needed to reach them, and room to turn or work at the ends. Avoid planning beds right up to every inside edge simply because the outside dimensions fit the gap. If you cannot reach a plant, open a door comfortably or carry out routine work, the advertised floor area will not describe how useful the space is to you.
Try the proposed layout with string, boxes or other temporary markers before ordering. A single planting strip with a clear route may suit a narrow interior better than two crowded beds, but the right arrangement depends on the model’s supports, door placement and your gardening habits. If storage is part of the plan, include its footprint and access as well as the growing area. The Limited Edition Aluminium Greenhouses with Storage range is listed from 5.52 to 28.08 m². Check the exact plan to see how the storage relates to the growing space rather than assuming the listed area is all available for plants.
Allow room for installation and future maintenance
Think about how the greenhouse will get into the passage and how future repairs could be done. The route for components may be narrower than the finished footprint: a gate, steps, a corner or a fixed outdoor fitting can block access from the nearest driveway or garden entrance. Measure the route at its tight points and check what delivery and assembly information is available for the chosen option. Do not assume that a large component can be turned in the gap just because the assembled greenhouse can stand there. Note where parts could be laid out without blocking another access route.
Allow for care of the house and fence as well. You may need to reach house gutters, repair exterior surfaces, open a window, replace a fence panel or clear growth along the boundary. Consider how that work could be carried out with the greenhouse in place, including whether any part of it would need dismantling. The T-Model Orangery Greenhouse page lists variants from 16.52 to 30 m²; for installation planning, you also need the component sizes and assembly access requirements for the exact option. Keep these separate from the space needed for later repairs. Where installation affects building fabric or access to services, get qualified, site-specific advice.

Compare greenhouse types against the site plan
Once the site works on paper, compare a wall-side design and a freestanding design against the same measurements. A lean-to may be relevant when a wall is part of the plan, while a freestanding greenhouse needs its own complete outside outline and the access you expect to use. Neither description guarantees a suitable fit in a narrow passage: the full dimensions, roof projections, door position and installation method matter. If the manufacturer’s instructions describe a connection to a wall, check that the proposed wall is suitable rather than treating any existing wall as a ready-made support.
Use each model’s plan to compare how its shape occupies the passage. The Pyramid Greenhouse is another catalogue design to assess, but a photograph is not a substitute for a dimensioned outline. Place the selected variant’s footprint on your sketch and look at the space left at the ends and along each side. A shape that fits within the boundaries can still leave awkward corners or interrupt the maintenance route. Compare that arrangement with the other options you have drawn, and ask the supplier to clarify any undefined measurements before ruling a design in or out.
Decide whether the gap works in practice
Bring the measurements, shade notes, water routes and access paths together on one drawing. Mark the greenhouse base, roof edge and door-open area separately; show which side you will use for cleaning, where house and fence maintenance still happens, and how rainwater moves. This brings conflicts into view before you buy: a roof projection over a downpipe, a door opening into the only path, or a fence panel that cannot be removed may matter more than the nominal footprint. If a feature cannot be measured confidently, label it as unconfirmed rather than treating an estimate as a clearance.
The Spacious Greenhouse listing spans 47 to 70 m². Use that range to compare overall scale, not to decide whether a variant suits this passage. Make the final choice from the complete site drawing: does it leave useful growing space, a workable entrance and access for upkeep? Resolve any unconfirmed measurements and installation requirements before committing to a variant. If the remaining space does not work, compare a smaller greenhouse or a different internal layout with another part of the garden. A larger listed area is not an advantage if the greenhouse prevents you from using or maintaining the passage.
Frequently asked questions
How wide does the gap need to be for a greenhouse?
There is no single minimum that works for every site. Compare the narrowest measured width with the exact model’s full outside dimensions, including its base and any roof projections, then allow for the access you need. Check the interior plan as well: a greenhouse can fit outside but leave too little usable growing space.
Is a lean-to greenhouse always better between a house and a fence?
No. A lean-to may be worth comparing when the house forms one side of the proposed area, but the exact model, wall and site still need to suit its installation instructions. Check access for cleaning and repairs, the door position and roof runoff; the name alone does not confirm a suitable fit.
How can I tell whether the passage gets enough sun?
Record shadows from the house, fence and any nearby structures at different times of day and in more than one season where possible. Dated photos help show how the pattern changes. Compare the result with what you plan to grow and where beds or benches would sit, rather than relying on one bright visit.
What should I do about water from the house and greenhouse roofs?
Map the gutters, downpipes, outlets and areas where water collects after rain. Check that the greenhouse will not block existing drains or create a problem at a doorway or beside a wall. If water already pools, or you cannot identify a safe route for runoff, ask a qualified drainage professional to assess the site.
Does a greenhouse’s advertised area tell me whether it will fit?
No. Area does not give you the exact outside width, length, height, door position, roof projections or access space. Use a dimensioned plan for the specific size you are considering, then check its internal layout too. The area figure is useful for comparison, not as proof that a model suits the gap.
Judge the gap by the space that remains after the greenhouse, access, upkeep and water routes are all drawn in. If the plan leaves a clear route, useful growing width and access to the house and fence, compare exact variants against it. If it does not, choosing a smaller greenhouse, changing the layout or using another part of the garden is a sound result. A successful fit is one you can use and maintain, not simply one that can be placed there.
