
White Crust on Greenhouse Soil: Finding the Cause
Greenhouse soil and growing media
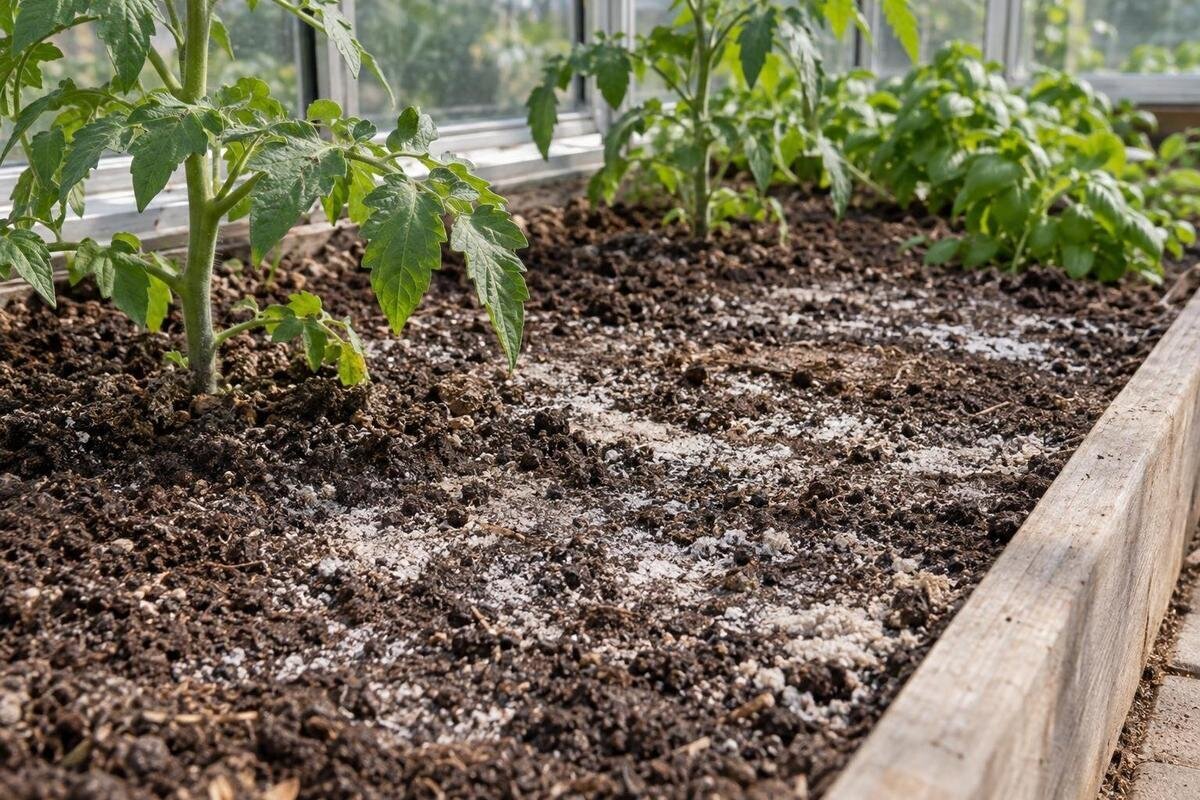
A white crust on greenhouse soil is a useful clue, but it does not identify the material by sight. Fertiliser salts, mineral deposits carried by irrigation water and surface growth can look similar once dry. A reliable diagnosis combines the patch’s location and texture with feeding and watering records, then tests the water and growing medium separately. The aim is not to make the mark disappear as quickly as possible; it is to find what is accumulating, where it comes from and whether it is affecting the root zone. That distinction matters because rinsing or adding an amendment before testing can change the evidence and create another problem.

Why a white crust is not a diagnosis
White or pale crust can be residue left as water evaporates from the surface. The dissolved material may have come from fertiliser, or from minerals already present in irrigation water. These are not the same diagnosis: water-derived scale may be carbonate-rich, while fertiliser residues can contain a mixture of soluble ions. A damp, organic growing medium can also develop pale fungal growth. The materials can look alike after drying, and more than one cause may be present. Colour and location are useful observations, but neither identifies the substance or shows how much is present in the root zone.
Soluble salts matter when they accumulate around roots at a concentration that disrupts normal water and nutrient uptake, but a surface mark alone does not prove that this is happening. A surface without visible deposits does not rule out a build-up lower down either. Leaf-edge browning, weak growth or wilting can have several causes, so treat them as supporting observations rather than a shortcut diagnosis. Avoid adding fertiliser, acid, compost or a salt-removing treatment just because the crust looks white. First record the pattern and inputs, then use tests to decide whether the issue is the water, the growing medium, surface growth or a combination.
Map where the deposit appears
Before scraping, brushing or wetting the deposit, take a dated photo and mark its position on a simple sketch of the bed. Note whether it is spread evenly or concentrated along an edge, around a dripper, under a pot or in one patch. Record whether the material is powdery, hard, gritty, thread-like or slick, and whether the surface underneath is damp. These descriptions help you investigate water delivery, evaporation, fertiliser placement or surface growth as possible explanations, but they are not tests. Mark an apparently unaffected area too, so a later comparison uses the same method and a similar root-zone position.
That sketch is also useful if you are planning separate growing zones in a new greenhouse. The Spacious Greenhouse listing covers 47 to 70 m². Use the full plan for the option you are considering to draw in paths, bed widths and sampling points; the floor-area range alone does not establish a workable arrangement. Label each bed and irrigation line on the sketch so that observations from different zones remain separate. Keep affected and comparison areas clearly marked, including the position of each photograph. A recurring deposit is easier to investigate when you can locate the same patch again rather than relying on a general description.
Use watering and feeding records as evidence
Write down what has been added to the affected area and when: fertiliser type, form, dilution or application rate as recorded, frequency, and whether feed is applied through irrigation. Include changes in water source, watering pattern, growing medium or top-dressing, as well as any spill near the patch. Use product labels and mixing records rather than memory. A new feed or water source shortly before the deposit appeared may support a hypothesis, but does not prove it; residues can take time to show and may persist after a routine changes. Note which crops and zones are affected, while treating plant symptoms as clues rather than proof of salinity.
Keep separate histories for in-ground beds, raised beds, pots and grow bags if they use different media or receive different water or feed. Their results are not interchangeable simply because they are under one roof. If you are planning a mixture of growing systems, the Classic aluminium greenhouse range is listed from 3.77 to 28.08 m². Compare its full plan with your proposed bed-and-container layout, including access to inspect each system. Give each bed or group of pots a label that matches its watering and feeding record. This keeps a deposit on one crop from being mistaken for a problem affecting everything in the greenhouse.
Check the irrigation water before changing it
Test the irrigation water that actually reaches the greenhouse, not only a remembered tap reading or a result from another time. Take a labelled sample before fertiliser is added and, if you add feed through irrigation, a second sample from the line after it is mixed. If water is collected, blended or treated before use, note each source and test the water at the point it enters the growing system. Use clean containers, record the date and keep samples separate. Water with fertiliser already in it cannot tell you what the untreated supply contributes, so do not treat those readings as equivalent.
Electrical conductivity (EC) estimates the total concentration of dissolved ions in water; it does not identify whether they are nutrients, fertiliser salts or scale-forming minerals. If hard, chalky deposits are suspected, ask a testing laboratory what analysis can assess water hardness, alkalinity and relevant ions. A pH reading alone will not answer that question. When planning water access for a new structure, compare the Lean-to Greenhouse options, listed from 3.69 to 14.34 m², with your intended irrigation arrangement. Mark where you would collect untreated water and mixed feed on the full plan, keeping those sampling points clearly distinguished in your records.

Collect a growing-medium sample that answers the question
Do not send only a scraping of the white surface and call it a soil test. A crust sample may help identify a deposit, but it cannot show what is present in the main root zone. Follow the laboratory’s instructions for collecting growing-medium samples, as methods differ with the substrate and the result being sought. Take separately labelled samples from the affected area and an apparently unaffected comparison area, at comparable positions in the root zone. Use clean tools, and do not combine the crust, surface layer and deeper medium into one sample unless the laboratory asks for that. Record recent watering and feeding, which may affect results.
Ask for measurements that answer the question, such as EC and pH, and whether nutrient or water-related analysis is appropriate for the crop and substrate. Results depend on how a sample is extracted, so record the method and compare like with like. A laboratory can interpret findings against crop-specific guidance; do not judge a number from one test method using a threshold from another. For a new bed layout, the Limited Edition Aluminium Greenhouse is listed from 3.77 to 28.08 m². Check the full plan for access to each proposed bed, including its comparison sampling area, rather than planning only around the space occupied by crops.
Separate what EC and pH can tell you
EC is a broad indicator of dissolved ions in a water sample or growing-medium extract. A higher reading in the affected area than in a comparable unaffected sample can support the idea that soluble material has accumulated, particularly if the source water or feeding history fits. It still cannot tell you which ions caused the result or whether the visible deposit is a particular fertiliser salt. Different meters, extraction ratios and laboratory methods can produce results that should not be compared directly. Follow the instrument instructions, use one consistent method and ask a suitable laboratory to interpret uncertain or crop-critical results.
pH answers a different question: whether a sample is acidic or alkaline under that test method. It does not measure total salts, and a normal pH cannot rule out a high EC. Water alkalinity is another measure that can help explain why certain supplies leave carbonate-type deposits over time. Keep the readings together, but do not substitute one for another or adjust pH based only on the crust. If you are planning space for sample preparation alongside beds, the T-Model Orangery Greenhouse range is listed from 16.52 to 30 m². Compare the full plan with the working space and clearances you need; total floor area does not show how that space is distributed.
Look for surface growth and other lookalikes
Surface growth can be a lookalike, especially on organic medium that stays damp. Fine white threads or a soft, cottony patch may be fungal growth; a slick surface film may be algae or another type of growth, while a dry, gritty or hard deposit is more consistent with mineral material. These are visual tendencies, not a reliable identification: growth and salts can coexist, and the surface changes as it dries. Photograph it before disturbing the bed. Do not taste a sample or apply household acid to see what happens; quick tests can be unsafe, inconclusive and may change the evidence.
Pale growth confined to the medium does not prove a plant disease or establish that the root zone is healthy. Check leaves and stems separately, and seek crop-specific advice if the plant itself is affected or the growth spreads quickly. A comparison pot helps only when its medium, watering and position are genuinely comparable. If you are choosing a structure for a combination of pots and beds, the Pyramid Greenhouse listing covers 5.53 to 18.9 m². Use its full plan to mark their intended positions and inspection access. Keep those locations in your observation records so that a difference between pots is not assessed without considering where and how they are grown.
Match the remedy to the test results
If tests support excess soluble salts in the root zone, trace the source before treating the surface. Review feeding concentration and frequency against crop and growing-medium guidance, then check irrigation quality and whether water drains as expected. Do not automatically flood a bed: leaching can carry nutrients away, leave a poorly drained area saturated, and fail to correct salts if the water used adds them too. In-ground beds and container media respond differently, so ask the laboratory to interpret results when the crop or bed is valuable or the evidence is unclear. The aim is to reduce further accumulation, not simply wash off the visible crust.
If the evidence points to water-derived minerals rather than fertiliser salts, investigate the water chemistry before changing soil pH or adding a treatment. If surface growth is more likely, consider whether the medium stays wet for long periods, but change irrigation only within the crop’s needs; removing the visible patch does not identify its cause. For a new greenhouse with equipment storage, the Limited Edition Aluminium Greenhouse with Storage is listed from 5.52 to 28.08 m². Compare its storage and growing-area details with your intended beds, paths and equipment. Include access for inspecting irrigation and drainage in that layout, rather than considering storage space separately from bed maintenance.

Repeat the test after changing one factor
Once you make a change supported by the evidence, change one factor at a time where practical and write down exactly what changed. Keep the water source, feed, watering approach and sample method on the same record as photographs and plant observations. If you alter several inputs together, later improvement cannot tell you which change mattered, while a new deposit may have more than one explanation. Ask the laboratory when a repeat sample will be useful; there is no single interval suited to every medium and crop. Retest the affected zone and comparison zone in the same way, rather than comparing unrelated readings.
Mark repeat sample points on your bed sketch and avoid choosing a new spot each time. If you are planning permanent beds in a new structure, the Prestige Greenhouse listing ranges from 3.77 to 28.08 m². Compare the full plan with your intended bed sizes and paths, and check whether you could return to the same sampling points once crops are in place. Record those points as part of the bed layout, not just in a one-off test note. This planning consideration is not a reason to replace a greenhouse when deposits appear: test results should guide changes to the growing medium or its inputs, not the choice of model.
Keep future checks consistent across the greenhouse
A light monitoring routine can prevent a small deposit becoming a recurring mystery. Take dated photos, mark affected spots, note the water source and any feed changes, and inspect the surface after you alter the routine. Recheck source water when its origin or treatment changes, and use the same test method for before-and-after samples. If you use a meter, follow its calibration and cleaning instructions; if you send samples to a laboratory, keep reports with crop and bed notes. The goal is a comparable record over time, not constant testing without a clear question.
Keep pots and beds as separate diagnostic units. A container has its own medium and drainage, so a surface deposit on one pot should not be used to infer what is happening throughout an in-ground bed; equally, a bed-wide composite can conceal one localised patch. Label containers and sample locations, clean tools between areas, and note whether each receives the same water and feed. If deposits recur despite an evidence-based adjustment, or plant performance declines without a clear explanation, a crop-appropriate laboratory or horticultural adviser can help decide which sample or water analysis is needed next.
Frequently asked questions
Is white crust always fertiliser salt?
No. It may be residue from fertiliser, minerals in irrigation water, or surface growth on organic growing medium. Different causes can look similar once dry, and more than one may be present. Use the pattern and texture as clues, then compare water and growing-medium test results.
Can I rinse the crust off first?
It is better to record and test before rinsing. Removing the visible deposit can make it harder to examine, and flushing a bed may move salts, nutrients or water into other areas. A clean-looking surface would not show whether the root zone still has an issue.
Which test should I use first?
Test the water used for irrigation and a representative growing-medium sample separately. EC gives a broad indication of dissolved ions, but does not identify them. For suspected mineral deposits or unclear results, ask a laboratory what water and substrate analyses suit the crop and growing medium.
Does a high pH prove the deposit is mineral scale?
No. pH describes acidity or alkalinity under the test method; it does not identify a crust or measure total dissolved salts. Water alkalinity and specific water or substrate analyses can provide different clues. Keep the results together, but do not treat one as a substitute for another.
Does white, fuzzy growth mean the plant has a disease?
Not necessarily. Pale, thread-like growth on damp organic medium may be fungal growth, but appearance alone cannot confirm what it is or whether a plant is affected. Check leaves and stems separately. If the plant shows changes or the growth spreads, seek crop-specific horticultural advice.
White deposits become easier to interpret when you separate the visible patch from the source of the material. A dated map, a comparison sample and separate tests of irrigation water and root-zone medium give you a sounder basis than colour alone. When results are clear, adjust the relevant input and repeat the same check. When they are not, preserve the evidence and seek a crop-appropriate analysis rather than treating the bed by guesswork.
