
How to Stop Seedlings Becoming Root-Bound Before Planting
Seedling planning guide
Root-bound seedlings are usually the result of a mismatch: plants fill their cells before the planting place is ready, or the nursery has no room for another potting-on stage. The fix is to plan backwards from a suitable planting window, then match sowing dates, container volume and available greenhouse space to the time each crop is likely to spend indoors. Because growth and planting conditions vary, root checks and a little schedule flexibility matter as much as the calendar.

Greenhouse capacity check 1
Why seedlings become root-bound
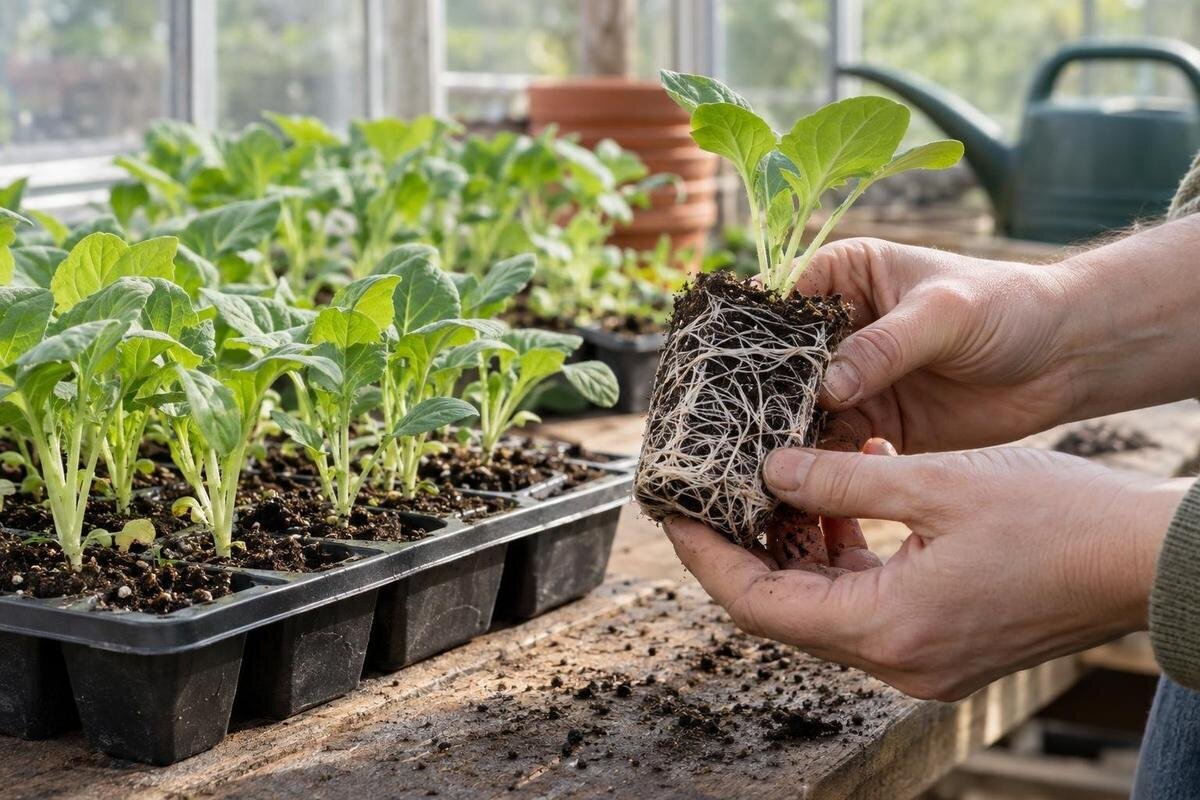
Root-bound describes a seedling whose roots have used most of the available space in a cell or pot and are beginning to circle the sides or form a dense layer at the base. Roots showing at a drainage opening are a clue, not proof: a plug can have visible roots and still contain plenty of loose mix for further growth. When a batch is due for assessment, ease one representative seedling from its container and look at the sides, base and centre of the root ball. The key question is whether roots still have room to extend before the intended planting window.
The usual cause is a mismatch between growth and the time a plant must wait: sowing too early, a delayed planting bed, or a small cell being asked to hold a vigorous seedling for too long. A crowded root ball may dry more quickly or growth may stall, but neither symptom proves root-binding on its own. Check roots alongside the mix and the plant’s overall condition. Nursery capacity matters too. If you are comparing options such as the T-Model Orangery Greenhouse, listed from 16.52 m² to 30 m², first identify why your seedlings are waiting. More space may accommodate a potting-on stage, but it does not correct a sowing date that is too early.
Work back from a suitable planting window
Choose a realistic planting window for each crop, rather than one date for every seedling. Use the seed packet, crop-specific growing guidance and your own records to identify when it can be planted out; account for whether its destination will actually be ready. Work backwards through every stage that occupies nursery space: acclimatising plants, the final pot or cell stage, any earlier potting on, and the time from sowing through germination to a sturdy transplant. Guidance may give a range, so avoid planning around the fastest possible growth. The earliest possible sowing date is not necessarily useful if plants then wait in small cells longer than intended.
Mark both sowing and planting windows and note where batches overlap. If a bed is delayed or conditions hold up planting, seedlings still need their current containers and space. For each week, note which batches will be in trays, which will be in larger pots and which should be ready to leave. This shows when demand is likely to peak. When considering the Pyramid Greenhouse, whose listed sizes range from 5.53 m² to 18.9 m², use that busiest period as the basis for your space plan. Allow some flexibility in the dates rather than assuming one batch will always leave just as the next needs its place.
Greenhouse capacity check 2
Choose cells for the time plants will spend in them
The right starting cell is one that gives the seedling enough room for the time it will spend there, not automatically the largest pot that fits on the bench. Small cells make efficient use of seed-raising mix and bench space when a crop will be moved on promptly; they leave little margin if planting is delayed or growth is fast. A larger cell can provide more room between sowing and the next move, but it also uses more mix and occupies more area from the beginning. Match the choice to crop guidance, growth rate, intended sowing date and the time you can realistically devote to potting on.
Think about the whole sequence, not just the first tray. If seedlings will be potted on once before planting, note the footprint of both containers and how long each stage is likely to last. Keep the tray dimensions and the dimensions of the later pots together in your plan, so a change in container size is not overlooked. If you are considering the Limited Edition Aluminium Greenhouses with Storage, listed from 5.52 m² to 28.08 m², account separately for growing space and stored supplies. Avoid choosing tiny cells solely to fit more seeds if that leaves you with several rushed potting sessions and nowhere to put the larger pots.
Check the root ball, not just the leaves
Look for a root pattern, not one isolated sign. A plug that slides out easily and shows roots across the mix may be ready for normal transplanting without being severely root-bound. More concern is warranted when roots densely circle the outside, form a thick mat at the base, or hold the whole plug in a tight shape with little mix visible. Check a few plants in the same batch where possible; one unusually large seedling may not represent the rest. Looking at more than one plant helps you avoid making a whole-tray decision based on an outlier.
Leaves that yellow, droop or stop growing can accompany a crowded root system, but they can also reflect watering, light, nutrition or other growing conditions. Likewise, mix that dries quickly is a prompt to look more closely, not a diagnosis by itself. Avoid repeatedly pulling seedlings out to inspect them; sample gently as a crop approaches its planned potting-on point, and use crop-specific guidance for expected root behaviour. Record what the root ball looks like, so next time you can act before the whole batch becomes difficult to handle.

Greenhouse capacity check 3
Decide when to pot on
Pot on when the current container is close to being fully occupied and the seedling still has a meaningful wait before planting out. Root circling or a dense base mat makes the choice more urgent; a plant with visible roots but a loose root ball may simply need watching. If the planting window is close and conditions are suitable, another container change may add unnecessary disturbance. The decision depends on the crop, root condition and whether the bed or final growing place is truly ready, not on a fixed number of days after sowing.
Choose the next container to carry the plant through the planned interval, rather than moving every seedling straight into an oversized pot. A very large jump uses more nursery room and can make moisture management less straightforward. Some plants also have particular preferences about root disturbance, so follow crop-specific advice. If only a few seedlings are ahead, pot those on rather than moving the whole tray at once, and keep the groups labelled. Before starting, set out the next containers and check where they will go. If comparing sizes of the Bloomcabin Prestige Greenhouse, listed from 3.77 m² to 28.08 m², include this mixed stage of trays and individual pots rather than assuming every plant changes containers together.
Pot seedlings on with minimal disturbance
Have the new containers, suitable growing mix and labels ready before lifting seedlings, so roots are not left exposed while you search for supplies. Ease each plug out by supporting the root ball; avoid pulling on the stem. If roots are tightly packed, handle them gently and follow the crop’s guidance about whether to loosen them, since root disturbance is not equally suitable for every plant. Set the seedling at the crop-appropriate depth, fill around the roots without hard packing, and water in according to its growing needs.
After potting on, label the crop and sowing batch, then keep it in conditions appropriate to that plant while it re-establishes. Check that the mix is neither drying out nor staying saturated, and avoid treating every species identically. Plan where the finished pots will go before covering the working surface with trays and supplies. The Spacious Greenhouse listing offers areas from 47 m² to 70 m²; when considering that scale, separate the potting workspace from the area where plants will remain. Work through a manageable group, return it to its allocated place, then bring over the next. This keeps newly potted seedlings accessible rather than leaving them crowded around the potting area.
Greenhouse capacity check 4
Calculate the nursery’s peak space requirement
Capacity is the number of plants you can manage at their busiest stage, not the number of seed cells you can sow. For every batch, count how many trays will be occupied at each stage, then allow for the change in footprint when cells become individual pots. Include batches that overlap, older plants you are keeping in the greenhouse, and a margin for seedlings that need to wait. If you count only at sowing, a compact tray plan can turn into a congested nursery as soon as the first potting-on round arrives. Include temporary holding space after potting as well, since those plants still need to be accessible.
Measure the usable bench or shelf surface and place the actual tray footprints on a sketch; leave room to reach, water and move containers, rather than filling every available edge. Keep a clear route and a separate spot for potting work if you use one. The Aluminium Classic Greenhouse listing spans 3.77 m² to 28.08 m²; compare a chosen option’s stated area with your internal layout instead of assuming the full figure is available for seedlings. Recheck the sketch after each planned size change, because the sowing tray and the final pre-plant pots do not occupy the same space.
Stagger sowings to avoid a bench-space bottleneck
Staggering sowings can spread potting work and prevent every seedling reaching its largest container at once. Divide a crop into manageable batches only when doing so still suits the intended planting window and the crop’s guidance; different sowing dates mean different readiness dates, so label each clearly. A succession of small batches is not automatically better if the bed will only be ready for one large planting or if you cannot check each group. The aim is to raise batches you have room to care for and can plant when ready. Judge readiness by each batch’s growth and roots rather than assuming a later sowing will catch up with an earlier one.
Where the greenhouse also holds established plants, seedlings must share the available space, and that allocation can change over the season. Reserve a defined area for each batch and note when it should become available for the next one. For a smaller growing area, such as one of the Lean-to Greenhouse options listed from 3.69 m² to 14.34 m², make the overlap between established plants and seedlings explicit in your plan. Do not count a space as free simply because its current occupants are due to move. If they are still there when the next sowing is planned, postpone or reduce that batch rather than creating another queue of seedlings.

Greenhouse capacity check 5
Keep space for acclimatising and delayed planting
Include acclimatising time in the schedule, because seedlings still occupy containers while they adjust before planting out. Follow crop-specific guidance on how to make that transition; a greenhouse does not remove the need to prepare plants for a change in environment. Keep the plants labelled and grouped by crop or batch, so a ready group does not become mixed with one that needs more time. The area occupied during this stage belongs in your peak-space estimate just as much as the earlier cell trays do.
Do not force a planting date just to clear a bench if the destination is not ready or conditions are unsuitable for that crop. Instead, build a realistic buffer into the timeline and decide what you will do if the delay outlasts the current container: pot on, reduce a later batch, or use another appropriate space. Make that decision while roots still have room, rather than waiting until small cells are crowded. If considering the Limited Edition Aluminium Greenhouses, listed from 3.77 m² to 28.08 m², include a delayed batch in the layout you assess. Identify where its larger pots would go and which later sowing would need to change.
Record what happened and adjust the next sowing
Keep a simple record for each sowing batch: crop, variety if known, sowing date, starting cell size, approximate germination period, potting-on dates and container changes. Add the date you began acclimatising and the date plants were actually planted out, plus any delay and the reason you noted at the time. A note such as ‘roots filled the cell before the planned potting-on date’ is more useful than ‘looked too big’. Record whether roots circled, formed a base mat or still left plenty of mix visible. Include the number of trays or pots at each stage if space was tight, so you can distinguish a container problem from an overcrowded nursery.
At the end of the season, compare root condition with the actual wait to planting. If a batch was crowded well before its intended date, sow later, start in a larger suitable cell, or arrange a potting-on stage sooner, depending on the crop and available room. If plants stayed loose in their cells but filled the greenhouse, the issue may be batch size or overlap rather than container volume. If a bed delay caused the problem, changing cell size alone may simply move the congestion elsewhere. Change one part of the plan at a time, then keep the records that help explain the result.
Frequently asked questions
How can I tell if a seedling is root-bound?
Ease one representative plug from its cell. A dense mass of roots circling the sides or matting at the base, with little loose mix left, suggests the plant is running out of room. A few roots at a drainage hole alone do not prove it.
Should I pot on as soon as roots appear at the bottom?
Not necessarily. Roots appearing at a hole can be normal; check whether the root ball still contains loose mix and how long the plant must wait before planting out. Pot on when roots are close to filling the current container, using crop-specific guidance rather than a fixed root count.
What size pot should I move a seedling into?
There is no single pot size for all seedlings. Match the next container to the crop, the current root ball, expected growth and time until planting. It should bridge the planned interval without using more nursery room than you can manage; check species-specific instructions.
Can I leave a root-bound seedling in its tray until planting day?
If the crop is ready and outdoor conditions and the planting site suit it, planting out may avoid another potting stage. But do not plant early just to free space. If a delay is expected, move the seedling into a suitable larger container and allow for acclimatising.
Will a bigger pot stop seedlings becoming root-bound?
A bigger pot gives roots more room, but it cannot remove the effect of early sowing, delayed planting or limited nursery capacity. Larger containers take up more bench space and need their own care. Choose cell size alongside the sowing schedule and plan for potting on if needed.
Preventing root-bound seedlings is mostly about keeping growth, container volume and planting readiness in step. Set a planting window for each crop, select a cell for the time the seedling is likely to spend in it, then check roots before a dense mat forms. Count space at the largest pre-plant stage and leave room for a delay. After the season, use each batch’s dates and root condition to adjust the next sowing, rather than relying on a calendar that did not match what happened.
