
Straight-Sided or Curved-Wall Greenhouse: Which Has More Usable Space?
Greenhouse planning
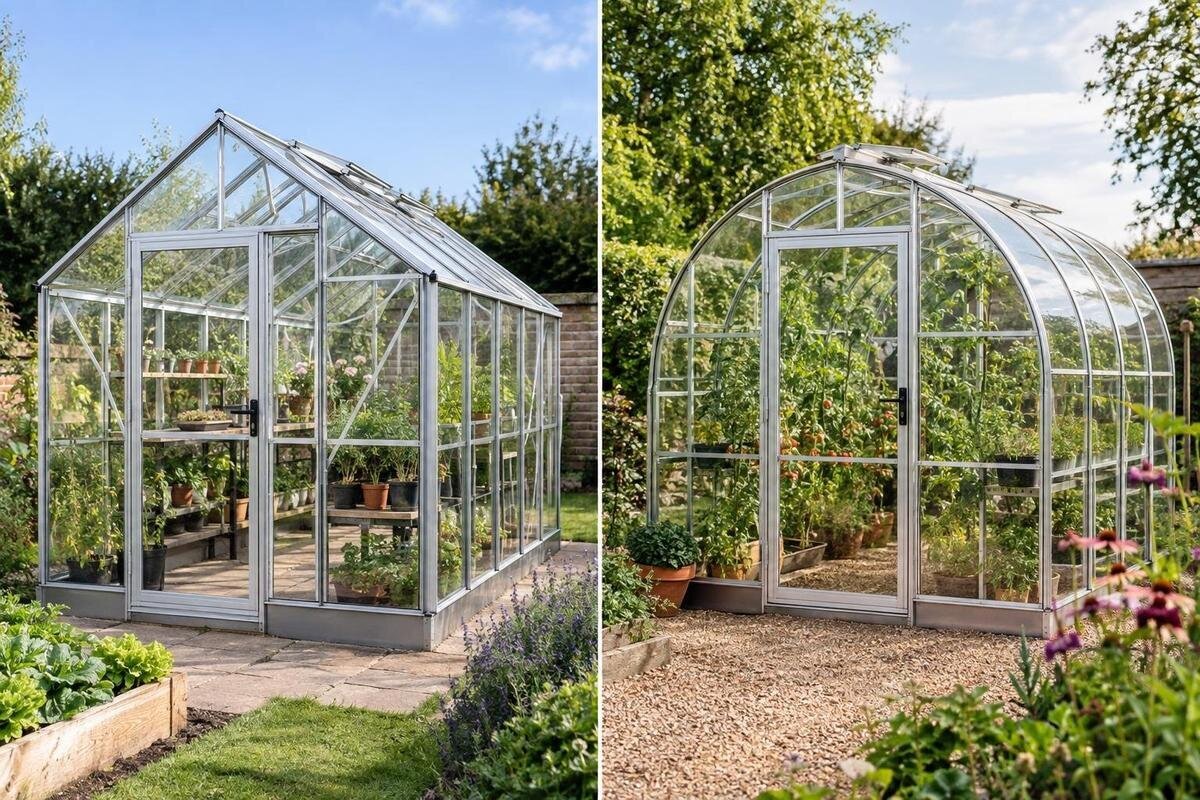
A greenhouse can cover the same floor area as another and still offer quite different places to stand, work or grow plants. The important difference is often around the perimeter: a vertical side can retain useful height beside the floor, while a curved wall may bring the roof closer to a bench or crop as it approaches the ground. Neither outline is automatically better. Compare clear internal dimensions and cross-sections, then place your actual benches, shelves, plants and aisle on the drawing. That shows whether the space you pay for suits your routine.

Floor area, headroom and growing space
Floor area describes the horizontal footprint, not how much of the greenhouse has a particular height above it. A low edge under a curve still covers floor and can hold a tray, pot or low plant; it may simply be unsuitable for a tall bench, a person working close to the wall or a mature plant with broad foliage. Separate clear floor area, standing or working headroom, and growing space at the height a crop needs. One practical measure is how much of the perimeter retains the clearance you actually need. These measures answer different questions, so none can be read reliably from an area figure alone.
Compare the same internal footprint and overall width wherever possible. Check whether a stated area describes the exterior or the usable floor inside, and whether posts, framing or a base reduce the clear space. Catalogue sizes can help narrow your options, but they do not show the height above a particular part of the floor. The T-Model Orangery Greenhouse range is listed from 16.52 m² to 30 m², for example; that area range does not tell you whether a bench will fit beneath the side wall. Treat square metres as the beginning of the comparison, not its conclusion.
A cross-section shows where headroom changes
A cross-section is a vertical slice across the greenhouse, showing its outline from the floor to the roof. In a straight-sided design, the wall remains vertical up to the eaves before the roof changes direction, leaving a strip beside the wall with consistent height up to that point. In a curved profile, the side or roof bends down, so clearance can fall as you move out from the centre. A curved greenhouse may also have a straight lower wall or raised base; the label alone does not tell you where the curve starts. A straight-sided design does not necessarily have a flat roof, either, so compare the whole outline.
On the drawing, locate the finished floor, inside face of the wall, eaves or roof transition, ridge and any frame members. Then check the height at several floor positions, especially where a bench’s back and front edges would sit. Use internal clear dimensions: outside width can include the frame and says little about the space between uprights. If the Pyramid Greenhouse is on your shortlist, compare its section with the other profiles at those same positions. A photograph can make slopes and depth difficult to judge, whereas a section lets you see which parts of your proposed layout sit beneath the lower roof.
Straight sides can make the perimeter easier to plan
A vertical wall gives you a predictable strip of height beside the floor, which can be useful for a long bench, staging or a row of pots. You can choose a bench depth and height, then check the clearance above it without a sloping wall coming in over the work surface. That can make it easier to keep a consistent bench height along a side. The run may still be interrupted by a door, post, vent or brace, so check the length of uninterrupted wall as well as the cross-section. A clear-looking side view does not guarantee a clear run in the finished layout.
Measure from the finished floor to the nearest obstruction at the back and front edges of the proposed bench, not just at the wall or ridge. Consider the person working there too: headroom, room to reach across a tray and access for watering can make a bench technically possible but awkward in practice. When considering the Limited Edition Aluminium Greenhouses with Storage, mark the storage area separately from the bench run on your plan. Use the side elevation to locate openings or framing along that run, then distinguish space occupied by storage from space where you can stand and work.
Curved walls make bench clearance vary by position
Where a wall curves towards the floor, the space above a bench changes with both its depth and its distance from the wall. A narrow shelf may fit below the curve, while a deeper bench placed against the side could leave less clearance above its back edge than its front. This does not make the whole perimeter unusable: low seed trays, pots or storage may suit a lower-clearance area better than a standing-height work surface. You could move a bench inwards or choose a shallower one, but either change affects the available aisle or planting space. Check the actual dimensions rather than labelling an entire edge as usable or wasted.
Trace the bench footprint on the floor plan, then check its top and back against the cross-section. Leave room to work without leaning into the frame or roof, and do not assume that glazing or structural members are suitable fixing points. A short vertical wall or raised base can change the clearance considerably, so confirm those details for the chosen configuration. Include the Prestige Greenhouse in this comparison by drawing the same bench in each candidate’s section. Keeping the bench dimensions unchanged helps you see whether a difference in clearance comes from the wall profile or from moving the furniture.

Shelf space depends on height as well as depth
Shelving takes up floor space at its base, but every upper tier needs clearance at its own height. Along a curved wall, the available space can narrow on higher levels, so a rack that fits at floor level may not sit neatly beneath the roof or leave room for pots above. With a vertical wall, repeated shelf depths may be easier to plan, although windows, doors, uprights and braces still affect where a unit can go. Check that you can reach the plants and the back of each shelf; a tier that fits on paper may be awkward to use if the curve leaves little room to lean in.
Draw each shelf as a footprint on the plan and as horizontal lines on the cross-section. Check the space above every tier, the position of its back edge and the room left in front for access. A freestanding rack can be moved away from the wall, but it uses some of the aisle; use fixed shelving only where the structure’s instructions allow. If you are considering the Spacious Greenhouse, work out the useful shelf levels for your chosen layout rather than estimating them from total floor area. Count only tiers that leave room for the pots and plants you intend to place on them and that you can comfortably reach.
Place tall plants where their full growth will fit
Plants need room for their mature height, not just the space they occupy when first planted. Allow for the container or bed, expected growth and any stake or trellis you plan to use, as well as room to reach the leaves or harvest. A plant on a bench starts higher above the floor, and broad foliage may spread towards the wall even if its stem is centred. A straight side can provide more continuous headroom around the edge; a curved profile often places more headroom towards the centre. These are useful tendencies, not rules for every design or crop. Check the plant’s expected space against the inside profile at its actual growing position.
Compare the expected height and spread of each plant with the clear space above and around it. If tall crops will grow in a central bed, lower perimeter areas may still work for seedlings or smaller pots. If you want a tall row beside a side wall, the available edge height may matter more than extra height at the ridge. For a layout in the Aluminium Greenhouses range, mark the intended crop positions before comparing sizes. Include the height of containers or benches in those marks, and check any limits on where plant supports can be placed. This keeps the comparison tied to your planting arrangement.
Keep the aisle and access to plants clear
An edge can fit a pot yet still be uncomfortable to use as a route. Draw the aisle at floor level and include the benches, pots and plant spread you expect, rather than planning around an empty structure. Then check head and shoulder clearance wherever someone will pass close to a sloping side. Make sure you can reach plants without stepping across a bed or brushing against foliage. A curve does not automatically take floor area away from the aisle, but changing headroom can affect how comfortably you move along a route near the perimeter, particularly as plants grow.
Check the route from the doorway to the central bed or bench, including the swing of any inward-opening door, stored trays and room to turn with a bucket or seedling tray. Compare clear internal width rather than nominal footprint, and check the places where framing or planting could narrow the route. When assessing a Lean-to Greenhouse, draw the access route into the layout rather than treating it as whatever space remains after placing benches. Mark temporary outlines on the ground and walk the route with the items you regularly carry. That can reveal awkward turns or reaches before you commit to permanent benching.
Compare the exact dimensions, not the model label
Ask for a cross-section for the size and configuration you are considering, rather than relying on a marketing image or plan view. Use the finished floor as a common starting point and note the internal width, side or eaves height, ridge height, door opening and positions of posts, braces, vents and framing. Compare similar widths and lengths where possible. If one structure is taller or wider, separate the effect of that extra size from the effect of its wall profile; otherwise, you are comparing two decisions at once. Product names and overall area are not measurements of perimeter clearance.
Mark the proposed bench top, shelf tiers, crop heights and clear aisle on each drawing. A simple table can record height at the wall, at the bench back, at its front edge and along the route; keep units consistent and note whether dimensions are internal or external. If your shortlist includes the Limited Edition Aluminium Greenhouses options, give each size or configuration its own column rather than treating the range as one set of measurements. Record missing dimensions as unknown instead of filling them in from a photograph. Ask the seller for those measurements so that your comparison uses the same information for every option.

Match the wall profile to how you grow
Straight sides may suit a layout that depends on using a long edge at bench or plant height. Repeated work surfaces, taller crops along the walls or accessible shelving can make that vertical strip valuable. A curved profile may work well when the main growing area is central, the perimeter is reserved for low pots or trays, and the working route stays clear of the lower sides. These are tendencies rather than guarantees: a curved structure with useful vertical lower walls will offer different edge clearance from one where the curve reaches almost to the floor.
Think through a typical week in the greenhouse rather than judging an empty interior. Where will you pot up, water, prune, move plants, store trays and stand while working? Which spots need full height, and which need only floor space? If you want a continuous side bench, compare the uninterrupted clear height and length along each side. If the priority is an open central bed, check the width and headroom above it. The more useful profile is the one that puts clearance where your routine needs it, not necessarily the one with the largest-looking roof.
Test the layout before choosing
Make a scale plan from the internal floor dimensions and draw in the benches, shelves, beds, door swing and aisle. Check each item against the cross-section as well, so that floor space is not mistaken for clear headroom. If drawings are difficult to compare, use masking tape to mark the layout on the ground or make a simple side template. Include the depth of the equipment and the room needed to reach it. An outline of the outer footprint alone will not show whether the roof crowds a shelf or the edge of a bench.
Compare the profiles against the same short list: clear bench length, useful shelf levels, height above the crops you plan to grow and a comfortable route to each working area. Keep those measures separate rather than turning them into a single invented figure for usable space; floor beneath low headroom may work for one purpose and not another. If one design offers more room at the centre but less at the sides, decide which positions matter most in your garden. A layout-based comparison makes that trade-off clearer than silhouette or headline area.
Frequently asked questions
Does a straight-sided greenhouse always have more usable space?
No. It often offers more consistent headroom around the perimeter where the walls remain vertical, but the result depends on side height, roof profile, width and framing. Compare the sections for the exact models and sizes.
Does a curved wall reduce the greenhouse’s floor area?
Not necessarily. The curve changes the height above different parts of the footprint; it does not automatically remove floor area. It may, however, limit where you can comfortably place tall plants, shelving or a working bench.
Where should I measure usable edge height?
Measure from the inside finished floor where a bench, shelf or plant will sit to the nearest obstruction above it. Check the back and front edges of a bench, as well as any posts or framing nearby.
Can I put shelves against a curved greenhouse wall?
Possibly, if the shelf depth and each tier’s height fit the curve and any fixing points are suitable for the structure. Higher shelves may need to be shallower or set further in; allow room to reach them and keep the aisle clear.
Which wall profile is better for tall plants?
It depends on where the plants will grow. Straight sides can retain more height near the edge, while a curved profile often has more headroom towards the centre. Check expected plant and support height at each planned position.
Straight-sided greenhouses often provide more consistent headroom around the perimeter when their walls remain vertical to a useful height. A curved profile can still offer a practical central growing area and suit low planting or a central bench, but its edge clearance needs careful checking. Compare the internal sections for the exact sizes, then test the benches, shelves, plants and route you intend to use. That is the reliable way to choose by usable space rather than appearance or headline floor area.
