
When to Prick Out Seedlings into Larger Pots
Seedling propagation guide
Seedlings do not need to reach a particular age before you move them. The most useful signal is a combination of leaf development and root growth, with crowding indicating how soon you need to act. For many crops, the first true leaves mark the practical window for pricking out, but individual sowing, species-specific root sensitivity and uneven growth can all change the decision.

01
What pricking out means
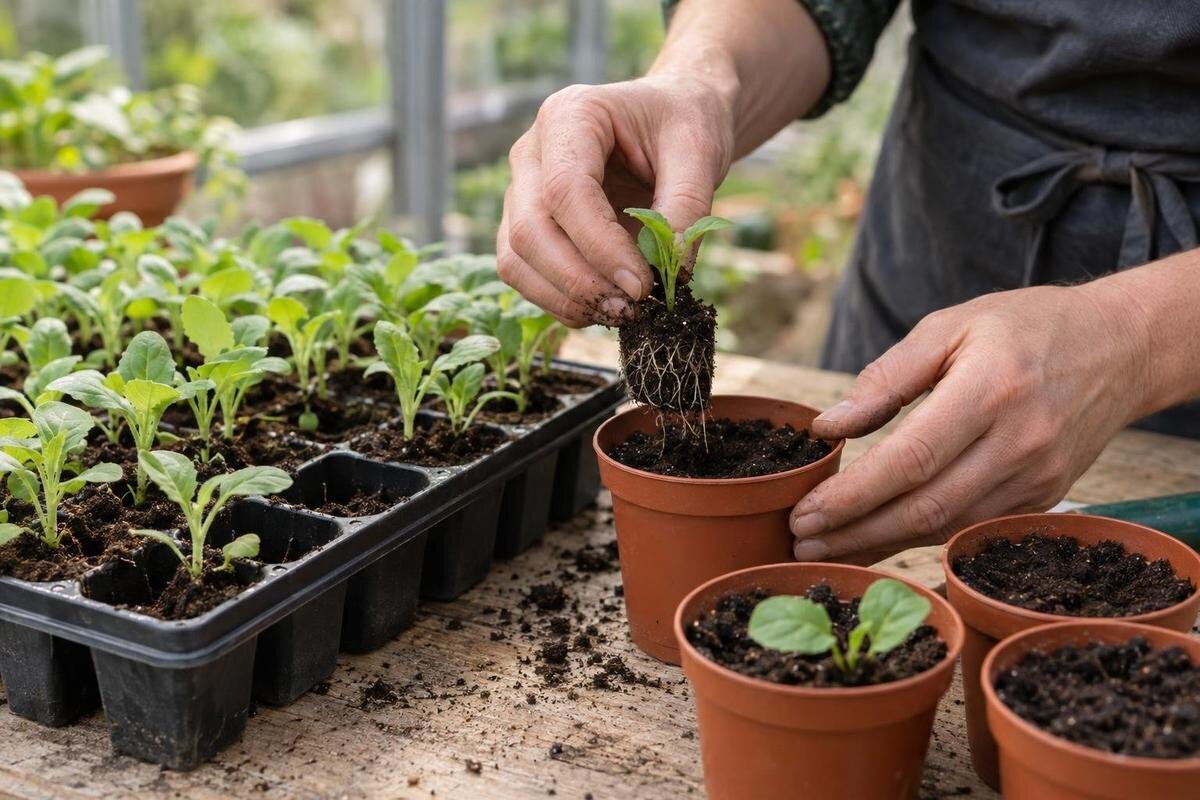
Pricking out means lifting individual seedlings from a shared seed tray or crowded sowing container and giving each one its own cell or small pot. You separate them while they are still small, rather than letting neighbouring roots knit together into a dense mass. The receiving container does not need to be the plant’s final pot; it only needs enough room for the next stage of growth. If you want just one plant from several seedlings in a spot, thinning may be simpler than transplanting every extra. Pricking out keeps chosen seedlings to grow on; thinning removes the surplus.
Potting on is a later move: a seedling already growing in its own cell or pot goes into a larger one when the current container is becoming restrictive. Gardeners sometimes use the terms loosely, but the distinction helps you choose the right job. A seedling sown singly in a module normally skips pricking out and stays there until later signs justify potting on. Some seedlings need one move, some may need both, and others can remain in their container until they are ready for their next planting stage. Moving a plant simply because it has reached a particular age can add handling without solving a real space problem.
True leaves provide the main timing cue
At germination, seedlings first show cotyledons, often called seed leaves. The true leaf or leaves appear afterwards and begin to show the plant’s usual foliage shape; the first set may be quite small. For many crops, an opened first true leaf is a useful point to consider pricking out: the seedling has moved beyond emergence but is still manageable. Wait until you can see and handle that growth clearly, rather than moving a barely emerged shoot just because it looks crowded from above. Cotyledons can look similar across different plants, so they are not as useful for judging the crop’s development.
Treat this as a stage cue, not a universal rule. Some seedlings are easier to move at a particular crop-specific stage, and growth rates vary with conditions. Check trays regularly as they approach this point; if germination was uneven, some seedlings may be ready while others need longer. You can prick out the ready plants individually rather than holding the whole batch to one date. Keep the remaining seedlings undisturbed and check them again later. A sowing date is useful for keeping records, but it cannot tell you on its own whether each plant is ready.
02
What root growth can tell you
In cell trays or modules, fine roots visible at the drainage holes or along the edge of a plug support the leaf-stage cue. A seedling may lift with a little mix held around its roots, suggesting the root system has begun to occupy the cell. Avoid pulling on the stem to test this: roots may not yet be visible below even when the seedling is ready, while one or two roots at a hole do not necessarily mean it has run out of room. In a communal tray, roots are harder to inspect without disturbing plants, so rely more on leaf development and crowding.
A dense mat of roots, strong circling or several seedlings’ roots woven together can mean you have left separation late. Deal with those plants gently rather than trying to pull the root mass apart in one go. Distinguish between a plug that holds together around one seedling and a tangled mass joining several plants: the first can make handling easier, while the second makes separation more difficult. When several trays are involved, allow room to set them down while you inspect them. The Spacious Greenhouse is listed with floor-area options from 47 to 70 m², but you will need the selected layout to work out actual bench space and access. Floor area alone does not show how many plugs you can handle comfortably. Keep a tray supported while examining its drainage holes, and avoid repeatedly lifting the same seedling just to see whether its roots have developed further.
Crowding means it is time to inspect the tray
Crowding is a reason to take a closer look, not an automatic instruction to transplant every seedling. Leaves may overlap, seedlings may be difficult to reach, and roots can begin competing for the same small area. A leaf brushing a neighbour is not enough on its own to set a deadline; check whether the seedlings have true leaves, whether they can still be separated and how much room remains around them. A tall or leaning seedling is not, by itself, proof that it is ready to prick out.
If the seedlings have reached a suitable stage, move the plants you want to keep before their roots become harder to separate. If they are too young to handle, thinning may be the gentler way to reduce numbers when you do not need to save each one. Decide how many plants you intend to grow on before filling the receiving pots; a crowded tray does not oblige you to keep every seedling. Work through the accessible plants first rather than reaching across delicate shoots to collect a particular one. For a run of seed trays, the Aluminium Classic Greenhouse is listed in floor-area options from 3.77 to 28.08 m². When considering a layout, think about whether you can reach the middle of a tray without leaning over neighbouring plants. That access matters during selective pricking out, when some seedlings move and others remain in place.

03
Allow for crop differences and seedling condition
The first true leaves are a broad guide, not a replacement for crop-specific advice. Some plants are less forgiving of root disturbance, while others are commonly moved at a small seedling stage. If the growing guidance for a crop recommends sowing it individually or avoiding root disturbance, follow that instruction instead of applying a general rule. For mixed plantings, label each batch with the crop and sowing date so you can check its requirements before moving it; similar-looking young seedlings can be easy to mix up.
Choose seedlings that look sound and have an intact growing point and roots you can handle. Pricking out does not correct poor growth or damage, and a weak seedling may not benefit from being moved before it can recover. Compare seedlings within the same crop rather than assuming that the largest plant in a mixed tray is the most advanced. If several crops are at different stages, keep their trays clearly labelled and separate while you work. Move one labelled group at a time so that a plant’s identity does not depend on recognising its leaves afterwards. For this kind of batch organisation, the Lean-to Greenhouse is listed in floor-area options from 3.69 to 14.34 m². Consider where the trays awaiting attention and those already completed would sit, with labels visible and no need to shuffle unfinished batches together.
Prepare pots and a clear work area first
Choose clean cells or small pots with drainage holes and enough room for the seedling’s roots to spread at this stage. A container several times larger than the root system can leave a lot of mix around a small plant, making moisture harder to judge. Use fresh mix suited to young plants, moisten it before filling and settle it lightly without packing it hard. Have labels ready before you begin, especially if you are moving more than one crop or variety. Preparing the receiving containers first means lifted seedlings spend less time exposed while you look for a pot or try to identify a batch.
Water the original tray so its mix is evenly damp, not saturated; dry mix tends to crumble away from roots, while soggy mix is harder to handle. Put the source tray, filled pots, labels and dibber within reach, and work in small groups so each seedling can be planted promptly. Reused containers should be clean before you start. Make the planting holes before lifting the first group, then check that the receiving pots are stable and easy to reach. This avoids holding a seedling in the air while trying to prepare its new container with your other hand. If you are planning a permanent work area, the Limited Edition Aluminium Greenhouse has listed floor-area options from 3.77 to 28.08 m². Allow a clear working surface for this sequence, rather than filling every available spot with waiting trays. Keep labels beside the corresponding pots until the plants are settled.
04
How to lift and separate seedlings
Slide a dibber, narrow plant label or similar tool underneath the seedling’s roots, lifting from below rather than tugging upwards. Hold the plant by a leaf as you work; a stem is easily bruised or crushed between your fingers. Support the root plug where possible so the roots and some surrounding mix stay together. If several seedlings are growing close in a shared tray, loosen the soil around the group first, then lift one at a time. Keeping the mix slightly moist makes it easier to free roots without shaking or scraping them unnecessarily.
Separate neighbouring roots slowly with the dibber or your fingers, taking care not to pull plants apart by their stems. Keep roots covered with mix or out of direct sun while you work, and plant each seedling before moving on to a large batch. If roots are tightly interwoven, avoid forcing a clean separation at the cost of badly tearing the plants. Loosen a small part of the group, check which roots belong to the seedling you are supporting, and continue only while they come free gently. Do not strip away all the mix simply to produce bare, tidy-looking roots. A clear route between the source tray and the pots helps you transfer seedlings without carrying them over other plants. The T-Model Orangery Greenhouse is listed with floor-area options from 16.52 to 30 m²; consider the working position within the selected plan, including where you will stand or sit while handling the plants.
Planting depth and root position
Make a hole deep enough for the roots to point downwards without folding back on themselves. Lower the seedling into the hole by its leaf and position it at about the same depth at which it was growing in the tray, unless crop-specific guidance calls for a different planting depth. Keep the growing point and leaves clear of the mix. If a seedling is planted too shallowly, its roots may be exposed; planted too deeply, its growing point may be buried. Use the plant’s existing position as your reference rather than setting every crop at an identical depth.
Draw mix around the roots and press lightly so the seedling stands upright, without compressing the medium into a hard plug. Water gently to settle the mix and bring it into contact with the roots; there is no need to flood the pot. Look again after watering: the seedling should remain upright, with its leaves and growing point clear of the surface. If the mix has settled unevenly, adjust it gently rather than repeatedly lifting and replanting the seedling. Keep each plant in its own cell or pot and retain its label. Allow room for the newly filled containers to sit without being knocked or crowded by other trays. The Pyramid Greenhouse is listed in floor-area options from 5.53 to 18.9 m². When arranging finished pots, leave their edges accessible so you can move a container by the pot rather than accidentally catching its seedling.

05
Aftercare for newly pricked-out seedlings
After planting, keep the mix evenly moist rather than letting it dry out or remain waterlogged. Place the new pots in a bright, sheltered spot while roots settle, avoiding harsh direct sun or a dry draught immediately after handling. Greenhouse conditions can change, so check the plants and the mix rather than following a fixed watering schedule. If you are moving trays between areas, avoid a sudden change from the conditions in which the seedlings have been growing. The aim is steady conditions while the roots make contact with the new mix, not extra feeding or repeated handling.
A little temporary drooping can follow root disturbance, but do not assume that every wilted plant simply needs more water. Check whether the mix is too dry or too wet and whether the seedling is sitting firmly at the right depth. Compare the affected pot with others in the batch before watering them all: each container needs attention according to its condition, not just because a neighbouring plant looks limp. Keep the newly potted batch accessible for observation, and avoid disturbing roots again merely to check progress. The Limited Edition Aluminium Greenhouse with Storage is listed with floor-area options from 5.52 to 28.08 m². In the selected layout, identify a place where you can see the recovering plants clearly and reach individual pots. Keep that batch identifiable until you can assess how it has settled after the move.
Keep a record of each batch
Record the crop, sowing date and the stage at which you pricked it out. A brief note about the first true leaves, root condition and degree of crowding will help you judge the next batch more accurately than a calendar date alone. If one sowing produces seedlings at different rates, note that too; future trays may still vary, but your records show which signs were useful for that crop in your conditions. Keep labels with plants through the move so you can match the record to the right pots.
After the move, add a brief follow-up note about how the batch settled. Record whether the seedlings were straightforward to separate or whether tangled roots made the work difficult. This gives the original timing note a useful outcome: you can distinguish a stage that worked well from one that left you struggling to free the plants. If only part of a tray was ready, record which group moved and leave the original label with the remaining seedlings. Your notes may also show that several batches become ready together, so allow for source trays and newly filled pots to be present at the same time. The Prestige Greenhouse is listed with floor-area options from 3.77 to 28.08 m². Use the selected layout to assess that temporary overlap, while keeping the record focused on the seedlings’ development rather than treating a previous pricking-out date as a fixed deadline.
Frequently asked questions
How many true leaves should a seedling have before pricking out?
For many crops, the first true leaf or pair is a useful cue, provided the seedling can be lifted without crushing it. Check root growth and follow crop-specific guidance, as there is no universal leaf count.
Can I prick out seedlings before their true leaves appear?
Usually it is easier to wait until a true leaf has opened, when the seedling is more developed and easier to handle. Follow specific guidance for the crop if it recommends a different stage.
Should I move a seedling as soon as roots show through the tray?
Not necessarily. A few roots at a drainage hole are one clue, not a deadline. Consider the leaf stage, how readily the plug holds together and whether the seedling is becoming crowded.
Can I put a small seedling straight into a much larger pot?
A cell or modest pot with room for the next stage is usually easier to manage. A large volume of mix around a small root system can stay wet for longer, so choose a container suited to the seedling.
What should I do if seedlings have tangled roots?
Keep the mix slightly moist and loosen it gradually with a dibber or your fingers. Avoid pulling seedlings apart by their stems; separate those you can lift gently and use crop-specific guidance for the rest.
Use the leaves to judge development, the roots to confirm that a seedling can be lifted, and the tray’s density to decide how promptly to act. Move plants that are ready without waiting for a universal date, and handle them by a leaf while keeping their roots protected. With crop-specific guidance and a few notes from each batch, it becomes easier to recognise the right stage before seedlings become difficult to separate.
