
Why Greenhouse Seedlings Become Long and Leggy
Seedling troubleshooting
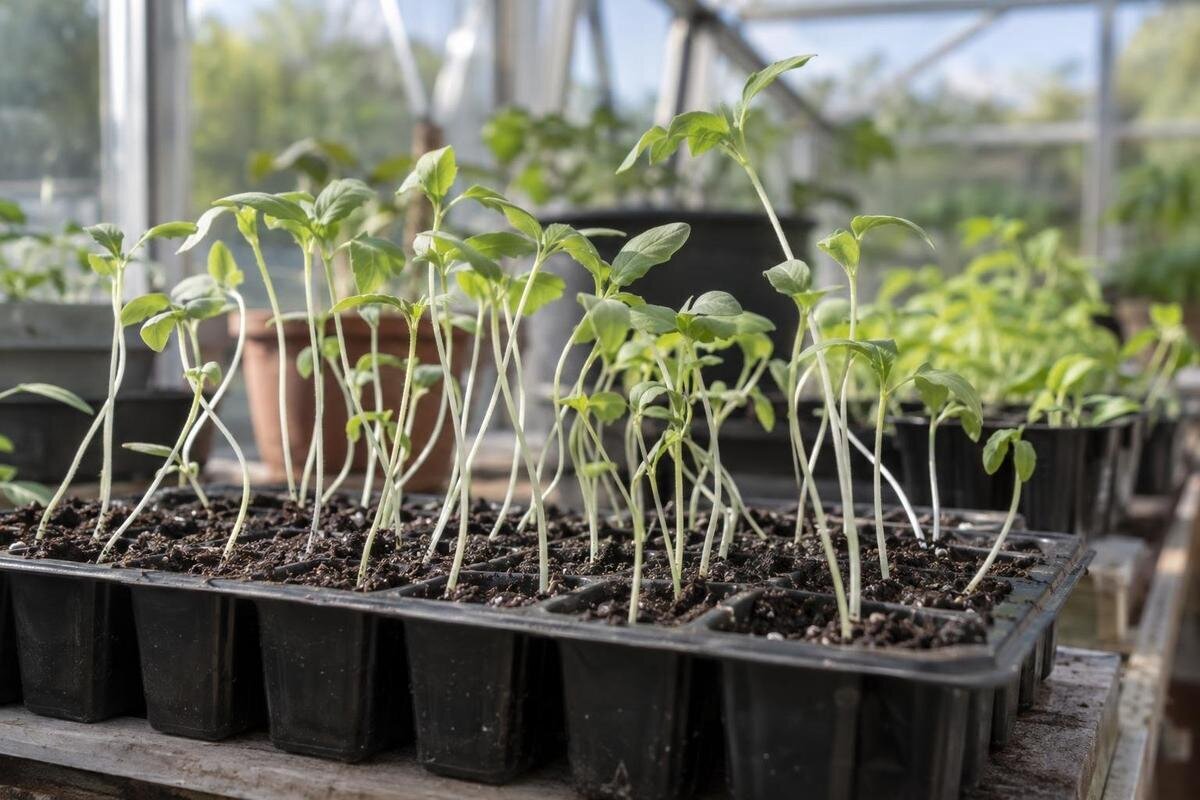
Greenhouse seedlings that develop long, thin stems are giving you a clue, not a complete diagnosis. Too little usable light for the warmth available is a common cause; crowded trays can make the problem worse. Check how growth varies across the tray, what reaches the leaves, temperatures after germination and the seedlings' stage before changing conditions. Some stretched plants can grow on successfully, while others are too weak to recover. The best response depends on the crop and on whether it has only just emerged or is already forming true leaves.

How to recognise leggy seedlings
Leggy is a description, not a diagnosis. Look for a stem that is unusually long and thin for that crop, with long gaps between leaves, a tendency to lean or flop, or leaves that seem small or pale. Compare seedlings of the same type and age: some plants naturally have a taller, more open shape than others. The concern is a change in proportion, where the stem extends faster than it can support the leaves and the seedling is not building compact new growth. Note whether the long section is below the first leaves or whether the spaces between newer leaves are also lengthening. That distinction gives you a useful starting point for monitoring: record what already looks stretched, then compare the growth that develops after you adjust conditions. Height alone is less useful than the seedling's overall shape and ability to support itself.
Look at the pattern across the tray. If most seedlings are stretched in a similar way, conditions may be affecting the whole batch. If only one side leans, light may be stronger from that direction; if seedlings at the edges are sturdier, the centre may be more crowded or shaded. Compare different crops too, as one species may be affected while another looks normal. Stems that collapse or develop lesions at soil level need a separate assessment rather than being treated as light stretch alone.
Check light at seedling height
Light is one of the first things to investigate, particularly when seedlings are warm and growing quickly. A greenhouse can feel bright to you while still providing too little useful light for plants. The amount reaching a leaf depends on intensity, duration and direction, as well as shading from nearby structures, plants, frames or covers. A warm germination spot is not automatically the right place for seedlings once they emerge; many crops need brighter conditions during active growth.
Observe the tray where the leaves sit, rather than judging light from the doorway or roof. Check where shadows fall at different times of day over several days, and note whether seedlings are leaning towards one side. Move trays to a brighter suitable position if you can, and turn them when growth is unevenly directional. Turning a tray can even up exposure, but it does not make a dim position brighter. If you use a grow light, follow its instructions: suitable distance and timing depend on the equipment and crop. Avoid moving seedlings from low light straight into intense direct sun.
Map shade across the greenhouse
Light can vary considerably between benches and even across one bench. Greenhouse framing, shade cloth, shelves, hanging plants and nearby buildings or trees may cast shadows at different times. A tray may receive morning light but sit in shade for the rest of the day, or be shaded by another crop as it grows. Make a simple map of where direct light and shade fall, then check it again when the sun angle changes or you move equipment.
Use your shade map when deciding where benches and storage should go. The Limited Edition Aluminium Greenhouses with Storage listing gives an area range from 5.52 m² to 28.08 m², but an area figure cannot show where shadows will fall at your site. Mark possible tray positions on your map, including any shelving or taller plants nearby. Then compare those positions during the hours when you would normally leave seedlings there, rather than choosing a spot from one bright moment. If you already have a greenhouse, try rearranging the objects that shade a tray before assuming the whole structure needs changing. Keep the map simple enough to update as crops grow: a bench that was clear when you sowed may become shaded later. This makes the light check specific to your seedlings rather than to the greenhouse's overall size.
Balance warmth with available light
Warmth can speed up growth, so seedlings may stretch quickly when temperatures are high but light is limited. Germination conditions and post-emergence conditions are not always the same: many crops benefit from warmth while sprouting, then need a brighter or less warm setting as they grow. Use crop-specific guidance rather than applying one temperature rule to every seedling. A greenhouse can also warm rapidly in sun, while temperatures may change again after the sun goes down.
Measure conditions near the seedlings, not up at the roof, and note both daytime and overnight patterns if possible. Record whether a cover or heat mat is in use so you can compare like with like. Ventilate appropriately when the space overheats, while avoiding sudden cold draughts. If trays have added warmth, check whether the crop still needs it after emergence rather than leaving the germination setup unchanged. When comparing structures, the Bloomcabin Prestige Greenhouse listing covers areas from 3.77 m² to 28.08 m²; those figures do not describe temperature performance. Keep your temperature observations separate from your size comparison. A useful note records the tray position, the conditions you found and the adjustment you made. You can then assess whether subsequent growth looks stronger instead of relying on how warm the greenhouse feels when you briefly step inside.

Give crowded trays more room
Seedlings sown too thickly can compete for light and space. Leaves overlap, lower growth becomes shaded, and stems may lengthen as plants grow towards the light. Even when seedlings were initially spaced well, crowding can develop as their first true leaves appear. Thin or separate them at the stage recommended for the crop, taking care not to damage the seedlings you intend to keep. In individual cells, keep the strongest plant where appropriate rather than allowing several to compete in one cell.
Allow for seedlings taking up more room as they develop, not just for the space occupied by newly sown trays. The Spacious Greenhouse listing gives an area range of 47–70 m², but tray capacity depends on the benches, paths and working space you arrange within it. Sketch the layout with both the initial trays and the pots you expect to use later. Include somewhere to place plants temporarily while you thin or separate them, so the remaining trays do not have to be pushed together. Check whether leaves from neighbouring trays would overlap even when the containers themselves fit neatly. Count the batches you raise at the same time, rather than the total number you sow over a season. This gives you a more useful space requirement and helps prevent a well-spaced sowing from becoming a crowded group of young plants.
Check watering and feeding
Poor watering can weaken seedlings, but it is not usually the only explanation for long, thin stems. A very dry mix can cause wilting, while persistently wet conditions can impair roots and leave plants weak. Check the moisture in the growing medium rather than relying on the surface alone, and follow crop-specific watering advice. Excess fertiliser will not compensate for low light; too much feed, particularly nitrogen, can encourage soft growth. Use a suitable seed-raising mix and feed only when the crop and its stage call for it.
Access matters when watering needs vary across a batch. You need to be able to inspect the growing medium in individual cells, see any standing water and reach the back of a bench without damaging neighbouring seedlings. For a size comparison, the Aluminium Greenhouses listing includes area options from 3.77 m² to 28.08 m². Work out your watering route separately: where will you stand, which trays will you need to move, and where can you put them while checking the others? Avoid an arrangement in which only the front row gets a close inspection and the rest receive water by habit. Keep feeding notes alongside watering observations so you do not mistake a change in routine for a response to improved light. These checks help you assess the whole batch without treating extra water or fertiliser as a remedy for stretching.
Improve conditions for seedlings that can still grow on
For recently emerged seedlings, correct the growing conditions promptly but avoid a harsh change. Move them to a brighter suitable position, reduce excess warmth where crop guidance supports it, and separate crowded trays. Keep moisture steady and monitor how the plants respond. A sudden move into very strong light can scorch seedlings accustomed to shade, so increase exposure gradually if the change is substantial. If only one area of a tray is affected, rearranging the trays may help, but first check whether the light or temperature differs across the space.
A separate monitoring spot can make weak seedlings easier to follow, provided it does not recreate the shade or crowding that caused concern. Label the affected batch and note its condition before moving it. Compare new leaves and stem growth over subsequent checks, rather than expecting an immediate change in the existing long stem. If you are considering a different growing space, the Lean-to Greenhouse listing gives area options from 3.69 m² to 14.34 m². Assess the proposed tray position and bench arrangement at the actual site; the listed area cannot establish the light available there. Decide how you would keep recovering seedlings visible and separate from taller plants as both grow. A monitoring spot should make comparison easier, not become a permanent holding area where weak plants are left unchecked or moved repeatedly without a clear reason.
Choose recovery steps by plant stage
Very young seedlings may respond well when light, warmth and spacing are corrected, provided their stems and growing points are intact. The elongated part will remain elongated; look instead for healthy leaves and more compact growth above it. As seedlings develop true leaves, they may need more room or individual pots, but the right timing depends on the species. Handle them gently and avoid trying to straighten or shorten a fragile stem by force. If roots or stems are badly damaged, that individual may not recover even after conditions improve. Assess plants individually before deciding whether to keep the entire batch. A seedling with a long stem but continuing healthy growth presents a different decision from one that has collapsed or stopped developing. Keep track of those differences so your recovery assessment reflects each plant's progress, rather than simply whether it was tall when you first noticed the problem.
Potting depth also varies by crop. Some plants, including tomatoes, can tolerate being potted more deeply to support a stretched stem, but that approach is not suitable for every species. Follow crop-specific instructions rather than burying all leggy seedlings to the same level. Before potting, group seedlings by crop and stage so you can make the appropriate decision for each group. Have their next growing position ready as well: moving them into individual pots will not resolve unsuitable light or warmth. If you are comparing space for this work, the Limited Edition Aluminium Greenhouses listing gives a range from 3.77 m² to 28.08 m². Plan both a clear surface for handling plants and somewhere for the finished pots. That distinction helps you judge the arrangement you need, rather than treating the greenhouse's total area as available potting space.

Prevent stretching in the next sowing
Use the crop's recommended sowing time and post-emergence conditions instead of sowing early simply because a greenhouse is available. If young plants emerge before a bright growing position is ready, they may spend too long warm and short of light. Sow a manageable number, label each batch and move seedlings from germination conditions when the crop guidance calls for it. Staggered sowings can also make it easier to keep trays spaced and avoid placing every plant in the brightest available spot at once.
Keep a brief record of emergence dates, tray position, crowding and temperature observations. Include when you moved seedlings out of their germination setup and what their subsequent growth looked like. If the next batch stretches, compare those notes with the previous one and adjust the likely limiting condition rather than adding fertiliser or watering more by default. For planning growing space, the T-Model Orangery Greenhouse listing gives an area range of 16.52 m² to 30 m². Pair your space comparison with a simple sowing calendar showing which batches will share the greenhouse. Mark when each batch is likely to need more room, using the guidance for that crop. This helps you see potential overlaps before sowing. A schedule based only on empty tray space at the start can overlook the larger plants that will still be there when the next batch emerges.
Plan a propagation area you can manage
A useful propagation space is one where you can see the seedlings, reach every tray and adjust their position as they grow. Before arranging it, consider the crops you raise, how many trays you need at one time, where light falls, and whether taller plants or equipment will shade them. Leave room to move trays and care for seedlings without stacking them into a darker corner. A greenhouse creates a protected growing space, but it does not guarantee enough light or the right temperature; those conditions still need to be checked where the plants are.
Bring these checks together in a layout based on your busiest propagation period. The Pyramid Greenhouse listing gives an area range from 5.53 m² to 18.9 m². Use the published area as an initial comparison, then check the dimensions and usable arrangement for your intended setup rather than assuming that the model name establishes suitability. On your plan, distinguish places for newly emerged seedlings, larger young plants and temporary working space. Check that moving a batch between those places will not put it behind taller foliage or into an inaccessible corner. If the arrangement becomes crowded, reconsider the number of simultaneous sowings rather than simply filling another shelf. The aim is a space you can observe and adjust throughout development. That makes it easier to notice stretching early and connect it with the light, warmth or spacing at a particular tray.
Frequently asked questions
How can I tell whether light or temperature is the main cause?
A one-sided lean often points to light coming more strongly from one direction; evenly stretched growth can indicate generally low light, excess warmth, crowding or a combination. Compare seedlings across the tray and record temperatures where the leaves are. These clues narrow the possibilities, but they do not identify a cause on their own.
How much grow light should seedlings receive?
There is no single setting that suits every crop, growth stage and light. Follow crop-specific guidance and the instructions for the grow light you use. Look for steady, compact new growth rather than relying on a universal number of hours or a distance that may not suit your equipment.
Will a leggy seedling recover?
It may. The stretched part of the stem will not shorten, but a healthy growing point can produce stronger new growth after conditions improve. How well it recovers depends on the species, the extent of stretching and whether the stem or roots have been damaged.
Should I bury the long stem when potting up?
Only when that crop tolerates it. Some plants, including tomatoes, can be potted more deeply, while other seedlings may be harmed if their stems or crowns are buried. Check the recommended potting depth for the species instead of using one method for every tray.
Do I need to discard the whole tray?
Not necessarily. Keep seedlings with healthy growing points and stems that can support them, while improving conditions for the whole batch. If some have collapsed, become damaged or stopped growing, assess those individually; collapse or lesions at soil level may point to a problem other than stretching.
Leggy seedlings are best assessed by looking at the whole growing setup: light at leaf level, warmth after emergence and space between plants. Correct the conditions that are limiting the crop, then judge recovery by the quality of new growth rather than expecting an elongated stem to shorten. With crop-specific care and a closer look at the next batch, stretching is often easier to prevent than to fix.
