
Seedlings Collapsing in the Greenhouse: Recognizing Damping Off
Seedling health
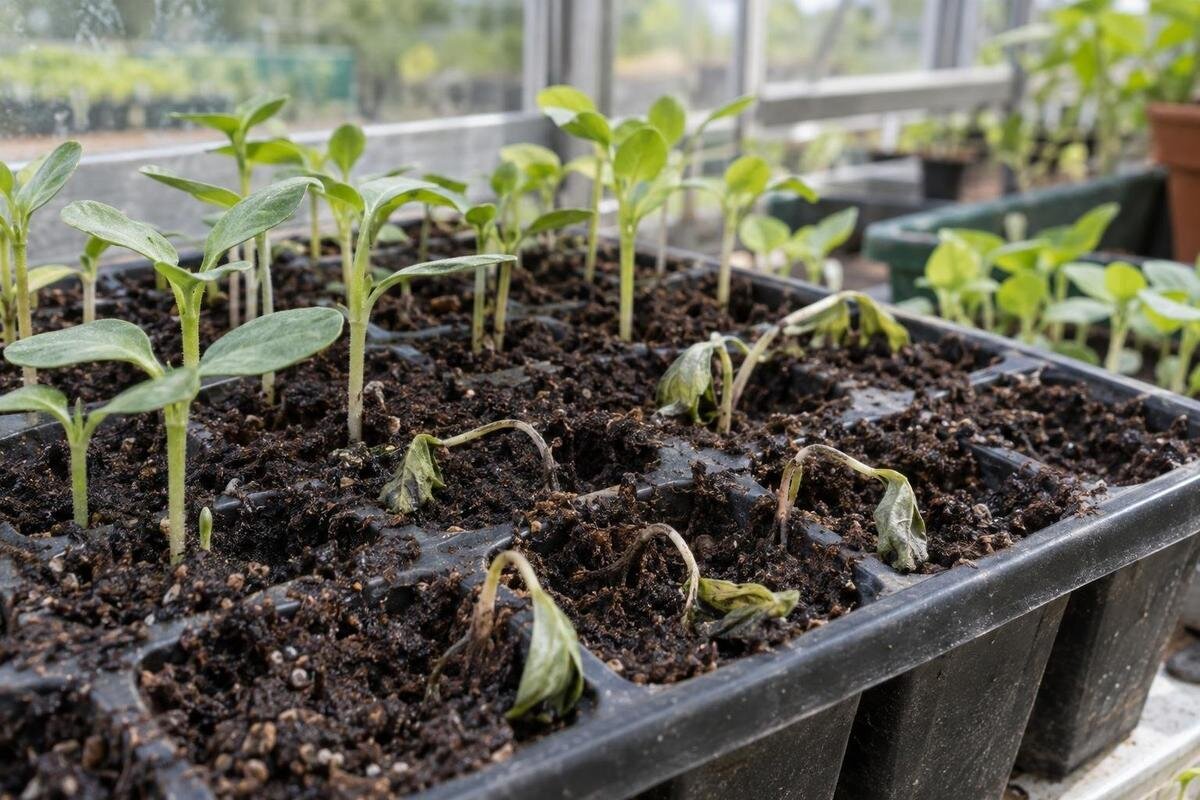
Seedlings that suddenly wilt, pinch at the soil line, and topple may be affected by damping off, a group of seedling diseases linked to soilborne pathogens. Yet collapse alone does not identify the cause: dry cells, saturated mix, root injury, and environmental stress can look similar. Check stem bases, roots, and the pattern across trays before treating an entire greenhouse as affected. Clean propagation routines reduce opportunities for disease to spread; recurring or widespread losses may warrant confirmation by a plant diagnostic lab or extension specialist.

Before choosing a greenhouse 1
What damping off looks like
The clearest post-emergence warning is a narrow, darkened or water-soaked area on the stem where it meets the growing medium. The stem can look pinched or threadlike there, then bend as the upper part loses support. A seedling may wilt and fall even though the mix is moist because damaged roots and stem tissue cannot move water normally. Examine the base of an affected seedling and, if you remove it, inspect its roots rather than judging only by the leaves. Soft, discolored roots add to the concern, but neither root color nor collapse alone confirms damping off. Note whether several plants show the same basal change; avoid pulling healthy seedlings just to inspect them. A long, thin stem with no basal lesion may point to a different problem.
Before emergence, a seed or newly germinated sprout may decay below the surface, leaving empty cells or gaps along a row. Those gaps can also result from old or nonviable seed, sowing too deep, uneven moisture, or conditions unsuited to the crop, so missing seedlings alone are not a diagnosis. After emergence, losses may appear singly or in small clusters; healthy neighbors do not rule a disease out, and a whole tray failing does not prove one. Note the stage when losses started and whether the stem base is affected. A tray map and close-up photos are more useful than a general note that seedlings just disappeared.
Symptoms that can point to other problems
Wilt is common to many kinds of stress. Cells that dried out, roots damaged during handling, heat or cold swings, standing water, or a stem broken while moving a tray can all leave a plant limp. Excessively tall, weak stems may topple without the water-soaked pinch associated with damping off; surface mold or algae on mix is also not, by itself, evidence that the seedling disease is present. Damping off describes a pattern caused by several soilborne organisms, including fungi and fungus-like organisms, whose signs overlap. A dark base increases suspicion, but timing, growing conditions, and other evidence still matter. More than one problem can occur at once, too: overly wet mix can stress roots while a disease is also present.
Ask for specialist confirmation when losses recur in clean batches, spread rapidly, affect a large or valuable sowing, or remain unexplained after you correct obvious watering and hygiene issues. In the United States, a local Cooperative Extension office, university plant diagnostic lab, or qualified plant-health professional can advise on testing. Contact the lab before submitting anything; its requirements for fresh tissue, roots, medium, photos, and packaging can differ. Keep a newly symptomatic seedling available if practical, but do not send material unrequested. Share the crop, seed lot, sowing date, medium source, watering routine, and a simple map of affected cells or trays. These details can help distinguish disease from a wider environmental stress.
Before choosing a greenhouse 2
Map the pattern before changing conditions
Before you discard everything or change several conditions at once, locate each failure. Mark the tray, row, shelf, and date; note whether affected seedlings came from the same seed packet, mix bag, sowing session, or watering event. Compare them with healthy trays of the same crop and age. A cluster near one tray edge is worth comparing with drainage, splashing, or proximity to a door; failures across separate benches may direct your attention elsewhere. These patterns are clues, not proof: water, temperature, media, handling, and pathogens can overlap. Take photos from the same angle and write down changes, including a vent adjustment or an unusually bright day, while details are fresh.
Keep the map even if all trays remain in place: it provides a record of whether later losses occur in the same location or within the same batch. If you're already comparing greenhouse space, the Prestige Greenhouse range lists available sizes from 40.6 to 302 square feet. Use listed area as a scale reference, not a seed-tray count: usable bench space, access aisles, and separation between batches depend on your own layout. Sketch work surfaces and watering routes, and mark where each labeled batch would sit. This makes it easier to connect observations with particular trays rather than reporting that seedlings throughout the greenhouse are failing. More square footage does not identify a pathogen or prevent damping off.
Separate suspect trays and remove affected seedlings
Once you spot a suspect tray, reduce the chance of carrying wet mix or plant debris to healthy seedlings. Work with healthy batches first and the suspect area last, or set it aside on a washable surface away from clean supplies if space allows. Avoid splashing water from one tray into another, sharing runoff, or setting a used tool on the clean bench. Mark the tray and keep its label with it. If there is no separate location, designate a spot for the suspect tray, stop moving it among benches, and clean any surface it previously occupied. Wash your hands after handling affected plants, and clean tools or change gloves before returning to healthy seedlings. Separation reduces opportunities for transfer while you investigate; it does not identify the organism.
Remove seedlings that have collapsed or show a basal lesion, taking the affected plant and root system gently rather than pulling through neighboring cells. Bag the plant and its surrounding mix for disposal according to local waste guidance; do not put suspect mix back into seed-starting stock or reuse it for another tray. Clean reusable flats before their next batch. If you're comparing expansion options after finding no way to keep batches apart, the large backyard greenhouse models are listed from 506 to 753 square feet. That area range is not an isolation feature; plan actual bench zones and paths instead of assuming a larger floor area separates clean and suspect trays.
Before choosing a greenhouse 3
Clean trays, tools, and greenhouse surfaces
Scrub visible soil and plant fragments off trays, tools, and benches before sanitizing; disinfectant is less dependable when organic material remains. Wash with water and a suitable detergent, then use a product labeled for the surface and follow its contact time, dilution, and rinsing directions. Check compatibility with the tray material, and never mix cleaning products. Include cell corners, tray bottoms, bench edges, hand tools, watering-can outlets, and spots where runoff collects. A quick wipe of the visible top is not the same as cleaning the surfaces that touched contaminated medium or splash. Let cleaned items dry as directed before putting them back into use.
Keep cleaned items apart from used trays and debris while they dry, then store them where they will not pick up soil or splash before the next sowing. If the greenhouse layout is being reconsidered to make this sequence practical, the Classic greenhouse range lists models from 40.6 to 302.3 square feet. Compare that overall scale with the space needed for washing, drying, tray movement, and clear access. Measure the trays you actually use, including their rims, so the drying area can hold them without stacking wet surfaces together. Confirm the dimensions of the proposed work area before choosing a configuration. A simple checklist can help everyone clean the same contact points between batches.
Use fresh growing media and clean containers
Use fresh, commercially packaged seed-starting mix for new sowings, especially after a suspected outbreak. Do not return mix from a diseased or unexplained tray to the bag, and avoid using garden soil in propagation cells; its texture and microbial load are not controlled for that purpose. Choose clean containers with open drainage holes, and remove stuck roots and residue from any tray being reused. Do not cover old medium with a thin layer of fresh mix and assume the lower portion is clean. Follow the seed packet or crop-specific instructions for sowing depth, since seed buried too deeply may emerge weakly or not at all and mimic a disease-related gap.
Set up a filling area apart from dirty returns: use a clean scoop, fill trays without placing them on the floor or a used bench, and store the mix as its package directs. Overcrowding can make seedlings harder to inspect and keep the canopy damp; sow only what you can space and monitor. If choosing a greenhouse is part of providing a dedicated filling area, the Lean-To Greenhouse options list sizes from 40 to 154 square feet. Compare the listed area with the space needed for a work surface, filled trays, and a clear route between them; the model label does not tell you how that workflow fits.
Before choosing a greenhouse 4
Manage moisture without saturating the mix
Keep the medium evenly moist enough for the crop to germinate, but do not leave it saturated or let trays sit continuously in drainage water. Requirements differ by seed and stage, so inspect the actual cells instead of following a fixed daily schedule. Greenhouse conditions can change drying speed: sun and warm air may dry the surface quickly while the cell core stays wet. Check below the surface and lift a tray to judge its weight if that helps you assess moisture without disturbing roots. Drainage holes cannot do their job if a flat sits in a full catch tray for hours; empty excess water after watering. Checking at a consistent time can make changes easier to notice without turning that check into a watering rule.
Use clean water and a method that wets the mix without washing seed or seedlings out. If you bottom-water, use a clean reservoir or tray for that batch, let the mix draw up what it needs, and remove remaining water rather than sharing it among unrelated trays. If watering from above, keep the flow gentle and avoid splashing from suspect plants toward healthy ones. Check that you can reach the back rows well enough to assess their moisture and empty catch trays without spilling onto another batch. For a space comparison, the Limited Edition aluminum greenhouse range is listed from 40.6 to 302 square feet. Use your tray and bench measurements to assess access within a proposed layout, and identify where drained water will be collected.
Support air exchange at seedling height
Moist air and persistently wet foliage are not a diagnosis, but stagnant air can slow drying and contribute to a favorable environment for some damping-off pathogens. Provide appropriate air exchange for the crop and greenhouse conditions, avoid packing trays tightly together, and check the space at seedling height rather than relying only on a reading near the roof. At the same time, do not expose young seedlings to sudden cold drafts or a harsh blast of air to dry them out. Aim for a stable growing environment within the needs of the species; temperature and humidity preferences are not identical across crops or pathogens.
Watch where condensation collects and whether trays near the center, glazing, or a vent behave differently, then adjust spacing or ventilation gradually and record what changed. Compare trays of the same crop and age so differences in growth stage do not obscure the observations. When assessing a greenhouse for this setup, the T-Model Greenhouse page lists sizes from 178 to 323 square feet. Confirm the actual ventilation details and the locations of openings relative to your intended benches; listed floor area does not provide that information. Once the layout is in use, check temperature and air conditions at crop level in more than one position. A reading beside an opening may not represent the conditions around trays farther inside.
Before choosing a greenhouse 5
Plan capacity around usable bench space
Count the space occupied by actual trays, not just the greenhouse floor. Include room to reach each tray, label it, remove it for inspection, and water it without brushing neighboring foliage or knocking over cells. Leave a practical path for moving flats, and decide in advance where a suspect batch can go without crossing clean supplies. When sowings overlap, list how many batches will be growing at once and reserve bench space for the longest stay; a new batch should not force older seedlings into a crowded corner. This layout exposes a capacity problem before crowded trays are mistaken for a disease problem.
If a new structure is under consideration, draw the benches and aisles before estimating how many trays fit. The Pyramid Greenhouse sizes are listed from 60 to 203 square feet, but product area is not the same as usable bench area. Account for access, reach, watering routes, and space to keep clean and suspect trays apart; confirm the dimensions and layout details for a particular configuration. Include the space needed to lift a tray off the bench and carry it through the aisle, not just its footprint while stationary. If the drawing leaves no room to handle a tray without crossing another batch, reduce simultaneous sowings or revise the plan. The goal is a layout that supports inspection without unnecessary handling of neighboring plants.
Reset between batches and keep useful records
After a suspect batch is removed, restart with a clean tray and fresh medium rather than immediately sowing into the same setup. Clean and dry reusable items, remove plant debris, and keep new seed packets, labels, and clean scoops away from dirty returns. Record the crop, cultivar if known, seed lot, sowing date, mix source, watering, and where each tray sat. Apply those basic hygiene measures throughout the reset; do not leave suspect equipment in use just to test whether it caused the problem. For other adjustments, such as watering frequency or bench position, record what changed and when. If losses return, those notes help an extension specialist or lab compare the new batch with the previous one.
Storage can help keep supplies organized only if the intended space is suitable and kept separate from used trays, damp debris, and cleaning chemicals. The greenhouse model with built-in storage is listed in sizes from 59.4 to 302 square feet, but the product name alone does not tell you what the storage is designed to hold or how it is separated from growing space. Check those details before assigning it to seed packets, tools, or records. Whatever the structure, keep a simple tray map and dated photos; they let you compare the next sowing with this one instead of relying on memory.
Frequently asked questions
Can a seedling recover after it falls over?
If the stem is pinched or damaged at the soil line, the seedling is unlikely to regain support. Remove it and inspect nearby plants. A limp seedling with an intact stem may instead be reacting to dry mix, excess water, heat, or root disturbance.
Does mold on the growing medium mean damping off?
No. Surface mold or algae can indicate persistent moisture, but it does not confirm damping off. Look for damage at the stem base or roots, compare other seedlings, and seek a diagnostic opinion if losses continue.
Can damping off spread to other trays?
Some pathogens can move in contaminated mix, plant debris, splashed water, or on tools. Keep suspect trays separate where possible, handle healthy batches first, and avoid sharing runoff or unclean equipment.
Can I reuse potting mix from an affected tray?
Do not return suspect mix to your seed-starting supply or use it for another tray. Pathogens may not be visible in the medium. Start again with fresh mix and clean containers.
Will replacing my greenhouse solve the problem?
Not by itself. Damping off is linked to pathogens, susceptible seedlings, and growing conditions; a new structure does not replace clean equipment, suitable moisture, and good tray management. First identify a practical problem with the current setup.
Use collapse as a reason to inspect, not as a diagnosis. A pinched stem base, damaged roots, and losses that recur across a batch raise suspicion, while tray maps, moisture notes, and clean handling help narrow the possibilities. Remove suspect material, reset with fresh media and clean equipment, and avoid carrying runoff between trays. If the pattern keeps returning or the cause will change a larger growing plan, a plant diagnostic lab can give a more dependable answer than trial-and-error changes to the greenhouse.
