
Drip Lines vs. Soaker Hoses in Greenhouse Beds
Greenhouse irrigation
Greenhouse beds make irrigation differences visible. The soil may look wet near a supply point while the far end stays dry, or the surface may be damp while roots below are not. Drip lines and soaker hoses both put water near the ground, but they release it differently and respond differently to pressure, water quality, and routine care. Choosing between them means matching the delivery pattern to the bed layout, checking that the water source can supply the planned run, and deciding what you are willing to inspect and clean.

How drip lines and soaker hoses release water
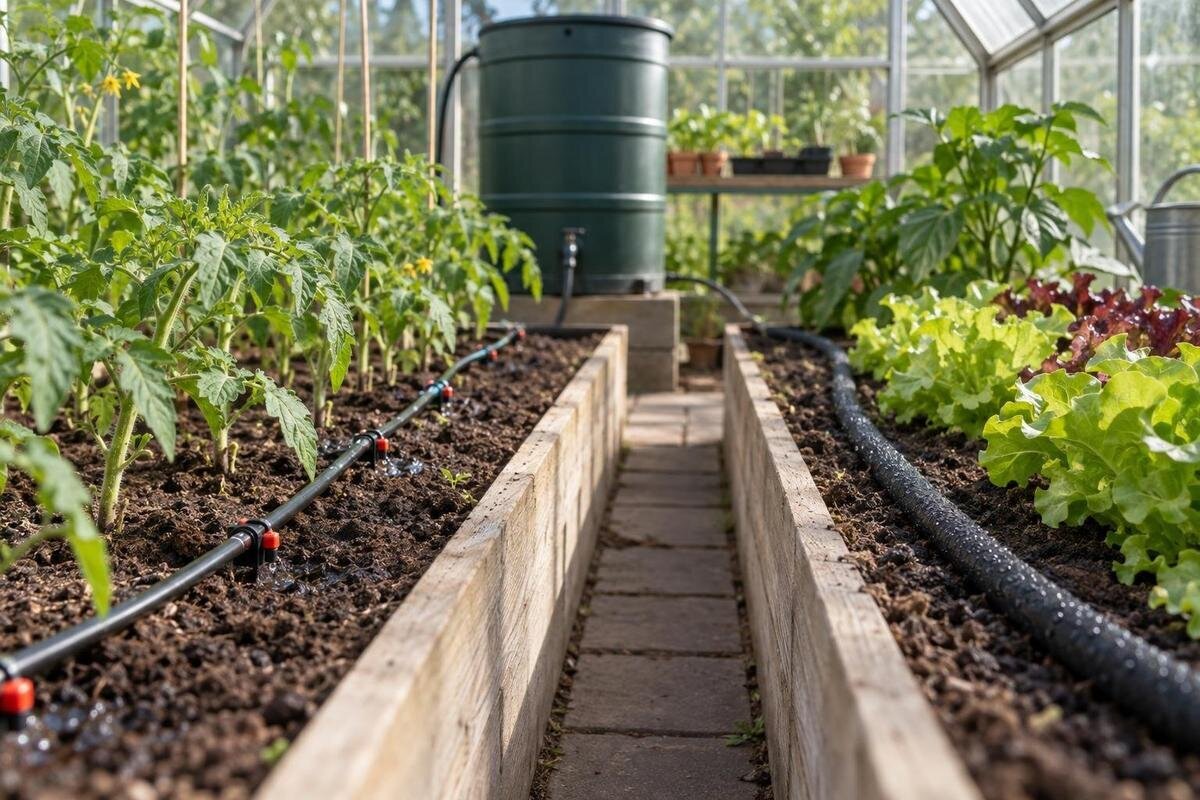
A drip line is tubing with emitters that release water at set intervals along a bed. Another form of drip irrigation uses plain supply tubing fitted with separate emitters, allowing more control over outlet positions. These arrangements are not interchangeable, so check what a seller means by “drip line.” Water exits at distinct points, then spreads through the surrounding soil. That makes it possible to position outlets in relation to plants, but spacing that is too wide for young or closely planted roots can leave dry soil between wet spots. Check the specified outlet spacing, flow, tubing diameter, and allowed run length for the exact product.
A soaker hose releases water through a permeable wall along much of its length. It can create a continuous, narrow wetting zone rather than a series of distinct drops, although continuous does not mean equal output at every point or moisture across the whole bed. The hose needs to follow the planted row closely; a loop placed between beds may water soil that does not need it. Both systems apply water near the soil and can work in greenhouse beds when their operating pressure, connections, and route suit the installation. In either case, the visible wet area on the surface may not show how far moisture has spread below.
Measure each bed run before buying tubing
Start with a plan of the actual growing beds, not just the greenhouse’s overall footprint. Mark each bed’s length and width, planting rows, paths, doorways, and the water-entry point. Note turns and branches: the tubing route can be longer than the bed itself, and separate runs may behave differently from one continuous line. Record where fittings, valves, and line ends could remain accessible. This sketch helps estimate how much tubing is needed and reveals whether one run is being asked to serve beds of very different lengths.
If you are also choosing a structure, the Limited Edition greenhouse with built-in storage offers a useful reason to plan growing and storage areas together. Its listing gives a size range from 59.4 to 302 square feet, not the dimensions of individual beds. On the selected floor plan, reserve space for stored tools and supplies before drawing the irrigation route. Distinguish the non-emitting supply tubing that carries water to a bed from the drip line or soaker hose that waters it. This prevents an estimate from treating every foot of tubing as a watering surface. Include the distance to each bed inlet, plus the connections needed to reach it, and keep those connections accessible rather than placing them behind storage.
Uniformity depends on the whole line
Even when the outlet spacing and total line length look suitable, discharge can differ from one end of a bed to the other. Water loses pressure as it moves through tubing and fittings; long runs, small tubing, extra branches, elevation changes, or several lines running at once can affect the pressure available at outlets. The size of that effect depends on the product and installation, so a level greenhouse does not guarantee equal output. Pressure-compensating emitters can improve consistency only within their specified operating range; they cannot correct a blocked filter or an undersized supply.
Pay attention to distribution along the entire route, not just the stated output of one outlet. When comparing layouts for the Large backyard greenhouse, consider several shorter bed runs as well as one long route. Its listed range of 506 to 753 square feet leaves the irrigation layout to be determined from the selected floor plan. Shorter runs can help keep a design within the irrigation maker’s limits, but opening all of them together still places a combined demand on the supply. Ask whether an emitter’s rated flow applies at your measured operating pressure and whether a pressure-compensating version has a minimum pressure requirement. If the far end receives less water, identify the cause rather than extending the watering time and soaking the area near the inlet.
Match the wetting pattern to crops and soil
Decide whether you need water at specific plant positions or along a whole row. With a drip line, match outlet spacing and flow to the planting intervals and the bed width. Widely spaced plants can be poorly served by outlets that miss their root areas; a dense row may need more continuous wetting than isolated points provide. A soaker hose can follow a planted row, but water still has to move outward through the soil. It does not automatically wet the full width of a bed just because the hose runs through it.
Soil texture affects how a wetted point or band spreads. In broad terms, water can move downward more quickly than sideways in coarse soil, while finer soil may spread moisture farther laterally. Bed mix, compaction, and drainage also matter, so treat these as tendencies rather than a planting formula. For a planting plan in the T-Model Greenhouse Orangery, draw the crops and their spacing on the chosen bed layout before placing watering lines. A wide bed may need more than one line to reach all the rows. Check moisture beside and between outlets, not only directly beneath them, to find gaps in coverage. Newly planted seedlings may need temporary supplemental watering if their small root zones do not yet reach the established wetting pattern.

Check operating pressure and available flow
Pressure and flow are related but different checks. A source may have pressure when a valve is closed and deliver less once water is moving through the planned system. What matters is how the setup performs while the lines are running. A pressure gauge and a measured flow check can help establish what the source provides; compare those readings with the requirements for the exact hose, emitter, regulator, and filter. If several lines will run together, test them under that same demand, since opening more lines can change performance.
A gravity-fed tank or rain barrel may behave differently from a pressurized tap, so confirm that the line is designed to work with the chosen source. When planning water access for a Lean-To Greenhouse, identify the supply point and the complete route to the beds before selecting irrigation components. A bucket test at an unrestricted tap can help describe the source, but it does not establish pressure or flow after water passes through a filter, regulator, fittings, and tubing. Check the assembled system while it is running. For a tank supply, also consider whether performance changes as the water level falls. Select any regulator according to the irrigation maker’s operating range and required flow; a regulator cannot raise pressure from a source that is already too low.
Choose filtration for the source and components
Filtration matters where water passes through small passages. Many drip emitters have narrow internal channels, and particles can block them or reduce output. Soaker hoses are not immune: sediment or deposits may affect porous material, although the needed protection varies by product and source. Follow the irrigation maker’s requirements for filter type and mesh rating. A filter that is too coarse may not catch particles that can obstruct an outlet, while an unnecessarily fine filter may add pressure loss or need more frequent cleaning.
A screen or disc filter captures suspended particles; it does not remove dissolved minerals, and filtration alone does not resolve every biological fouling problem. Clear-looking water therefore does not prove that it suits every component. If you are planning an installation in the Prestige greenhouse, reserve a reachable location for the filter where its housing can be opened and cleaned without disturbing plants. Compare the filter’s stated flow capacity and connection size with the planned system, as well as its filtration rating. Some instructions specify microns rather than mesh, so use the manufacturer’s stated equivalent instead of assuming the numbers mean the same thing. Inspect collected rainwater or well-water supplies as appropriate, maintain the filter as directed, and do not improvise chemical cleaning.
Plan for access, branches, and flushing
Route a supply line to the beds so that fittings and any branch valves are easy to inspect. Keep tubing out of doorways and main walking paths, and place line ends where they can be reached if the system is designed for flushing. A layout that can be disconnected or moved when beds are replanted may also be easier to service, provided the product allows it. Label separate rows or branches so you can identify which section needs attention without disturbing the rest of the bed.
For a bed plan in the Classic aluminum greenhouse, mark service points on the floor plan along with the planting rows. Leave enough room to open a filter housing, operate a shutoff, and reach a line end without stepping into the bed. A removable connection at a bed inlet can make seasonal rearrangement easier if the selected tubing and fittings support it. Check connection types before ordering: matching nominal diameters do not necessarily mean two fittings will connect or seal correctly. Keep a record of the exact components used so that replacement parts can be identified later. Avoid burying or concealing a line unless its instructions permit it, and do not assume that a flushable drip line and a porous hose use the same end arrangement.
Test the setup and keep it serviceable
Test under the same source setting and with the same number of lines you expect to run. For drip line, collect water from outlets near the beginning, middle, and end of a representative run over the same period, then compare the amounts. For a soaker hose, check the soil at similar positions and depths after a normal watering; water seeping from the hose does not show how much has reached the roots. Allow time for moisture to spread before checking, and repeat the comparison in more than one bed if the layouts differ.
Record where the soil is consistently too wet or dry, then adjust the layout or repair a fault before changing watering duration for every bed. For a new bed installation in the aluminum Limited Edition greenhouse, keep a simple baseline record of the source setting, lines operating, test duration, and results. Repeat tests under comparable conditions so a later decline is easier to recognize. Soil observations are most useful when taken at consistent depths and with the starting moisture noted; a bed that was already damp is not a fair comparison with a dry one. During routine care, inspect fittings, kinks, damaged hose walls, and outlets. Clean filters as directed, flush only where the system is designed for it, and follow the maker’s guidance for seasonal storage or leaving a hose in place.
Diagnose dry spots before extending a cycle
On a drip line, check for a dirty filter, kink, blocked emitter, loose connection, or a run that exceeds the manufacturer’s limit. Compare output near the inlet, in the middle, and at the far end. A single dry plant may instead have an outlet that misses its root area. On a soaker hose, look for sharp bends, leaks, or a section that no longer wets the soil as expected. A saturated patch surrounded by dry soil can indicate a local leak or outlet problem rather than a need to water the whole bed for longer.
Check the source while the system is running, confirm that valves are open, and inspect the route before changing the schedule. On a watering plan for the Pyramid-type greenhouse, label each bed inlet and branch so observations can be traced to a specific run. If every line weakens at once, investigate a shared component such as the source, filter, or regulator. If only one section changes, focus on that branch and compare conditions upstream and downstream of the problem. These clues narrow the search but do not establish the cause by themselves. Avoid probing emitters or porous hose walls with sharp tools unless the manufacturer explicitly permits it; damage can change discharge permanently. If the cause remains unclear, ask the system manufacturer or an irrigation professional to check the components.
Choosing between drip lines and soaker hoses
A drip line is a sensible option when discrete outlets can be placed to match the plants and the specified spacing, flow, pressure, and run length suit the bed. A soaker hose can suit a continuous planted row where seepage along the route is useful. It is not automatically more even or easier to maintain: the hose still needs compatible pressure, suitable filtration, and inspection for weak or blocked sections. Choose by the wetting pattern the crops and soil need, not by the system name alone.
Before buying, compare tubing diameter, outlet spacing or soaker-hose instructions, allowed inlet pressure, available flow, filter rating, connectors, and maximum run length. Check whether pressure regulation is specified, and do not assume fittings are universal. If bed layouts have different requirements, use separate controls only when the selected equipment supports them. A short trial in the installed bed, followed by a check of moisture at several root-zone points, is more useful than assuming one setup will perform the same way in every row.
Frequently asked questions
Which system usually waters more evenly across a long bed?
Neither type guarantees even watering. A drip line can distribute water consistently when its outlets, pressure, and run length match the manufacturer’s specifications. A soaker hose may release different amounts along a long run. Compare wetting at the beginning, middle, and end of the actual bed.
Do soaker hoses need a filter?
Check the hose manufacturer’s instructions. Sediment or deposits can affect some porous hoses, but filtration requirements vary by product and water source. Don’t assume that a filter specified for one system will suit another.
Should I use a pressure regulator?
Use one if the system instructions call for it or your source pressure is outside the permitted range. Check pressure while water is flowing and compare it with the requirements for your exact line, hose, and fittings. There isn’t one regulator setting that suits every setup.
Can drip lines and soaker hoses use the same water source?
They can share a source if its flow and pressure meet the requirements of both systems. Their operating needs may differ, so separate valves or controls may be appropriate. Confirm the connections and flow limits in the product instructions before combining them.
How can I tell when a bed has received enough water?
There is no universal run time. After watering, check the soil at several places along the bed and at a similar depth where the roots are growing. Use those observations, along with the crop and soil, to adjust the system rather than relying on a wet-looking surface.
Drip lines provide water at distinct outlets; soaker hoses seep along their length. The practical choice is the one that wets the required root zone under real operating conditions and remains accessible for cleaning and repair. Measure the beds, confirm the system specifications, and test several points before using the same design across every row.
